1977 DATSUN PICK-UP oil
[x] Cancel search: oilPage 83 of 537

r
Engine
Mechanical
Tool
number
For
Reference
No
Description
use
page
or
tool
name
Unit
mm
in
on
Figure
No
12
STl742000l
This
tool
is
used
to
prevent
chains
from
falling
out
of
place
All
Fig
EM
19
in
removing
cylinder
heads
or
earn
gears
and
shafts
L
series
Chain
stopper
40
1
S1
r
SE196
13
STl9320oo0
This
tool
is
used
to
take
oil
filter
out
of
place
n
tightening
All
Page
EM4
Oil
filter
wrench
the
filter
do
not
use
this
tool
to
prevent
excess
tightening
models
120
4
7
SE197
14
KV30100200
This
tool
is
used
to
install
clutch
assembly
to
engine
All
Fig
EM
107
L
series
Clutch
aligning
bar
SEGOl
Piston
ring
compressor
This
tool
is
used
to
compress
piston
rings
while
piston
is
being
inserted
into
cylinder
All
Fig
EM
92
models
15
EM03470000
2
SE199
EM
36
Page 85 of 537

ENGINE
LUBRICATION
SYSTEM
ENGINE
LUBRICATION
SYSTEM
CONTENTS
LUBRICATION
CIRCUIT
01
L
PUMP
Removal
Installation
Disassembly
and
assembly
EL
2
EL
2
EL
2
EL
2
EL
3
Inspection
OIL
PRESSURE
REGULATOR
VALVE
OIL
FILTER
RELIEF
VALVE
EL
3
EL
4
EL
4
EL
4
E
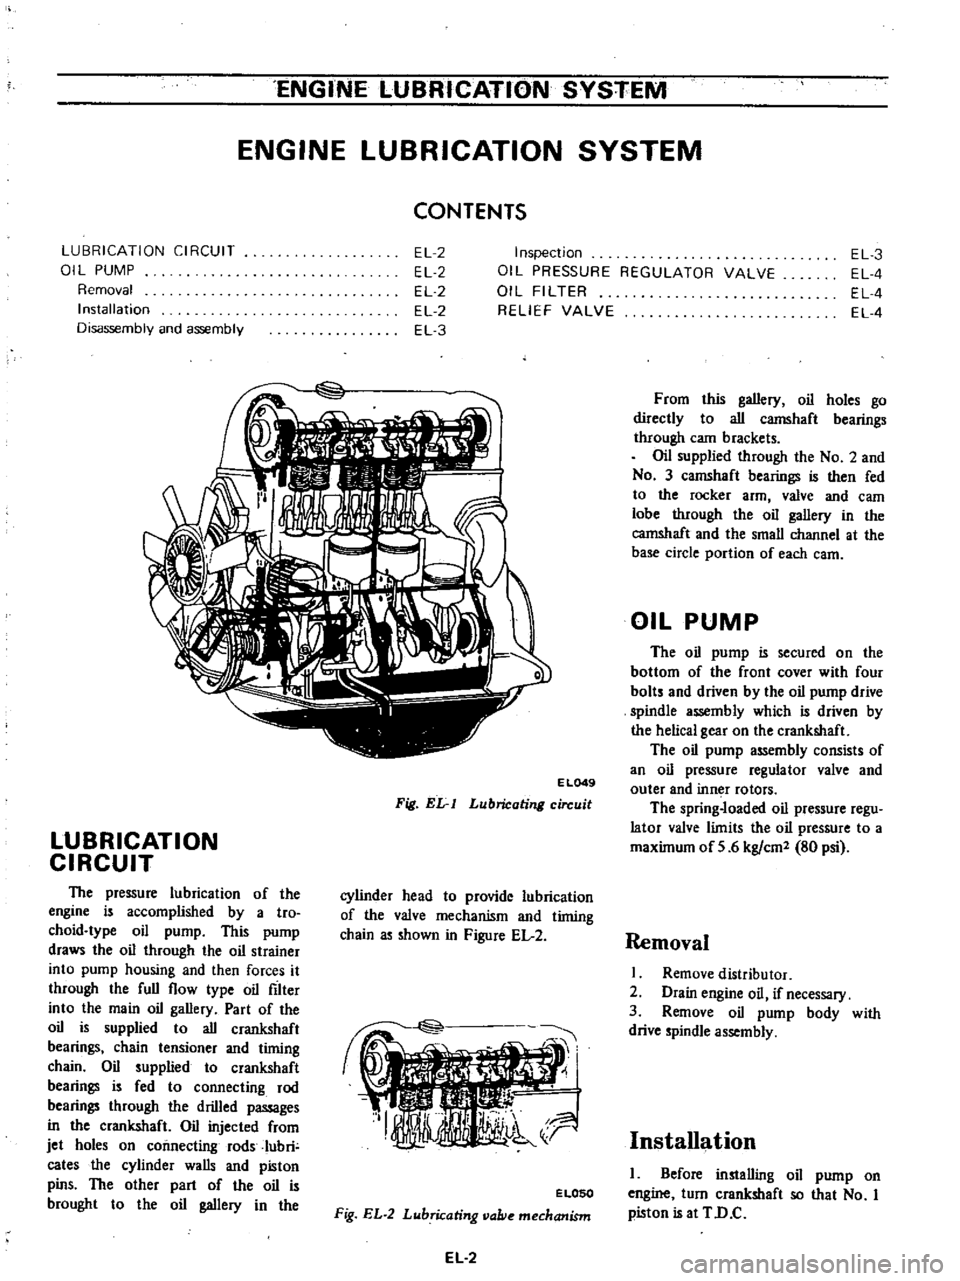
L049
Fig
Elr
I
Lubricating
circuit
LUBRICATION
CIRCUIT
The
pressure
lubrication
of
the
engine
is
accomplished
by
a
tro
choid
type
oil
pump
This
pump
draws
the
oil
through
the
oil
strainer
into
pump
housing
and
then
forces
it
through
the
full
flow
type
oil
filter
into
the
main
oil
gallery
Part
of
the
oil
is
supplied
to
all
crankshaft
bearings
chain
tensioner
and
timing
chain
Oil
supplied
to
crankshaft
bearings
is
fed
to
connecting
rod
bearings
through
the
drilled
passages
in
the
crankshaft
Oil
injected
from
jet
holes
on
connecting
rods
Iubri
cates
the
cylinder
walls
and
piston
pins
The
other
part
of
the
oil
is
brought
to
the
oil
gallery
in
the
cylinder
head
to
provide
lubrication
of
the
valve
mechanism
and
timing
chain
as
shown
in
Figure
EL
2
ELOSO
Fig
EL
2
Lubricating
vallie
mechanism
EL
2
From
this
gallery
oil
holes
go
directly
to
all
camshaft
bearings
through
cam
brackets
Oil
supplied
through
the
No
2
and
No
3
camshaft
bearings
is
then
fed
to
the
rocker
arm
valve
and
eam
lobe
through
the
oil
gallery
in
the
camshaft
and
the
small
channel
at
the
base
circle
portion
of
each
earn
OIL
PUMP
The
oil
pump
is
secured
on
the
bottom
of
the
front
cover
with
four
bolts
and
driven
by
the
oil
pump
drive
spindle
assembly
which
is
driven
by
the
helical
gear
on
the
crankshaft
The
oil
pump
assembly
consists
of
an
oil
pressure
regulator
valve
and
outer
and
inn
r
rotors
The
spring
loaded
oil
pressure
regu
lator
valve
limits
the
oil
pressure
to
a
maximum
of
5
6
kg
em
80
psi
Removal
I
Remove
distributor
2
Drain
engine
oil
if
necessary
3
Remove
oil
pump
body
with
drive
spindle
assembly
Installation
I
Before
installing
oil
pump
on
engine
turn
crankshaft
so
that
No
I
piston
is
at
TD
C
Page 86 of 537

ENGINE
LUBRICATION
SYSTEM
2
Fill
pump
housing
with
engine
oil
then
align
punch
mark
of
spindle
with
hole
in
oil
pump
as
shown
in
Figure
EL
3
Punch
mark
EL009
Fig
EL
3
Aligning
punch
mark
and
oil
hole
3
Using
a
new
gasket
install
oil
pump
and
drive
spindle
assembly
so
that
the
projection
on
its
top
is
located
in
II
25
a
m
position
at
this
time
the
smaller
bow
shape
will
be
placed
toward
the
front
as
shown
in
Figure
EL
4
JI
I
c
J
V
Front
J
@
9@
tr
i
d
L
It
I
I
EL010
Fig
EL
4
Setting
drive
pindle
o
EL011
Fig
EL
5
Imtalling
oil
pump
Ascertain
whether
or
not
the
en
gagement
is
in
order
by
checking
the
top
of
spindle
through
distributor
fit
ting
hole
4
Tighten
bolts
securing
oil
pump
to
front
cover
Disassembly
and
assembly
I
Remove
pump
cover
attaching
bolts
pump
cover
and
cover
gasket
and
slide
out
pump
rotors
2
Remove
regulator
cap
regulator
valve
and
spring
3
Install
pressure
regulator
valve
and
related
parts
4
Install
outer
rotor
inner
rotor
and
shaft
in
pump
body
and
do
not
turn
cover
gasket
up
CD
El012
r
@
@
CD@
1
Oil
pump
body
2
Inner
rotor
and
shaft
3
Outer
rotor
4
Oil
pump
cover
5
Regulator
valve
6
Regulator
spring
7
Washer
8
Regulator
cap
9
Cover
gasket
Fig
EL
6
Oil
pump
Inspection
Wash
all
parts
in
cleaning
solvent
and
dry
with
compressed
ir
I
Inspect
pump
body
and
cover
for
cracks
or
excessive
wear
2
Inspect
pump
rotors
for
excessive
Rotor
side
clearance
rotor
to
bottom
cover
Olm
in
Rotor
tip
clearance
@
mOl
in
Outer
rotor
to
body
clearance
D
mm
inl
EL
3
wear
3
Check
inner
rotor
shaft
for
looseness
in
pump
body
4
Inspect
regulator
valve
for
wear
or
scoring
5
Check
regulator
spring
to
see
that
it
is
not
worn
on
its
side
or
collapsed
6
Using
a
feeler
gauge
check
tip
clearance
2
and
outer
rotor
to
body
clearance
I
shown
in
Figure
EL
7
1
Outer
rotor
to
body
clearance
2
Tip
clearance
3
Gap
between
rotor
and
straight
edge
4
Gap
between
body
and
straight
edg
e
Fig
EL
7
Checking
rotor
clearance
7
Place
a
straight
edge
across
the
face
of
pump
and
depress
it
slightly
as
shown
in
Figure
EL
7
Check
gap
4
between
body
and
straight
edge
or
gap
3
between
rotor
and
straight
edge
The
gap
should
be
0
03
to
0
06
mm
0
0012
to
0
0024
in
then
rotor
side
clearance
rotor
to
bottom
cover
clearance
with
gasket
should
satisfy
the
specifications
Standard
Wear
limit
0
04
to
0
08
0
0016
to
0
0032
0
20
0
0079
Less
than
0
12
0
0047
0
20
0
0079
0
15
to
0
21
0
0059
to
0
0083
0
5
0
0197
Page 87 of 537

ENGINE
LUBRI
CATION
SYSTEM
Note
Pump
rotors
and
body
are
not
serviced
separately
If
pump
rotors
or
body
are
damaged
or
worn
replacement
of
the
entire
oil
pump
assembly
is
necessary
Tightening
torque
Oil
pump
mounting
bolts
Oil
pump
cover
bolts
Regulator
valve
cap
nut
Specifications
Oil
pressure
at
idling
Regulator
valve
spring
Free
length
Pressured
length
Regulator
valve
opening
pressure
OIL
FILTER
The
oil
filter
is
a
cartridge
type
The
oil
filter
element
should
be
reo
placed
periodically
with
the
use
of
Oil
Filter
Wrench
ST19320000
When
installing
an
oil
filter
fasten
it
to
cylinder
block
by
hand
Note
Do
not
overtighten
filter
or
oil
leakage
may
occur
OIL
PRESSURE
REGULATOR
VALVE
The
oil
pressure
regulator
valve
is
not
adjustable
At
the
released
position
the
valve
permits
the
oil
to
by
pass
through
the
passage
in
the
pump
cover
to
the
inlet
side
of
the
pump
Check
regulator
valve
spring
to
ensure
that
spring
tension
is
correct
kg
m
ft
Ib
kg
m
ft
lb
kg
m
ft
lb
kg
cm2
psi
mm
in
mm
in
kg
em
2
psi
RELIEF
VALVE
The
relief
valve
located
at
the
center
portion
securing
oil
fIlter
to
the
cylinder
block
by
passes
the
oil
into
the
main
gallery
when
the
oil
fIlter
element
is
excessively
clogged
STl9320000
EL015
Fig
EL
9
Removing
oil
filter
EL
4
EL014
Fig
EL
B
Regulator
value
l
l
to
1
5
8
0
to
11
0
7
to
1
0
5
Ito
7
2
4
to
5
29
to
36
0
8
to
2
8
II
to
40
52
5
2
067
34
8
1
370
35
to
5
0
50
to
71
With
oil
fIlter
removed
check
valve
unit
for
operation
Inspect
for
a
cracked
or
broken
valve
If
replace
ment
is
necessary
remove
valve
by
prying
it
out
with
a
screwdriver
Install
a
new
valve
in
place
by
tapping
it
EL016
Fig
EL
JO
Relief
lJOlue
Page 88 of 537

ENGINE
LUBRICATION
SYSTEM
SERVICE
DATA
AND
SPECIFICATIONS
Oil
pump
Standard
Wear
limit
mm
in
0
04
to
0
08
0
0016
to
0
0032
less
than
0
12
0
0047
0
15
toO
21
0
0059
to
0
0083
0
20
0
0079
0
20
0
0079
0
5
0
0197
Rotor
side
clearance
rotor
to
bottom
cover
Rotor
tip
clearance
mm
in
Outer
rotor
to
body
clearance
mm
in
Oil
pressure
regulator
valve
Oil
pressure
at
idling
Regulator
valve
spring
Free
length
Pressured
length
Regulator
valve
opening
pressure
kg
cm2
psi
0
8
to
2
8
II
to
40
mm
in
mmOn
kg
em2
psi
52
5
2
067
34
8
1
370
3
5
to
5
0
50
to
71
Tightening
torque
Oil
pump
bolt
Oil
pump
cover
bolt
Regulator
valve
cap
nut
kg
m
ft
lb
kg
m
ft
lb
kg
m
ft
Ib
1
1
to
1
5
8
0
to
10
8
0
7
to
1
0
5
1
to
7
2
4
to
5
29
to
36
TROUBLE
DIAGNOSES
AND
CORRECTIONS
Condition
Probable
causes
Corrective
actions
Oil
leakage
Damaged
or
cracked
body
cover
Oil
leakage
from
gasket
Oil
leakage
from
regulator
valve
Oil
leakage
from
blind
plug
Replace
Replace
Tighten
or
replace
Replace
Decreased
oil
pressure
Leak
of
oil
in
engine
oil
pan
Dirty
oil
strainer
Damaged
or
worn
pump
rotors
Faulty
regulator
Use
of
poor
quality
engine
oiL
Correct
Clean
or
replace
Replace
Replace
Replace
Warning
light
remains
on
engine
running
Decreased
oil
pressure
Oil
pressure
switch
unserviceable
Electrical
fault
Previously
mentioned
Replace
Check
circuit
Noise
Excessive
backlash
in
pump
rotors
Replace
EL
5
Page 89 of 537

No
Tool
number
tool
name
STl9320000
Oil
filter
wrench
ENGINE
LUBRICATION
SYSTEM
SPECIAL
SERVICE
TOOL
Description
Unit
nun
in
For
use
on
Reference
page
or
Figure
No
This
tool
is
used
to
take
oil
f1Iter
out
of
place
In
tightening
All
Fig
EL
9
the
f1Iter
do
not
use
this
tool
to
prevent
excess
tightening
models
I
120
4
7
SE197
EL
6
Page 91 of 537

DESCRIPTION
COOLANT
LEVEL
DRAINING
AND
FLUSHING
THE
COOLING
SYSTEM
WATER
PUMP
REMOVAL
AND
INSTALLATION
DISASSEMBLY
INSPECTION
AND
ADJUSTMENT
TORQUE
COUPLING
REMOVAL
AND
INSTALLATION
DESCRIPTION
The
cooling
system
is
of
the
con
ventional
pressure
type
A
centrifugal
pump
installed
on
the
timing
chain
cover
serves
to
circulate
the
coolant
The
pressure
type
radiator
filler
cap
installed
on
the
radiator
operates
the
cooling
system
at
higher
than
atmos
pheric
pressure
The
higher
pressure
raises
the
boiling
point
of
the
coolant
and
in
Cooling
System
COOLING
SYSTEM
CONTENTS
CO
2
CO
2
OISASSEMBL
Y
INSPECTION
TEM
COUPLlNG
INSPECTION
THERMOSTAT
REMOVAL
AND
INSTALLATION
INSPECTION
RADIATOR
REMOVAL
AND
INSTALLATION
INSPECTION
CO
2
CO
2
CO
3
CO
3
CO
3
CO
3
CO
4
creases
the
cooling
efficiency
of
the
radiator
When
the
thermostat
is
closed
the
coolant
remains
in
the
cylinder
head
and
block
for
swift
warming
up
of
the
engine
After
it
reaches
normal
oper
ating
temperature
the
coolant
circu
lates
through
the
radiator
The
cooling
fan
drive
is
of
a
coupling
type
COOLANT
LEVEL
The
coolant
level
should
be
check
ed
and
maintained
at
SO
mm
1
97
in
below
the
upper
face
of
filler
neck
when
the
engine
is
cold
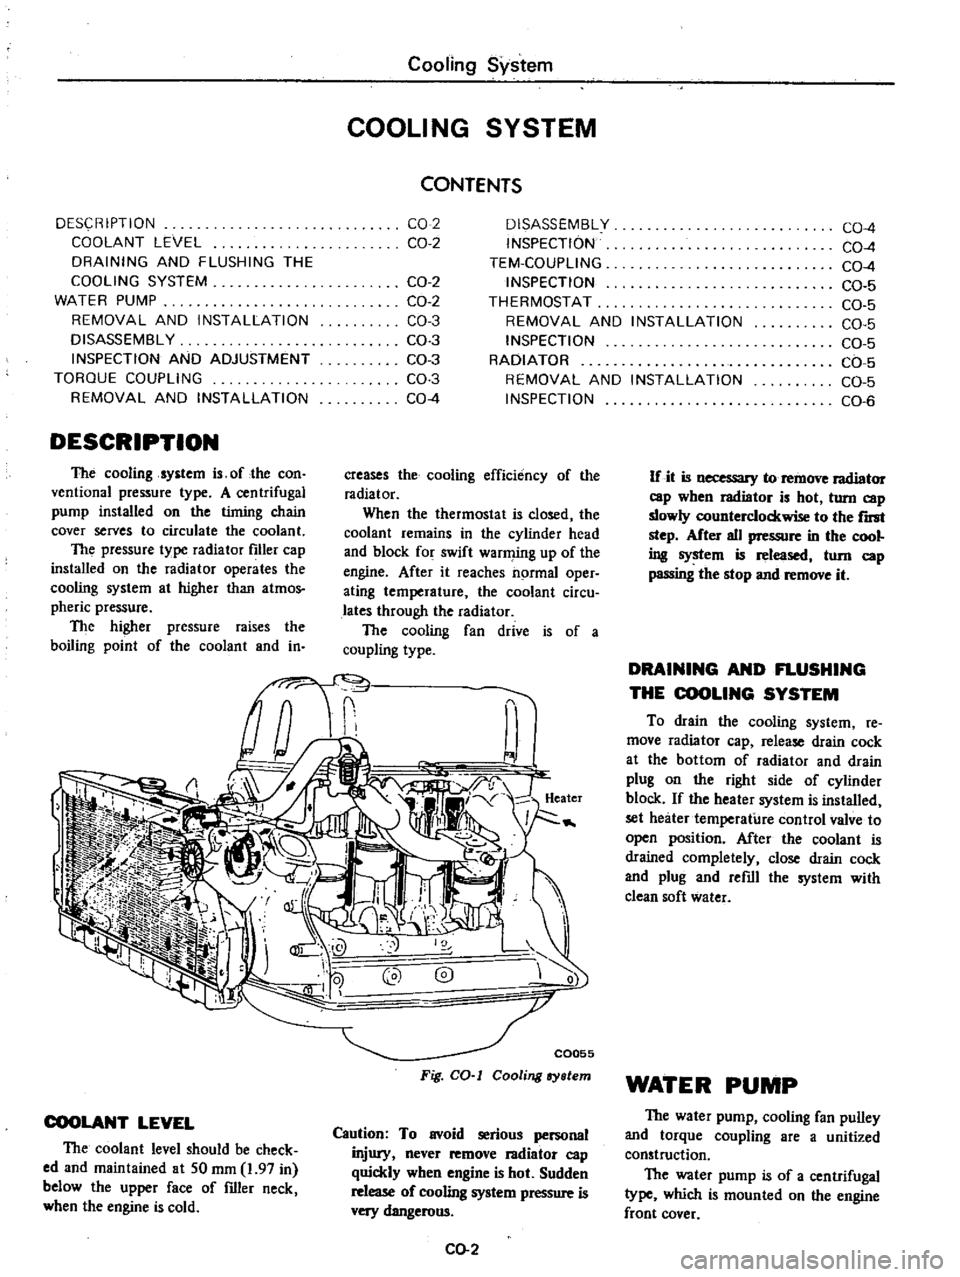
C0055
Fig
CO
I
Cooling
ry
lem
Caution
To
avoid
serious
personal
injury
never
remove
I3diator
cap
quickly
when
engine
is
hot
Sudden
release
of
cooling
system
pressure
is
very
dangerous
CO
2
CO
4
CO
4
CO
4
CO
5
CO
5
CO
5
CO
5
CO
5
CO
5
CO
6
If
it
is
necessary
to
remove
radiator
cap
wben
radiator
is
hot
turn
cap
slowly
counterclockwise
to
the
r
step
After
all
pressure
in
the
cool
ing
system
is
released
tom
cap
passing
the
stop
and
remove
it
DRAINING
AND
FLUSHING
THE
COOLING
SYSTEM
To
drain
the
cooling
system
re
move
radiator
cap
release
drain
cock
at
the
bottom
of
radiator
and
drain
plug
on
the
right
side
of
cylinder
block
If
the
heater
system
is
installed
set
heater
temperature
control
valve
to
open
position
After
the
coolant
is
drained
completely
close
drain
cock
and
plug
and
refill
the
system
with
clean
soft
water
WATER
PUMP
The
water
pump
cooling
fan
pulley
and
torque
coupling
are
a
unitized
construction
The
water
pump
is
of
a
centrifugal
type
which
is
mounted
on
the
engine
front
cover
Page 92 of 537

The
pump
shaft
is
supported
by
a
double
row
of
ball
bearings
press
fit
in
an
aluminum
die
cast
pump
body
The
bearings
are
permanently
lubricated
and
sealed
to
prevent
loss
of
lubricant
and
entry
of
dirt
The
pump
is
provided
with
an
impeller
which
turns
on
a
steel
shaft
The
steel
shaft
rotates
together
with
the
torque
coupling
wheeL
The
volute
chamber
is
built
in
the
engine
front
cover
assembly
The
inlet
of
the
pump
is
connected
to
the
radiator
s
lower
tank
by
a
hose
i
o
CQ047
Fig
CO
2
Water
pump
and
engine
front
cover
REMOVAL
AND
INSTALLATION
Removal
in
to
a
clean
con
assembly
I
CQ048
Fig
CO
3
Removing
water
pump
Installation
1
Be
sure
to
clean
the
gasket
sur
faces
in
contact
with
pump
and
front
cover
Always
use
new
gaskets
when
installing
pump
assembly
Be
sure
to
tighten
bolts
Cooling
System
Tightening
torque
0
4
to
0
5
kg
m
3
0
to
3
6
ft
lb
2
Fill
cooling
system
and
check
for
leaks
at
pump
3
Install
fan
blade
and
tighten
at
taching
bolts
securely
Install
belt
and
adjust
for
specified
tension
4
Operate
the
engine
at
fast
idling
and
recheck
for
leaks
5
Install
fan
shrouds
Note
Ensure
that
clearance
between
shroud
and
Can
is
even
at
any
place
DISASSEMBLY
Water
pump
is
made
of
aluminum
and
its
bearing
outer
race
is
of
a
press
fit
type
For
this
reason
water
pump
should
not
be
disassembled
INSPECTION
AND
ADJUSTMENT
Inspection
Inspect
pump
assembly
for
the
fol
lowing
conditions
and
replace
if
nee
essary
1
Badly
rusted
or
corroded
body
as
sembly
and
vane
2
Excessive
end
play
or
roughness
of
bearings
in
operation
3
Reduced
cooling
efficiency
due
to
deteriorated
silicone
oil
4
Oil
leakage
in
torque
coupling
Adjustment
Fan
belt
should
be
properly
ad
justed
at
all
times
A
tight
belt
causes
wear
of
alternator
and
water
pump
bearings
A
loose
belt
brings
about
improper
cooling
fan
water
pump
and
alternator
operation
Check
the
belt
slack
between
alter
nator
and
fan
pulley
by
force
of
10
kg
22
lb
Slackness
of
fan
belt
8
to
12
mm
0
31
to
0
47
in
If
adjustment
is
necessary
loosen
bolt
retaining
alternator
adjusting
bar
to
alternator
Move
alternator
toward
or
away
from
engine
until
the
correct
tension
is
obtained
TORQUE
COUPLING
Except
air
conditioner
equipped
models
The
torque
coupling
keeps
the
fan
speed
at
2
500
rpm
rated
or
below
to
conserve
horsepower
at
high
engine
speed
It
also
helps
reduce
fan
noise
to
a
minimum
during
high
speed
opera
tion
This
unit
is
filled
with
a
special
silicone
oil
used
as
a
fluid
coupling
which
controls
the
fan
speed
Silicone
oil
can
not
be
replenished
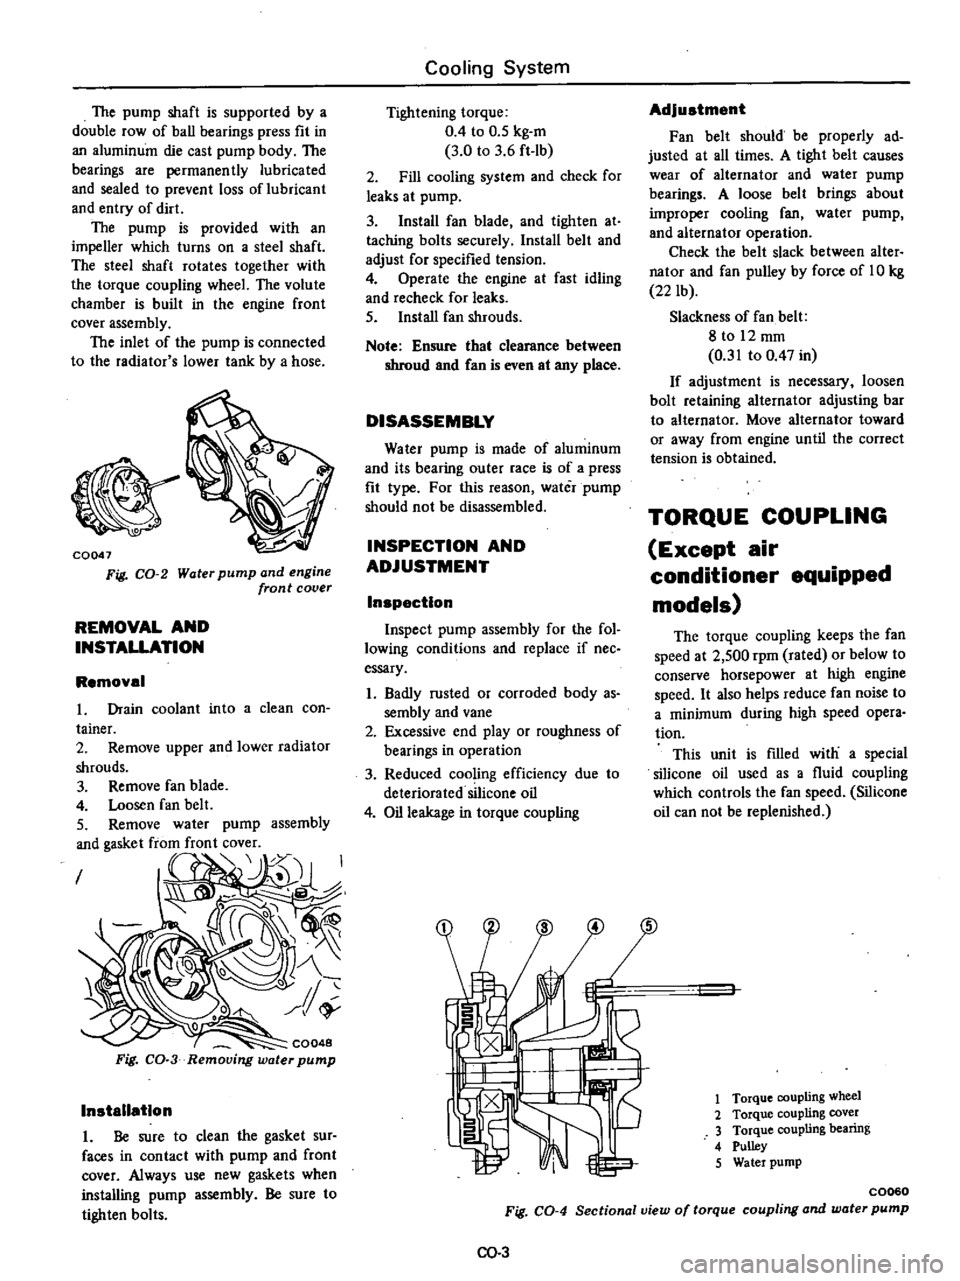
1
Torque
coupling
wheel
2
Torque
coupling
cover
3
Torque
coupling
bearing
4
Pulley
5
Water
pump
C0060
Fig
CO
4
Sectional
view
of
torque
coupling
and
water
pump
00
3