1974 FORD CAPRI check oil
[x] Cancel search: check oilPage 145 of 205

144 Chapter 9 Braking systom
9 II there Dre no inspec tion holes, remove the wheels and drums In inspect the linings . 10 Where any lining is less Ih,111 the nllnimufll thickness, renew Ihp. complete SCI 01 re,ll b,~ke shoes. 11 Refi ' the drums lind wheels as necessary then lowe. tho em \0 thl) 9lOund.
Ch eck operation of servo lIoil 12 Visually inspCCllhe vaCUUll1 hose IClIding hom the inlet mlllllfolll Of air box 10 the servo unit fOf dc\c,iOf1l1lon and security. 13 Wit h the engine Slopped. dCI).es s the bra ke pedal several ,imes to dissipate t he VOC U\Ull hoUl the sorvo Imit. 14 Depress the b'i1kc 11Cdll1 wilh moderate pressure then Sin' I the
cnU illC . As the V
R/mew fhe /)rilke I/Ilid 21 lJIucd Ihe hyd.; ."loc sySle m as d"scllherl III Seelloll 15 ilUOwnl! II",
Ihe new h ,,,k\) Ih"d to COnlph: lely 1,lIlhe C:"CUtt he"I!1 bled . 22 AI Ihe sanl\) I"ne rcn,uve Ihe 'Ci" ",ake \I'lOn,s alld check tho wlu,,,1
cylonclers 10' leak"IJe.
3 Front disc pl1ds - renewal
Apply t
he handbr
I .
. ~ .. " ,) •. :Y.
2 RemOV(l Ihe hont wheels.
3 It Ihe fhnd level in the maste' cylondel reservoir is high. when the pistons l1re moved into thei, respecI,ve bo,es to accommodate new pi1ds. thO leyel could rise sulticienlly fo, Iho fluid 10 oyerflow. Place ilhsoruent clOlh .1round the reSe,yO". o. syphon a Imlo Ituid oul. so 1)'Cven tUlg Pil"ltwOlk
<1 F rollt brake caliper _ rcmoy'll iltld refitting
1 nemove the f,on! disc pads i1S tie sc"lJc(/ in Section 3. 2 1111 'S Itll,,,,d,,(1 10 lit ncw Ci1tiper pistoll s "nd/o, seals. dep,ess the tH.1k'J Iwel,,1 10 hlUlU the pistons i"to COI11i1ct with thO (fisc and
'-.. ~
, .
3 .9B Fitting the tenS ion springs
.--.::.:.:; .
....... . ~,'
灲潣慲浡湵慬献捯m
Page 147 of 205

Chapter 9 Braking system
4 Note that in order to m,lintOIll even braking both discs should he renewed ill the sal1 1 e lime
5 T o remove il dl~c. first remove the tHlb as described in Chllpter 10 . 6 Prise lip th(J locklllU I"hs. unscrew the fOlll bolts. and remove the disc from Ihe huh.
7 Clcilll the Illllirnu !ilces of the disc and hub then locale the diSC on the huh and allgel the holt holes.
8 InScrt new holt~. tOI){)ther w rth new locking plates. and tiuhten them to the specrfre(1 torque_ loc k b y bending the tabs. 9 Th e huh Illily now he ref Illed with reference to Chapter 10.
7 ReM hrake shoes -rt)rlewal
Check the front wheels th!:n lilck up the rem of the CM lind support on ,1~le stands. Rel(,a5e Ihe handbr,lke lind femove the reM roadwh~~els
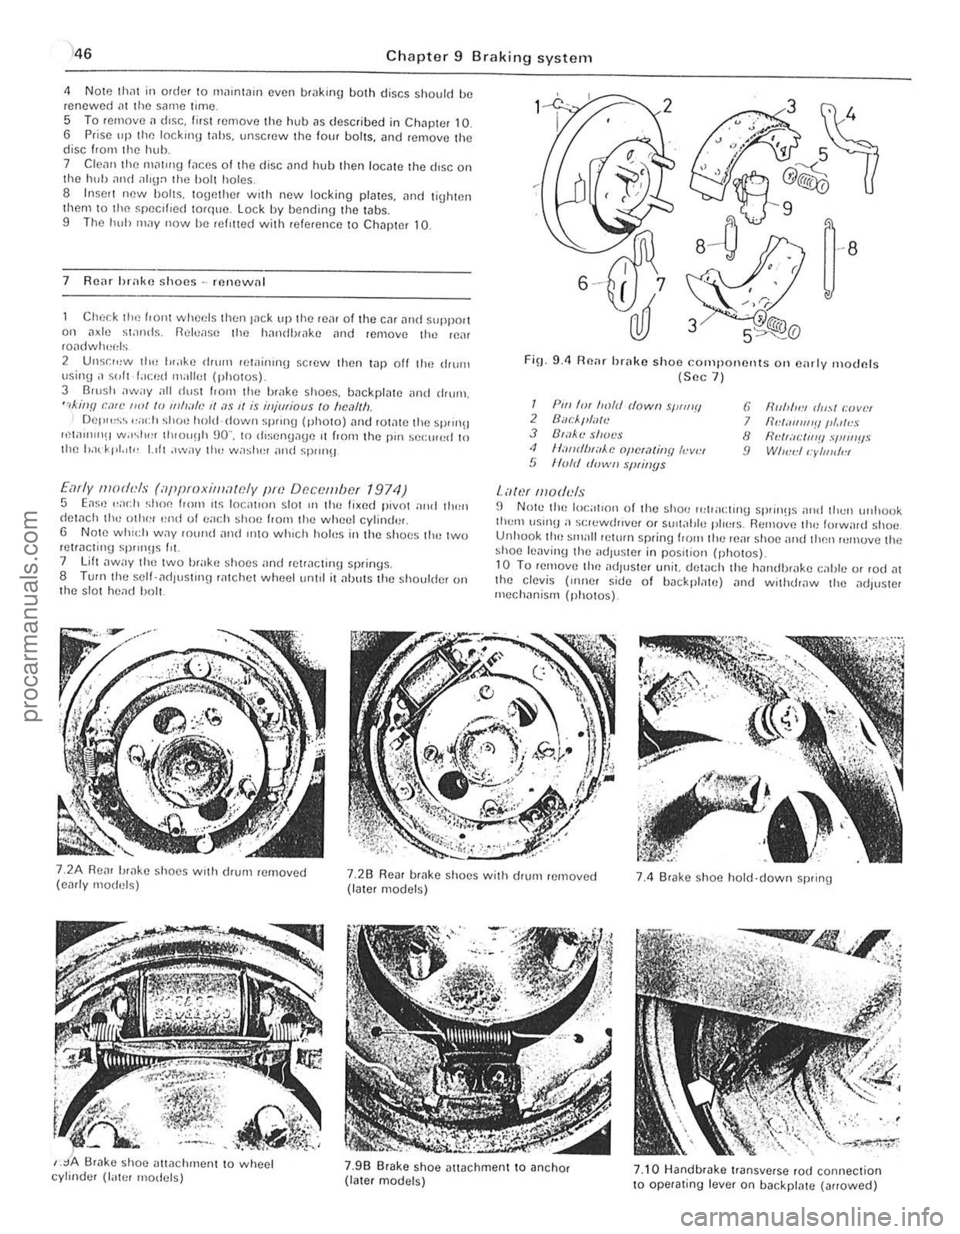
2 Unsr",w th" I"ake drum lewinrnu scrow then t.1p off the ,IIurn \Jsing ;I ~"It f.lced milliet (photos) 3 Barsh away all dust I.orll the brilke shoos, backplate ilnd drum, ",killfl can' ""I /0 11111""., II ;I S 1/ is iHjmiaus to "e,11Ih Del""~~ ,,;och shoe hold-down sprrng (photo) ,lnt! rOt,lte the sprrn!! ",w"nIlH w.r~I"" th,ou!lh 90" , to rhsengage ,t from the pm sel:rr",d 10 Ihe had' pt. 'I" 1.,11 ,"wily 1Ill! w;'shel and spm}!J
Early moth'ls (iippmxilllawly pm Df!c()tllbcf 1974) 5 Eas,) .. ad} shoe loom ,t~ loc;rllol1 slor III the lixed pivot nrrd tllen detach th,-othe! '~nd 01 ea(.11 shoe f,om the wheel cylind'lr, 6 Note whld, W.1Y fOwul and IIltO which holus in the s hoes tlH~ two retracting sP""Hs Ill. 7 lift ,lway t ho two brake shoes "nd retracting springs. 8 TUf(lthe self- ad lust'ng ratchot wheetum,1 it alJuts the shoulder on t he s lot head bolt.
FiO_ 9.4 Renr brake shoo components Oil e,lrly moclnfs (Sec 7 )
I Pili 'm froft! dowII sWIIIII 2 Buc/."liTlt! J B',l~'l! shot's <1 II,-IIIrflHiiAe opcra/jllY h-v", 5 lIo/d d"wII slNil/ys
Lawf lII oduls
6 fir"",,:, (/",,1 r:lJvlH 7 IId;III1I1'!IIII.llr!S 8 flNr;Il:IIl'!! .,'I,"IIIIS 9 WI",,:II:yllJldl!l
fJ N Ole the local,on of the shoe 1"lpacl,no sprrll!ls nrld thell unllook tlwm \lSUl!l a s(;lewrh,vef or SUil;!tJle plo~"s. Remuv,) th" lorw,lrd shoe Unhuok tho small pelurn spring loom the reill shoe and then rumuve the shoe lenvinlJ the adJus!Cr in pos,tiol} (ph o tos)_ 10 Tu remove tim adjuster unit. del
,
j
procarmanuals.com
Page 157 of 205

,
156 Chapter 9 Brakin g syste m
Secondary cc1ble (early models) 5 Loosen 1I1c lock.nut ~nd unscrew the adju stment ferrule from the right-hand rear clevis.
6 Remove the split pin and clevis pin securing the secanda.v caulo \0 the left-hand Icar operating le ve l. 7 htrac the clip, remove the clovis pin. and withdraw the pullcy wheel from the lever on the Ical a~le. 8 Remove Ihe cable from the lever.
Transverse rod (later models) 9 Disconne ct the cable from the righi-hand rear opCfating Icvcr by
removing the split pin and clovis pin. to Uncl.p the cable hom the 'Hlnsvcrse rod . 11 Remove Iho spli, pin and clevis pin securing the fod 10 the Icft·h~nd le;!1 operating lever . 12 Slide the transverse rod Irom the guide on the rOM axle . 13 Check thO {luide bush lor wear and dama ge and renew It il necessary by prising il oul and pressing a new bush irllo POSilioll.
All models 14 Refining is a r e versa' of removal. but lubr icllto the lin kage as )scflhed in Section 2, and atljl' stthe cable as (fescri bed in Section 18.
21 VilCUUrll sorvo unit -dosCrilHion
A vacuum servo unit is linod Into the lir,lk e hydrallirc cil cu il. 111 series with I he 111,1S ler cylinde f. to provide assiswnco to the dllver whlln Ihe brake pedal is depressed . Thi s reduces the eHolI le{luired try the driller to oper,lIe the brakes, under all brak ing condi tions .
This unit operates by vacuum, obtained from Ihe indu ction mnni rold and comprises basicall y iI booster diilphragnl and check lIallle . The servo unit and hydraulic master cylinder are connected
t o gether so that th e serllO unit piston rod acts as the master cylrnder pUShrod. The driller's b rilking ellon is trilnsmitted through allot her PIi ShlOd 10 the serllO unit piston and ils built-in COmrol system . The scrllo unll pislon docs not fit tightly inro the cylinder. but has a strong ,lltl flhril!Jlllto ke el) liS edges in COllst ilnt COntaCI with I he cylinder Willi_
23 rilult diagnosis -hrilking system
~ylllptom
-'ceSSllle ped,,1 u;tllel
nrakcs pull 10 ono Side
Or;tke ludder
E~cessive eHor l to stop car
so ensuring an i1inigh t seal between the two parts, The fo rward
chamber is held undelllaCUUm condi tions cleilted in the inle t manifold of the engine and during periods when the brake pedill is not in use, the controls open a passtlge 10 the rear ch ambe ., so placing it under lIacuum conditions as well. When the b.ake pedal is dep.essed. the lIacuum pass.Jge to the rear chamber is CUI oH and the chamber expos ed to atmospheric pressure. The consequent rush 01 ail pushes
the servo piston lorward in tile lIacuum chamber and operates the main push rod to the m.Jster cylindcl. The controls are designed so that assistance is given under all condllions. When the brakes are 1'101 requ ired, vacuum in the rear chamuer i s .e -es tabl ished when the br.Jke ped.J1 is released . All air Irom the atmosphe.e entering tho rear ch.Jmbe. is passed through II sma ll air trlter. Und er normal opcr.Jting cond itions tho IIflC(IUm serllO unit is lIery relraule and does not require ollerhaul e~cepl at IIcry high mile,1geS. In this case it is far bcner 1 0 o bta in a serllice e~hange uni l. r,1the, than rcp;ti . the o,igi'lo11 unit . Although inlernal components we,e once .Jv'lIlaule 10 ' ovcrhauling purposes this service has no w been
d,scont,nue(t .
22 Vacuulll servo unit _ remOlla l MId re filtillg
I RemOIlO the master cylinder as desc.ihed In Section 10. 2 D,scolllwc l thc vacuum hose from the non·return lIalve on the serllo \lI1it. 3 Work i,,!) insido thc cal. remOlle th e lower l;t cia panel below the stccring column. 4 E~tractlhc clip and l)ul1 outlho clellis pin attaching Ihe push.od to the l ootu .ake ped;t!. 5 Unsc.ew the nuts securing thc mount ing b.ack.et to the bulkhead.
then withdraw thc serllo unit and bracket from the engine COlllp,lJtlnen t, 6 UnSClew th e nuts ar1(1 serlar,lle the braket 110m the SCIIIO uni, . 7 netrning IS;t rell e.sal 0 1 remOllal w ith leference .Jlso 10 Section 1 0 when retrumg Ihe master cylrnder.
Renson(s)
RC.Jr blake self adju sting mechanism faulty All i n hydrilulic system
WOIll or cont,llllina led /rnin{Js Seized Caliper or wheel cy linde r
E~cessille run-out or distortion of discs o. drums
Worn Of cont aminated linings Brake backplate or caliper l oose WOIll suspensio n bailloints
SerllO unit faulty
Worn or conwmin.Jted linings
I
J
procarmanuals.com
Page 162 of 205

Chapter 10 Suspension and steering 161
fig. 10.11 Drivebelt [ldjustlllent pulley holts on 3.0 litre models -arrowed (Sec 2)
2 Routine maintenance
At the "*',vals spec ,f,ed III the Routine MainhHlance $()(;t,on in the front of til() manunl c,lIIy out the 101l0wlIl\j p,o(;cdures.
Check lyres for illflalioll, wear and conditioll 1 Check [lnd If necessary adjust the tyre pressures .
2 Check [III t yres for WC[lr and condition with referenc e to Section 21
Check power steering pump drive belt tensiof) 3 Check thm the deflection of the drivebelt m,dway ulon!) its lonyest nlll between upper pulleys is approxirn
(photo).
Clwck puwer steering fluid levef (lnd hydraulic huses II pOSStble the level should be checked w,th the Buid [It nOll1lal
uper,\!mg tClIll)Cr[lture . 6 On c;lrly modcls unscrcw the wing nut nnd relnove Ihe rese,voir cover ilild uaskel. The flu,d should be up 10 Ihe MAX level mark on the
reservo". 7 On later models, wrn tht! hiler C
Fig. 10. 5 Topping·up the power steering reservoir on early models (Sec 2)
8 Whele nec.ess.1'y ~dd Ihe ~pccilled lIU1d to bring Ihe level up to the
correct ,nilrk. 9 ChC(;k the hydr[luhc hoses for comJit,on and security.
Check steerinfj ,-md suspension components 10 n,ll$O tilt) front ilno reM 01 the Cill or position over an inspeclion pn. 11 Check the SleetinlJ wck and t'e 'rods for d[lm3ge und weM. Also check the wek HJbber bellows and track rod end rubber bOOIS for spfilS
ilnd leilk[lge. 12 Chec k the front ,md reilr suspension components lor d"m.Jge [lnd wear. In particuf;lr check the front suspension tr.Jck control Mm ilrod stahiliwr r"bber mounling bushes. Usc a lever to check that there is no excessive we[lr III the Iron I slispenSlon lower IJ[ll lJoints which Me
"'\()\JIill wnh the track conlrol ilflllS . 13 Check the operat,on of the I,ont ;IIHt rear shock absorbers This is
be st ilchievcd with thO} Cilr on the \lfOlind by depressing euch corner of the ca' 1111\I1. On 'ele[lsil\ljthe C()"H~r helllU checked Ihe body should ,,~c thell s"llie IIlIl11ed,mely on ,t~ way down. II there nrc sever.J1 ()sclll;ot'ons the sho(;k absorber IS weilk nnd should be renewed.
3 Front hub _ removal. refitliny and bearing adjustillent
Apply the h[llldhr[lke then Jilek tip the front 01 the cm ilnd support
on axlt! standS Remove til(! rOildwhecl 2 Rernove the front ul;lke CJllper With ,elerence 10 Ch.Jpter 9. Whele the flex,ble br[lke host! is connecte(t dueclly to the cililper ther e IS no need 10 disconnect the hose i1S thO} caliper can be suspcnded by wire
aWily from the diSC. 3 By calelul 1
" :<>,:,~,.
Adjusting the power Sleering pump drivebelt tension on the 2.8 litre engine
2.7 Powcr steeling filler c.Jp/d,pstlck for the 2.8 hIre engine
3.3 Removing the dUSI cap from the front
hob
i
i ,
~ !
procarmanuals.com
Page 167 of 205

,6 Chapter 10 Suspension and steering
A
l
I Lr;=::;;r""~Jj'Q l
G-cc;;;;-~---~~~~~
, " I : I 'II
'I' , ,
, ,
FiU · 10.11 Fl(Wr stniJiliscr b;H flnd piece positioning (Sec 11)
A IJ 2620 I J!J 111111 (/03 101m) 100111111 (0·1 mJ
1"'5 ;",(1 ,0.:1'1 tile t;1\{1 sHoec When l ilted. the wHip'cec should he 1'''~'ll'''H,,1 .15 shown III FlO 1011 DIIIlCIlS'Oll A should he betweell ?!.i 59 nlld 2Gtl 5 ""ll (102 ami 104 JI') :lnd Ih" (h(fmcncc IWlwr!f!1l IllI! two s"I"5 IIll1S! nOI he \l'catc, th.1rl 2 5 nUll (0 1 m)
(l II Ihe IJl,~hcs "' II", (,11(1 11".:';'$ "''1''''<) """,wi,I, II 'llaV I", found "'O'e COI1V"Il
h",,/.ul1,11 h.'vel (the wUIOht ",qlllred IS dpp'ox,m
J.!Ck lip the front 0 1 thn C,lr and place s1
2 Remove tile nul ~lId holt from the elnmp at the front of tile fleXIble COllpll ll(1 on the steerm!j colllllln, Tills cl,IInp hOlds the couplln(J to the pillion splines.
3 Working on the front crossmemlier, knock hilek the lockmg wbs orl the two bolts on each IJck houslllg U ·C lillllp. undo the bolt ~nd remove tbe locking tabs ~nd clamps
4 Remove Ihe split pillS
Th iS cnn be done by ensuflng that the d,swnces hetween Ihp. ends oj bOlh trllek rods 1111(1 the Stec1inu geilr hOllslng on both sides ~re the same .
7 Place the stee"ng Uear in it s 10c
-,
Fig. 10,12 COfrect position o f stnhiliser bar ruhher bush {Sec11 )
T'!jht(:n the holts to Ihe speclf,(:{! to"lne, 9 Relit the I.,lck rod ends into the stO)(:IIn!) illluS. refIt (he I:a';[ellolted nllts and II!Jhten them to the slleclfl{)d tOlque Use new spill pillS to '!:t.nn the nuts
10 T'!lhten tho I:I,II"P bolt (HI the steeru'!J COItIllHI lIex'hle couphllU to 1f1n spec""~d torque. h,)vIlI!) fll~t rnil(\e SlJlOl tholt tlul pin lOll is cOlfecily 10(;"101(1 III t he S"III1CS 1 1 Lower the cm to tho urOllnd. thcn check nrld If neceSSo1ly ildJlIst the front whlwl ;III(J 'Hncnr 015 descrd)ed in Sec lion 20.
13 Stcerinu geM (Illanual) -overhaul <111(1 adjustment
Remove tlllltr ilc k rod nnds (Section 14) then .elllove 1)nd discard the Wile retalnlllg cliPS. remove the hellows and drall1 the I"hricant 2 Mount the stee"ng Ijear in
15 LubrientIJ the ball Seilts. balls and housings. with the specified gear 011 Screw the locknuts OntO the ends of the steeling (1)ck. 1 G Assemble t he sprlllgs. waShers. bJIl seJts. track rOd ends and housing. Tighten the hOllsmgs. to obwin a rowtionnltorque of 7 N m (5 Ibf It). then lock them w ith the locknuts. Recheck the torque alter tiuhtening the locknut 17 Drill new holes (even If the o ld holes Jre in aliunment). 4 mm {O, 16
______________________________ .1
procarmanuals.com
Page 169 of 205

)8 Ch apter 10 Suspensio n and steering
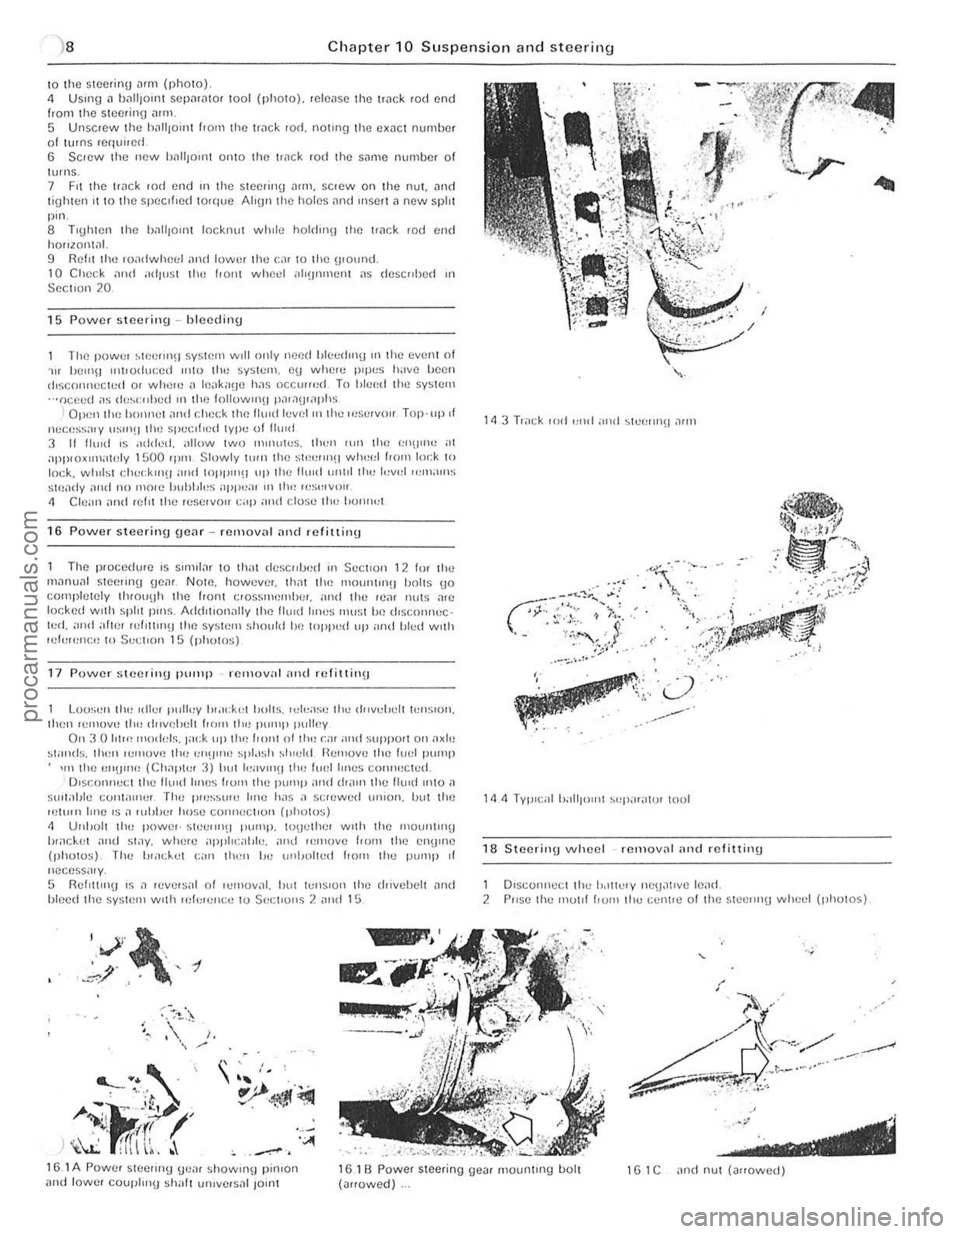
\0 the SI(lcring Mill (photo) 4 USlIlg" 1)[lIi)onH SCpilriltor tool (photo). reh:o,lS(l the ['ilek rod end from the Slc(!rino ""m 5 Unscrew the h,"'IOlilt hom the ['
The power ~1P.elln\J SysHllll WIll only need blc",rhnfj Ifl the even! of . .., hell1\J Il1tl<)(hu:ed ",to the system. cu whcn: IH llI:S h;IV() IW(}1l dlscoI1l1cc«:d or whel() J Ifl.lk"(Je has occlUfed To hleed the system ···ocp.ed ;'s (1<,~<:"I)Cd III 1(11) followlllU l),l';)\J,,1I)hs
I Open llH~ hO'Hl()1 ,111<1 cl\p.(:k the Il",d h:v el "llhe Il'Sl'IVi'" Top·llp.t llucess;IIY IIS"'!J (Il<) spe.:II,ed lype of 11(11<1 3 11 11."d IS added. allow two "'''HlWS. th"l1 lUll 11m I;I\U"W at apPI{)xIIllntnly 1500 rp'" Slowly \illll lhe st'!""Il(! wheel 1,0m lo,:k to lock. wlllisl r:l\.,,;klllH and WPP"'!I up Ih e Ihlld unlll th" l"v,,1 ",m;II11S
Stf),li1y ;1<\<1 no molC hubhl"s ilPP":U I II tlw I"S,,,V,,II
" elc ;,", and refn Ihe r"servoll cap ami close II,,, 1>0"",,1
16 Power steering gear rellloval and refittinu
The p'ocedure IS Sllml", to thilt descrd)<)d III Sc(:t lon 12 10' th" m,10u,,1 steeling gC,lf NOlO. how"ver. lhm tile 111011111(1)(1 1)I)Its (jo cOllipletely tl1(ouyh lhe front e,ossmflmhe,. "nd the II.),,, nil IS a,e
I()(;ked wllh sphl pillS. Add,llon"lly lhe lIuld IIIH)S rnu~;t Iw lhsc.onnec · l"d. and atln' ,uI,Um!J the system ~hollid he loppud III' ,lnd Illed wllh lui"",,,!:,, 10 $"(;tl{>n 15 (photos)
17 Power steerillU pump remov;ll "lid rcfil1 ill\J
Loo~"n tl", «II.." Iwlley 1",lck,,1 b"lts. ,el..,ase Ih" d"ve!Jclt lellSlon. Ihcn ,emOVe II", dllvelu:lt I,,)m the P"'''I' pulley Oil 3 0 101", IIIO
h,;lc.k(,t ~nd st;)y. wlw,e ;1j)1'11 <:;,I)I". ,!Ill! ","'ove f'DIII Ihe CII!) "le (photos). The "",d..,1 C;'rl lh"" 1m (lnl)nlt"d flOm Ihe pUlllp of nccess;"y, 5 RellltlllU IS .1 ,ev,,'~al 01 I..,moval. "ul l"'Il~lon Ihe lhlvehelt ~Ild "Iced Ihe sy~IC'" wllh lek'e'll:tJ to Sec;1I0ns 2 ,!Ild 15
"V',~, , .,' , -t .~/ ,.
~
' ---... . . ' .. ' , "
A-i·J<'~ r~ _ I' .' If! h \l:: fITI \~, . '''''
~
•• :. ' 10)",', / )
. .. 'I.· L../,
'": .. ':;' ., .... ---,.
. .. .
18 S teerinU wheel removnl nnd rIllittinu
1 Dlsconneci the lodlielY nCU~lIve le,,(1, 2 PIISC Ih" mOllf hUIll Ihe celn,,) o f Ihe stcclln(j whc,,1 (photos)
15.1 A Powef SICCIIIl(j (je,, ' showUlU pinlOrl and lowe, coupl",U ~h,,11 un,vcfsnl lo;nl 161 B Power steering ue", mountUlg bolt (,,"owed) 1 G 1 C "nd nul (""owed)
.' ---------------------------------procarmanuals.com
Page 172 of 205

Chapter 10 Suspension and steering 171
19 4C Removinu the top steering column Shroud 19 G lunitlon SWitch ,1nd wirlllU (A). also COllll'lII upper mOlUllnl!J holt (0) 19.7 Removing the steering column uppcr mounlul(J holt (arrowed)
'5 Secure Ihe SIt:(;(1I1(1 lock 10 Ihe colulIlIl ,lIal ~heil' the h eads I,om ,he m:w holt~ 11) U~e the stecrin\J lock to locate the shaft in Ihe column. then III Ihe )ct,on mdlGltor OICIlJalinn GUll alld Stecrmn wheel. CtlCC~ that Ihe ruadwheels afC st,lIln the 5trai\jht·ahead P05,110l1. 17 Install the Stce!Ul(J column orommet Oil the lowm en(t. 18 LOCille the column assembly ami sr:c",e It wrth the Iwo mOllrlllng bolts. 19 The ((,milliuler of the rellllUI\J proccrl",e ,~ th" reverSI! of lhe removill procedure,
20 F ront wheel alignment and steering ilngles
Accurate front whcel alignment IS essential lor good stoer"'g and lyre WOiJr. Scion) cons,dering the steering angle. check Ihat Ihe tyres
are correctly inflated. tllnt the front wheel s arc nOI IJlJckled. the hub hea"nns arc not worn o r mcorrectly adjusted und thilt the sleflr"'g IlIlkaUfl is in IJood order. wllhout slackness or we,ll at thu Jo,nls
2 WIH;f; 1 "I'!JIununt co"s'st~ 01 loUl I"ctors, C;"lliJcr_ IS the ""Ule "t wilich the front whet:ls ,lie sci from Ihe
verllcal when v'ewud 100'" the IrOnt 01 the c"r 1'0sIt,ve camber 's Ihe .. mount (111 de\J'ee~) th"t til() whucls ,ue toited outwards at the lOp 100'"
thu vert,c;,1
Castor. ,~tho i"'~Jlu between the SIl,erlIlU ,,~,s OIrld.1 v..,'I,e.11 lone len viewud IrOIll p,lch ~,dfl 01 the C,lI 1'0~;llIve castor 's when the ~tcermu ",x,s 'S ",cloned rUiHw,,,ds ill the top jStcerinu ilxis inclin,,{ion 's lhe illl\Jle. when VIewed frOI11 the .It 01 the Cilr. bel ween the verltcal and "n 1Il'''U>I1.1ry hne drawn betwCl)n the upper ilnd lower suspensIon strut p,vots, Toe-i n IS the ilmoUl,t by wh,ch tlte dl5li"'Ce helween the frOrlt
IIlsuJu ed\Je~ 01 the rOildwhecls ('He,lsu1ed m huh heiuht) ,s less thiln lhe d'sWrlCI) ",e
6
Oht"in or m"ke
ne:w components have heen I'lted. set the ro"dwheels ,n the stral\jht·ilheil(f p05otrOn and also cent",lrse the steering wheel. AdJ"st the len\Jths of the track rods hy lllll1ing tltem so th,,! the track rod end IJ,litJoinl studs w,11 drop eils,ly onlO the eyes of the steer inu ilrlllS Measllfe the dislilllces between the centres of the hilllfOllllS illld the grooves on Ihe inner ends of the track rods and ildjust. ,r neceSSilry. so Ihiltthey me equ,ll Thl~ is all lII,t,,,1 sellinlJ only and prec,se ildillstmellt mu~t he carried oul as descrrhed earheL
21 Wheels and lyres -uonNal care and milintenl1nce
Wheels ilild tyre~ shOuld give no reill problems in usc provided thm ,1 close eye IS kept on Ihe", with re\janlto excessive weilr or dilmilge To llns end. the following pOllltS should he noted Ensure thm lyre pressures ",e checked re\Jularly ami ma,ntallled correctly. Checklllg should be c,Hried out woth the tyres cold alld nOI IIlHlledialely alter the vehicle hilS heen "I usc. II the pressures are checked w'th the tyres hOI. iln ap(l,Hently hi\jh readmlJ w,1l be ohw'lled OWlnH to heilt expJnsron. Under n<) Cllcumst
eSpecii\lIy 111 the s,dewalls Remove any na,ls or stones ell\bedded 111 the tread hefore they penetr"te lhe tyre 10 cnuse dcfliltlon If remov,,1 {)i
dilll1i1ged by ·kerbing· wh,lst par king. and simililrly stee l wheels may hecome denIed or buckled, Renewnl of the wheel rs very ohenthe only course of rellled'ill ilct,on poss,ble, The balance 01 each wheel Jnd tyre ilssembly should be mainta,ned to ilvoid excess,ve weilr, not only 10 the tyres but illso to the s teering and suspension components. Wheel imbillilnce 's normilily S'\ln, f,ed by v,i)rilllOn through the veillcle·s bodyshell. illthouUh III many c~ses it IS piullcularly nOliceahle Ihrouoh the steenng whuel. Conversely. it ~hould bc noted thilt weilr o r dilnlaUc 111 suspellS IOll or steer ing components may '.:ause e~ceSSlve tyre wear. Out·of·round or out-of· t!Ue lyres, damaged wheels and wheel !leafing weilf/ nlilladJustntent also lilll into th
,.
:.
procarmanuals.com
Page 177 of 205

)76 Chapter 11 Bodywork and fitting
General description
The body is of all-s teel welded construction with impact ilbsorbing hont Dnd rear sections . Anli-burSllocks nrc lilted 10 the doors, ilnd the
t ailgDte is supponcd by \J
AI the in1erVills speCIfIed in the Routine M"IIl\cnilnCe section in the front 0 1 the nl
Check underbody protective coatiog 5 W,th the CM supponed on i1xle stilnds. check the cond,tlon 01 the un(lelbody protcctivc coating. i1nd wherc neceSSilry clean
M,,;ntcll
Wily to remove any aCCUIllUI,lted mud whIch WIll retillll mOlslu re
Mats and C
very line culling pils te. Finally, opply wax polish. WhNe the scrotch has penctrDt(ld right through to the metill of the bodywork. causing the mowl \0 rust. iI d ifferent repa ir lechnique is
required. Remove any loosc rus t fronl the bottom 01 the scra tch with a penknile. then apply rUSI inhibiting paint 10 prevent the lormation 01 rust in Ihe future. Using n rubber or nylon appliCiltor fill the scratch with bodystopper paste. II requ ired. this paste Ciln be mixed with cellulose thinners to provide a very thin paste which is ideal for filling narrow scratches. Before t he stopper·paSI(l in the scratch hardens. wrilp il piece 01 smooth COllon rJg i1round the lOp 01 J linger. Dip the finger in cellulose thinners and then quickly sweep it i1CIOSS the surlace of the 5topper-pJste in the scratCh: this will ensure tha t the surfilce 01 the stopper,pilste is slightly hollowed. The scratch can now be p
first wsk is to pull the dent out, untrl t he affected bodywork almost
procarmanuals.com