1973 CHEVROLET CAMARO recommended oil
[x] Cancel search: recommended oilPage 46 of 84
Downloaded from www.Manualslib.com manuals search engine Fruit Stains, Coffee, Soft Drinks,
Ice Cream and Milk-Wipe with
cloth soaked in cold water.
If nec
essary clean lightly with fabric
cleaning fluid.
Soap and water is
not recommended as it might set
the stain.
Catsup-Wipe with cloth soaked in
cool water.
If further cleaning is
necessary, use a detergent foam
cleaner.
Grease, Oil, Butter, Margarine
and Crayon -
Scrape off excess
with dull knife.
Use fabric cleaning
fluid.
Paste or Wax Type Shoe Polish
-Light applications of fabric clean
ing fluid.
Exterior Appearance
Your car is finished with General
Motors "Magic-Mirror" acrylic
lacquer. This is a finish of maxi
mum beauty which, in depth of
color, gloss retention and durability
Tar -Remove excess with dull
knife, moisten with fabric cleaning
fluid, scrape again, rub lightly with
additional cleaner.
Blood -Wipe with clean cloth
moistened with cold water. Use no
soap.
Urine -Sponge stain with luke
warm soap suds from mild neutral
soap on clean cloth, rinse with cloth
soaked in cold water, saturate cloth
with one
part household ammonia
and 5 parts water, apply for 1 min
ute, rinse with clean, wet cloth.
Vomitus-Sponge with clean cloth
dipped
in clean, cold water. Wash
lightly with lukewarm water
and
is superior to conventional lacquer
finishes.
Washing Your Car
The best way to preserve the
finish and maintain original beauty
43
mild neutral soap. If odor persists,
treat area with a water-baking soda
solution (1 teaspoon
baking soda
to one cup of tepid water).
Rub
again with cloth and cold water.
Finally , if necessary , clean lightly
with fabric cleaning fluid.
Interior Glass Surface
The interior glass surface should
be cleaned on a periodic basis for
continued good visibility. A com
mercial household glass cleaning
agent containing ammonia will re
move normal tobacco smoke and
dust films sometimes caused by in
gredients used in vinyls, plastics
or
other interior trim materials.
of appearance
is to keep it clean .
Wash the car
in lukewarm or cold
water. Never use strong so ap
or
chemical detergents. Cleaning
agents should be quickly flushed
from the surfaces.
Page 47 of 84
Downloaded from www.Manualslib.com manuals search engine Polishing and Waxing
Your Car
Although acrylic paint on your
car
is durable, you may wish to wax
or polish for added protection.
Your Chevrolet Dealer offers many
polishes and waxes now available
which have proven of real value in
maintaining a good paint finish.
When using a tar and road oil re
mover, be certain it
is safe for use
on acrylic painted surfaces.
Protection of Exterior
Bright Metal Parts
Bright metal parts should be
cleaned regularly to maintain lus
ter. Washing with water
is all that
is usually required. However, G.M.
Chrome Polish may be used on
CHROME or STAINLESS STEEL
trim if necessary.
Use special care with ALU-
MINUM trim. Never use auto or
.chrome polish, steam or any caustic
soap to clean aluminum.
A coating of wax, rubbed to a
high polish,
is recommended for all
bright metal parts.
Cleaning White Sidewall
Tires
Use a tire cleaner which will not
harm aluminum trim. A stiff brush
may be used with the cleaner to
remove road grime and dirt from
white sidewall tires.
Cleaning the Optional
Vinyl Top
The top should be washed fre
quently with neutral soap suds,
lukewarm water and a brush with
soft bristles. Rinse top with
suffi
cient quantities of clear water to re
move all traces of soap.
44
If the top requires additional
clea~ing after using soap and water,
a
mtld foaming cleanser can be
used. Rinse the whole top with
water; then apply a mild foaming
~pe cleanser on an area of approx
Imately two square feet.
Scrub area
with a small soft bristle hand brush
adding water
as necessary until th~
cleanser foams to a soapy consis
tency. Remove the first accumu
lated soilage with a cloth or sponge
before it can be ground into the top
material. Apply additional cleanser
~o the area and scrub until the top
IS clean. Care must be exercised to
keep the cleanser from running onto
body finish
as it may cause streaks
if allowed to run down and dry.
After the entire top has been
cleaned, rinse generously with clear
water to remove all traces of
cleanser. Do not use volatile cleaner
or household bleaching agents on
the top material.
Page 49 of 84
Downloaded from www.Manualslib.com manuals search engine to 0.5 grams per gallon) gasolines
to minimize emissions
or hydro
carbons and particulates.
If un
leaded or low-lead gasolines are
not available, gasolines containing
more than
0.5 grams per gallon
may be used.
In states using the Gasoline
Performance and Information
Sys
tem of fuel designation, unleaded
or low-lead fuels having an anti
knock designation of
"2" or higher
are recommended.
Gas Cap-The fuel tank filler cap
has a new two-step removal and
installation procedure plus a pres
sure-vacuum safety relief valve. It
is equipped with a double set of
locking tangs.
To remove:
• Rotate cap one-half turn coun
terclockwise to clear the first set
of tangs from the slots inside the
filler neck. This will allow any
residual pressure to escape.
• Pull the cap outward and rotate
one-quarter turn counterclock
wise to clear second set of tangs
and remove the cap.
• To install, reverse this procedure.
NOTE: If this cap requires a re
placement, only a cap with these
same features should be used. Fail
ure
to use the correct cap can re
sult in a serious malfunction of the
system. Correct replacement caps
may be obtained from your Au
thorized Chevrolet Dealer.
Engine Oil and Filter
Recommendations
• Use only SE engine oil.
• Change oil each 4 months or
6,000 miles. If more than 6,000
miles are driven in a 4-month
period, change oil each
6,000
miles.
46
• Change oil each 2 months or
3,000 miles, whichever occurs
first, under
th~ following con
ditions:
- driving in dusty conditions,
- trailer pulling,
- extensive idling,
- short-trip operation at freez-
ing temperatures (engine not
thoroughly warmed-up).
• Operation in dust storms may
require an immediate oil change.
• Replace the oil filter at the first
oil change, and every second oil
change thereafter. AC oil filters
provide excellent engine pro
tection.
See your Chevrolet dealer for ad
vice on the frequency of oil and
filter changes under unusual driv
ing conditions.
The above recommendations ap
ply to the first change
as well as
subsequent oil changes. The oil
change interval for your Camaro
Page 50 of 84
Downloaded from www.Manualslib.com manuals search engine engine is based on the use of SE oils
and quality oil filters.
Oil change in
tervals longer than those listed
above will seriously reduce engine
life and may affect Chevrolet obli
gation under the provisions of the
New Vehicle Warranty.
A high quality
SE oil was in
stalled in your engine at the fac
tory.
It is not necessary to change
this factory-installed oil prior to the
recommended normal change pe
riod. However, check the oil level
more frequently during the break
in period since higher oil consump
tion
is normal until the piston rings
become seated.
NOTE: Non-detergent and other
low quality oils are specifically
not recommended.
Only the use
of
SE engine oils and proper oil
and filter change intervals assure
you of continued proper lubrica
tion of your Camaro engine.
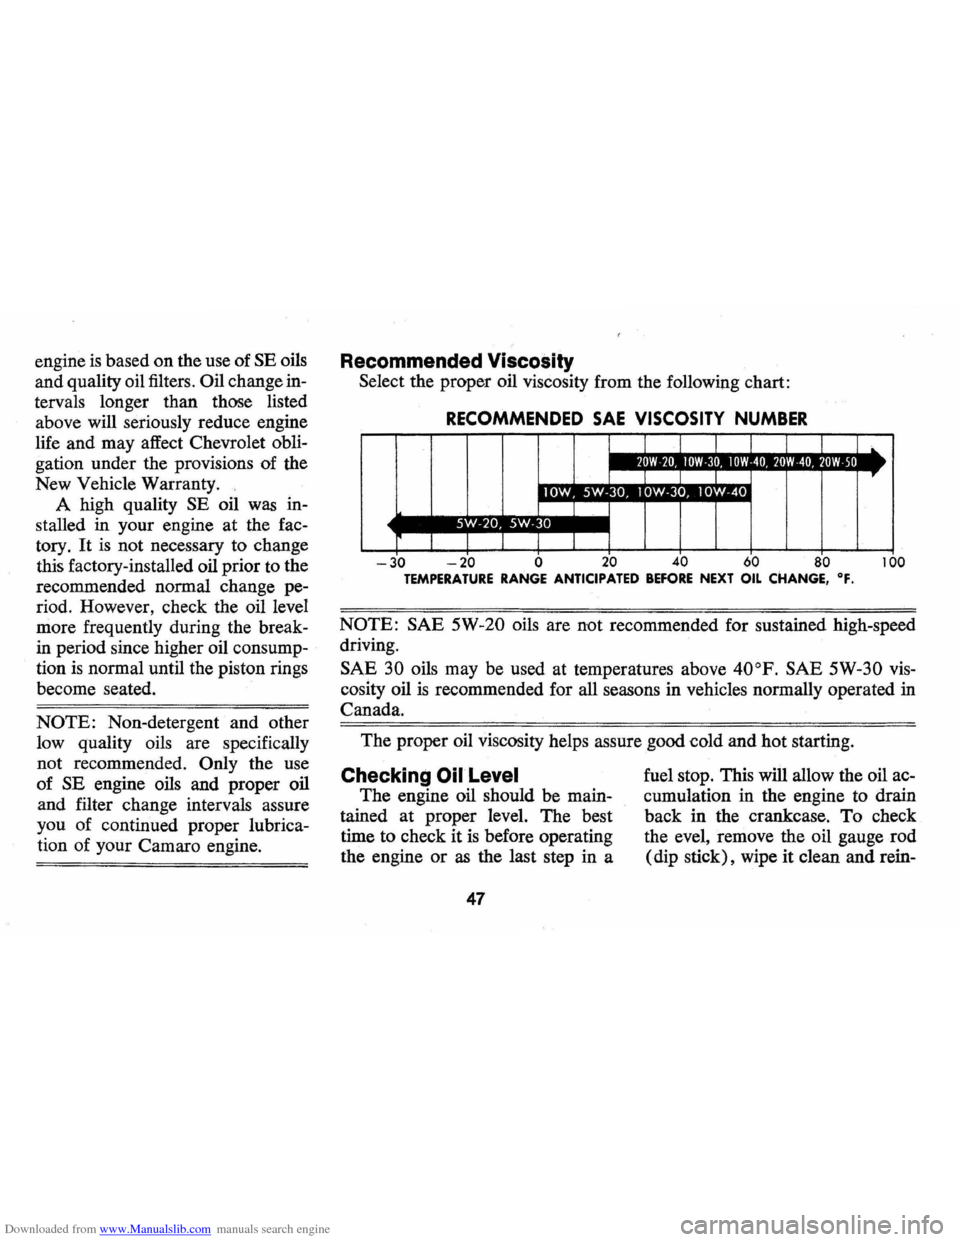
Recommended Viscosity
Select the proper oil viscosity from the following chart:
RECOMMENDED SAE VISCOSITY NUMBER
I I _111'1.11 11II'laU.III'11 .. 1_111'.'l!! :1. 11'1&'1_
I I
. I
I r I
-30 -20 0 20 40 60 80 100 TEMPERATURE RANGE ANTICIPATED BEFORE NEXT OIL CHANGE, OF.
NOTE: SAE 5W-20 oils are not recommended for sustained high-speed
driving.
SAE 30 oils may be used at temperatures above 40oP. SAE 5W-30 vis
cosity oil is recommended for all seasons in vehicles normally operated in
Canada.
The proper oil viscosity helps assure good cold and hot starting.
Checking Oil Level
The engine oil should be main
tained at proper level. The best
time to check it
is before operating
the engine
or as the last step in a
47
fuel stop. This will allow the oil ac
cumulation in the engine to drain
back in the crankcase. To check
the
eve!, remove the oil gauge rod
(dip stick), wipe it clean and rein-
Page 56 of 84
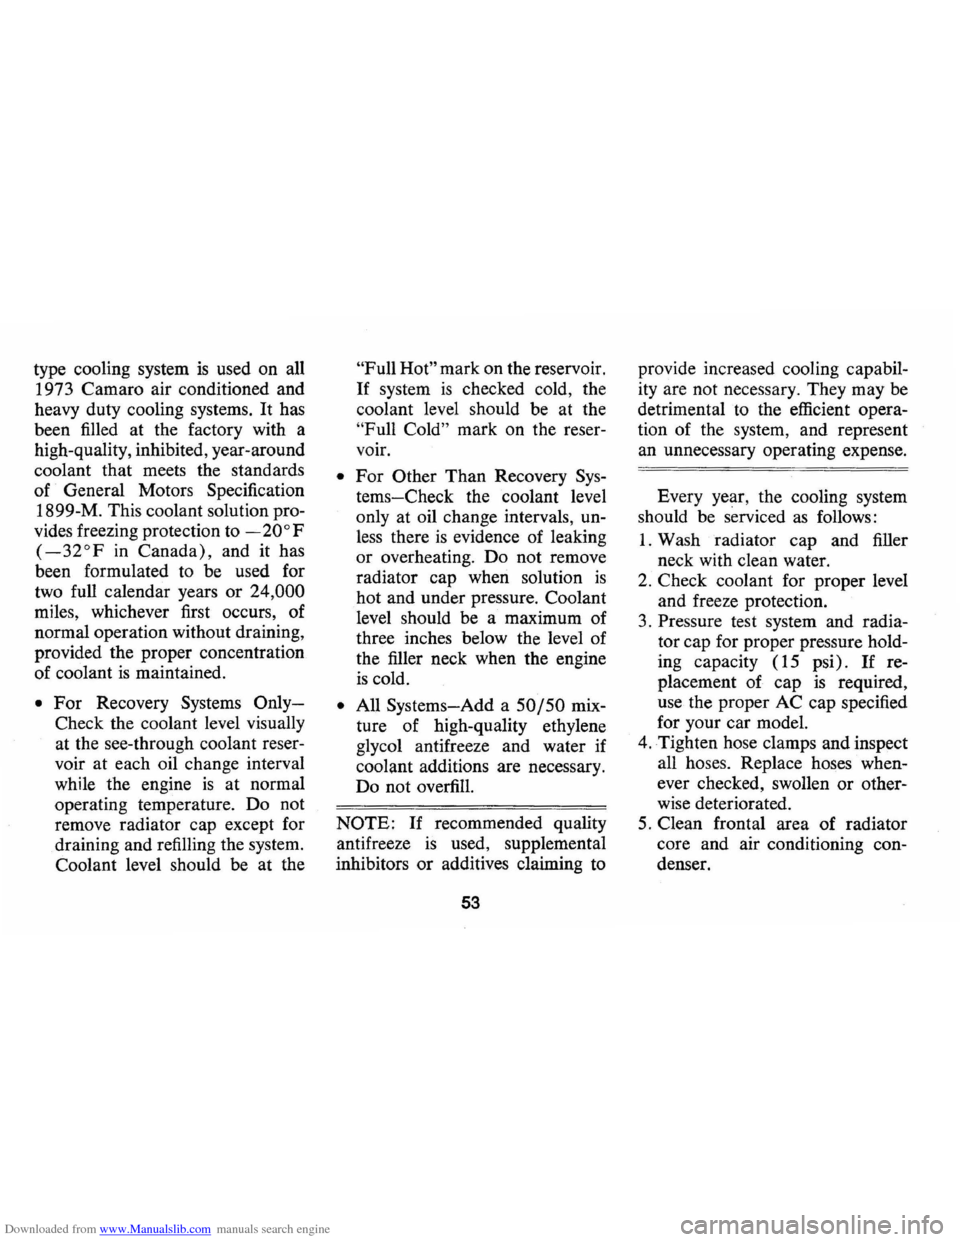
Downloaded from www.Manualslib.com manuals search engine type cooling system is used on all
1973 Camaro air conditioned and
heavy duty cooling systems. It has
been filled at the factory with a
high-quality, inhibited, year-around
coolant that meets the standards
of General Motors Specification
1899-M. This coolant solution pro
vides freezing protection to
-20 0 F
(-32°F in Canada), and it has
been formulated to be used for
two full calendar years
or 24,000
miles, whichever first occurs, of
normal operation without draining,
provided the proper concentration
of coolant
is maintained.
• For Recovery Systems Only
Check the coolant level visually
at the see-through coolant reser
voir at each oil change interval
while the engine
is at normal
operating temperature. Do not
remove radiator cap except for
draining and refilling the system.
Coolant level should be at the
"Full Hot" mark on the reservoir.
If system is checked cold, the
coolant level should be at the
"Full Cold" mark on the reser
voir.
• For Other Than Recovery Sys
tems-Check the coolant level
only at oil change intervals, un
less there
is evidence of leaking
or overheating. Do not remove
radiator cap when solution
is
hot and under pressure. Coolant
level should be a maximum of
three inches below the level of
the filler neck when the engine
is cold.
• All Systems-Add a 50/50 mix
ture of high-quality ethylene
glycol antifreeze and water if
coolant additions are necessary.
Do not overfill.
NOTE: If recommended quality
antifreeze
is used, supplemental
inhibitors or additives claiming to
53
provide increased cooling capabil
ity are not necessary. They may be
detrimental to the efficient opera
tion of the system, and represent
an unnecessary operating expense.
Every year, the cooling system
should be serviced
as follows:
1. Wash radiator cap and filler
neck with clean water.
2. Check coolant for proper level
and freeze protection.
3. Pressure test system and radia
tor cap for proper pressure hold
ing capacity (15 psi).
If re
placement
of cap is required,
use the proper AC cap specified
for your car model.
4. Tighten hose clamps and inspect
all hoses. Replace hoses when
ever checked, swollen
or other
wise deteriorated.
5. Clean frontal area of radiator
core and air conditioning con
denser.
Page 58 of 84
Downloaded from www.Manualslib.com manuals search engine It is the owner's responsibility
to keep the freeze protection at a
level commensurate with the tem
peratures which may occur
in the
area of vehicle operation.
• Maintain cooling system freeze
protection at
_200 F or below
to ensure protection against cor
rosion and loss of coolant from
boiling, even though freezing
temperatures are not expected.
• Add ethylene glycol base cool
ant that meets GM Specification
1899-M when coolant additions
are required because of coolant
loss or to provide additional
protection against freezing at
temperatures lower than
_200
F (_320 F in Canada).
NOTE: Alcohol or methanol base
coolants
or plain water are not
recommended for your Camaro at
any time.
Radiator Pressure Cap
The radiator cap, a 15 lb. pres
sure type, must be installed tightly,
otherwise coolant may be lost and
damage to engine may result from
overheating. Radiator pressure
caps should be checked periodi
cally for proper operation.
If re
placement
is required specify AC.
Thermostat
The cooling system is protected
and controlled by a thennostat
in
stalled in the engine coolant outlet
to maintain a satisfactory operat
ing temperature of the engine. This
thermostat
is designed forcontinu
ous use through both winter and summer
and need not be changed
seasonally . When replacement
is
necessary, Delco parts are recom~
mended.
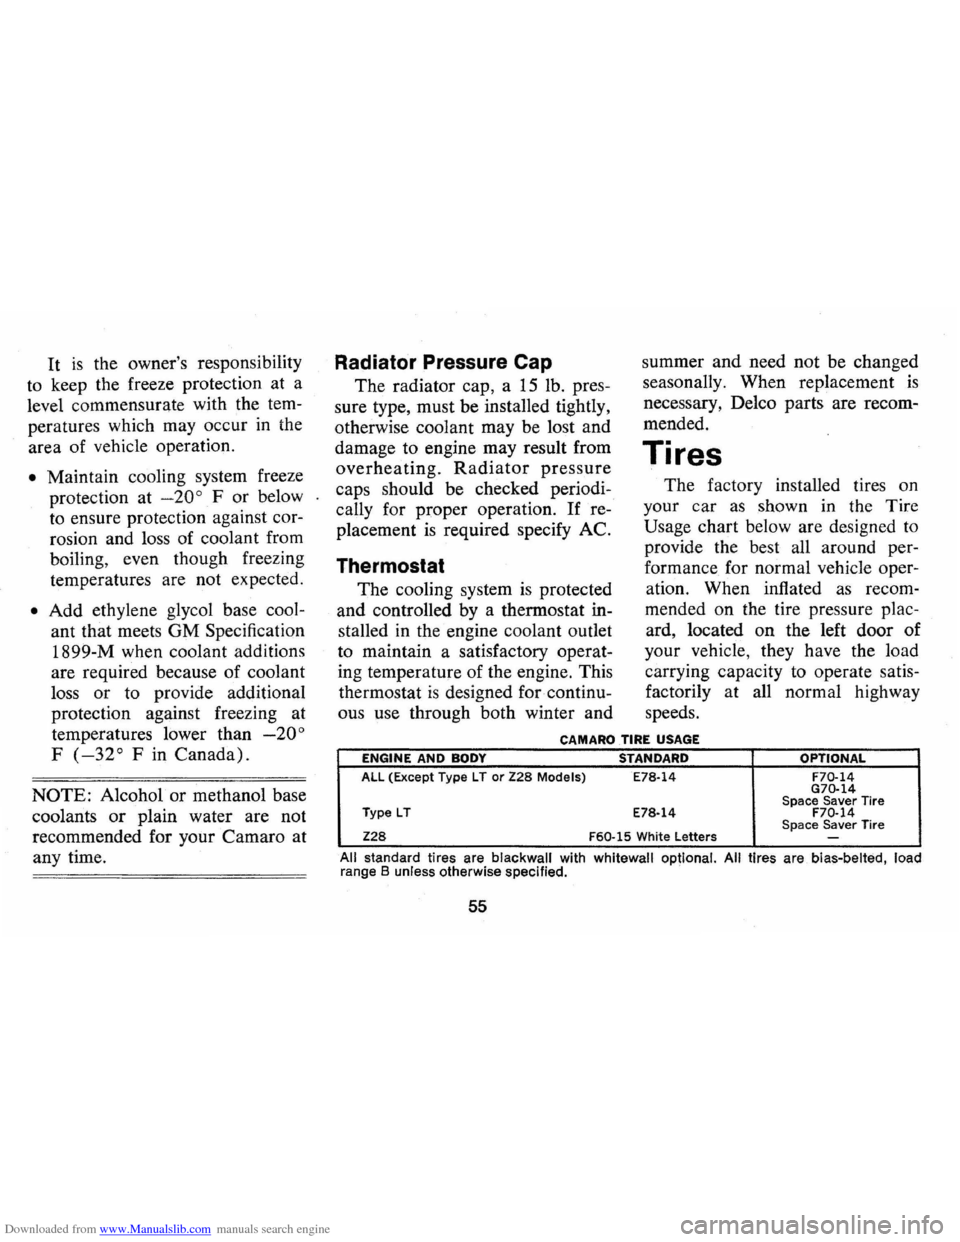
Tires
The factory installed tires on
your car
as shown in the Tire
Usage chart below are designed to
provide the best all around per
formance for normal vehicle oper
ation. When inflated
as recom
mended on the tire pressure plac
ard, located
on the left door of
your vehicle, they have the load
carrying capacity to operate satis
factorily at all normal highway
speeds.
CAMARO TIRE USAGE
ENGINE AND BODY STANDARD OPTIONAL
All (Except Type l T or Z28 Models) E78·14 F70·14 G70·14
Type lT Space Saver Tire E78·14 F70·14
Z28 F60·15 White letters Space Saver Tire -
All standard tires are blackwall with whitewall optional. All tires are bias-belted, load
range B unless otherwise specified. .
55
Page 67 of 84

Downloaded from www.Manualslib.com manuals search engine IE) If the car will start but stalls when hot or has a rough idle,
you can suspect a faulty IDLE ADJUSTMENT, a malfunctioning AUTOMATIC CHOKE or an extremely dirty and blocked AIR CLEANER ELEMENT. Replace paper element air cleaner if necessary. Idle adjustment or automatic choke service (other than that outlined in paragraph 0 above) should be performed by your
Chevrolet Dealer.
If the above Fuel System checks and the checks suggested under the Electrical System following do not correct the malfunction, it is recommended that you return to your Authorized Chevrolet Dealer
for further checks, adjustments or repairs.
ELECTRICAL SYSTEM If, when the ignition key is turned to "Start", the engine will not
turn over, you have good reason to suspect electrical trouble. NOTE: Never remove Delcotron bat lead without first disconnecting
battery ground cable.
IF) When there is no response at all to attempts to start the car, check the obvious-your AUTOMATIC TRANSMISSION SELECTOR LEVER must be in Neutral or Park position (manual transmission
must have clutch depressed all the way to floor) before the engine can be started. Turning the IGNITION SWITCH rapidly back and forth several times will sometimes correct a poor internal switch
contact.
IG) The BATIERY may be discharged. If so, lights will be dim and the horn will have a poor tone if it will blow at all.
Usually a garage recharge will be necessary to return the battery to operation. Occasionally, however, a long drive will recharge the battery. NOTE: If the battery is determined to be dead, and for no apparent reason, have your Authorized Chevrolet Dealer check the
battery, the GENERATOR and the VOLTAGE REGULATOR.
GENERATOR trouble should already have been indicated by the generator indicator light on the instrument panel.
64
POOR BATIERY CONNECTIONS may be suspected if the car has operated properly a short time before and now not even the horn
will operate. Check both ends of both battery cables. If the connections are corroded, a car may sometimes be restored to operation by removing all cable ends, scraping all contacting surfaces
clean with a pen knife, and reassembling. If the cables are broken,
they must be replaced. The power supply should now be restored
unless the battery is dead.
IH) If, however, the lights and horn work properly but the starter will still not turn over, check the STARTER connections. A "click" from the starter solenoid indicates that the wiring to the starter is properly installed. If the wiring seems to be clean and tightly in
stalled, the trouble is probably in the starter itself and should be referred to your Authorized Chevrolet Dealer.
When the engine will
"turn over" but will not start, the foilowing
items may be checked along with the Fuel Systems Checks listed
previously.
II) With a clean dry cloth, wipe the ceramic portions of the spark plugs dry. In particularly damp or rainy weather dampness may be
the cause of not sta rting, especi
ally when the engine is cold.
IJ) Check the cables at the top of the distributor and coil as well as each spark plug cable for
tightness.
IK) If the co r will still not sta rt,
check for spark at the spark plugs in the following manner:
Pull one of the spark plug
wires off its spark plug. Insert a
short piece of bare wire (such as Di.,ribu'or and Coil Cab I ••
Page 72 of 84
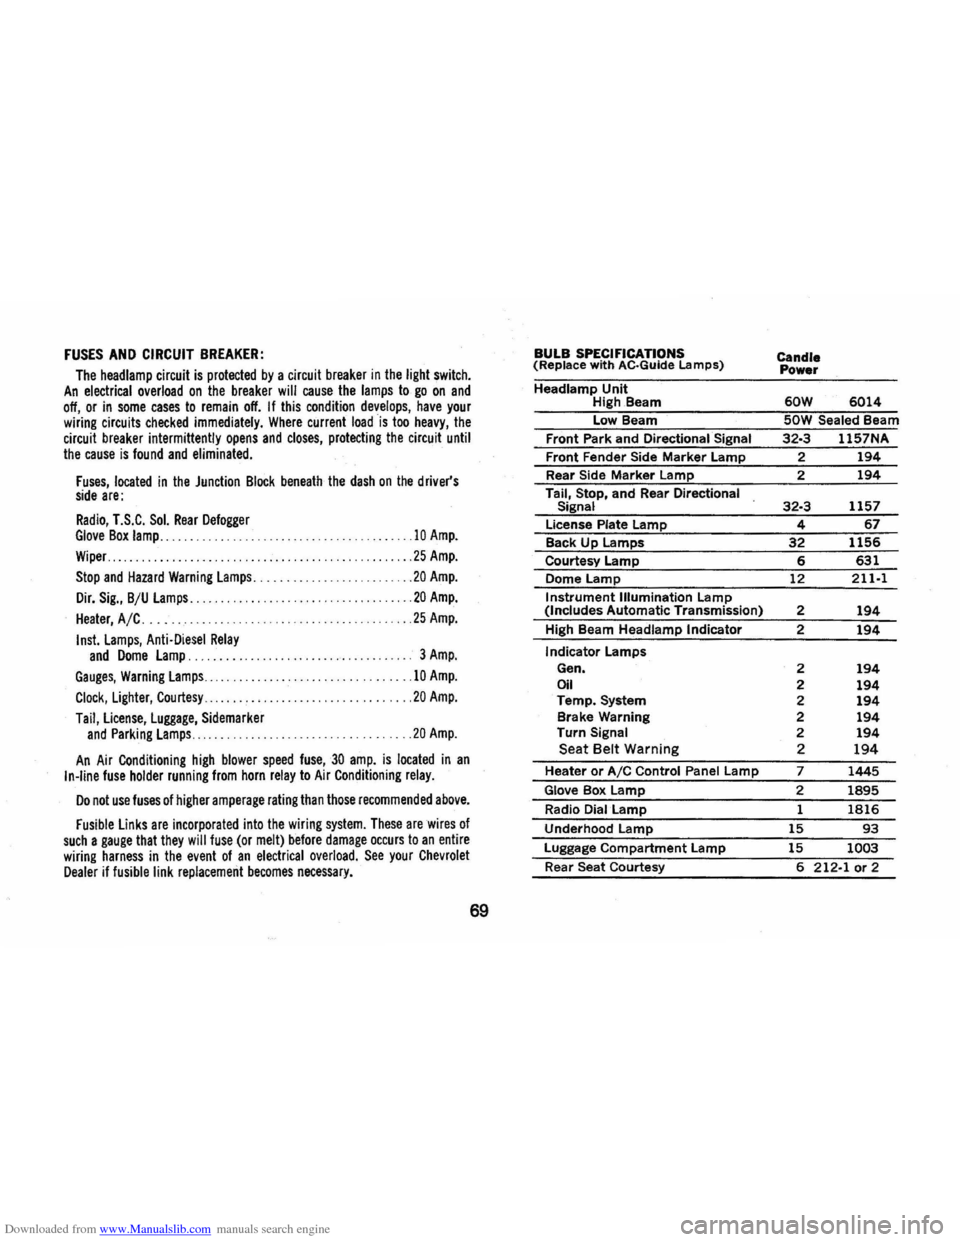
Downloaded from www.Manualslib.com manuals search engine FUSES AND CIRCUIT BREAKER:
The headlamp circuit is protected by a circuit breaker in the light switch. An electrical overload on the breaker will cause the lamps to go on and off, or in some cases to remain off. If this condition develops, have your wiring circuits checked immediately. Where current load is too heavy, the circuit breaker intermittently opens and closes, protecting the circuit until the cause is found and eliminated.
Fuses, located in the Junction Block beneath the dash on the driver's side are:
Radio, T.S.C. Sol. Rear Defogger Glove Box lamp .......................... .
Wiper .................. . .
..
10 Amp.
25 Amp.
Stop and Hazard Warning lamps .................. ... ..... 20 Amp.
Dir. Sig., B/U lamps .................... ............ .... 20 Amp.
Heater, A/C. . . . .. .. . .. .. . .. . .. .. .. .. . . .. .. .. .. . .. ... 25 Amp.
Insl. lamps, Anti·Diesel Relay and Dome lamp. 3 Amp.
Gauges, Warning lamps.. .. .
. .. .. . .. .... . . .. . .. .. . . .. .. .10 Amp.
Clock, lighter, Courtesy.. .. .. . . . . .. . .. ... .. .. . .20 Amp.
Tail, license, luggage, Sidemarker and Parking lamps ...... . .20 Amp.
An Air Conditioning high blower speed fuse,30 amp. is located in an In·line fuse holder running from horn relay to Air Conditioning relay.
Do not use fuses of higher amperage rating than those recommended above.
Fusible links are incorporated into the wiring system. These are wires of such a gauge that they will fuse (or melt) before damage occurs to an entire wiring harness in the event of an electrical overload. See your Chevrolet Dealer if fusible link replacement becomes necessary.
69
BULB SPECIFICATIONS (Replace with AC·Guide Lamps)
Headlamp Unit High.Beam
Low Beam
Front Park and
Directional Signal
Front Fender Side Marker Lamp
Rear Side
Marker Lamp
Tail, Stop, and Rear
Directional
Signal
License Plate Lamp
Back Up Lamps
Courtesy Lamp
Dome
Lamp
Instrument Illumination Lamp (Includes Automatic Transmission)
High Beam
Headlamp Indicator
Indicator Lamps
Gen.
Oil Temp. System
Brake Warning
Turn
Signal Seat Belt Warning
Heater or AIC Control Panel Lamp
Glove Box Lamp
Radio Dial Lamp
Underhood
Lamp
Luggage Compartment Lamp
Rear Seat Courtesy
Candle Power
60W 6014
SOW Sealed Beam
32·3 1157NA
2 194
2 194
32·3 1157
4 67
32 1156
6 631
12
211·1
2 194
2 194
2 194 2 194 2 194 2 194 2 194 2 194
7 1445
2 1895
1 1816
15 93
15 1003
6 212·1 or 2