1973 CHEVROLET CAMARO load capacity
[x] Cancel search: load capacityPage 53 of 84
Downloaded from www.Manualslib.com manuals search engine the transmission sump and add ap
proximately 2.5 quarts U.S. Mea
sure
(2.0 quarts Imperial Mea
sure). Operate transmission
through all shift ranges and re
check fluid level as described
above.
Turbo Hydra-Matic 400-Lubri
cation of your Turbo Hydra-matic
400 will, except for fluid capacity
and filter change listed below, fol
low previously stated automatic
transmission recommendations.
After checking transmission fluid
level it
is important that the dip
stick be pushed all the way into
the filler tube.
Every 24,000 miles -After re
moving fluid from the transmission
sump, approximately
71h. pints
U.S. measure (6 pints Imperial
measure) of fresh fluid will be re
quired to return level to proper mark
on the dipstick.
Every 24,000 miles the transmis
sion sump filter should be re
placed.
Transmission Shift and Back
drive Linkage (Manual and
Automatic) -
Every 6,000 miles
or 4 months lubricate shift link
age and on manual transmission
floor controls lever contacting
faces with water
resistantEP chas
sis lubricant which meets GM
Specification 6031M.
Transmission Shift Linkage
(Manual and Automatic)
Every 6,000 miles or 4 months
lubricate shift linkage and on man
ual transmission floor controls
lever contacting faces with water
resistant
EP chassis lubricant
which meets
GM Specification
6031M.
50
Chassis
Front Suspension
Every 6,000 miles or 4 months
-Lubricate 4 fittings · with water
resistant
EP Chassis Lubricant
which meets
GM Specification
6031M.
Ball joints should not be lu
bricated unless their tempera
ture
is 10°F. or higher. During
colder weather, they should be
allowed to warm up as neces
sary before lubrication.
Steering Linkage
Every 6,000 miles or 4 months
-Lubricate 7 fittings, one at each
end of each tie rod, one at each
end of relay rod, and one
at idler
lever with water resistant
EP Chas
sis Lubricant which meets
GM
Specification 6031 M.
Page 56 of 84
Downloaded from www.Manualslib.com manuals search engine type cooling system is used on all
1973 Camaro air conditioned and
heavy duty cooling systems. It has
been filled at the factory with a
high-quality, inhibited, year-around
coolant that meets the standards
of General Motors Specification
1899-M. This coolant solution pro
vides freezing protection to
-20 0 F
(-32°F in Canada), and it has
been formulated to be used for
two full calendar years
or 24,000
miles, whichever first occurs, of
normal operation without draining,
provided the proper concentration
of coolant
is maintained.
• For Recovery Systems Only
Check the coolant level visually
at the see-through coolant reser
voir at each oil change interval
while the engine
is at normal
operating temperature. Do not
remove radiator cap except for
draining and refilling the system.
Coolant level should be at the
"Full Hot" mark on the reservoir.
If system is checked cold, the
coolant level should be at the
"Full Cold" mark on the reser
voir.
• For Other Than Recovery Sys
tems-Check the coolant level
only at oil change intervals, un
less there
is evidence of leaking
or overheating. Do not remove
radiator cap when solution
is
hot and under pressure. Coolant
level should be a maximum of
three inches below the level of
the filler neck when the engine
is cold.
• All Systems-Add a 50/50 mix
ture of high-quality ethylene
glycol antifreeze and water if
coolant additions are necessary.
Do not overfill.
NOTE: If recommended quality
antifreeze
is used, supplemental
inhibitors or additives claiming to
53
provide increased cooling capabil
ity are not necessary. They may be
detrimental to the efficient opera
tion of the system, and represent
an unnecessary operating expense.
Every year, the cooling system
should be serviced
as follows:
1. Wash radiator cap and filler
neck with clean water.
2. Check coolant for proper level
and freeze protection.
3. Pressure test system and radia
tor cap for proper pressure hold
ing capacity (15 psi).
If re
placement
of cap is required,
use the proper AC cap specified
for your car model.
4. Tighten hose clamps and inspect
all hoses. Replace hoses when
ever checked, swollen
or other
wise deteriorated.
5. Clean frontal area of radiator
core and air conditioning con
denser.
Page 58 of 84
Downloaded from www.Manualslib.com manuals search engine It is the owner's responsibility
to keep the freeze protection at a
level commensurate with the tem
peratures which may occur
in the
area of vehicle operation.
• Maintain cooling system freeze
protection at
_200 F or below
to ensure protection against cor
rosion and loss of coolant from
boiling, even though freezing
temperatures are not expected.
• Add ethylene glycol base cool
ant that meets GM Specification
1899-M when coolant additions
are required because of coolant
loss or to provide additional
protection against freezing at
temperatures lower than
_200
F (_320 F in Canada).
NOTE: Alcohol or methanol base
coolants
or plain water are not
recommended for your Camaro at
any time.
Radiator Pressure Cap
The radiator cap, a 15 lb. pres
sure type, must be installed tightly,
otherwise coolant may be lost and
damage to engine may result from
overheating. Radiator pressure
caps should be checked periodi
cally for proper operation.
If re
placement
is required specify AC.
Thermostat
The cooling system is protected
and controlled by a thennostat
in
stalled in the engine coolant outlet
to maintain a satisfactory operat
ing temperature of the engine. This
thermostat
is designed forcontinu
ous use through both winter and summer
and need not be changed
seasonally . When replacement
is
necessary, Delco parts are recom~
mended.
Tires
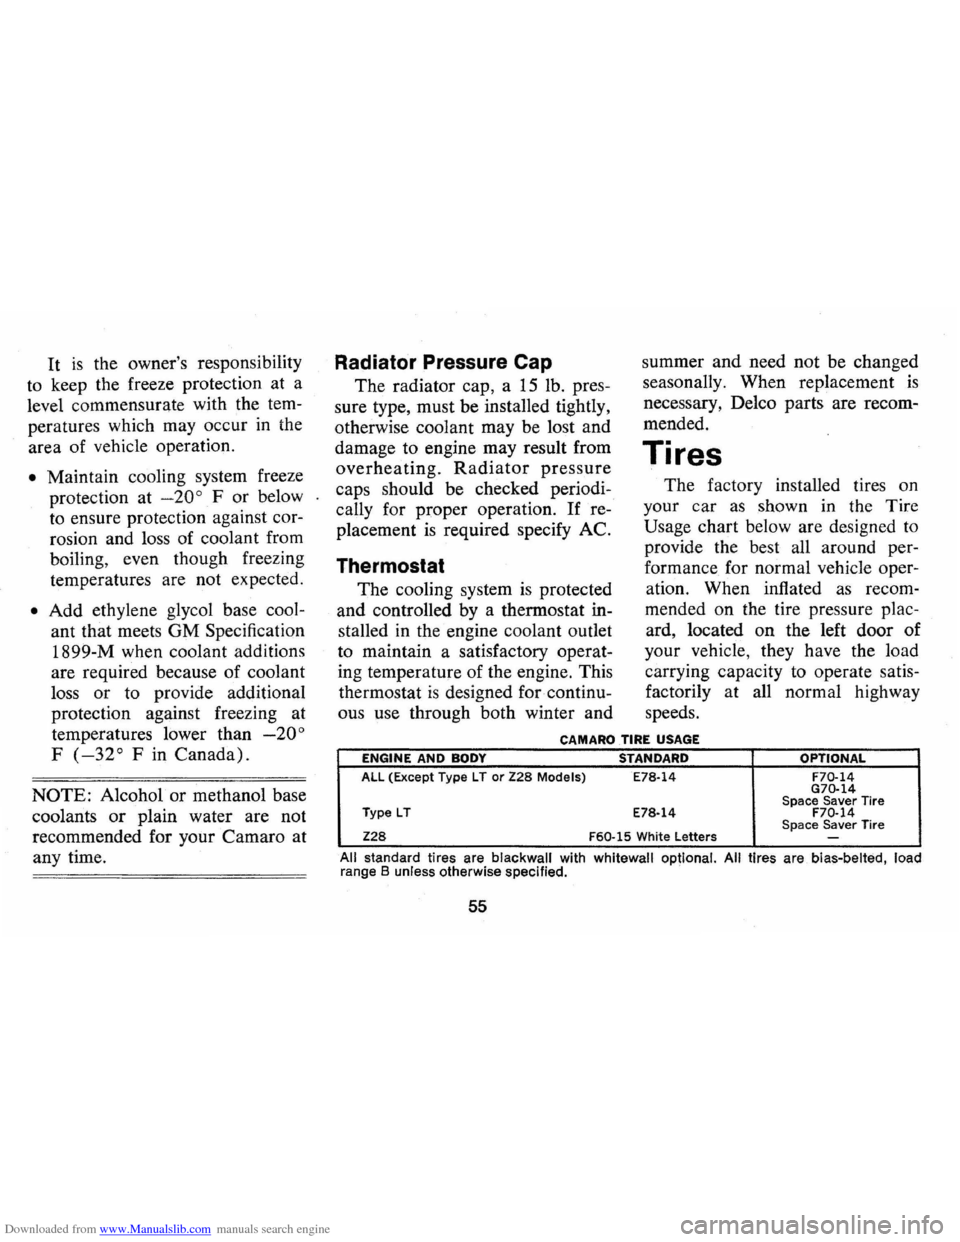
The factory installed tires on
your car
as shown in the Tire
Usage chart below are designed to
provide the best all around per
formance for normal vehicle oper
ation. When inflated
as recom
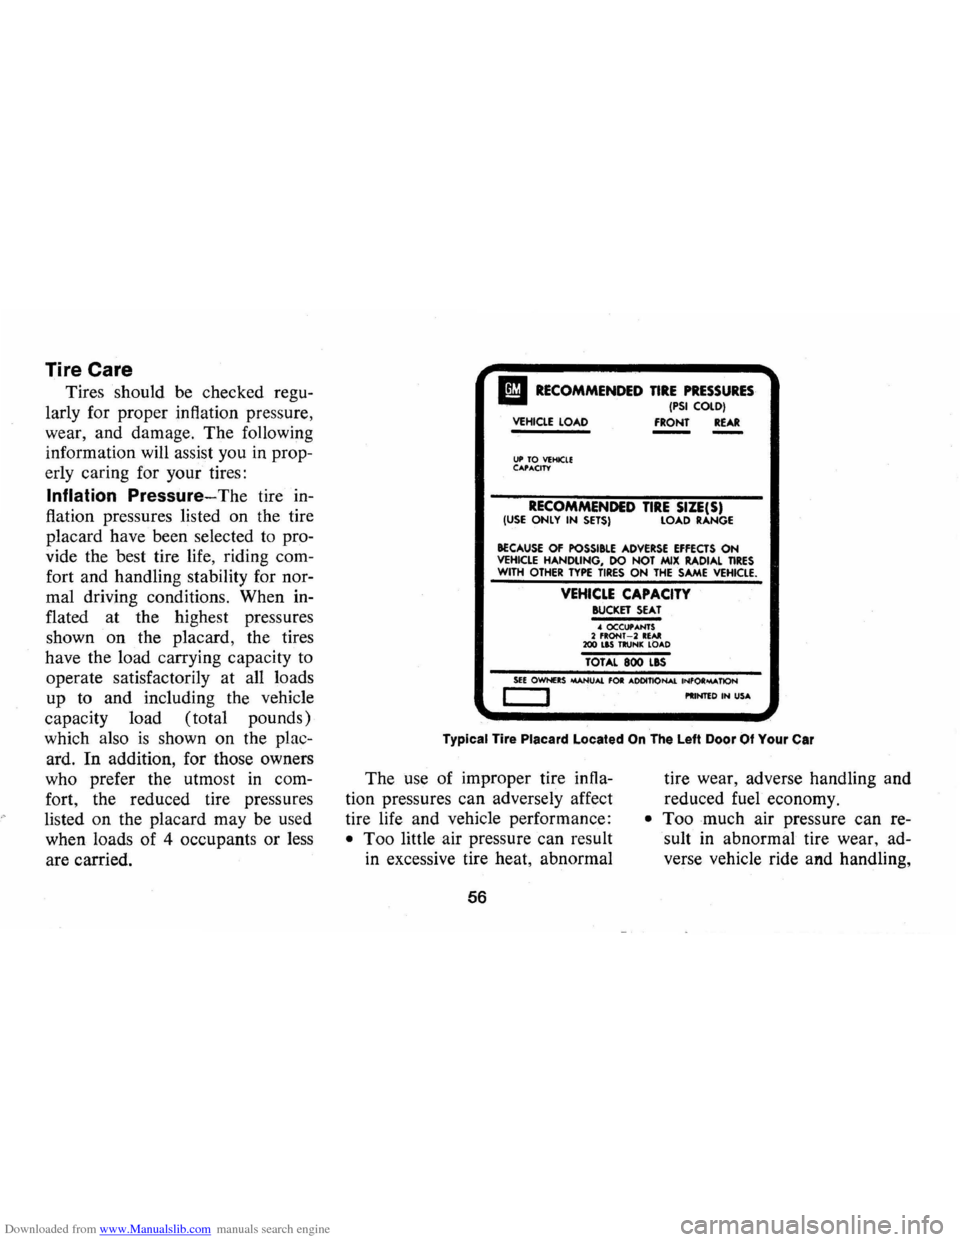
mended on the tire pressure plac
ard, located
on the left door of
your vehicle, they have the load
carrying capacity to operate satis
factorily at all normal highway
speeds.
CAMARO TIRE USAGE
ENGINE AND BODY STANDARD OPTIONAL
All (Except Type l T or Z28 Models) E78·14 F70·14 G70·14
Type lT Space Saver Tire E78·14 F70·14
Z28 F60·15 White letters Space Saver Tire -
All standard tires are blackwall with whitewall optional. All tires are bias-belted, load
range B unless otherwise specified. .
55
Page 59 of 84
Downloaded from www.Manualslib.com manuals search engine Tire Care
Tires should be checked regu
larly for proper inflation pressure,
wear, and damage. The following
information will assist you in prop
erly caring for your tires:
Inflation
Pressure-The tire in
flation pressures listed on the tire
placard have been selected to pro
vide the best tire life, riding com
fort and handling stability for nor
mal driving conditions. When in
flated at the highest pressures
shown
on the placard, the tires
have the load carrying capacity to
operate satisfactorily at all loads
up to and including the vehicle
capacity load (total pounds)
which also
is shown on the plac
ard.
In addition, for those owners
who prefer the utmost
in com
fort , the reduced tire pressures
listed on the placard may be used
when loads of 4 occupants or less
are carried.
II RECOMMENDED TIRE PRESSURES . (PSI COlD) VEHICLE LOAD
FRONT REAR
UP TO VEHICLE C"',"'CITY
RECOMMENDED TIRE SIZE(S) (USE ONLY IN SETS) LOAD RANGE
BECAUSE OF POSSI&lE ADVERSE EFFECTS ON VEHICLE HANDliNG, DO NOT MIX RADIAL TIRES WITH OTHER TYPE TIRES ON THE SAME VEHICLE.
VEHICLE CAPACITY BUCKET SEAT ~ OCCU,""NTS 2 fRONT -2 RE .... 200 lIS TRUNK lO ... D
TOTAL 800 lIS
SEE OWNERS oAANU"" fOR ... OOITlONAl INfOR""'TlON c::=:J I'IINTED IN US ...
Typical Tire Placard Located On The Left Door Of Your Car
The use of improper tire infla
tion pressures can adversely affect
tire life and vehicle performance:
• Too little air pressure can result
in excessive tire heat, abnormal
56 tire
wear, adverse handling and
reduced fuel economy.
• Too much air pressure can re
sult in abnormal tire wear, ad
verse vehicle ride and handling,
Page 60 of 84
Downloaded from www.Manualslib.com manuals search engine and increased susceptibility to
damage by road impacts.
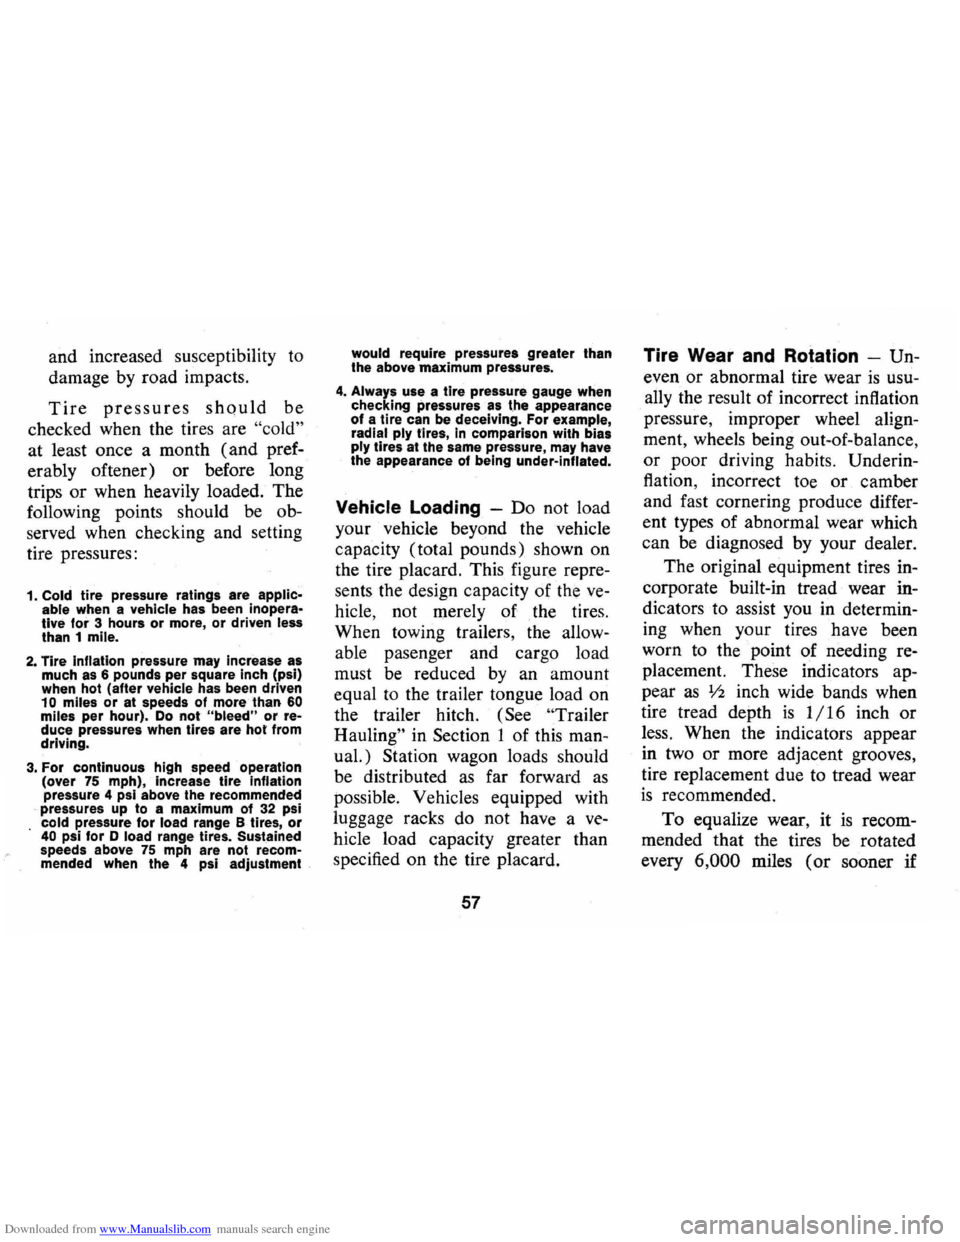
Tire pressures should be
checked when the tires are
"cold"
at least once a month (and pref
erably oftener) or before long
trips
or when heavily loaded. The
following points should be ob
served when checking and setting
tire pressures:
1. Cold tire pressure ratings are applic
able when a vehicle has been inopera
tive for 3 hours or more, or driven less than 1 mile.
2. Tire Inflation pressure may increase as
much as 6 pounds per square inch (psi)
when hot (after
vehicle has been driven 10 miles or at speeds of more than 60 miles per hour). Do not "bleed" or re
duce pressures when tires are hot from
driving.
3. For continuous high speed operation
(over 75 mph), Increase tire Inflation pressure 4 psi above the recommended
pressures up to a maximum of 32 psi cold pressure for load range B tires, or 40 psi for 0 load range tires. Sustained
speeds above 75 mph are not recommended when the 4 psi adjustment ,
would require pressures greater than
the above maximum pressures.
4. Always use a tire pressure gauge when
checking pressures as t,he appearance of a tire can be deceiving. For example,
radial ply fires, In comparison with bias ply tires at the same pressure, may have
the appearance of being under-inflated.
Vehicle Loading -Do not load
your vehicle beyond the vehicle
capacity (total pounds) shown on
the tire placard. This figure repre
sents the design capacity of the
ve
hicle, not merely of the tires.
When towing trailers, the allow
able pasenger and cargo load
must be reduced by an amount
equal to the trailer tongue load on
the trailer hitch.
(See "Trailer
Hauling"
in Section 1 of this man
ual.) Station wagon loads should
be distributed
as far forward as
possible. Vehicles equipped with
luggage racks do not have a
ve
hicle load capacity greater than
specified on the tire placard.
57
Tire Wear and Rotation -Un
even or abnormal tire wear is usu
ally the result of incorrect inflation
pressure, improper wheel align
ment, wheels being out-of-balance,
or poor driving habits. Underin
flation, incorrect toe or camber
and fast cornering produce differ
ent types of abnormal wear which
can be diagnosed by your dealer.
The original equipment tires in
corporate built-in tread wear
in
dicators to assist you in determin
ing when your tires ,have been
worn to the point of needing re
placement. These indicators ap
pear
as Ij2 inch wide bands when
tire tread depth
is 1/16 inch or
less. When the indicators appear
in two or more adjacent grooves,
tire replacement due to tread wear
is recommended.
To equalize wear, it
is recom
mended that the tires be rotated
every
6,000 miles (or sooner if
Page 70 of 84
Downloaded from www.Manualslib.com manuals search engine SPECIFICATIONS (Cont'dl
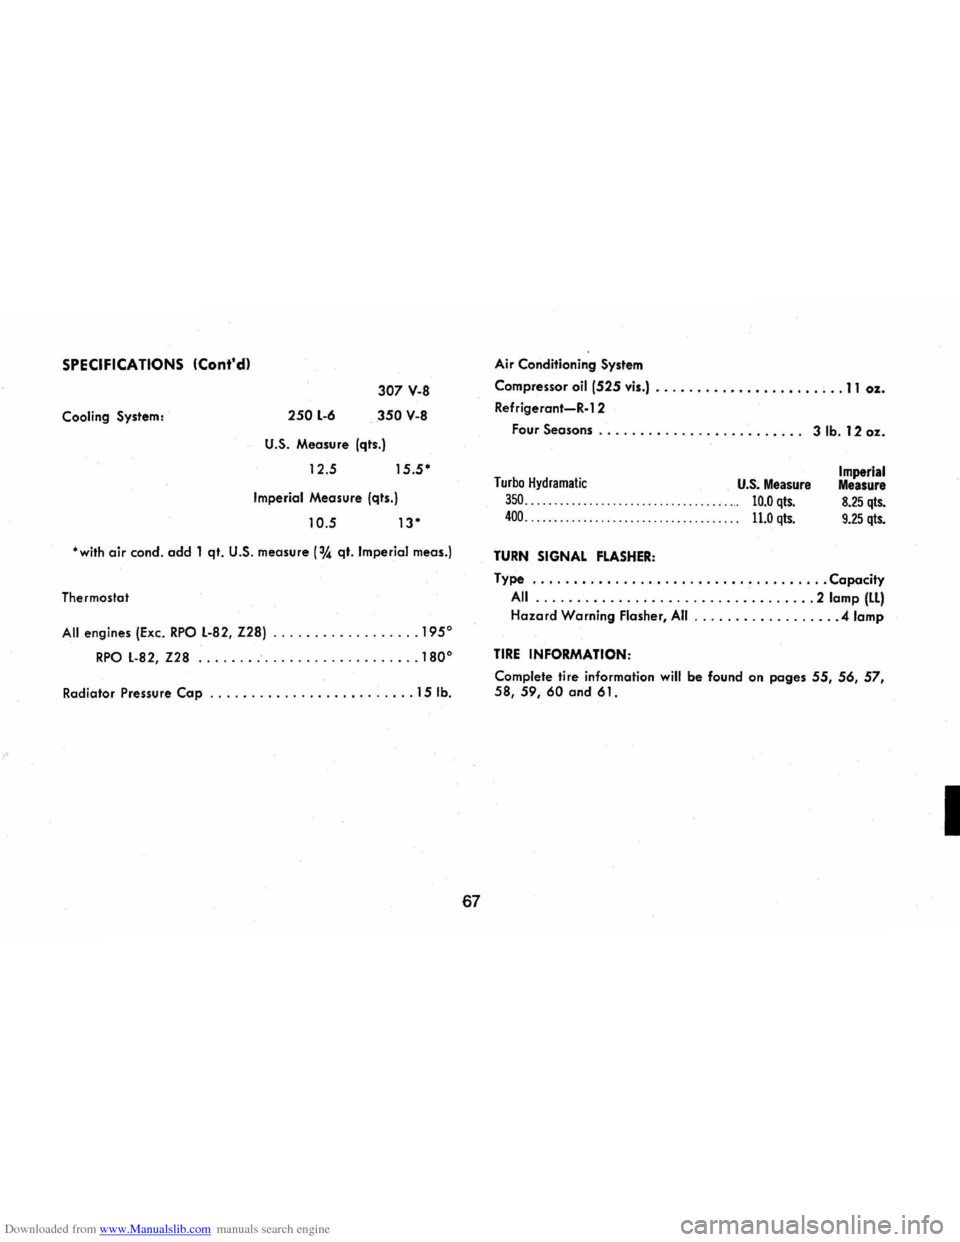
Cooling System: 250 L-6
307 V-8
350 V-8
U.S. Measure (qts.)
12.5
15.5·
Imperial Measure (qts.)
10.5 13·
·with air condo add 1 qt. U.S. measure (3,4 qt. Imperial meas.)
Thermostat
All engines (Exc. RPO L-82, Z28) .............. .... 1950
RPO L-82, Z28 ........................... 1800
Radiator Pressure Cap ......................... 15 lb.
67
Air Conditioning System
Compressor
oil (525 vis.) .................... , .. 11 oz.
Refrigerant-R-l 2
Four
Seasons . . . . . . . . . . . . . . . . . . . . . . . .. 3 lb. 12 oz.
Turbo Hydramatic U.S. Measure
350. . . . . . . . . . . . . . . . . . . . . . . . . . . . . . . . . . . ... 10.0 qts.
400. . . . . . . . . . . . . . . . . . . . . . . . . . . . . . . . . . . . . 11.0 qts.
TURN SIGNAL FLASHER:
Imperial Measure
8.25 qts.
9.25 qts.
Type .................................... Capacity
All .................................. 2 lamp (LL)
Hazard Warning Flasher, All ................. .4 lamp
TIRE INFORMATION:
Complete tire information will be found on pages 55, 56, 57, 58,59,60 and 61.
I
Page 78 of 84
Downloaded from www.Manualslib.com manuals search engine Dealer Assistance. . . . . . . . . . . . . . . . . . . . . 70
Defogger, Rear Window ............ ... 30 Defroster, Defogger, Windshield .... .... 29 Delco Eye On Battery . . . . . . . . . . . . . . . .. 61 Dimensions, Vehicle ................... 66 Dimmer Switch , Headlamp ............ 21 Directional Signals.. . . . . .. . . . . . . . . .. .. 17 Door Locks. . . . . . . . . . . . . . . . . . . . . . . . . . 4 Drive Belts, Engine. . . . . . . . . . . . . . . . . .. 48
Driver Seat Adjustment. . . . . . . . . . . . . . . . . . . .
5 "Drive" (D) Transmission Range. . . . . 15 Dusty Conditions, Operating Under Oil Change Interval. . . . . . . . . . . . . . . .. 46 Oil Filter Change Interval. . . . . . . . . . . . 46
Electric Clock.. .. .. . .. .. . .. .. .. . . .. .. 27 Electrical System Ammeter ................ .......... 26 Battery ......................... ... 61 Bulbs ..................... ........ 69 Fuses ................... .......... 69 Generator Indicator Light. . . . . . . . . .. 24 Emergency, In Case Of ...... , . ........ 36 Brake Warning Light ................ 24 Generator Indicator Not Charging. . .. 22 Hazard Warning Flasher ............. 36 Jacking To Change Wheels ........... 39 Jump Starting with Auxiliary Battery.. 37 Overheated Radiator. . . . . . . . . . . . . . .. 39 (Temperature Indicator: Hot) Pushing To Start. . . . . . . . . . . . . . . . . .. 37 Energizer (See Battery)
Engine Cooling
........................... 53
Exhaust Gas Caution .......... ...... 12 Flooded, Starting Procedure .......... 14
Overheating. . . . . . . . . . . . . . . . . . . . . . .. 39
Serial Number.... . . . . . . . . . . . . .. . ... 66
Specifications ....................... 66 Starting. . . . . . . . . . . . . . . . . . . . . . . . . .. 13 Temperature Light .................. 24
Engine Oil
Capacity. . . . . . . . . . . . . . . . . . . . . . . . .
.. 66
Change Interval ................... , 46 Dip Stick .......................... 47 Filter ................. , ........... , 46
Pressure Indicator ................. , 23 Recommendation . . . . . . . . . . . . . . . . . .. 46
Ethylene Glycol Coolant. ............. , 53 Exhaust Gas Caution ...... ............ 12
Driving With Trunk Open ........... 12 Parked With Engine Running. . . . . . .. 12 Pulling A Trailer ............... .. . , 10 Exterior Finish and Trim Care. . . . . . . .. 43
Fabric Care . ........ ................ , 41 Fan Belt .......... ..................... 48
Ventilating ......................... 27 Filters OiL ............................... 46
Finish Care, Exterior. . . . . . . . . . . . . . . .. 43
First Few Hundred Miles of Driving ........................ .... 2
First Gear. . . . . . . . . . . . . . . . . . . . . . . . . .. 17 Flame Arrestor. . . . . . . . . . . . . . . . . . . . . .. 48
Flammable Cleaning Solvents .......... 41 Flashers Hazard Warning .................... 36 Turn Signal. . . . .. .. .. .. .. .. .. .. .... 17 Flooded Engine, Starting. . . . . . . . . . . . .. 14 Floor Controls. . . . . . . . . . . . . . . . . . . . . .. 20
Fluid Levels
Battery
............... ............. 61 Brake Master Cylinder ............. , 51 Engine Oil. . . .. .. .. . . . . . . .. . . .. . . .. 48
75
Power Steering. . . . . . . . . . . . . . . . . . . .. 51 Radiator .................. , ........ 55 Rear Axle. . . . . . . . . . . . . . . . . . . . . . . .. 48
Transmission ................ . .. . , .. 49
Fluid Recommendations
Battery
.......................... .. 61 Brake ................... .......... 51 Power Steering . . . . . . . . . . . . . . . . . . . .. 51 Radiator ............ , ........... , .. 55
Transmission .......... ............. 49
Windshield Washer ...... ........... 27 Fogging, With Air Conditioner. . . . . . . .. 32
Folding Seat Back Latches ........... " 4
Foreign Countries, Operation In ........ 11 Four Way Hazard Flasher. . . . . . . . . . . .. 36 Front Suspension . . . . . . . . . . . . . . . . . . . .. 50 Front Wheel Bearings ................. 51 Fuel (See Gasoline) Full Rated Load (See Tires)
Fumes Engine Exhaust . . . . . . . . . . . . . . . . . . .
.. 12
Gasoline ........ ... ................ 12
Fuses
Chart ............................. 69 Location ........................... 68 Gas Station Information
Inside Back Cover Gasoline (See Also Fuel) Do Not Use For Cleaning ........... 41 Filler Cap Location ................ IBC
Fumes ...................... ....... 12
Gauge .......... ......... .......... 23 Low-Lead .......... ................ 45
Recommendations. . . . . . . . . . . . . . . . .. 45
Gauge, Fuel. . . . . . . . . . . . . . . . . . . . . . . . .. 23 GearshiftLever .................... '" 17 Generator Indicator Light ("AMP") .................... ...... 24