Page 65 of 88

Downloaded from www.Manualslib.com manuals search engine When driving on wet or slushy
roads, it
is possible for a wedge of
water to build up between the tire
and road surface. This phenome
non, known as hydroplaning, may
cause partial or complete loss of
traction, which adversely affects
vehicle control and stopping abil
ity.
To reduce the possibility of
traction loss, the following pre
cautions should be observed:
1. Slow down during rainstorms or
when roads are slushy.
ENGINE AND BODY
2. Slow down if road has standing
water or puddles.
3. Replace tires when tread wear
indicators are visible. (See
Safety Checks section.)
4. Keep tires properly inflated.
For temporary assistance when
traction
is lost on ice or snow, the
use of
AC Liquid Tire Chain is
recommended.
Optional Tires
Only those tires of the size shown
STANDARD
on the following table are recom
mended for use on your Camaro.
Use of any other size tire may seri
ously affect ride, handling, ground
clearance, tire clearance and speed
ometer calibration.
To achieve best
all around vehicle handling per
formance, belted-bias tires and
bias ply tires should not be mixed
on the same car. Because of possi
ble adverse effects
on vehicle han
dling, do not mix radial ply tires
with other type tires on the same
vehicle.
OPTIONAL
ALL (Except SS or Z28 Models) I "ss" Z28
E78 x 14 F70 x 14 White Letters F60 x 15 White Letters Stripe or White Letters
I
F70 x 14 White
All
Standard and Optional Tires are Load Range B.
Inflation Pressure
The tire inflation pressures listed
on the tire placard affixed to the
left front door of your vehicle have been
selected to provide you with
the best tire life and riding comfort
over the full range of normal driv
ing conditions.
62
The use of improper tire infla
tion pressures can affect tire life
and load carrying capacity. Infla
tion pressures should be checked at
Page 66 of 88
 to insure that the right
amount of air
is contained in the
tires. With regard to t")
Downloaded from www.Manualslib.com manuals search engine least once a month (and preferably
more often) to insure that the right
amount of air
is contained in the
tires. With regard to tire life, too
little air pressure allows abnormal
deflection of the tire causing exces
sive operating temperatures, while
too much air pressure prevents
normal deflection, making the cord
body more vulnerable to road im
pacts.
Use of optional inflations
is al
lowable only with a reduced load
(one to four passengers). When
operating at loads greater than the
optional reduced load, the inflation
pressure
must be increased to the
standard inflation for full rated
loads.
1. Tire inflation pressure may in
crease
as much as 6 pounds per
square inch (psi) when hot.
2.
For continuous high speed oper- ation
(over 75 mph) increase
tire inflation pressure 4 pounds
per square inch over the recom
mended pressures up to a maxi
mum of 32 pounds per square
inch cold for load range B tires. Sustained
speeds above 75 mph
are not recommended when the
4 pounds per square inch adjust
ment would require pressures
greater than the maximum
stated above.
TIRE PRESSURES (COOL) FRONT REAR STANDARD UP TO VEHICLE CAPACITY
REDUCED 1 TO 5 PASSENGERS (750 LBS.)
TIRE SIZES VEHICLE CAPACITY BENCH BUCKET
LOAD RANGE
63
OCCUPANTS
TRUNK LOAD
TOTAL
.&L~
Page 67 of 88

Downloaded from www.Manualslib.com manuals search engine 3. Cold tire inflation pressure:
after vehicle has been inopera
tive for 3 hours
or more, or
driven less than 1 mile. Hot tire
inflation pressure:
after vehicle
has been driven
10 miles or at
speeds of more than
60 miles
per hour.
4. Vehicles with luggage racks do
not have a vehicle load limit
greater than specified.
5. When towing trailers, the allow
able passenger and cargo load
must be reduced by
an amount
equal to the trailer tongue load
on the trailer hitch.
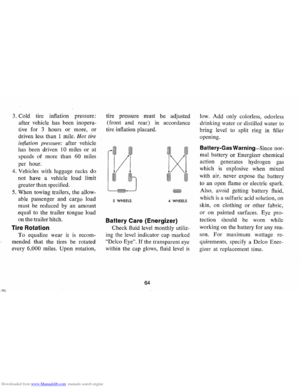
Tire Rotation
To equalize wear It IS recom
mended that the tires be rotated
every
6,000 miles. Upon rotation, tire
pressure must be adjusted
(front
and rear) in accordance
tire inflation placard.
1IIII1 1IIII1
/
IIIIII IIIIIJ
1IIII1 111111
IXl
1IIII1 111111
5 WHEELS 4 WHEELS
Battery Care (Energizer)
Check fluid level monthly utiliz
ing the level indicator cap marked
"Delco Eye". If the transparent eye
within the cap glows, fluid level
is
64
low. Add only colorless, odorless
drinking water
or distilled water to
bring level to split ring in filler
opening.
Battery-Gas Warning-Since nor
mal battery
or Energizer chemical
action generates hydrogen gas
which
is explosive when mixed
with air, never expose the battery
to an open flame
or electric spark.
Also, avoid getting battery fluid,
which
is a sulfuric acid solution, on
skin, on clothing
or other fabric,
or on painted surfaces. Eye pro
tection should be worn while
working on the battery for any rea
son.
For maximum wattage re
quirements, specify a Delco Ener
gizer at replacement time.
Page 68 of 88

Downloaded from www.Manualslib.com manuals search engine Operation in Foreign Countries
If you plan to operate your Camaro
outside the continental limits of
the United States or Canada, there
is a possibility
that the best fuels
available
are so low in anti-knock
quality
that excessive knocking and
serious engine damage may result
from their use.
To minimize this
possibility, write to Chevrolet
Motor Division, Service Depart
ment, Detroit, Michigan 48202,
giving:
• The compression ratio and cubic inch
displacement of the engine
(See page 74 or obtain from
your
Dealer.)
• The vehicle identification num
ber (on plate on instrument
panel
ahead of the steering
wheel
and visible through the
windshield ,
or from the regis
tration slip
or title) .
• The country or countries in
which you
plan to travel.
You will be furnished details of
65 adjustments
or modifi
cations which
should be
made to your engine at
your Chevrolet Dealership prior to
your departure.
Failure to make
the necessary changes to your car
and subsequent operation under
conditions of continuous
or exces
s ive knocking constitutes misuse of
the engine for which the Chevrolet
Division is
not responsible under
the terms of the Chevrolet New
Vehicle Warranty.
After arriving
in a foreign country, determine
and use the best fuels available.
Page 69 of 88

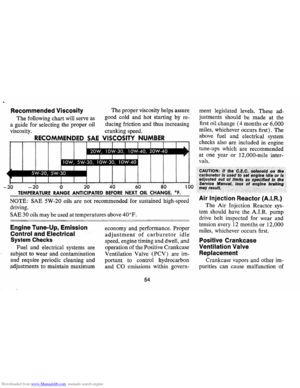
Downloaded from www.Manualslib.com manuals search engine MAINTENANCE SCHEDULE
This section contains a complete summary of the scheduled maintenance recommended for your vehicle.
Intarval
Every 6,000 mile. or 4 month., which· ever occur. flrat
Service To Be Performed
• Change engine oil (normal passenger car serv
ice"). Not to exceed 6,000 miles.
•
Lubricate front suspension and steering linkage.
• Check brake lines and hoses.
• Check all lubricant and fluid levels (power
steering pump, brake master cylinder, transmission, rear axle, radiator, battery).
• Check Power Steering lines and hoses.
• Hood latch lubrication.
• Check manifold
heat control valve.
•
Lubricate transmission floor shift linkage.
• Check
throttle and parking brake linkage and
body parts.
• Check emission control items at first oil
change (adjust engine idle speed, dwell, ignition timing) .
• Check exhaust system for proper mounting , leaks, and missing or damaged parts.
Interval
At first oil change
At first
oil change and
every second
oil change
thereafter
Every
6,000
mlle&
Service To Be Performed
• Check air conditioning system hose connections, refrigerant charge and for refrigerant
leaks.
• Tire and wheel condition inspection.
• Inspect accessory drive belts.
•
Lubricate parking brake pulley, cables and linkage.
Inspect crankcase ventilation filter (located in
air cleaner) and replace if necessary.
• Set idle speed , ignition timing, and dwell to
specifications.
• Change engine oil filter."
•
Rotate ti res • Lubricate parking brake pulley, cables and
linkage .
·Servlce more often during severe operating conditions as outlined under Service and Maintenance.
66
Page 70 of 88

Downloaded from www.Manualslib.com manuals search engine Interval
First 12,000 miles Every 12
months
or 12,000 miles
Every
24,000 miles
Service To Be Performed
• Rotate distributor cam lubricator. See 24,000 mile recommendation.
• Insp .ect air cleaner element, if satisfactory
rotate 1800 from original position and reinstall. See 24,000 mile recommendation.
• Inspect brake linings and check system for
leaks
• Inspect parking brake and throttle linkage. • Engine tune-up.
Replace carburetor 'Inlet fuel filter element. • Check emission control items. • Inspect AIR drive belt.
Evaporation Control System-Replace filter in
base of canister and inspect canister. • Check headlamp aiming.
• Repack front wheel bearings.
• Replace distributor cam lubricator. • Drain automatic transmission sump and add
fresh fluid (normal passenger car service).' Adjust Powerglide low band at first fluid
change.
• Replace crankcase ventilation filter (located
within air cleaner).
• Replace Turbo Hydra-Matic sump filter.
Interval Service To Be Performed
Every 2 years • Drain radiator coolant, flush and refill system.
Every
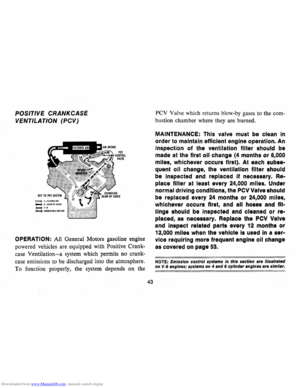
24 months· Replace PCV Valve. Inspect all hoses and or 24,(100 miles fittings.
Every
36,000 • Check steering gear for seal leakage (actual
miles solid grease-not just oily film).
• Lubricate clutch cross shaft (sooner if necessary), remove plug and install lube fittIng.
During Winter
• Check operation of air conditioning system.
months
Periodically • Check battery liquid leve/.
• Inspect seat belts, buckles, retractors and
anchors.
• Check all lights for proper operation.
As Required
• Check wheel alignment and balancing.
'Service more often during severe operating conditions as outlined under Service and Maintenance.
67
Page 71 of 88
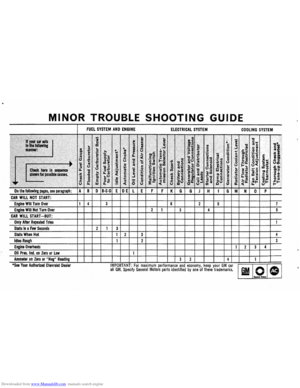
Downloaded from www.Manualslib.com manuals search engine MINOR TROUBLE SHOOTING GUIDE
IMPORTANT: For maximum performance and economy, keep your GM car I I I I aU GM. Specify General Motors parts identified by one of these trademarks. 1iM.Q. G
Page 72 of 88

Downloaded from www.Manualslib.com manuals search engine The chart on the previous page, and the information on the pages
which
follow, contains information designed to aid the average
driver to discover, and possibly correct, conditions resulting in minor
mechanical
difficulties in his car. The chart, designed to point out
possible solutions to several of the most common automotive mal
functions and point out a logical checking sequence, will lead step
by step to the most likely causes and corrective procedures. If, after
making the checks and adjustments suggested, the source of the
trouble has not been found and corrected, it is strongly recom
mended that an Authorized Chevrolet Dealer inspect the vehicle and
make whatever repairs
or adjustments are necessary.
FUEL SYSTEM AND ENGINE
If the ignition switch will cause the engine to "turn over" or
"crank" but the car will not start, check Steps A through D below.
NOTE:
If continual "Rooding" of the carburetor is evidenced by a
carbur.tor wet with
fuel or black exhaust smoke, perform the
operation suggested in paragraph D only.
(A) The first and most obvious,
and one of the most frequently overlooked, items to check when
you have difficulty in sta rting you r car is the amount . of fuel in the
tank. Make it a habit to check the FUEL GAUGE regularly and most especially at a time when the engine will "turn over" but will not
start.
(8)
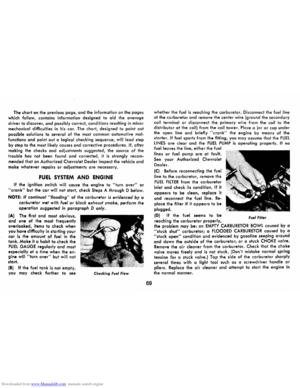
If the fuel tank is noi empty,
you may cheek further to see Checking Fllel Flow
69
whether the fuel is reaching the carburetor. Disconnect the fuel line at the carburetor and remove the center wire (ground the secondary coil terminal or disconnect the primary wire from the coil to the distributor at the coil) from the coil tower. Place a jar or cup under
the open line and briefly "cronk" the engine by means of the
starter. If fuel spurts from the fitting, you may assume that the FUEL LINES are clear and the FUEL PUMP is operating properly. If no fuel leaves the line, either the fuel
lines
or fuel pump are at fault.
See. your Authorized Chevrolet
Dealer.
(C) Before reconnecting the fuel
line
to the carburetor, remove the
FUEL FILTER from the carburetor
inlet and check its condition. If it
appears to be clean, replace it
and reconnect the fuel line. Re
place the filter if it appears to be
plugged.
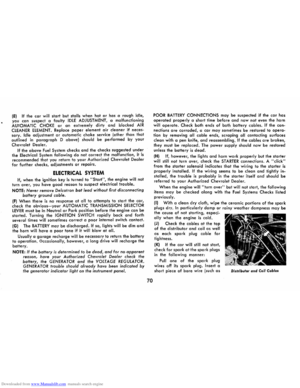
(D) If the fuel seems to be
reaching the
carburetor properly, File' Fllt.r
the problem may be: an EMPTY CARBURETOR BOWL caused by a "stuck shut" carburetor; a FLOODED CARBURETOR caused by a "stuck open" condition and evidenced by gasoline seeping around
and down the outside of the carburetor; or a stuck CHOKE valve. Remove the air cleaner from the carburetor. Check that the choke valve moves freely and is not stuck. (Don't mistake normal spring
tension for a stuck valve.) Tap the side of the carburetor sharply
several times with a light tool such as a screwdriver handle or pliers. Replace the air cleaner and attempt to start the engine in
the
normal manner.