2024 PEUGEOT 308 ECU
[x] Cancel search: ECUPage 17 of 280

15
Dashboard instruments
1► Pull the electric parking brake control and
hold it for approximately 7 to 15 seconds, until
the indicator lamp lights up on the instrument
panel.
If this procedure does not work, secure the
vehicle:
►
Park on a level surface.
►
With a manual gearbox, engage a gear
.
►
With an automatic gearbox or drive selector
,
select mode
P, then place the supplied chock
against one of the wheels.
Then carry out (2).
Automatic functions deactivated (electric
parking brake)
Fixed.
The "automatic application" (on switching
off the engine) and "automatic release" (on
acceleration) functions are deactivated.
If automatic application/release is no longer
possible:
►
Start the engine.
►
Use the control to apply the electric parking
brake.
►
T
ake your foot fully off the brake pedal.
►
Hold the control pressed in the release
direction for between 10 and 15
seconds.
►
Release the control.
►
Depress and hold the brake pedal.
►
Pull the control in the application direction for
2
seconds.
►
Release the control and the brake pedal.
Anti-lock braking system (ABS)Fixed.
The anti-lock braking system has a fault.
The vehicle retains conventional braking.
Drive carefully at moderate speed, then carry
out (3).
Power steeringFixed.
A minor fault in the power steering has
been detected.
Drive carefully at moderate speed, then carry
out (3).
Dynamic stability control (DSC)/Anti-slip
regulation (ASR)
Fixed.
The system is deactivated.
The DSC/ASR system is reactivated
automatically when the vehicle is restarted,
and at speeds above approximately 31 mph
(50
km/h).
At speeds below 31
mph (50 km/h), it can be
reactivated manually.
Flashing.
DSC/ASR system regulation is activated
in the event of a loss of grip or trajectory.
Fixed.
The DSC/ASR system has a fault.
Carry out (3).
Emergency brake malfunction (with
electric parking brake)
Fixed, accompanied by the
message "Parking brake fault".
Emergency braking does not deliver optimal
performance.
If automatic release is not available, use manual
release or carry out (3).
Hill start assistFixed, accompanied by the
message "Anti roll-back system
fault".
The system has a fault.
Carry out (3).
Post Collision Safety BrakeFixed, associated with the
Service warning lamp,
accompanied by the display of a message and
an audible signal.
The system has a fault.
Carry out (3) quickly.
Engine self-diagnostic system (Petrol,
Diesel, Hybrid or Rechargeable hybrid)
Flashing.
The engine management system has a
fault.
There is a risk that the catalytic converter will be
destroyed.
You must carry out (2).
Fixed.
The emissions control system has a fault.
Page 36 of 280

34
Access
Automatic folding/unfolding of the door mirrors is configured in the touch screen.
For more information on Mirrors, refer to the
corresponding section.
As a safety measure, never leave the vehicle, even for a short time, without
taking the Keyless Entry and Start system’s
electronic key with you.
Be aware of the risk of theft of the vehicle if
the key is present in one of the defined areas
while the vehicle is unlocked.
In order to preserve the battery in the
electronic key and the vehicle's battery:
–
The unlocking
on approach function
(zone
C) automatically switches to hibernation
mode after several days (approximately one
week) without being used. To unlock the
vehicle, use the remote control or press on
the driver’s door handle. The next time the
vehicle is started, the automatic unlocking
and locking functions will be reactivated.
–
If the welcome lighting is triggered
several times in succession without the
vehicle subsequently being started, it will be
deactivated.
–
All "hands-free" functions switch to
hibernation mode after 21 days without being
used.
To restore these functions, unlock the
vehicle using the remote control and start the
engine.
Electrical interference
The electronic key may not work if it is
close to an electronic device (e.g.
mobile
telephone (switched on or on standby), laptop
computer, strong magnetic fields). If this
occurs, move the electronic key away from
the electronic device.
Central locking
Manual
► Press these buttons to lock/unlock the vehicle
(doors and boot) from inside the passenger
compartment.
The indicator lamp comes on to confirm the
central locking of the vehicle.
Central locking does not take place if any
of the doors are open.
When locking/deadlocking from the
outside
When the vehicle is locked or deadlocked
from the outside, the indicator lamp in the
locking button
flashes and the buttons are
inactive.
►
After normal locking, pull one of the
interior door controls to unlock the vehicle.
►
After deadlocking, you must use the
remote control, the "Keyless Entry and
Start" system or the built-in key to unlock the
vehicle.
Automatic (anti-intrusion security)
The doors and boot lock automatically while
driving (speed above 6 mph (10
km/h)).
To deactivate/reactivate this function (activated
by default):
►
Press the locking button until a confirmation
message appears.
Transporting long or voluminous
objects
Press the central locking control to drive
with the boot open and the doors locked.
Otherwise, every time the speed of the
vehicle exceeds 6 mph (10 km/h), the sound
of the locks rebounding will be heard and an
alert will be displayed.
Page 40 of 280

38
Access
Never insert a finger in the locking
system of the motorised tailgate - risk of
serious injury!
To avoid the risk of injury through pinching or trapping, before and during
operation of the motorised tailgate:
–
ensure that there is no-one close to the
rear of the vehicle.
–
monitor the activity of the rear passengers,
particularly any children.
Bicycle carrier/Towing device
The motorised tailgate is not designed to support
a bicycle carrier.
When installing a bicycle carrier on the towing
device with connection of the cable to the trailer
socket, the motorised operation of the tailgate
will be automatically deactivated.
If using a towing device or bicycle carrier
not recommended by PEUGEOT, it is
essential to deactivate the motorised
operation of the tailgate.
Motorised operation
The motorised operation of the tailgate is configured in the Settings
> Vehicle
touch screen application.
There are several ways of operating the tailgate:
A. Using the Keyless Entry and Start system’s
electronic key
B. Using the exterior tailgate control
C. Using the interior tailgate control
D. Using the control on the dashboard
If motorised operation is not activated,
the request to open with this function
release the tailgate (partially-open position).
Opening
► A long press on the central button A of the
electronic key.
or
►
A
short press on the exterior tailgate control
B (with the electronic key on your person, if the
vehicle or the tailgate is locked).
or
►
T
wo consecutive presses on the control D of
the dashboard.
The tailgate opens, either completely by default, or to the position memorised
beforehand.
If motorised operation is not activated, these
actions release the tailgate (partially-open
position).
When the vehicle is locked, the request to
open the boot with one of the controls A
or B unlocks the vehicle, or only the boot if
selective unlocking is activated, prior to the
opening of the boot.
Closing
► A long press on the central button A of the
electronic key.
or
►
A
short press on the exterior tailgate control
B.
or
►
A
short press on the interior tailgate control C.
or
Page 41 of 280

39
Access
2► Two consecutive presses on the control D of
the dashboard.
It is possible to interrupt the operation of
the tailgate at any point.
Pressing one of these controls again
interrupts the movement that is underway.
Following the interruption of a movement,
pressing one of these controls again reverses
the movement.
If the tailgate is left open for an extended
period of time, the tailgate may need to
be closed manually to reset power tailgate
functionality.
Hands-free function (Hands-
Free Tailgate Access)
With the electronic key on your person, this
function allows the motorised tailgate to be
opened, closed or stopped via a "kicking"
movement under the rear bumper.
The "Handsfree Trunk Opening" function is configured in the Settings
> Vehicle
touch screen application.
Ensure that you are steady on your feet
before performing the "kicking"
movement.
Take care not to touch the exhaust system
which may be hot - risk of burns!
Rechargeable hybrid vehicles
The function is not available when the
vehicle is connected.
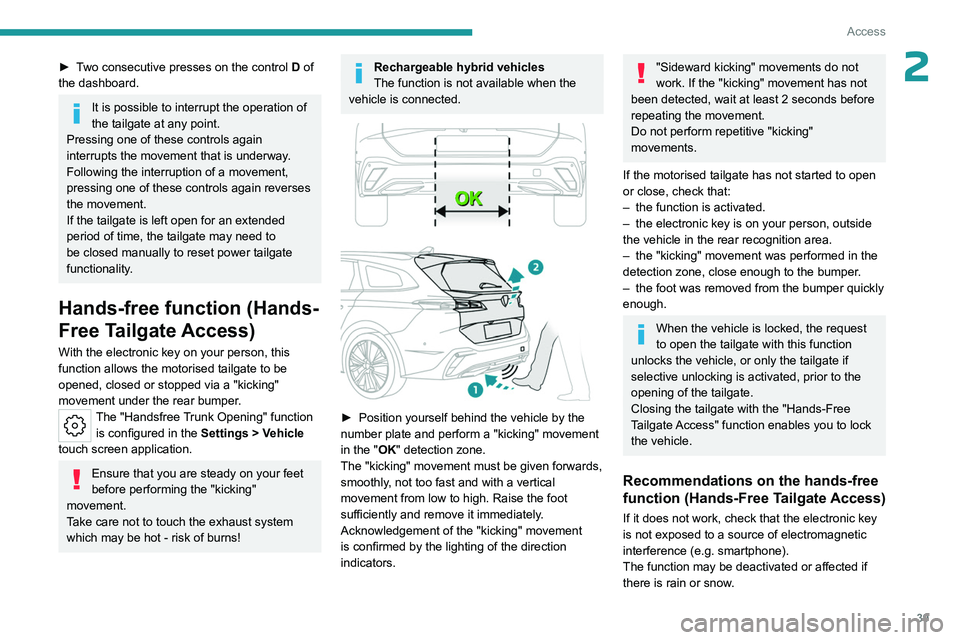
► Position yourself behind the vehicle by the
number plate and perform a "kicking" movement
in the "
OK" detection zone.
The "kicking" movement must be given forwards,
smoothly, not too fast and with a vertical
movement from low to high. Raise the foot
sufficiently and remove it immediately.
Acknowledgement of the "kicking" movement
is confirmed by the lighting of the direction
indicators.
"Sideward kicking" movements do not
work. If the "kicking" movement has not
been detected, wait at least 2 seconds before
repeating the movement.
Do not perform repetitive "kicking"
movements.
If the motorised tailgate has not started to open
or close, check that:
–
the function is activated.
–
the electronic key is on your person, outside
the vehicle in the rear recognition area.
–
the "kicking" movement was performed in the
detection zone, close enough to the bumper
.
–
the foot was removed from the bumper quickly
enough.
When the vehicle is locked, the request
to open the tailgate with this function
unlocks the vehicle, or only the tailgate if
selective unlocking is activated, prior to the
opening of the tailgate.
Closing the tailgate with the "Hands-Free
Tailgate Access" function enables you to lock
the vehicle.
Recommendations on the hands-free
function (Hands-Free Tailgate Access)
If it does not work, check that the electronic key
is not exposed to a source of electromagnetic
interference (e.g. smartphone).
The function may be deactivated or affected if
there is rain or snow.
Page 44 of 280

42
Access
The monitoring system is also deactivated when
the driver approaches the vehicle.
The monitoring system is deactivated: the
indicator lamp in the button goes off and the
direction indicators flash for about 2 seconds.
After unlocking using the remote
control
If the vehicle automatically locks itself again
(as happens if a door or the boot is not
opened within 30
seconds of unlocking), the
monitoring system is automatically activated.
Locking the vehicle
with exterior perimeter
monitoring only
Deactivate the interior volumetric and anti-tilt
monitoring to avoid the unwanted triggering of
the alarm, in certain cases such as:
–
Presence of an occupant or a pet.
–
Slightly open window
.
–
W
ashing the vehicle.
–
Changing a wheel.
–
T
owing the vehicle.
–
T
ransport on a ship or ferry.
Deactivating the interior volumetric
and anti-tilt monitoring
► Switch off the ignition and within 10 seconds
press the alarm button until its red indicator lamp
is on fixed.
►
Get out of the vehicle.
► Immediately lock the vehicle using the remote
control or the Keyless Entry and Start system.
Only the exterior perimeter monitoring is
activated; the button's red indicator lamp flashes
once every second.
To take effect, this deactivation must be carried out after each time the ignition is
switched off.
Reactivating the interior volumetric
and anti-tilt monitoring
► Deactivate the exterior perimeter monitoring
by unlocking the vehicle using the remote control
or the Keyless Entry and Start system.
The indicator lamp in the button goes off.
►
Reactivate all monitoring by locking the
vehicle using the remote control or the Keyless
Entry and Start system.
The red indicator lamp in the button once again
flashes every second.
Triggering of the alarm
This is indicated by sounding of the siren
and flashing of the direction indicators for 30
seconds.
Depending on the country of sale, certain
monitoring functions remain active until the alarm
has been triggered eleven times consecutively.
When the vehicle is unlocked using the remote
control or the Keyless Entry and Start system,
rapid flashing of the red indicator lamp in the button informs you that the alarm was triggered
during your absence. When the ignition is
switched on, this flashing stops.
Failure of the remote control
To deactivate the monitoring functions:
►
Unlock the vehicle using the key in the front
left-hand door lock.
►
Open the door; the alarm is triggered.
►
Switch on the ignition; this stops the alarm.
The indicator lamp in the button goes off.
Locking the vehicle without
activating the alarm
► Lock the vehicle using the key (built-in the
remote control) in the front left-hand door lock.
Automatic activation
(Depending on version)
The system is activated automatically 2 minutes
after the last door or the boot is closed.
►
T
o avoid triggering the alarm on entering the
vehicle, first press the unlocking button on the
remote control or unlock the vehicle using the
"Keyless Entry and Start" system.
Malfunction
When the ignition is switched on, the fixed
lighting of the red indicator lamp in the button
indicates a system malfunction.
Have it checked by a PEUGEOT dealer or a
qualified workshop.
Page 49 of 280

47
Ease of use and comfort
3When driving
Maintain a good driving position and hold the
steering wheel with both hands at the 'quarter to
three' position, so that you can easily and quickly
reach the controls behind and near the steering
wheel.
Never adjust the seats or steering wheel
when driving.
Always keep your feet on the floor.
Front seats
Before moving the seat backwards,
ensure that there is no person or object
that might prevent the full travel of the seat.
There is a risk of trapping or pinching
passengers if present in the rear seats or of
jamming the seat if large objects are placed
on the floor behind the seat.
Front head restraints
Adjusting the height
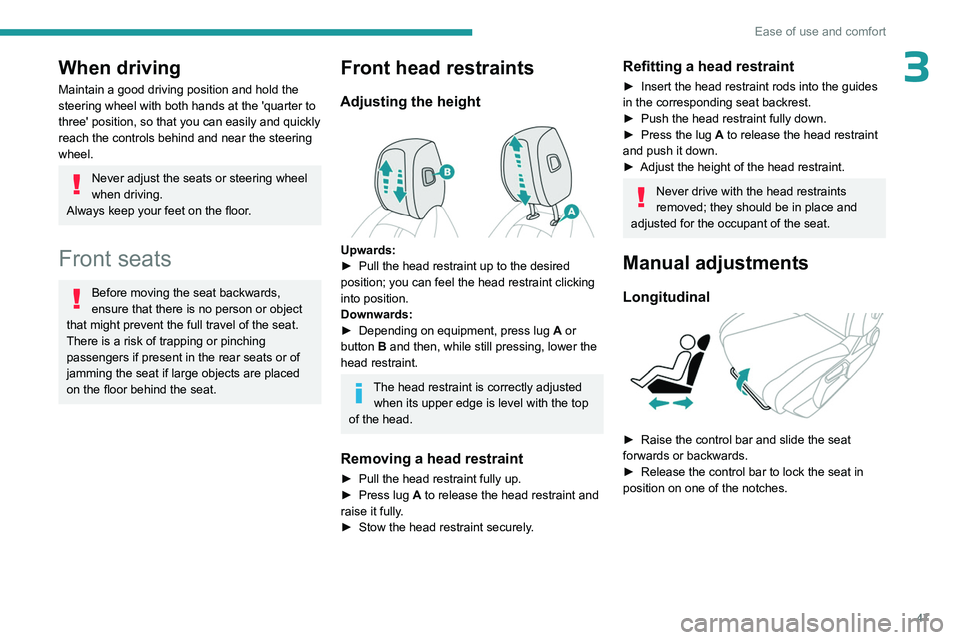
Upwards:
► Pull the head restraint up to the desired
position; you can feel the head restraint clicking
into position.
Downwards:
►
Depending on equipment, press lug A
or
button B and then, while still pressing, lower the
head restraint.
The head restraint is correctly adjusted when its upper edge is level with the top
of the head.
Removing a head restraint
► Pull the head restraint fully up.
► Press lug A to release the head restraint and
raise it fully.
►
Stow the head restraint securely
.
Refitting a head restraint
► Insert the head restraint rods into the guides
in the corresponding seat backrest.
►
Push the head restraint fully down.
►
Press the lug
A to release the head restraint
and push it down.
►
Adjust the height of the head restraint.
Never drive with the head restraints
removed; they should be in place and
adjusted for the occupant of the seat.
Manual adjustments
Longitudinal
► Raise the control bar and slide the seat
forwards or backwards.
►
Release the control bar to lock the seat in
position on one of the notches.
Page 62 of 280

60
Ease of use and comfort
(approx. 21°C) before you enter the vehicle, on
the days and at the times of your choice.
This function is available when the vehicle is
connected or not connected.
Programming
In the Climate touch screen application,
select the Preconditioning tab.
►
Press
+ to add a programme.
►
Select the time of entry into the vehicle and
the desired days. Press
OK.
►
Press
ON to activate this programming.
The pre-conditioning sequence begins
approximately 45
minutes before the
programmed time when the vehicle is connected
(20
minutes when it is not connected) and is
maintained for 10
minutes after.
For rechargeable hybrid vehicles, this indicator
lamp comes on fixed when a temperature pre-
conditioning cycle is programmed. It flashes
when temperature pre-conditioning is in
progress.
You can set multiple programmes. Each one is saved in the system.
To optimise the driving range, we recommend
starting a programme while the vehicle is
connected.
The programming can also be carried out from a smartphone via the MYPEUGEOT
APP application.
For more information on Remotely operable
additional functions , refer to the corresponding
section.
The fan noise that occurs during temperature pre-conditioning is perfectly
normal.
Vehicles equipped with an alarm
system
Depending on version, interior volumetric
and anti-tilt monitoring may be reduced or
even suspended during temperature pre-
conditioning sequences.
Operating conditions
– The function is only activated when the
ignition is switched off and the
vehicle
locked.
–
When the vehicle is not connected, the
function is only activated if the battery charge
level is greater than 20% (Rechargeable hybrid)
or 30% (Electric).
–
When the vehicle is not connected and a
recurring programme is active (e.g. from Monday
to Friday), if two temperature pre-conditioning sequences are run without the vehicle being
used, the programme will be deactivated.
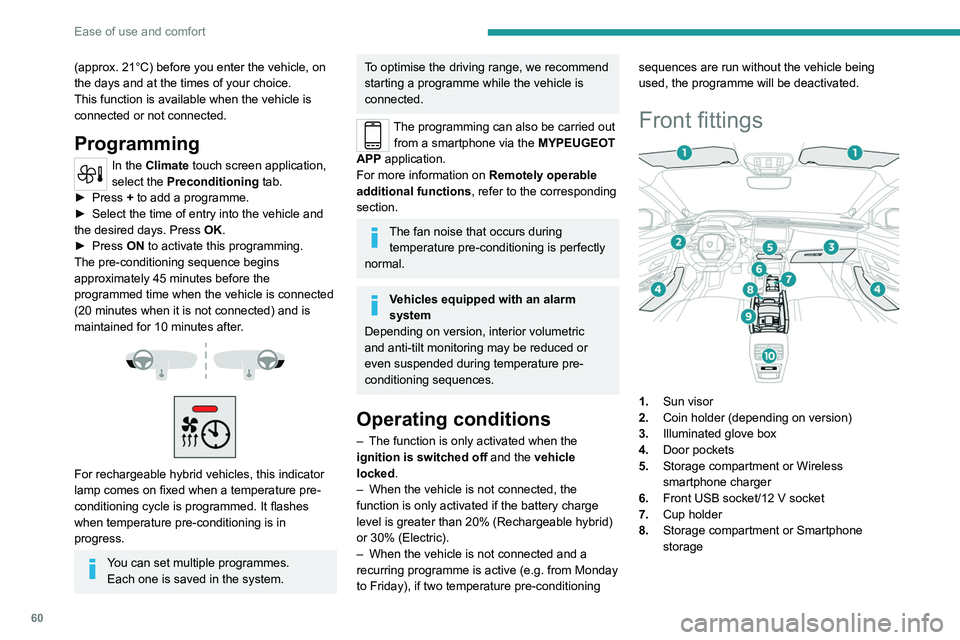
Front fittings
1.
Sun visor
2. Coin holder (depending on version)
3. Illuminated glove box
4. Door pockets
5. Storage compartment or Wireless
smartphone charger
6. Front USB socket/12 V socket
7. Cup holder
8. Storage compartment or Smartphone
storage
Page 65 of 280

63
Ease of use and comfort
3Front armrest
It includes a storage space and is illuminated
when the cover is opened (depending on
version).
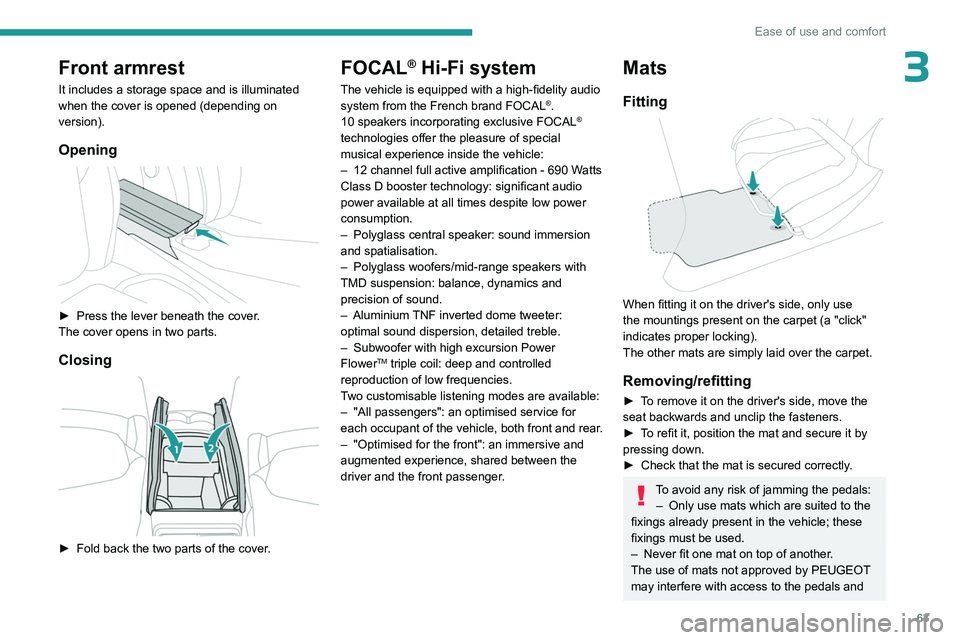
Opening
► Press the lever beneath the cover.
The cover opens in two parts.
Closing
► Fold back the two parts of the cover .
FOCAL® Hi-Fi system
The vehicle is equipped with a high-fidelity audio
system from the French brand FOCAL®.
10 speakers incorporating exclusive FOCAL®
technologies offer the pleasure of special
musical experience inside the vehicle:
–
12 channel full active amplification - 690 W
atts
Class D booster technology: significant audio
power available at all times despite low power
consumption.
–
Polyglass central speaker: sound immersion
and spatialisation.
–
Polyglass woofers/mid-range speakers with
TMD suspension: balance, dynamics and
precision of sound.
–
Aluminium
TNF inverted dome tweeter:
optimal sound dispersion, detailed treble.
–
Subwoofer with high excursion Power
FlowerTM triple coil: deep and controlled
reproduction of low frequencies.
Two customisable listening modes are available:
–
"All passengers": an optimised service for
each occupant of the vehicle, both front and rear
.
–
"Optimised for the front": an immersive and
augmented experience, shared between the
driver and the front passenger
.
Mats
Fitting
When fitting it on the driver's side, only use
the mountings present on the carpet (a "click"
indicates proper locking).
The other mats are simply laid over the carpet.
Removing/refitting
► To remove it on the driver's side, move the
seat backwards and unclip the fasteners.
►
T
o refit it, position the mat and secure it by
pressing down.
►
Check that the mat is secured correctly
.
To avoid any risk of jamming the pedals:– Only use mats which are suited to the
fixings already present in the vehicle; these
fixings must be used.
–
Never fit one mat on top of another
.
The use of mats not approved by PEUGEOT
may interfere with access to the pedals and