2024 PEUGEOT 308 window
[x] Cancel search: windowPage 61 of 280

59
Ease of use and comfort
3This function is activated automatically when the front screenwash is used or
reverse gear is engaged.
Front demisting/defrosting
This mode allows the windscreen and side windows to be demisted or defrosted as quickly
as possible.
► Press this button to activate/deactivate
the mode (confirmed by the illumination/
extinction of the
indicator lamp).
The mode automatically manages the air
conditioning, air flow, air intake and distributes
ventilation optimally to the windscreen and side
windows.
The air flow can be changed manually without
deactivating this mode.
With Stop & Start, when demisting has
been activated, STOP mode is not
available.
In wintry conditions, before moving off, it
is essential to remove any snow or ice
from the windscreen around the camera.
Otherwise, the operation of the equipment
using the camera may be affected.
Rear screen demisting/
defrosting
This demisting/de-icing only works with the engine running.
Depending on version, it also demists/de-ices
the door mirrors.
► Press this button to activate/deactivate
the function (confirmed by the indicator
lamp coming on/switching off).
The function can be activated whatever the outside temperature may be.
The period of operation depends on the outside
temperature.
Demisting/defrosting therefore switches
off automatically to prevent an excessive
consumption of electrical current.
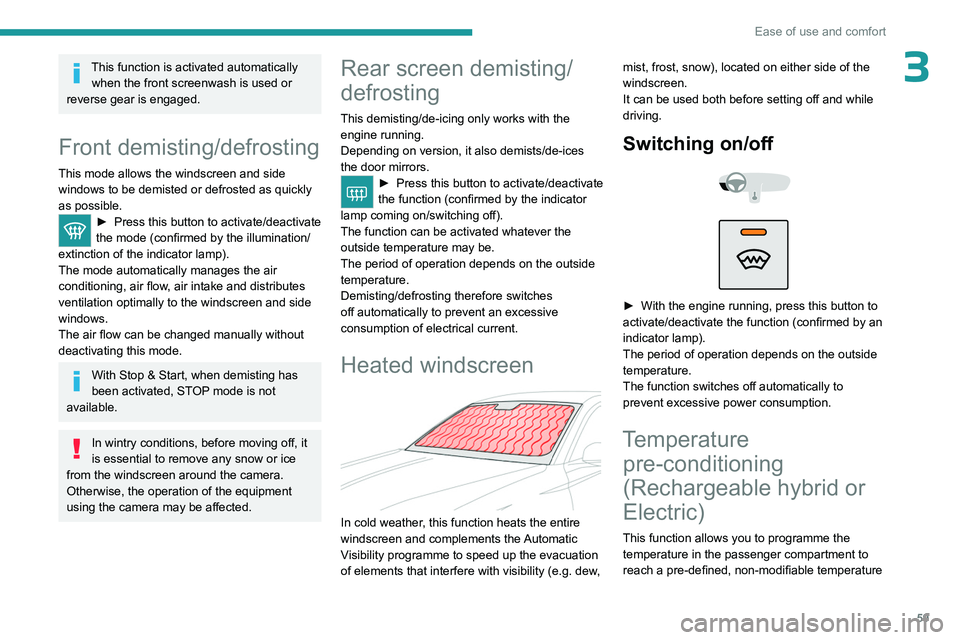
Heated windscreen
In cold weather, this function heats the entire
windscreen and complements the Automatic
Visibility programme to speed up the evacuation
of elements that interfere with visibility (e.g.
dew, mist, frost, snow), located on either side of the
windscreen.
It can be used both before setting off and while
driving.
Switching on/
off
► With the engine running, press this button to
activate/deactivate the function (confirmed by an
indicator lamp).
The period of operation depends on the outside
temperature.
The function switches off automatically to
prevent excessive power consumption.
Temperature pre-conditioning
(Rechargeable hybrid or
Electric)
This function allows you to programme the
temperature in the passenger compartment to
reach a pre-defined, non-modifiable temperature
Page 91 of 280

89
Safety
5Front airbags
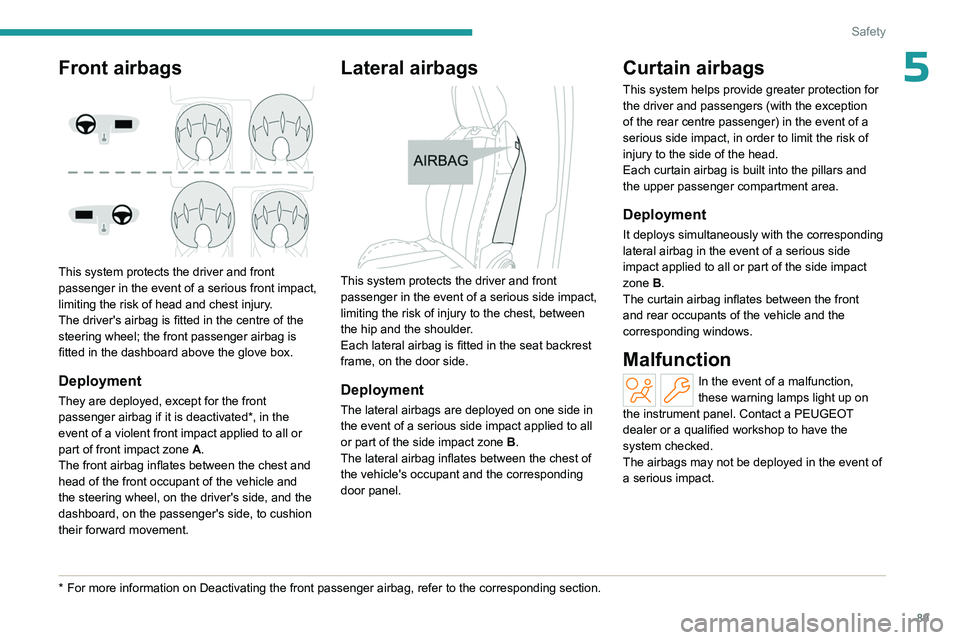
This system protects the driver and front
passenger in the event of a serious front impact,
limiting the risk of head and chest injury.
The driver's airbag is fitted in the centre of the
steering wheel; the front passenger airbag is
fitted in the dashboard above the glove box.
Deployment
They are deployed, except for the front
passenger airbag if it is deactivated*, in the
event of a violent front impact applied to all or
part of front impact zone A.
The front airbag inflates between the chest and
head of the front occupant of the vehicle and
the steering wheel, on the driver's side, and the
dashboard, on the passenger's side, to cushion
their forward movement.
* For more information on Deactivating the front passenger airbag, refer t\
o the corresponding section.
Lateral airbags
This system protects the driver and front
passenger in the event of a serious side impact,
limiting the risk of injury to the chest, between
the hip and the shoulder.
Each lateral airbag is fitted in the seat backrest
frame, on the door side.
Deployment
The lateral airbags are deployed on one side in
the event of a serious side impact applied to all
or part of the side impact zone B.
The lateral airbag inflates between the chest of
the vehicle's occupant and the corresponding
door panel.
Curtain airbags
This system helps provide greater protection for
the driver and passengers (with the exception
of the rear centre passenger) in the event of a
serious side impact, in order to limit the risk of
injury to the side of the head.
Each curtain airbag is built into the pillars and
the upper passenger compartment area.
Deployment
It deploys simultaneously with the corresponding
lateral airbag in the event of a serious side
impact applied to all or part of the side impact
zone B.
The curtain airbag inflates between the front
and rear occupants of the vehicle and the
corresponding windows.
Malfunction
In the event of a malfunction,
these warning lamps light up on
the instrument panel. Contact a PEUGEOT
dealer or a qualified workshop to have the
system checked.
The airbags may not be deployed in the event of
a serious impact.
Page 93 of 280

91
Safety
5It is recommended that children travel
on the rear seats of the vehicle:
–
"rearward facing" up to the age of 3.
–
"forward facing" over the age of 3.
Make sure that the seat belt is correctly
positioned and tightened.
For child seats with a support leg, ensure that
the support leg is in firm and steady contact
with the floor.
An incorrectly installed child seat in a vehicle compromises the child's safety in
the event of an accident.
Ensure that there is no seat belt or seat belt
buckle under the child seat, as this could
destabilise it.
Remember to fasten the seat belts or the
child seat harness keeping the slack relative
to the child's body to a minimum, even for
short journeys.
When installing a child seat using the seat
belt, ensure that the seat belt is tightened
correctly on the child seat and that it secures
the child seat firmly on the vehicle seat. If
the passenger seat is adjustable, move it
forwards if necessary.
Remove the head restraint before
installing a child seat with a backrest on a
passenger seat.
Ensure that the head restraint is stored or
attached securely to prevent it from being
thrown around the vehicle in the event of
sharp braking. Refit the head restraint once
the child seat has been removed.
Installing a booster seat
The chest part of the seat belt must be
positioned on the child's shoulder without
touching the neck.
Ensure that the lap part of the seat belt
passes correctly over the child's thighs.
Use a booster seat with a backrest, equipped
with a belt guide at shoulder level.
Additional protections
To prevent accidental opening of the
doors and rear windows, use the "Child lock".
Take care not to open the rear windows by
more than one third.
To protect young children from the sun's rays,
fit side blinds on the rear windows.
As a safety measure, do not leave:
–
A
child alone and unsupervised inside a
vehicle.
–
A
child or an animal in a vehicle which is
exposed to the sun, with the windows closed.
–
The keys within reach of children inside the
vehicle.
Child seat at the rear
Forward-facing or rearward-facing
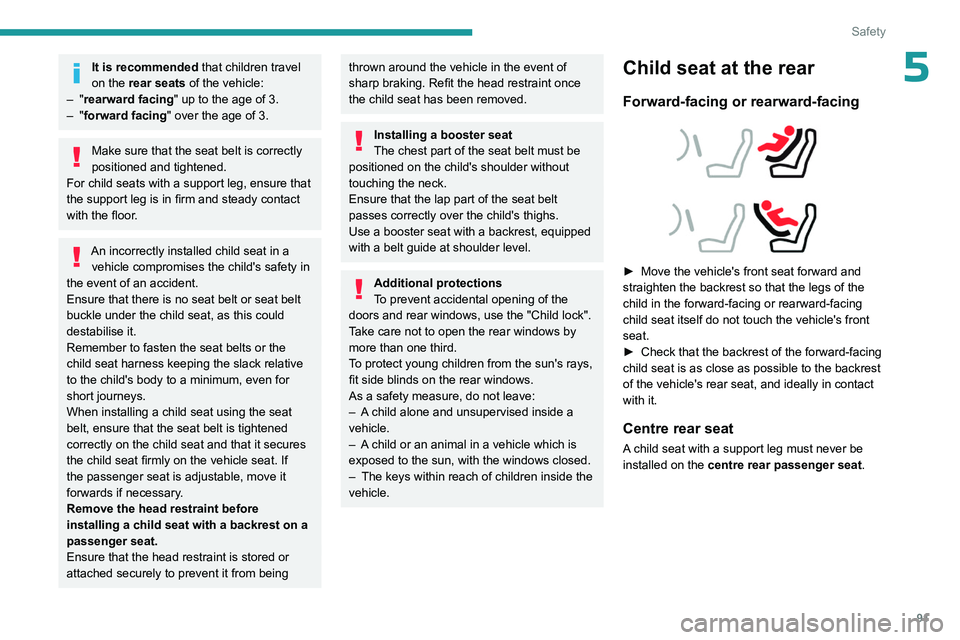
► Move the vehicle's front seat forward and
straighten the backrest so that the legs of the
child in the forward-facing or rearward-facing
child seat itself do not touch the vehicle's front
seat.
►
Check that the backrest of the forward-facing
child seat is as close as possible to the backrest
of the vehicle's rear seat, and ideally in contact
with it.
Centre rear seat
A child seat with a support leg must never be
installed on the centre rear passenger seat .
Page 154 of 280

152
Driving
detection signal is given directly instead of the
audible confirmation signal.
If no audible signal is given, the display
indication is not shown or a warning message
appears, the system has a failure.
Audible assistance
The system signals the presence of obstacles
which are both within the sensors’ detection zone
and in the vehicle path defined by the direction of
the steering wheel.
Depending on version, in the example shown,
only the obstacles present in the shaded area
will be signalled by the audible assistance.
The proximity information is given by an
intermittent audible signal, the frequency of
which increases as the vehicle approaches the
obstacle.
When the distance between the vehicle and
the obstacle becomes less than about thirty
centimetres, the audible signal becomes
continuous.
The sound emitted by the speaker (right or
left) indicates the side on which the obstacle is
located.
The audible signal is automatically suspended
when the vehicle is stationary for a few seconds.
The audible signal is automatically restored
when the vehicle is moving again or if the
obstacle approaches the vehicle.
Adjusting the audible detection signalPressing this button opens the
window for adjusting the volume
of the audible signal.
Pressing this button mutes/unmutes
the audible signal.
Visual assistance
This supplements the audible signal, without
taking account of the vehicle's trajectory, by
displaying bars on the screen whose location
represents the distance between the obstacle
and the vehicle (white: more distant, orange:
close, red: very close).
When the obstacle is very close, the " Danger"
symbol is displayed on the screen.
Closing the system display windowPressing this button closes the
system display window.
This warning lamp flashes during obstacle detection on the instrument panel.
Muting the audible assistance /
Closing the visual assistance
If the audible detection signal is muted or
the system display window is closed by the
driver during the obstacle detection, only
the warning lamp continues to flash on the
instrument panel.
Front parking sensors
Supplementing the rear parking sensors, the
front parking sensors are triggered when an
obstacle is detected in front and the speed of the
vehicle is below 6 mph (10
km/h).
Front parking sensor operation is suspended if
the vehicle stops for more than three seconds in
forward gear, if an obstacle is no longer detected
or the vehicle speed exceeds 6
mph (10 km/h).
The sound emitted by the speaker (front or rear) locates the obstacle relative to
the vehicle, whether in front of or behind it on
its path.
Page 156 of 280

154
Driving
The screen is divided into 3 parts with a side
menu, a contextual view and a view from above
the vehicle in its close surroundings.
The parking sensors supplement the information
in the view from above the vehicle.
Different contextual views are available:
–
Automatic zoom view
.
–
Standard view
.
–
Panoramic view
.
Depending on the context, the system chooses
the best view to display (standard or automatic
zoom).
The view type can be changed at any time
during the manoeuvre.
The system status is not saved when the ignition
is switched off.
Operating principle
Using the camera, the vehicle's close
surroundings are recorded during low speed
manoeuvres.
An image from above the vehicle in its close
surroundings is created in real time (on the side
of the screen), as the vehicle progresses.
This view makes it easier to align the vehicle
when parking and to perceive nearby obstacles.
It is automatically deleted if the vehicle remains
stationary for too long.
An additional jet is fitted above the number plate to clean the reversing
camera (depending on version).
Settings
In the side menu:This window allows to adjust the volume of the audible signal.
This button allows to mute/unmute the audible signal.
This button allows to trig the camera washing (depending on equipment).
Activation/Deactivation
To activate the camera, engage reverse gear.
The system is deactivated:
–
when changing out of reverse gear
.
–
by pressing the cross in the top left-hand
corner of the touch screen.
Automatic zoom view
The rear camera records the vehicle's
surroundings during the manoeuvre in order to
create a view from above the rear of the vehicle
in its close surroundings, allowing the vehicle to
be manoeuvred around nearby obstacles.
Using the sensors located on the rear bumper,
the automatic zoom view is displayed when
approaching an obstacle at the red line (less
than 30 cm) during the manoeuvre.
This view is only available automatically.
Page 158 of 280

156
Driving
Operating principle
Reconstructed view
The cameras are activated and a reconstruction
of a view from above your vehicle in its close
surroundings is displayed on the touch screen.
Live view
The front, rear and side views automatically
appear in the view from above the vehicle.
It is also possible to display any live view by
selecting the corresponding zone.
The front view can be selected in forward gear
up to 10 mph (16 km/h).
Installing the very cold climate screen
can alter the image transmitted by the
front camera.
An additional jet is fitted above the number plate to clean the reversing
camera (depending on version).
Settings
In the side menu:
This window allows to adjust the volume of the audible signal.
This button allows to mute/unmute the audible signal.
This button allows to trig the camera washing (depending on equipment).
Activation/Deactivation
Automatic
With the rear camera, engine running and
vehicle stationary, rear vision is displayed
automatically if reverse gear is engaged.
With the front camera, engine running and speed
below 10 mph (16 km/h), rear vision is displayed
automatically if a gear is engaged.
Manual
► In the ADAS touch screen application,
select Functions>Panoramic Camera
The system is deactivated:
–
automatically for the rear
, when changing out
of reverse gear.
–
automatically for the front, above
approximately 10 mph (16 km/h).
–
by pressing the cross in the top left-hand
corner of the touch screen.
Automatic zoom view
The front or rear camera records the
surroundings during the manoeuvre to create
a front or rear view from above the vehicle in
its close surroundings, making it possible to
manoeuvre the vehicle around the surrounding
obstacles.
Using the sensors located on the front or rear
bumper, the automatic zoom view is displayed
when approaching an obstacle at the red line
(less than 30 cm) during the manoeuvre.
This view is only available automatically.
Depending on version, it can be activated/
deactivated in the ADAS application of the touch
screen.
Obstacles may appear further away than
they actually are.
It is important to monitor the sides of the
vehicle during the manoeuvre, using the
mirrors.
Parking sensors also provide additional
information about the area around the vehicle.
Page 214 of 280

212
In the event of a breakdown
► Lift the plastic cover on the (+) terminal, if the
vehicle has one.
►
Connect the cables of charger
B
as follows:
•
the positive (+) red cable to the (+) terminal
of battery
A.
•
the negative (-) black cable to earth point
C
on the vehicle.
►
At the end of the charging operation, switch
off charger
B
before disconnecting the cables
from battery
A.
If this label is present, use only a 12 V
charger to avoid causing irreversible
damage to the electrical components.
24V
12V
Disconnecting/reconnecting the
battery
In order to maintain an adequate state of
charge for starting the engine, we recommend
disconnecting the battery if the vehicle is to be
unused for an extended period.
Before disconnecting the battery:
►
Close all openings (doors, boot, windows,
roof).
►
Switch off all electricity-consuming devices
(audio system, wipers, lamps, etc.). ►
Switch off the ignition and wait for 4
minutes.
After accessing the battery, it is only necessary
to disconnect the (+) terminal.
Quick-release terminal clamp
Disconnecting the (+) terminal
► Depending on equipment, lift the plastic cover
on the (+) terminal.
►
Raise lever
A
fully to release clamp
B
.
►
Remove clamp
B
by lifting it off.
Reconnecting the (+) terminal
► Raise lever A fully.
► Refit open clamp B on the (+) terminal.
►
Push clamp
B fully down.
►
Lower lever
A
to lock clamp B.
►
Depending on equipment, lower the plastic
cover on the
(+) terminal.
Do not force the lever when pressing on
it, as if the clamp is not positioned
correctly, locking will then not be possible.
Start the procedure again.
The Stop & Start system may not be operational during the trip following the
first engine start.
In this case, the system will only be available
again after a continuous period with the
vehicle immobilised, the duration of which
depends on the exterior temperature and the
Page 219 of 280

217
In the event of a breakdown
8
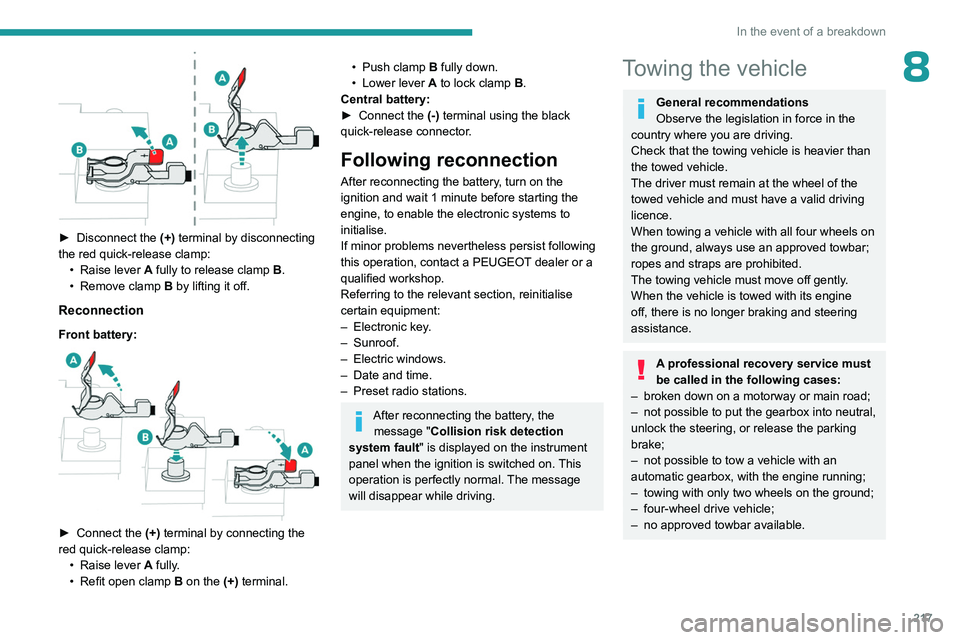
► Disconnect the (+) terminal by disconnecting
the red quick-release clamp: •
Raise lever
A
fully to release clamp
B
.
•
Remove clamp
B
by lifting it off.
Reconnection
Front battery:
► Connect the (+) terminal by connecting the
red quick-release clamp: •
Raise lever
A
fully.
•
Refit open clamp
B
on the (+) terminal.
• Push clamp B fully down.
• Lower lever A to lock clamp B.
Central battery:
►
Connect the
(-) terminal using the black
quick-release connector.
Following reconnection
After reconnecting the battery, turn on the
ignition and wait 1 minute before starting the
engine, to enable the electronic systems to
initialise.
If minor problems nevertheless persist following
this operation, contact a PEUGEOT dealer or a
qualified workshop.
Referring to the relevant section, reinitialise
certain equipment:
–
Electronic key
.
–
Sunroof.
–
Electric windows.
–
Date and time.
–
Preset radio stations.
After reconnecting the battery, the message "Collision risk detection
system fault" is displayed on the instrument
panel when the ignition is switched on. This
operation is perfectly normal. The message
will disappear while driving.
Towing the vehicle
General recommendations
Observe the legislation in force in the
country where you are driving.
Check that the towing vehicle is heavier than
the towed vehicle.
The driver must remain at the wheel of the
towed vehicle and must have a valid driving
licence.
When towing a vehicle with all four wheels on
the ground, always use an approved towbar;
ropes and straps are prohibited.
The towing vehicle must move off gently.
When the vehicle is towed with its engine
off, there is no longer braking and steering
assistance.
A professional recovery service must
be called in the following cases:
–
broken down on a motorway or main road;
–
not possible to put the gearbox into neutral,
unlock the steering, or release the parking
brake;
–
not possible to tow a vehicle with an
automatic gearbox, with the engine running;
–
towing with only two wheels on the ground;
–
four-wheel drive vehicle;
–
no approved towbar available.