2024 PEUGEOT 308 oil
[x] Cancel search: oilPage 162 of 280
160
Practical information
Compatibility of fuels
Petrol fuels conforming to the EN228 standard
containing up to 5% and 10% ethanol
respectively.
Diesel fuels conforming to the EN590, EN16734
and EN16709 standards and containing up to
7%, 10%, 20% and 30% fatty acid methyl ester
respectively. The use of B20 or B30 fuels, even
occasionally, imposes special maintenance
conditions referred to as "Arduous conditions".
Paraffinic Diesel fuel conforming to the EN15940
standard.
The use of any other type of (bio) fuel (e.g. pure or diluted vegetable or animal
oils, domestic fuel) is strictly prohibited - risk
of damaging the engine and fuel system!
The only fuel additives authorised for use are those that meet the B715001 (Petrol)
or B715000 (Diesel) standards.
Diesel at low temperature
At temperatures below 0 °C (+32 °F), the
formation of paraffins in summer-type Diesel fuels could prevent the engine from operating
correctly
. In these temperature conditions, use
winter-type Diesel fuel and keep the fuel tank
more than 50 % full.
At temperatures below -15 °C (+5 °F) to avoid
problems starting, it is best to park the vehicle
under shelter (heated garage).
Travelling abroad
Certain fuels could damage your vehicle’s
engine.
In certain countries, the use of a particular
fuel may be required (specific octane rating,
specific trade name, etc.) to ensure correct
operation of the engine.
For all additional information, consult a dealer.
Refuelling
Fuel tank capacity: approximately 52
litres (Petrol, Diesel or Hybrid) or 40 litres
(Rechargeable hybrid).
Reserve level: approximately 6 litres.
Low fuel level
When the low fuel level is reached, this
warning lamp lights up on the instrument
panel, accompanied by the display of a message
and an audible signal. When it first comes on,
about 6 litres of fuel remain.
Until sufficient fuel is added, this warning lamp
appears every time the ignition is switched on,
accompanied by the message and the audible
signal. When driving, this message and audible
signal are repeated with increasing frequency as
the fuel level drops towards 0.
You must refuel as soon as possible to avoid
running out of fuel.
For more information on Running out of fuel
(Diesel), refer to the corresponding section.
A small arrow by the warning lamp indicates which side of the vehicle the
fuel filler flap is located on.
Stop & Start / e-Auto mode
Never refuel with the engine in STOP
mode or in stand-by; you must switch off the
ignition.
Refuelling
Any addition of fuel must be in quantities of at
least 10 litres, in order to be registered by the
fuel gauge.
Opening the filler flap may create a noise caused
by an inrush of air. This vacuum is entirely
normal, resulting from the sealing of the fuel
system.
To refuel in complete safety:
►
Always switch off the engine.
Page 191 of 280

189
Practical information
7Closing
► Lower the bonnet and release it near the end
of its travel.
►
Check the locking.
Because of the presence of electrical
equipment under the bonnet, it is strongly
recommended that exposure to water (rain,
washing, etc.) be limited.
Engine compartment
The engine shown here is an example for
illustrative purposes only.
The locations of the following components may
vary:
–
Air filter
.
–
Engine oil dipstick.
–
Engine oil filler cap.
Petrol engine
Diesel engine
1. Screenwash fluid reservoir
2. Engine coolant reservoir
3. Brake fluid reservoir
4. Battery/Fuses
5. Remote earth point (-)
6. Fusebox
7. Air filter
8. Engine oil filler cap
9. Engine oil dipstick
Diesel fuel system
This system is under very high pressure.
All work must be carried out only by a
PEUGEOT dealer or a qualified workshop
Electric engine
1. Screenwash fluid reservoir
2. Engine coolant reservoir (level only)
3. Brake fluid reservoir
4. Battery/Fuses
5. Remote earth point (-)
6. Fusebox
7. 400
V electrical circuit
8. Emergency circuit-breaker for emergency
services and maintenance technicians
For more information on the Charging system
(Electric), refer to the corresponding section.
Checking levels
Check all of the following levels regularly in
accordance with the Manufacturer's service
schedule. Top them up if required, unless
otherwise indicated.
If a level drops significantly, have the
corresponding system checked by a PEUGEOT
dealer or a qualified workshop.
Page 192 of 280
190
Practical information
The fluids must comply with the Manufacturer's requirements and with
the vehicle's engine.
Take care when working under the bonnet, as certain areas of the engine
may be extremely hot (risk of burns) and the
cooling fan could start at any time (even with
the ignition off).
Used products
Avoid prolonged contact of used oil or fluids with the skin.
Most of these fluids are harmful to health and
very corrosive.
Do not discard used oil or fluids into
sewers or onto the ground.
Empty used oil into the containers reserved
for this purpose at a PEUGEOT dealer or a
qualified workshop.
Engine oil
The level is checked, with the engine having been switched off for at least 30
minutes and on level ground, either using the oil
level indicator in the instrument panel when the
ignition is switched on (for vehicles equipped
with an electric gauge), or using the dipstick.
It is normal to top up the oil level between two
services (or oil changes). It is recommended
that you check the level, and top up if necessary,
every 3,000 miles (5,000 km).
In order to maintain the reliability of the
engine and emissions control system,
never use additives in the engine oil.
Checking using the dipstick
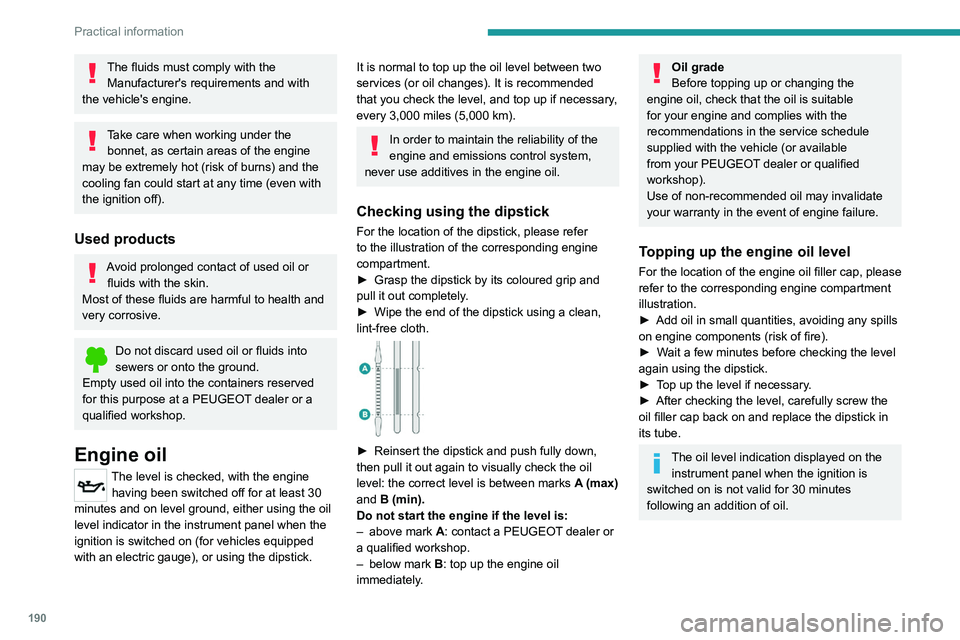
For the location of the dipstick, please refer
to the illustration of the corresponding engine
compartment.
►
Grasp the dipstick by its coloured grip and
pull it out completely
.
►
Wipe the end of the dipstick using a clean,
lint-free cloth.
► Reinsert the dipstick and push fully down,
then pull it out again to visually check the oil
level: the correct level is between marks
A
(max)
and
B (min).
Do not start the engine if the level is:
–
above mark
A: contact a PEUGEOT dealer or
a qualified workshop.
–
below mark
B
: top up the engine oil
immediately.
Oil grade
Before topping up or changing the
engine oil, check that the oil is suitable
for your engine and complies with the
recommendations in the service schedule
supplied with the vehicle (or available
from your PEUGEOT dealer or qualified
workshop).
Use of non-recommended oil may invalidate
your warranty in the event of engine failure.
Topping up the engine oil level
For the location of the engine oil filler cap, please
refer to the corresponding engine compartment
illustration.
►
Add oil in small quantities, avoiding any spills
on engine components (risk of fire).
►
W
ait a few minutes before checking the level
again using the dipstick.
►
T
op up the level if necessary.
►
After checking the level, carefully screw the
oil filler cap back on
and replace the dipstick in
its tube.
The oil level indication displayed on the instrument panel when the ignition is
switched on is not valid for 30 minutes
following an addition of oil.
Page 194 of 280

192
Practical information
Otherwise, have them checked by a PEUGEOT
dealer or a qualified workshop.
Only use products recommended by
PEUGEOT or products of equivalent
quality and specification.
In order to optimise the operation of
components as important as those in the
braking system, PEUGEOT selects and offers
very specific products.
12 V battery
The battery does not require any maintenance.
Check regularly that the terminals are correctly
tightened (versions without quick-release
terminals) and that the connections are clean.
For more information on the precautions
to take before any work on the 12 V
battery, refer to the corresponding section.
Versions equipped with Stop & Start are
fitted with a 12 V lead-acid battery with
special technology and specifications.
Its replacement should be carried out only by
a PEUGEOT dealer or a qualified workshop.
Passenger compartment
filter
Depending on the environment and the
use of the vehicle (e.g. dusty atmosphere,
city driving), change it twice as often, if
necessary .
A clogged passenger compartment filter
can adversely affect air conditioning
system performance and generate
undesirable odours.
Air filter
Depending on the environment and the
use of the vehicle (e.g. dusty atmosphere,
city driving), change it twice as often, if
necessary .
Oil filter
Change the oil filter each time the engine
oil is changed.
Particle filter (Diesel)
The start of clogging of the particle filter is
indicated by the temporary lighting of this
warning lamp, accompanied by an alert
message.
As soon as traffic conditions allow, regenerate
the filter by driving at a speed of at least 37
mph
(60
km/h), with an engine speed above 2,500
rpm, for about 15 minutes (until the warning lamp
goes out).
If it is not possible to reach 37
mph (60 km/h),
leave the engine running at idle for about 15
minutes, then drive with an engine speed
above
2,500 rpm for 15 minutes.
Do not switch off the engine until the filter
is fully regenerated; repeated intervals
can degrade the engine oil prematurely.
Regenerating the filter while the vehicle is
stationary is not recommended.
Following prolonged operation of the
vehicle at very low speed or at idle, you
may, in exceptional circumstances, notice
water vapour coming from the exhaust while
accelerating. These emissions have no
impact on the vehicle’s behaviour and the
environment.
New vehicle
During the first few particle filter
regeneration operations, you may notice a
"burning" smell. This is perfectly normal.
Manual gearbox
The gearbox does not require any maintenance (no oil change).
Automatic gearbox
The gearbox does not require any maintenance (no oil change).
Brake pads
Brake wear depends on the style of
driving, particularly in the case of vehicles
used in town, over short distances. It may be
Page 199 of 280
197
Practical information
7To clean instrument panels, touch screens
or other displays, wipe gently with a soft,
dry cloth. Do not use products (e.g. alcohol,
disinfectant) or soapy water directly on these
surfaces - risk of damage!
Bodywork
High-gloss paint
Do not use abrasive products, solvents,
petrol or oil to clean the bodywork.
Never use an abrasive sponge to clean
stubborn stains - risk of scratching the
paintwork!
Do not apply polish in strong sunshine, or to
plastic or rubber parts.
Use a soft cloth and soapy water or a pH
neutral product.
Gently wipe the bodywork with a clean
microfibre cloth.
Apply polish with the vehicle clean and dry.
Comply with the instructions for use stated on
the product.
Decals
(Depending on version)
Do not use a high-pressure washer to
clean the vehicle - risk of damaging or
detaching the decals!
Use a high-flow hose (temperature
between 25°C and 40°C).
Place the jet of water perpendicular to the
surface to be cleaned.
Rinse the vehicle with demineralised water.
Textile
The dashboard, door panels and seats may
contain parts made of textile material.
Maintenance
Do not use aggressive cleaning products
(e.g. alcohol, solvent or ammonia).
Do not use steam-cleaning systems - risk of
affecting the adhesion of the fabrics!
Remove dust from the textile parts
regularly with a dry cloth, soft brush or
vacuum cleaner
.
Rub down the
textile parts once per year with
a clean, damp cloth. After leaving overnight to
dry, brush with a soft-bristled brush.
Stain removal
Do not rub the stain or it may spread or
you may cause the substance to
penetrate the surface.
Act quickly by reducing the stain from its edges inwards.
Remove as much substance or solids as
possible using a spoon or spatula, and
remove
as much liquid as possible using
absorbent paper.
Product/Procedure to use depending
on the type of stain:
–
Grease, oil and ink: clean with a pH-neutral
detergent.
–
V
omit: clean with sparkling mineral water.
–
Blood: spread flour over the stain and allow
to dry; remove with a slightly damp cloth.
–
Mud: allow to dry and then remove with a
slightly damp cloth.
–
Cake, chocolate, ice cream: clean with
lukewarm water
.
–
Sugary and/or alcoholic drinks: clean with
lukewarm water
, or lemon juice if the stain is
persistent.
–
Hair gel, coffee, tomato sauce, vinegar:
clean with lukewarm water and lemon juice.
For solid substances, then use a soft brush or
vacuum cleaner
.
For liquid substances, then use a damp
microfibre cloth and then dry with another
cloth.
Alcantara®
Alcantara® is an elegant and practical material
which is very resistant and easy to maintain.
Page 204 of 280
202
In the event of a breakdown
Only the 12 V socket located at the front
of the vehicle can be used to power the
compressor.
For more information on the Tool kit,
refer to the corresponding section.
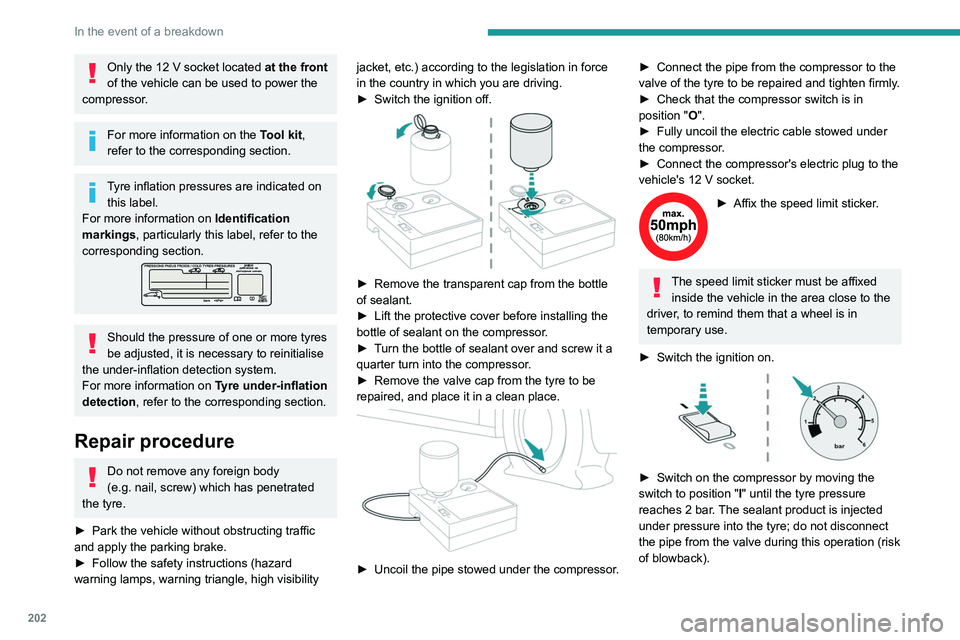
Tyre inflation pressures are indicated on this label.
For more information on Identification
markings, particularly this label, refer to the
corresponding section.
Should the pressure of one or more tyres
be adjusted, it is necessary to reinitialise
the under-inflation detection system.
For more information on Tyre under-inflation
detection, refer to the corresponding section.
Repair procedure
Do not remove any foreign body
(e.g. nail, screw) which has penetrated
the tyre.
►
Park the vehicle without obstructing traffic
and apply the parking brake.
►
Follow the safety instructions (hazard
warning lamps, warning triangle, high visibility jacket, etc.) according to the legislation in force
in the country in which you are driving.
►
Switch the ignition off.
► Remove the transparent cap from the bottle
of sealant.
►
Lift the protective cover before installing the
bottle of sealant on the compressor
.
►
T
urn the bottle of sealant over and screw it a
quarter turn into the compressor.
►
Remove the valve cap from the tyre to be
repaired, and place it in a clean place.
► Uncoil the pipe stowed under the compressor.
► Connect the pipe from the compressor to the
valve of the tyre to be repaired and tighten firmly .
►
Check that the compressor switch is in
position
"O".
►
Fully uncoil the electric cable stowed under
the compressor
.
►
Connect the compressor's electric plug to the
vehicle's 12
V socket.
► Affix the speed limit sticker .
The speed limit sticker must be affixed
inside the vehicle in the area close to the
driver, to remind them that a wheel is in
temporary use.
►
Switch the ignition on.
► Switch on the compressor by moving the
switch to position "I" until the tyre pressure
reaches 2
bar. The sealant product is injected
under pressure into the tyre; do not disconnect
the pipe from the valve during this operation (risk
of blowback).
Page 205 of 280
203
In the event of a breakdown
8If after approximately 7 minutes, the
pressure of 2 bar is not reached, this
indicates that the tyre is not repairable;
contact a PEUGEOT dealer or a qualified
workshop for assistance.
►
Move the switch to position
"O".
►
Disconnect the compressor's electric plug
from the vehicle's 12
V socket.
►
Remove the kit.
►
Refit the cap on the valve.
►
Remove and store the bottle of sealant.
The sealant product is harmful if swallowed and causes irritation to the
eyes.
Keep this product out of the reach of children.
The use-by date of the fluid is marked on the
bottle.
After use, do not discard the bottle into the
environment; take it to a PEUGEOT dealer or
an authorised waste disposal site.
Do not forget to obtain a new bottle of
sealant, available from a PEUGEOT dealer or
a qualified workshop.
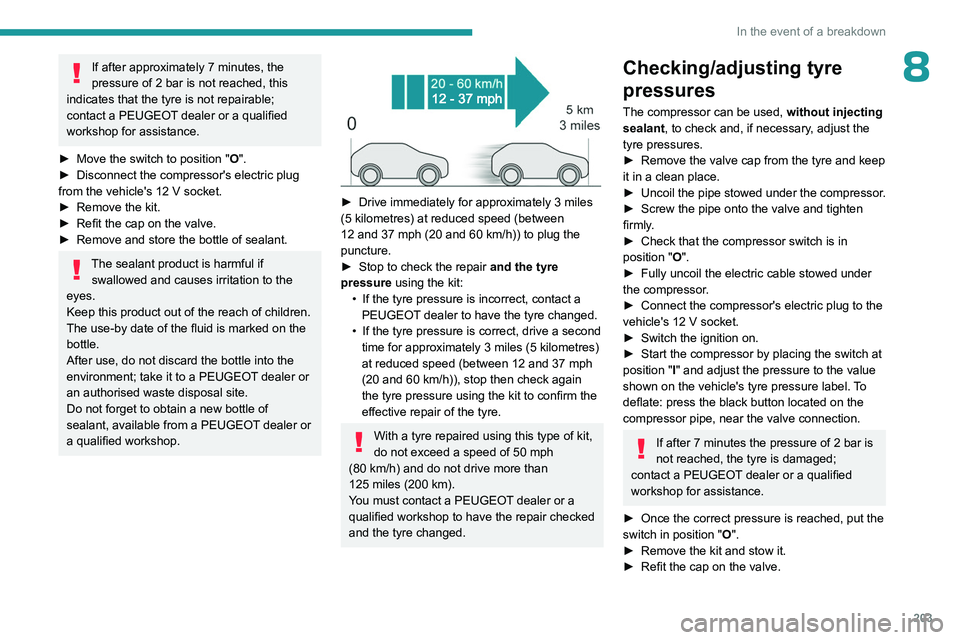
► Drive immediately for approximately 3 miles
(5 kilometres) at reduced speed (between
12 and 37
mph (20 and 60 km/h)) to plug the
puncture.
►
Stop to check the repair
and the tyre
pressure using the kit:
•
If the tyre pressure is incorrect, contact a
PEUGEOT
dealer to have the tyre changed.
•
If the tyre pressure is correct, drive a second
time for approximately 3
miles (5 kilometres)
at reduced speed (between 12 and 37
mph
(20 and 60
km/h)), stop then check again
the tyre pressure using the kit to confirm the
effective repair of the tyre.
With a tyre repaired using this type of kit,
do not exceed a speed of 50 mph
(80
km/h) and do not drive more than
125
miles (200 km).
You must contact a PEUGEOT dealer or a
qualified workshop to have the repair checked
and the tyre changed.
Checking/adjusting tyre
pressures
The compressor can be used, without injecting
sealant, to check and, if necessary, adjust the
tyre pressures.
►
Remove the valve cap from the tyre and keep
it in a clean place.
►
Uncoil
the pipe stowed under the compressor.
►
Screw the pipe onto the valve and tighten
firmly
.
►
Check that the compressor switch is in
position
"O".
►
Fully uncoil the electric cable stowed under
the compressor
.
►
Connect the compressor's electric plug to the
vehicle's 12
V socket.
►
Switch the ignition on.
►
Start the compressor by placing the switch at
position
"I" and adjust the pressure to the value
shown on the vehicle's tyre pressure label. To
deflate: press the black button located on the
compressor pipe, near the valve connection.
If after 7 minutes the pressure of 2 bar is
not reached, the tyre is damaged;
contact a PEUGEOT
dealer or a qualified
workshop for assistance.
►
Once the correct pressure is reached, put the
switch in position
"O".
►
Remove the kit and stow it.
►
Refit the cap on the valve.
Page 251 of 280

249
Alphabetical index
Charging flap (Electric) 174, 177, 179–180
Charging flap (Rechargeable hybrid)
168, 170, 172–173
Charging system (Electric)
7, 173, 189
Charging the battery
214
Charging the traction battery
(Electric)
173, 177, 179–180
Charging the traction battery (Rechargeable
hybrid)
22, 167, 170, 172–173
CHECK
25
Checking the engine oil level
20
Checking the levels
190–191
Checking tyre pressures
(using the kit)
201, 203
Checks
189, 191–193
Checks, routine
191–192
Child lock
97
Children
87, 93–94
Children (safety)
97
Child seats
87, 90–92, 94
Child seats, conventional
94–96
Child seats, i-Size
94–96
Child seats, ISOFIX
93–96
Cleaning (advice)
163–164, 196–198
Closing the boot
33, 37
Closing the doors
33, 37
Collision Risk Alert
142–144
Configuration, vehicle
12, 27
Connection, Bluetooth
237–238
Connectivity
243
Consumptions
28
Container, AdBlue®
194Control, emergency boot release 37
Control, emergency door
35
Control, heated seats
49–50
Controls, steering mounted
106, 109
Control stalk, lighting
69–70
Control stalk, wipers
75–77
Control unit
165, 168–169, 172, 175
Courtesy lamps
64
Cruise control
124, 126, 128–129
Cruise control, adaptive
124, 126, 130–131
Cruise control by speed limit
recognition
124, 126
Cup holder
60
D
Date (setting) 243
Daytime running lamps
70
Deactivating the passenger airbag
89, 92
Deadlocking
31, 33
Deferred charging
29, 172, 178
Deferred charging (Electric)
174, 177
Deferred charging (Rechargeable
hybrid)
28–29, 168, 170
Defrosting
51, 59
Defrosting, front
59
Defrosting, rear screen
59
Demisting
51, 59
Demisting, front
59
Demisting, rear
59
Diagnosis, vehicle
25
Dials and gauges 11
Digital instrument panel
11
Dimensions
227
Dipstick
20, 190
Direction indicators (turn signals)
70, 208–209
Display screen, instrument panel
12
Domestic charging
165
Domestic charging (Electric)
178–180
Domestic charging (Rechargeable
hybrid)
172–173
Door pockets
60
Doors
37
Drive Assist Plus
130
Drive, electric
7, 173, 181, 189, 210, 218, 226
Driver’s attention warning
146–147
Drive selector (Electric)
11 2
Driving
46–47, 98–99, 121
Driving aids camera (warnings)
120
Driving aid shortcuts
121
Driving aids (recommendations)
119
Driving economically
9
Driving modes
11 3
Driving modes (Electric)
11 4
Driving positions (storing)
49
Dynamic stability control (DSC)
85
E
e-Auto mode 56, 117, 160
EBFD
84
Eco-driving (advice)
9