2024 PEUGEOT 308 ad blue
[x] Cancel search: ad bluePage 27 of 280

25
Dashboard instruments
1Manual test
This function allows you to check certain
indicators and display the alerts log.
The test is launched in the Settings> Vehicle touch screen application.
►
Then select
Safety > Diagnostics.
The following information is displayed on the
instrument panel:
–
T
yre pressures.
–
Engine oil level (depending on engine).
–
Next service due.
–
Driving range associated with the
AdBlue® and
the SCR system (BlueHDi
Diesel).
–
Current alerts.
This information is also displayed automatically every time the ignition is
switched on.
Total distance recorder
The total distance recorder measures the total
distance travelled by the vehicle since its initial
registration.
With the ignition on, the total distance is
displayed at all times. It remains displayed for
30
seconds after switching off the ignition. It is
displayed when the driver's door is opened, and
when the vehicle is locked or unlocked.
When travelling abroad, you may have to
change the distance units (miles or km):
the displayed speed must be in the local
country’s official unit (mph or km/h).
The unit is changed via the screen's
configuration application, with the vehicle
stationary.
Rechargeable hybrid or electric
vehicles
The total distance recorder is only accessible
from the trip computer.
For more information on the Trip computer,
refer to the corresponding section.
Lighting dimmer
Used to manually adjust the brightness of the
instruments and controls to suit the exterior light
level.
It is configured in the Settings >
Brightness touch screen application.
►
In the "
Cockpit" category, press or move the
slider to the desired setting.
Trip computer
Displays information related to the current trip
(e.g. range, average consumption, average
speed, distance travelled).
Data displayed on the
instrument panel
Displaying the different tabs
► Pressing the button located on the end of the
wiper control stalk displays the following tabs in
turn:
–
Current information:
•
Current consumption (Petrol, Diesel or
Hybrid).
•
T
ime counter for Stop & Start (Petrol or
Diesel).
•
Percentage of the current journey travelled
in all-electric driving mode (Hybrid or
Rechargeable hybrid).
•
T
otal distance recorder (Rechargeable hybrid
or Electric).
–
T
rips "1" then "2":
•
A
verage speed.
•
A
verage consumption.
•
Distance travelled.
End of trip page
(Depending on version)
When the ignition is switched off, the instrument
panel automatically displays an additional page
of the trip computer that recapitulates information
about the last trip.
Page 30 of 280
28
Dashboard instruments
Activation/Deactivation and configuration of
the exterior lighting, vehicle access and safety
functions.
Energy
For rechargeable hybrid versions
Access to the rechargeable hybrid system
features (energy flow, consumption statistics,
deferred charging, e
- SAVE function).
For electric versions
Access to the charging system features (energy
flow, consumption statistics, deferred charging).
Energy application
(Rechargeable hybrid or
Electric)
Energy Flow
For rechargeable hybrid versions
The page shows the operation of the
rechargeable hybrid system in real time.
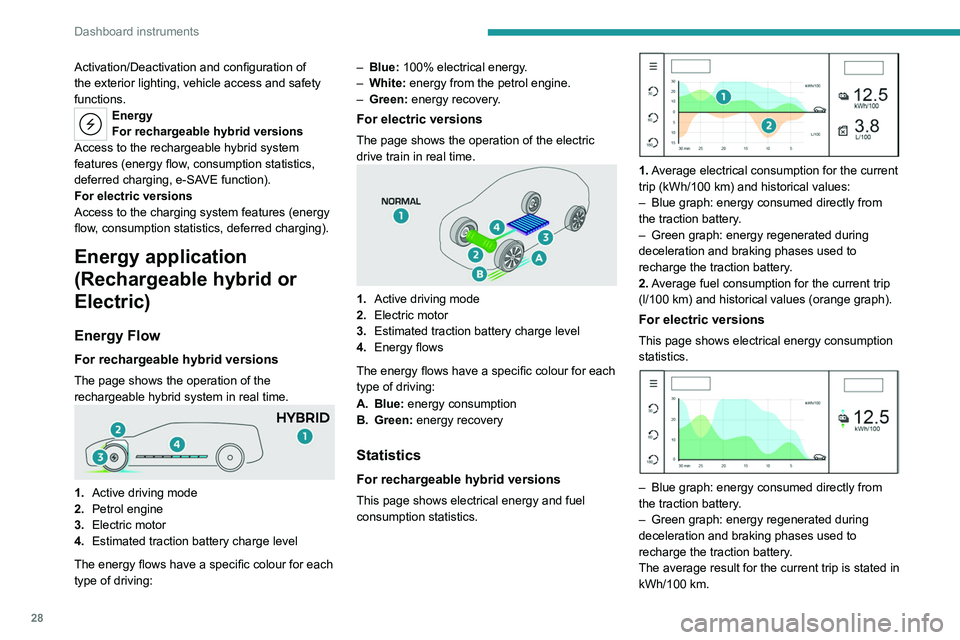
1. Active driving mode
2. Petrol engine
3. Electric motor
4. Estimated traction battery charge level
The energy flows have a specific colour for each
type of driving: –
Blue:
100% electrical energy.
–
White:
energy from the petrol engine.
–
Green:
energy recovery.
For electric versions
The page shows the operation of the electric
drive train in real time.
1.
Active driving mode
2. Electric motor
3. Estimated traction battery charge level
4. Energy flows
The energy flows have a specific colour for each
type of driving:
A. Blue: energy consumption
B. Green: energy recovery
Statistics
For rechargeable hybrid versions
This page shows electrical energy and fuel
consumption statistics.
1. Average electrical consumption for the current
trip (kWh/100 km) and historical values:
–
Blue graph: energy consumed directly from
the traction battery
.
–
Green graph: energy regenerated during
deceleration and braking phases used to
recharge the traction battery
.
2. Average fuel consumption for the current trip
(l/100
km) and historical values (orange graph).
For electric versions
This page shows electrical energy consumption
statistics.
– Blue graph: energy consumed directly from
the traction battery .
–
Green graph: energy regenerated during
deceleration and braking phases used to
recharge the traction battery
.
The average result for the current trip is stated in
kWh/100
km.
Page 139 of 280
137
Driving
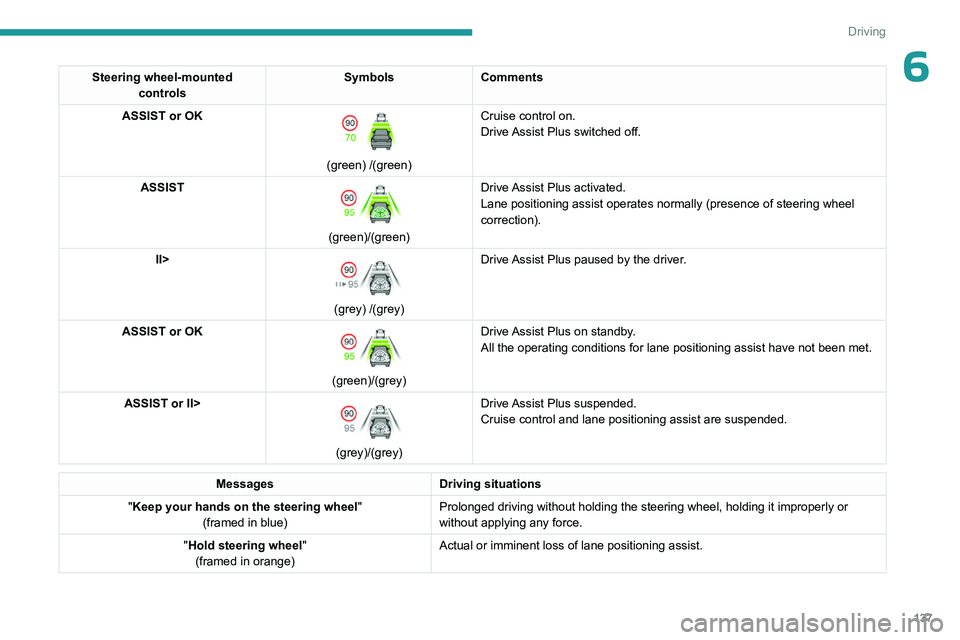
6Steering wheel-mounted controls Symbols
Comments
ASSIST or OK
(green) /(green) Cruise control on.
Drive Assist Plus switched off.
ASSIST
(green)/(green) Drive Assist Plus activated.
Lane positioning assist operates normally (presence of steering wheel
correction).
II>
(grey) /(grey) Drive Assist Plus paused by the driver.
ASSIST or OK
(green)/(grey) Drive Assist Plus on standby.
All the operating conditions for lane positioning assist have not been m\
et.
ASSIST or II>
(grey)/(grey) Drive Assist Plus suspended.
Cruise control and lane positioning assist are suspended.
Messages
Driving situations
"Keep your hands on the steering wheel "
(framed in blue) Prolonged driving without holding the steering wheel, holding it imprope\
rly or
without applying any force.
"Hold steering wheel "
(framed in orange) Actual or imminent loss of lane positioning assist.
Page 144 of 280
142
Driving
(orange)
“Lane change interrupted: Stay in the
lane”
The system cannot manage the current driving
situation.
Brake, accelerate or use the steering wheel,
depending on the context.
(blue)
"Lane change canceled"
Continuation of the systems: Lane positioning
assist and Adaptive cruise control.
or
Interruption at the initiative of the driver.
(red)
"Take back control"
The system cannot manage the current driving
situation.
Brake, accelerate or use the steering wheel,
depending on the context.
Operating limits
The system should only be used on driving lane.
The system may not work in the following
situations:
–
W
earing thick gloves.
–
Poor visibility (insufficient road lighting,
snowfall, rain, fog).
–
Dazzle (headlamps of an oncoming vehicle,
low sun, reflections on a wet road surface,
leaving a tunnel, alternating light and shade).
–
Windscreen area in front of the camera
dirty
, misted up, frost-covered, snow-covered,
damaged or covered by a sticker.
– Lane markings eroded, partially hidden (snow ,
mud) or multiple (roadworks, surface joints).
–
T
ravelling in a tight bend.
–
Winding roads.
–
Road surface repairs.
The system must not be activated in the following situations:
–
When changing a wheel or working near a
wheel.
–
T
owing or with a bicycle carrier on a towing
device, especially with trailer not plugged in or
not approved.
–
Adverse weather conditions.
–
Road with low grip (risk of aquaplaning,
snow
, ice).
–
Unusual configuration such as road works
areas, toll areas and emergency lanes.
–
Driving on racing circuits.
–
Driving on a rolling road.
If the system detects that the driver is not
holding the steering wheel firmly enough,
it triggers a series of gradual alerts and then
deactivates itself if there is no response from
the driver.
Malfunction
In the event of a malfunction, this warning
lamp lights up on the instrument panel,
accompanied by the display of a message and
an audible signal.
Have it checked by a PEUGEOT dealer or a
qualified workshop.
Active Safety Brake with Collision Risk Alert and
Intelligent emergency
braking assistance
For more information, refer to the
General recommendations on the use
of driving and manoeuvring aids .
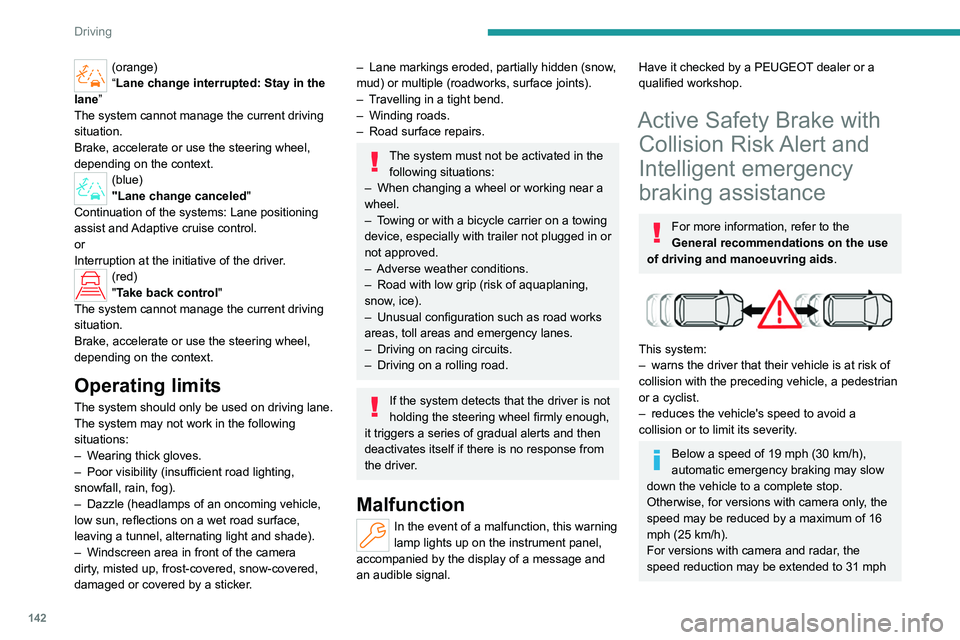
This system:
–
warns the driver that their vehicle is at risk of
collision with the preceding vehicle, a pedestrian
or a cyclist.
–
reduces the vehicle's speed to avoid a
collision or to limit its severity
.
Below a speed of 19 mph (30 km/h),
automatic emergency braking may slow
down the vehicle to a complete stop.
Otherwise, for versions with camera only
, the
speed may be reduced by a maximum of 16
mph (25
km/h).
For versions with camera and radar, the
speed reduction may be extended to 31 mph
Page 157 of 280

155
Driving
6Obstacles may appear further away than
they actually are.
It is important to monitor the sides of the
vehicle during the manoeuvre, using the
mirrors.
Parking sensors also provide additional
information about the area around the vehicle.
Standard view
The area behind the vehicle is displayed on the
screen.
The blue lines 1 represent the width of your
vehicle, with the mirrors unfolded; their direction
changes according to the position of the steering
wheel.
The red line 2 represents a distance of 30
cm
from the rear bumper; the two blue lines 3 and 4
represent 1
m and 2 m, respectively.
This view is available automatically or by
selection in the side menu.
Panoramic view
The panoramic view allows you to leave, in
reverse, a parking space by anticipating the
arrival of vehicles, pedestrians or cyclists.
This view is not recommended for carrying out a
complete manoeuvre.
This view is only available by selection in the
side menu.
Visiopark 3
For more information, refer to the
General recommendations on the use
of driving and manoeuvring aids .
This system allows you to view your vehicle's
close surroundings
on the touch screen using
cameras, located at the front and rear of the
vehicle, as well as under the door mirrors.
The screen is divided into 4 parts with two side
menus, a contextual view and a view from above
the vehicle in its close surroundings.
The parking sensors supplement the information
in the view from above the vehicle.
Depending on the view angle chosen in the
left-hand side menu, the system provides
specific visual assistance in particular driving
conditions, such as entering a blind intersection
or manoeuvring in areas with reduced visibility.
Different contextual views are available for the
rear or for the front:
–
Automatic zoom view
.
–
Standard view
.
–
Panoramic view
.
Depending on the context, the system chooses
the best view to display (standard or automatic
zoom).
The view type can be changed at any time
during the manoeuvre.
The system status is not saved when the ignition
is switched off.
Page 159 of 280

157
Driving
6Standard view
Depending on the context, the area behind or in
front of your vehicle is displayed on the screen.
The blue lines (at the rear)/orange lines (at the
front) 1 represent the width of your vehicle, with
the mirrors unfolded; their direction changes
according to the position of the steering wheel.
The red line 2 represents a distance of 30 cm
from the rear or front bumper; the two blue lines
(at the rear)/orange lines (at the front)
3
and
4
represent 1 m and 2 m respectively.
This view is available automatically or by
selection in the left-hand side menu.
Panoramic view
The rear or front panoramic view allows you to
leave a parking space by anticipating the arrival
of vehicles, pedestrians or cyclists.
This view is not recommended for carrying out a
complete manoeuvre.
This view is only available by selection in the left-
hand side menu.
Side views
The left-hand/right-hand side view allows you to
view the surroundings of each side of the vehicle
(e.g.
pavement, low wall, other vehicle parked
next to it).
► Select the relevant view in the view from
above the vehicle.
The selected area turns yellow and the side view
appears in the middle of the screen.
This view is not recommended for carrying out a
complete manoeuvre.
Rear cross traffic alert
For more information, refer to the
General recommendations on the use
of driving and manoeuvring aids .
When engaging reverse gear with the engine
running, or when reversing at up to 6 mph
(10
km/h), this system warns of approaching
obstacles (e.g.
pedestrian, cyclist, vehicle, truck,
motorcycle) in the rear blind spots of the vehicle,
using the radars installed in the bumper.
The system detects obstacles moving more than
2 mph (3
km/h) at a maximum distance of 40 m.
The system operates in addition to the Parking
sensors, Visiopark 1 or Visiopark 3 functions
(depending on version).
For more information about the Parking
sensors, Visiopark 1 or Visiopark 3 functions,
refer to the corresponding sections.
The driver must monitor their surroundings before and during the
whole manoeuvre. Drive slowly and carefully
in reverse gear in case of reduced or no
visibility.
Page 170 of 280
168
Practical information
Charging flap
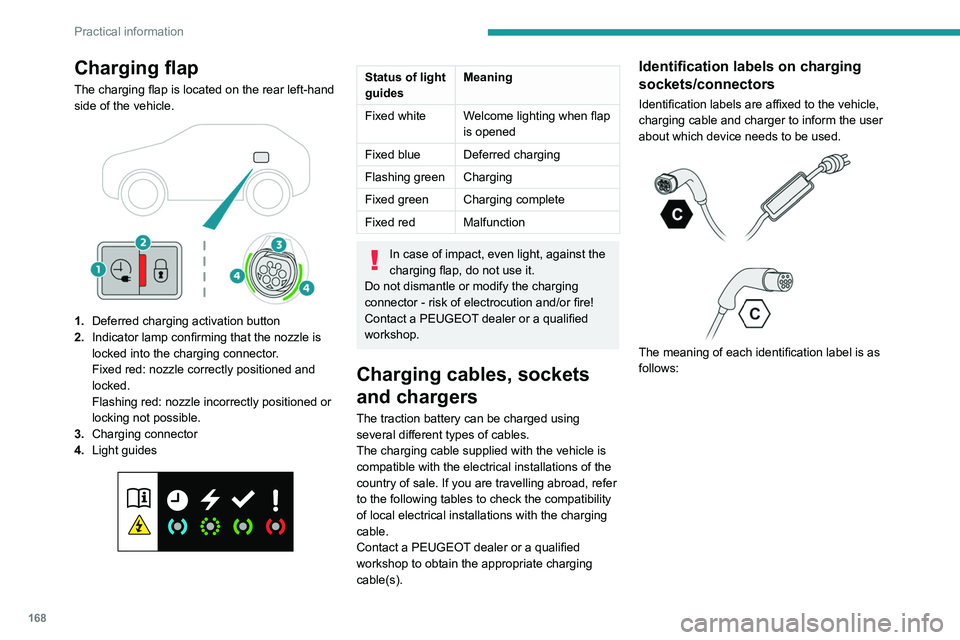
The charging flap is located on the rear left-hand
side of the vehicle.
1.Deferred charging activation button
2. Indicator lamp confirming that the nozzle is
locked into the charging connector.
Fixed red: nozzle correctly positioned and
locked.
Flashing red: nozzle incorrectly positioned or
locking not possible.
3. Charging connector
4. Light guides
Status of light
guides Meaning
Fixed white Welcome lighting when flap
is opened
Fixed blue Deferred charging
Flashing green Charging
Fixed green Charging complete
Fixed red Malfunction
In case of impact, even light, against the
charging flap, do not use it.
Do not dismantle or modify the charging
connector - risk of electrocution and/or fire!
Contact a PEUGEOT dealer or a qualified
workshop.
Charging cables, sockets
and chargers
The traction battery can be charged using
several different types of cables.
The charging cable supplied with the vehicle is
compatible with the electrical installations of the
country of sale. If you are travelling abroad, refer
to the following tables to check the compatibility
of local electrical installations with the charging
cable.
Contact a PEUGEOT dealer or a qualified
workshop to obtain the appropriate charging
cable(s).
Identification labels on charging
sockets/connectors
Identification labels are affixed to the vehicle,
charging cable and charger to inform the user
about which device needs to be used.
The meaning of each identification label is as
follows:
Page 174 of 280
172
Practical information
Never work under the bonnet:
– Some areas remain very hot, even an hour
after charging ends - risk of burns!
–
The fan may start at any time - risk of cuts
or strangulation!
After charging
Check that the charging flap is closed.
Do not leave the cable connected to the
domestic power socket - risk of short-circuit
or electrocution in the event of contact with or
immersion in water!
Deferred charging
By default, the deferred charging start time is set
to be around midnight.
Depending on equipment, this time can be
changed.
Settings
► In the Energy touch screen
application, select the Charging tab.
►
Set the charging start time.
►
Press
OK.
The setting is saved in the system.
You can also programme the deferred charging function using a smartphone, via
the MYPEUGEOT APP application.
For more information on Remotely operable
additional functions , refer to the corresponding
section.
Activation
► After programming the deferred charging,
connect the vehicle to the desired charging
equipment.
► Press this button in the flap within one
minute to activate the deferred charging
(confirmed by the light guides coming on in
blue).
Charging procedure
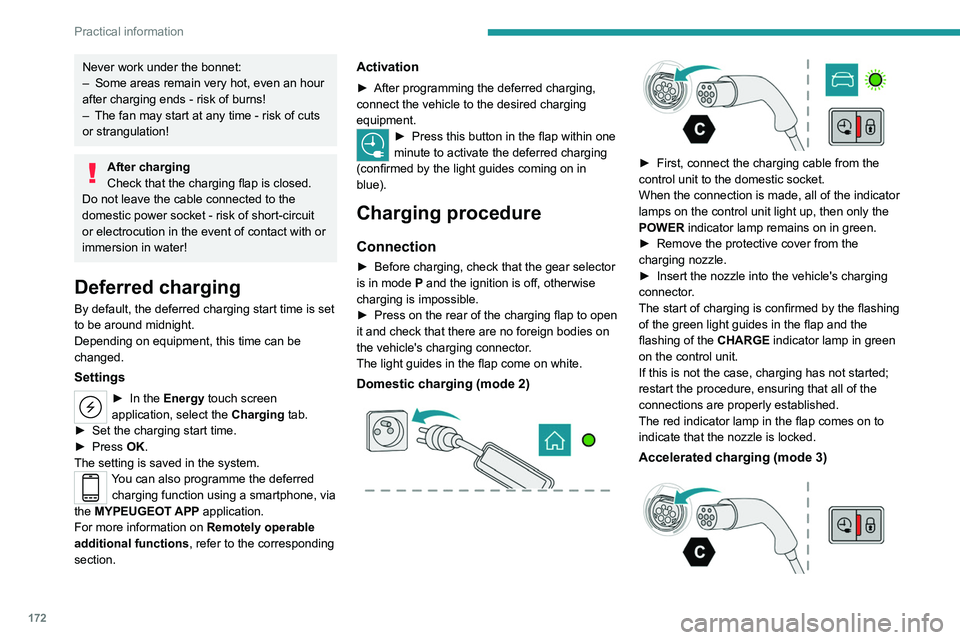
Connection
► Before charging, check that the gear selector
is in mode P and the ignition is off, otherwise
charging is impossible.
►
Press on the rear of the charging flap to open
it and check that there are no foreign bodies on
the vehicle's charging connector
.
The light guides in the flap come on white.
Domestic charging (mode 2)
► First, connect the charging cable from the
control unit to the domestic socket.
When the connection is made, all of the indicator
lamps on the control unit light up, then only the
POWER
indicator lamp remains on in green.
►
Remove the protective cover from the
charging nozzle.
►
Insert the nozzle into the vehicle's charging
connector
.
The start of charging is confirmed by the flashing
of the green light guides in the flap and the
flashing of the
CHARGE indicator lamp in green
on the control unit.
If this is not the case, charging has not started;
restart the procedure, ensuring that all of the
connections are properly established.
The red indicator lamp in the flap comes on to
indicate that the nozzle is locked.
Accelerated charging (mode 3)