2024 PEUGEOT 308 ESP
[x] Cancel search: ESPPage 204 of 280
202
In the event of a breakdown
Only the 12 V socket located at the front
of the vehicle can be used to power the
compressor.
For more information on the Tool kit,
refer to the corresponding section.
Tyre inflation pressures are indicated on this label.
For more information on Identification
markings, particularly this label, refer to the
corresponding section.
Should the pressure of one or more tyres
be adjusted, it is necessary to reinitialise
the under-inflation detection system.
For more information on Tyre under-inflation
detection, refer to the corresponding section.
Repair procedure
Do not remove any foreign body
(e.g. nail, screw) which has penetrated
the tyre.
►
Park the vehicle without obstructing traffic
and apply the parking brake.
►
Follow the safety instructions (hazard
warning lamps, warning triangle, high visibility jacket, etc.) according to the legislation in force
in the country in which you are driving.
►
Switch the ignition off.
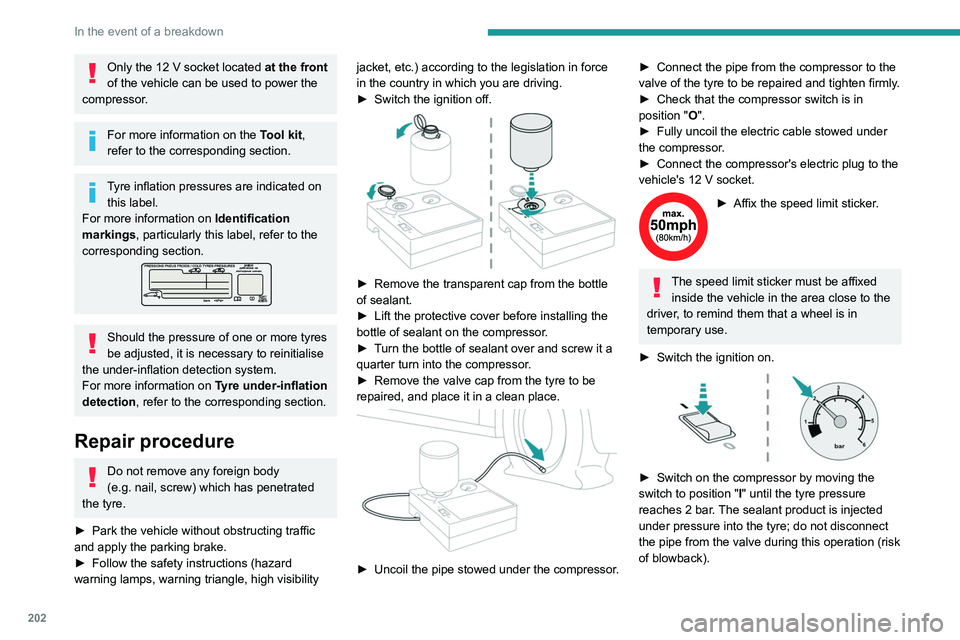
► Remove the transparent cap from the bottle
of sealant.
►
Lift the protective cover before installing the
bottle of sealant on the compressor
.
►
T
urn the bottle of sealant over and screw it a
quarter turn into the compressor.
►
Remove the valve cap from the tyre to be
repaired, and place it in a clean place.
► Uncoil the pipe stowed under the compressor.
► Connect the pipe from the compressor to the
valve of the tyre to be repaired and tighten firmly .
►
Check that the compressor switch is in
position
"O".
►
Fully uncoil the electric cable stowed under
the compressor
.
►
Connect the compressor's electric plug to the
vehicle's 12
V socket.
► Affix the speed limit sticker .
The speed limit sticker must be affixed
inside the vehicle in the area close to the
driver, to remind them that a wheel is in
temporary use.
►
Switch the ignition on.
► Switch on the compressor by moving the
switch to position "I" until the tyre pressure
reaches 2
bar. The sealant product is injected
under pressure into the tyre; do not disconnect
the pipe from the valve during this operation (risk
of blowback).
Page 206 of 280

204
In the event of a breakdown
Spare wheel
Visit this link to view explanatory videos:
http://q-r.to/bagGl9
For more information on the Tool kit,
refer to the corresponding section.
Accessing the spare wheel
Hatchback
SW
The spare wheel is stored in the boot, under the
floor.
To access the spare wheel, first refer to the Tool
kit section.
Depending on version, the spare wheel
may be a standard (steel or aluminium)
or 'space-saver' wheel.
Removing the spare wheel
► Slacken the central nut.
► Remove the fastening device (nut and bolt).
►
Lift the spare wheel towards you from the
rear
.
►
T
ake the wheel out of the boot.
Putting the spare wheel back in place
The punctured wheel cannot be put under the boot floor.
► Put the spare wheel back in place in its
housing.
►
Slacken the nut on the bolt by a few turns.
►
Position the fastening device (nut and bolt) in
the middle of the wheel.
Hatchback
Page 211 of 280

209
In the event of a breakdown
8Model with Full LED 3D lamps
1.Direction indicators (LED)
2. Brake lamps/sidelamps (LED)
3. Sidelamps
(LED)
4. Foglamps (P21W)
5. Reversing lamps (W16W)
Reversing lamps/Foglamps
These bulbs are replaced from outside the rear
bumper.
► Remove the fixing screw(s) from the access
flap located under the bumper using a Torx
screwdriver.
►
Unclip the access flap.
►
T
urn the bulb holder a quarter turn and
remove it.
►
For the foglamp: turn the bulb a quarter turn
and replace it.
►
For the reversing lamp: pull out the bulb and
replace it.
When changing the bulb within a few
minutes of switching off the ignition, take
care not to touch the exhaust - risk of burns!
Fuses
Changing a fuse
All work must be carried out only by a
PEUGEOT dealer or a qualified workshop
The replacement of a fuse by a third party
could cause a serious malfunction of the
vehicle.
Installing electrical accessories
The vehicle's electrical system is
designed to operate with standard or optional
equipment.
Before fitting other electrical equipment
or accessories to your vehicle, contact a
PEUGEOT dealer or a qualified workshop.
PEUGEOT accepts no responsibility for
the cost incurred in repairing the vehicle
or for rectifying malfunctions resulting from
the installation of accessories not supplied or
not recommended by PEUGEOT and not
installed in accordance with its
recommendations, in particular when the
combined power consumption of all of the
additional equipment connected exceeds 10
milliamperes.
12 V battery/Accessory
batteries
Lead-acid starter batteries
These batteries contain harmful
substances (sulphuric acid and lead).
They must be disposed of in accordance
with regulations and must never under any
circumstances be discarded with household
waste.
Dispose of used batteries at a designated
collection point.
Protect your eyes and face before
handling the battery.
All operations on the battery must be carried
out in a well ventilated area and away from
naked flames and sources of sparks, to avoid
any risk of explosion or fire.
Page 215 of 280
213
In the event of a breakdown
8state of charge of the battery (up to about 8
hours).
For hybrid versions
Procedure for starting the engine using another
battery or for charging a discharged battery
(12 V or 48 V).
►
Access to the 12
V battery.
For more information on Accessing the battery,
refer to the corresponding section.
►
If necessary
, perform the 12 V battery
disconnection/reconnection procedure.
For more information on Disconnecting/
Reconnecting the battery, refer to the
corresponding section.
►
After reconnecting the 12
V battery, perform
the automatic reset procedures of the electronic
systems and manual reset of some equipment.
For more information on Following
reconnection, refer to the corresponding
section.
Starting using another battery
The hybrid system starts the vehicle, but a 12 V supply is required. There are
several reasons why the vehicle cannot be
started.
If the 12
V battery is flat, the 12 V power supply
can be ensured using a backup battery (either
external or from another vehicle) and jump leads
or using a battery booster or using a battery
charger.
Never use a 24 V or higher battery
booster .
Check beforehand that the backup battery
has a nominal voltage of 12
V and a capacity
at least equal to that of the discharged
battery.
The two vehicles must not be in contact with
each other.
Switch off all electricity-consuming equipment
on both vehicles (audio system, wipers,
lighting, etc.).
Make sure that the jump leads are well away
from the engine’s moving parts (fan, belt,
etc.).
Do not disconnect the (+) terminal while the
engine is running.
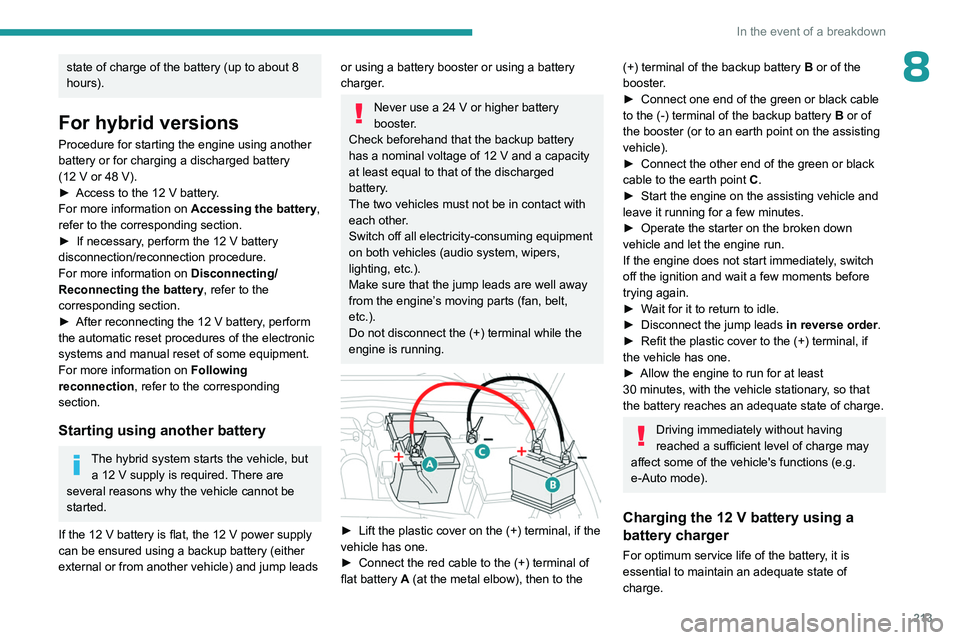
► Lift the plastic cover on the (+) terminal, if the
vehicle has one.
►
Connect the red cable to the (+) terminal of
flat battery
A (at the metal elbow), then to the
(+) terminal of the backup battery B or of the
booster .
►
Connect one end of the green or black cable
to the (-) terminal of the backup battery
B or of
the booster (or to an earth point on the assisting
vehicle).
►
Connect the other end of the green or black
cable to the earth point
C
.
►
Start the engine on the assisting vehicle and
leave it running for a few minutes.
►
Operate the starter on the broken down
vehicle and let the engine run.
If the engine does not start immediately
, switch
off the ignition and wait a few moments before
trying again.
►
W
ait for it to return to idle.
►
Disconnect the jump leads in reverse order.
►
Refit the plastic cover to the (+) terminal, if
the vehicle has one.
►
Allow the engine to run for at least
30
minutes, with the vehicle stationary, so that
the battery reaches an adequate state of charge.
Driving immediately without having
reached a sufficient level of charge may
affect some of the vehicle's functions (e.g.
e-Auto mode).
Charging the 12 V battery using a
battery charger
For optimum service life of the battery, it is
essential to maintain an adequate state of
charge.
Page 216 of 280
214
In the event of a breakdown
In some circumstances, it may be necessary to
charge the battery (e.g. if the vehicle is to be
taken off the road for several weeks)
Consult a PEUGEOT dealer or a qualified
workshop.
The hybrid system is connected to the 12 V network through the DC/DC
converter. Any operation may affect the
overall behaviour of the system.
To charge the vehicle's battery yourself, use
only a charger compatible with lead-acid
batteries with a nominal voltage of 12
V.
Follow the instructions provided by the
manufacturer of the charger.
Never reverse polarities.
It is not necessary to disconnect the
battery.
►
Switch the ignition off.
►
Switch off all electrical consumers (audio
system, lighting, wipers, etc.).
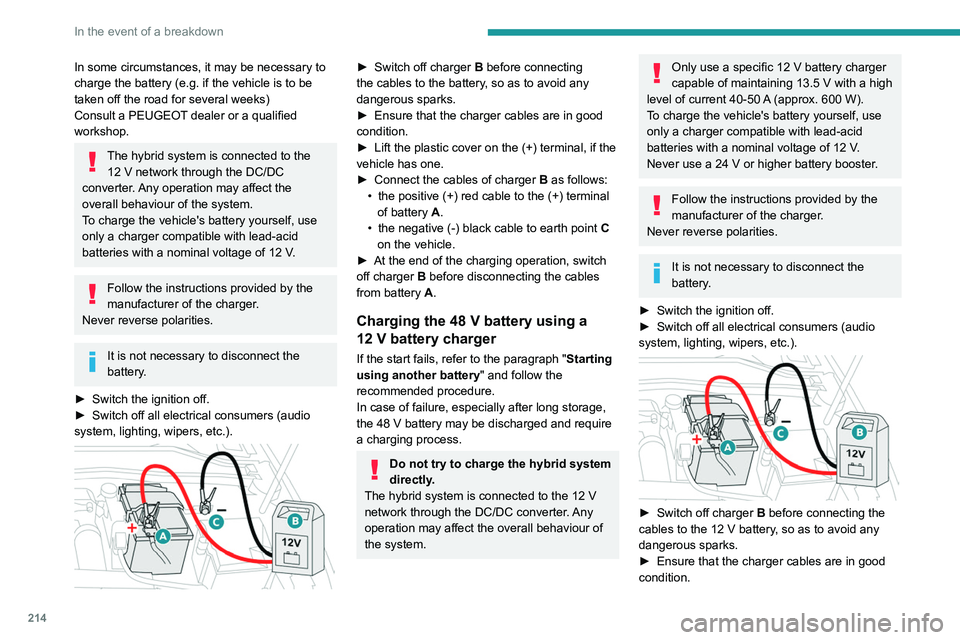
► Switch off charger B before connecting
the cables to the battery, so as to avoid any
dangerous sparks.
►
Ensure that the charger cables are in good
condition.
►
Lift the plastic cover on the (+) terminal, if the
vehicle has one.
►
Connect the cables of charger
B
as follows:
•
the positive (+) red cable to the (+) terminal
of battery
A.
•
the negative (-) black cable to earth point
C
on the vehicle.
►
At the end of the charging operation, switch
off charger
B
before disconnecting the cables
from battery
A.
Charging the 48 V battery using a
12 V battery charger
If the start fails, refer to the paragraph "Starting
using another battery" and follow the
recommended procedure.
In case of failure, especially after long storage,
the 48
V battery may be discharged and require
a charging process.
Do not try to charge the hybrid system
directly.
The hybrid system is connected to the 12
V
network through the DC/DC converter. Any
operation may affect the overall behaviour of
the system.
Only use a specific 12 V battery charger
capable of maintaining 13.5 V with a high
level of current 40-50
A
(approx. 600 W).
To charge the vehicle's battery yourself, use
only a charger compatible with lead-acid
batteries with a nominal voltage of 12
V.
Never use a 24
V or higher battery booster.
Follow the instructions provided by the
manufacturer of the charger.
Never reverse polarities.
It is not necessary to disconnect the
battery.
►
Switch the ignition off.
►
Switch off all electrical consumers (audio
system, lighting, wipers, etc.).
► Switch off charger B before connecting the
cables to the 12 V battery, so as to avoid any
dangerous sparks.
►
Ensure that the charger cables are in good
condition.
Page 220 of 280
218
In the event of a breakdown
Before towing the vehicle, it is essential
to put the vehicle in free-wheeling mode.
For more information on Free-wheeling, refer
to the corresponding section.
Special feature of towing for hybrid
vehicles
With both rear wheels on the ground: it
is only authorized for short distances (about
9
miles (15 km)) and at reduced speed
(maximum 15
mph (25 km/h)).
With all four wheels on the ground: the
vehicle can be towed a maximum of 0.06 mile
(100
metres) at a maximum speed of 6 mph
(10
km/h) (automatic gearbox in mode N and
N displayed in the instrument panel).
Rechargeable hybrid vehicles
Before any intervention, with the ignition
on, depress the brake pedal and select mode
N, then switch off the hybrid system (READY
indicator lamp off).
Always call on professionals for recovery of
the vehicle on a flatbed lorry or trailer.
Use the towing eye only
to free the vehicle
if it is stuck, or to secure it for recovery on a
flatbed lorry or trailer.
Electric vehicles
An electric vehicle cannot under any
circumstances be used to tow another
vehicle.
However, it may be used, for example, to exit
a rut.
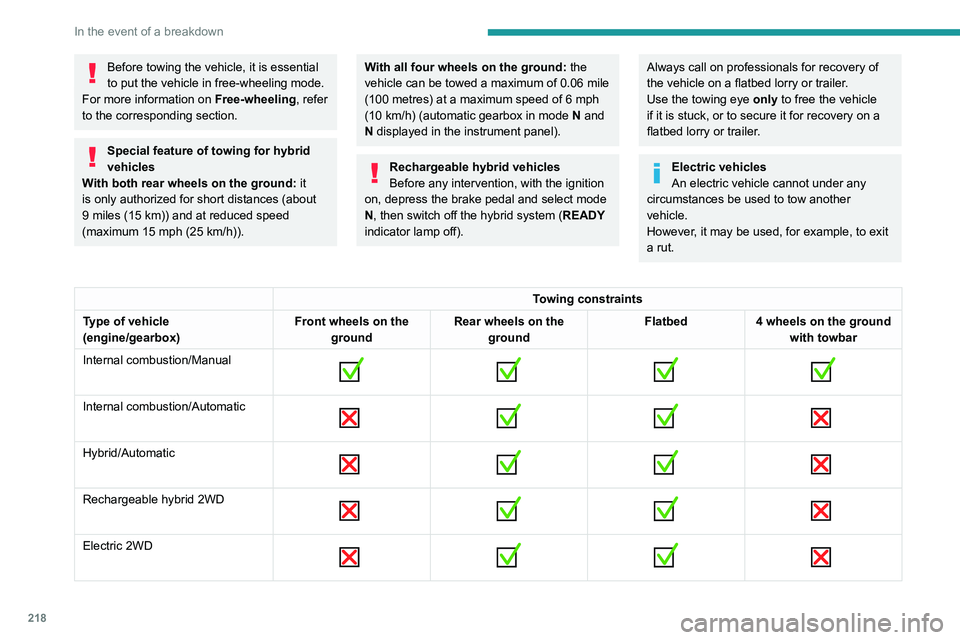
Towing constraints
Type of vehicle
(engine/gearbox) Front wheels on the
ground Rear wheels on the
ground Flatbed
4 wheels on the ground
with towbar
Internal combustion/Manual
Internal combustion/Automatic
Hybrid/Automatic
Rechargeable hybrid 2WD
Electric 2WD
Page 221 of 280
219
In the event of a breakdown
82WD: 2-wheel drive.
In case of battery or electric parking brake failure, it is essential to call a professional using flatbed recovery vehicles (excluding manual gearbox).
Accessing the tools
For more information on accessing the Tool kit,
refer to the corresponding section.
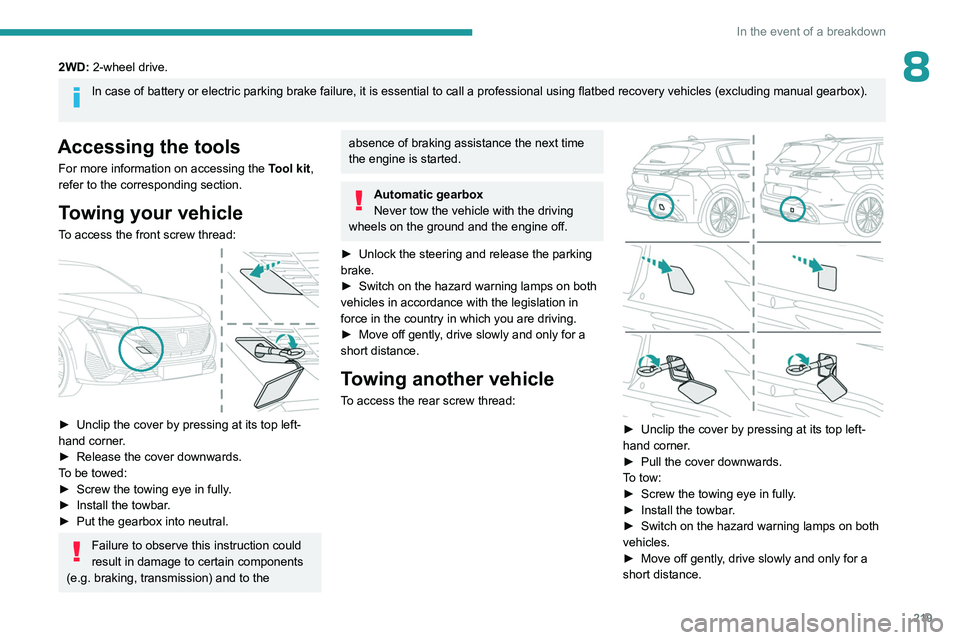
Towing your vehicle
To access the front screw thread:
► Unclip the cover by pressing at its top left-
hand corner .
►
Release the cover downwards.
T
o be towed:
►
Screw the towing eye in fully
.
►
Install the towbar
.
►
Put the gearbox into neutral.
Failure to observe this instruction could
result in damage to certain components
(e.g. braking, transmission) and to the
absence of braking assistance the next time
the engine is started.
Automatic gearbox
Never tow the vehicle with the driving
wheels on the ground and the engine off.
►
Unlock the steering and release the parking
brake.
►
Switch on the hazard warning lamps on both
vehicles in accordance with the legislation in
force in the country in which you are driving.
►
Move off gently
, drive slowly and only for a
short distance.
Towing another vehicle
To access the rear screw thread:
► Unclip the cover by pressing at its top left-
hand corner .
►
Pull the cover downwards.
T
o tow:
►
Screw the towing eye in fully
.
►
Install the towbar
.
►
Switch on the hazard warning lamps on both
vehicles.
►
Move off gently
, drive slowly and only for a
short distance.
Page 222 of 280

220
Technical data
Engine technical data and
towed loads
Engines
The engine characteristics are given in the
vehicle's registration document, as well as in
sales brochures.
Only the values available at the time of
publication are presented in the tables.
Contact a PEUGEOT dealer or a qualified
workshop to obtain missing values.
The maximum power corresponds to the value type-approved on a test bed, under
conditions defined by European legislation
(Directive 1999/99/EC).
For more information, contact a PEUGEOT
dealer or a qualified workshop.
Weights and towed loads
The weights and towed loads relating to
the vehicle are indicated on the registration
document, as well as in sales brochures.
These values are also indicated on the
manufacturer's plate or label.
For more information, contact a PEUGEOT
dealer or a qualified workshop.
The GTW (Gross Train Weight) and towed load
values indicated are valid up to a maximum
altitude of 1,000 metres. The towed load value
must be reduced by 10% for each additional
1,000 metres of altitude.
The maximum authorised nose weight
corresponds to the weight permitted on the
towball.
When exterior temperatures are high, the
vehicle performance may be limited in
order to protect the engine. When the exterior
temperature is higher than 37°C, reduce the
towed weight.
Towing even with a lightly loaded vehicle can adversely affect its road holding.
Braking distances are increased when towing
a trailer.
When using a vehicle to tow, never exceed
a speed of 62 mph (100
km/h) (observe the
local legislation in force).