2024 GMC SIERRA DENALI window
[x] Cancel search: windowPage 324 of 440

GMC Sierra/Sierra Denali 2500 HD/3500 HD Owner Manual (GMNA-
Localizing-U.S./Canada-16908340) - 2024 - CRC - 12/7/22
322 Vehicle Care
If the decision is made not to lift the hood
when this warning appears, get service help
right away. SeeRoadside Assistance Program
0 408.
If the decision is made to lift the hood,
make sure the vehicle is parked on a level
surface.
Check to see if the engine cooling fans are
running. If the engine is overheating, the
fans should be running. If they are not, do
not continue to run the engine and have the
vehicle serviced.
If the engine or transmission detects an
impending hot fluid condition, then the
transmission may force upshifts to limit
temperatures. Downshifts may also be
prevented in this instance. Normal operation
may continue unless the display indicates
there is a hot condition and engine should
be idled.If Steam is Coming from the Engine
Compartment
{Warning
Steam and scalding liquids from a hot
cooling system are under pressure.
Turning the pressure cap, even a little,
can cause them to come out at high
speed and you could be burned. Never
turn the cap when the cooling system,
including the pressure cap, is hot. Wait
for the cooling system and pressure cap
to cool.
If No Steam is Coming from the Engine
Compartment
The ENGINE OVERHEATED STOP ENGINE or
the ENGINE OVERHEATED IDLE ENGINE
message, along with a low coolant
condition, can indicate a serious problem.
If there is an engine overheat warning, but
no steam is seen or heard, the problem may
not be too serious. Sometimes the engine
can get a little too hot when the vehicle:
.Climbs a long hill on a hot day.
.Stops after high-speed driving.
.Idles for long periods in traffic.
.Tows a trailer; see Trailer Towing0280.
If the ENGINE OVERHEATED STOP ENGINE or
the ENGINE OVERHEATED IDLE ENGINE
message appears with no sign of steam, try
this for a minute or so: 1. Turn the air conditioning off.
2. Turn the heater on to the highest temperature and to the highest fan
speed. Open the windows as necessary.
3. When it is safe to do so, pull off the road, shift to P (Park) or N (Neutral) and
let the engine idle.
If the temperature overheat gauge is no
longer in the overheat zone or an overheat
warning no longer displays, the vehicle can
be driven. Continue to drive the vehicle
slowly for about 10 minutes. Keep a safe
vehicle distance from the vehicle in front.
If the warning does not come back on,
continue to drive normally and have the
cooling system checked for proper fill and
function.
If the warning continues, pull over, stop, and
park the vehicle right away.
If there is still no sign of steam and the
vehicle is equipped with an engine driven
cooling fan, push down the accelerator until
the engine speed is about twice as fast as
Page 341 of 440

GMC Sierra/Sierra Denali 2500 HD/3500 HD Owner Manual (GMNA-
Localizing-U.S./Canada-16908340) - 2024 - CRC - 12/7/22
Vehicle Care 339
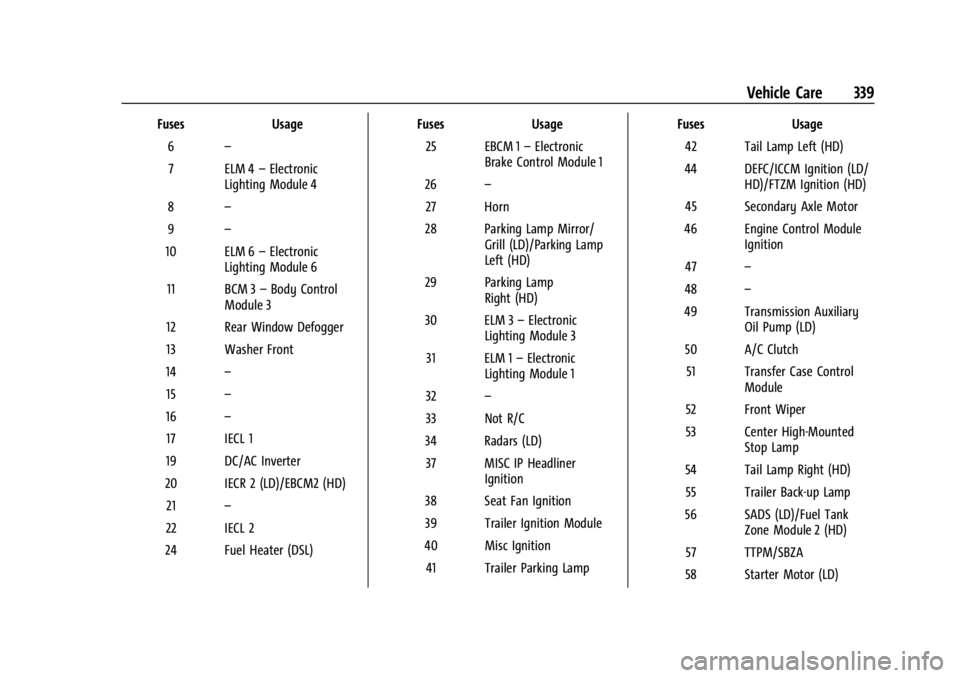
FusesUsage
6 –
7 ELM 4 –Electronic
Lighting Module 4
8 –
9 –
10 ELM 6 –Electronic
Lighting Module 6
11 BCM 3 –Body Control
Module 3
12 Rear Window Defogger
13 Washer Front
14 –
15 –
16 –
17 IECL 1
19 DC/AC Inverter
20 IECR 2 (LD)/EBCM2 (HD) 21 –
22 IECL 2
24 Fuel Heater (DSL) Fuses
Usage
25 EBCM 1 –Electronic
Brake Control Module 1
26 –
27 Horn
28 Parking Lamp Mirror/ Grill (LD)/Parking Lamp
Left (HD)
29 Parking Lamp Right (HD)
30 ELM 3 –Electronic
Lighting Module 3
31 ELM 1 –Electronic
Lighting Module 1
32 –
33 Not R/C
34 Radars (LD) 37 MISC IP Headliner Ignition
38 Seat Fan Ignition
39 Trailer Ignition Module
40 Misc Ignition 41 Trailer Parking Lamp Fuses
Usage
42 Tail Lamp Left (HD)
44 DEFC/ICCM Ignition (LD/ HD)/FTZM Ignition (HD)
45 Secondary Axle Motor
46 Engine Control Module Ignition
47 –
48 –
49 Transmission Auxiliary Oil Pump (LD)
50 A/C Clutch 51 Transfer Case Control Module
52 Front Wiper
53 Center High-Mounted Stop Lamp
54 Tail Lamp Right (HD) 55 Trailer Back-up Lamp
56 SADS (LD)/Fuel Tank Zone Module 2 (HD)
57 TTPM/SBZA
58 Starter Motor (LD)
Page 342 of 440

GMC Sierra/Sierra Denali 2500 HD/3500 HD Owner Manual (GMNA-
Localizing-U.S./Canada-16908340) - 2024 - CRC - 12/7/22
340 Vehicle Care
FusesUsage
60 Powertrain Sensor 2 (DSL)
61 Active Hydraulic Steering (HD)
62 DEFC Batt 1/CVS
63 Trailer Brake
65 –
66 Cooling Fan Motor Left (LD)
67 –
68 DEFC Batt 2
69 Starter Pinion (LD Gas)/ Starter Motor (HD)
71 Cooling Fan Lower (LD)
72 Cooling Fan Right (LD)
73 Trailer Stop/Turn Lamp Left
74 Trailer Interface Module 2
75 Integrated Chassis Control Module
76 Electric RNG BDS Fuses
Usage
78 Engine Control Module
79 Cabin Cool Pump 17W (LD)/Auxiliary
Battery (HD)
80 Powertrain Sensor 1 (DSL)
81 Trailer Stop/Turn Lamp Right
82 Trailer Interface Module 1
83 FTZM 1
84 Trailer Battery 85 –
86 Engine Control Module 87 Injector B Even
88 O2 B Sensor
89 O2 A Sensor
90 Injector A Odd 91 Engine Control Module Throttle Control (HD) Fuses
Usage
92 Cool Fan Clutch (HD DSL)/Aeroshutter
(LD/HD)
Relays Usage
5 Rear Window Defogger
18 DC/AC Inverter
23 Fuel Heater (DSL)
35 Parking Lamp
36 Run/Crank
43 Secondary Axle Motor
59 A/C Clutch
64 Starter Motor (LD)/Cool Fan Clutch (HD DSL)
70 Starter Pinion (LD Gas)/ Starter Motor (HD)
77 Powertrain
Page 344 of 440

GMC Sierra/Sierra Denali 2500 HD/3500 HD Owner Manual (GMNA-
Localizing-U.S./Canada-16908340) - 2024 - CRC - 12/7/22
342 Vehicle Care
FusesUsage
F20 Endgate F22 Rear Sliding Window
F23 –
F24 –
F25 –
F26 –
F27 –
Circuit
Breakers Usage
CB1 –
Relays Usage
K1 Rear Sliding Window Open
K2 Rear sliding Window Close
K3 MFEG Major 1 –
Multifunction End Gate
Major 1
K4 MFEG Minor 1 –
Multifunction End Gate
Minor 1 Relays
Usage
K5 MFEG Minor 2 –
Multifunction End Gate
Minor 2
K6 MFEG Major 2 –
Multifunction End Gate
Major 2
K7 –
K8 –Instrument Panel Fuse Block
(Right)
The right instrument panel fuse block access
door is on the passenger side edge of the
instrument panel.
Pull off the cover to access the front of the
fuse block.
Page 346 of 440

GMC Sierra/Sierra Denali 2500 HD/3500 HD Owner Manual (GMNA-
Localizing-U.S./Canada-16908340) - 2024 - CRC - 12/7/22
344 Vehicle Care
FusesUsage
F1 Right Doors
F2 Left Doors
F3 –
F4 ELM 2 –Electronic Lighting
Module 2
F5 ELM 7 –Electronic Lighting
Module 7
F6 Front Blower
F8 LF Window Switch
F10 Steering Tilt (LD)/UVM (HD)/Electronic Lighting
Module 5
F11 VPM/OHC Camera
F12 CGM/TCP/COL LCK/ DMS (LD)
F14 –
F17 Steering Wheel Controls
F18 –
F19 –
F20 –
F21 – Fuses
Usage
F22 Heated Steering Wheel
F23 –
F24 –
F25 SPOT LAMP LT/RT (LD)
F26 USB Ports/Special Equipment Option Retained
Accessory Power
F27 Accessory Power Outlet/ Retained Accessory Power
F28 Accessory Power Outlet/ Battery
F30 SDM/ICS/IPC/HUD/HMDTY (HD)/HDLM (LD)
F31 BCM 2 –Body Control
Module 2
F32 RFA WCM AUX JACK/CSM AUX JACK/TBCS
F33 BCM 4 –Body Control
Module 4
F34 –
F40 –
F41 – Fuses
Usage
F42 Electric Park Brake Switch
F43 –
F44 Shifter Interface Board (LD) F45 Radio Lo
F46 –
F47 –
F48 Transmission Control Module
F49 Body Control Module 1 F50 –
F51 Battery 1 (HD)
F52 Battery 2 (HD)
F53 –
F54 Sunroof F55 Driver Power Seat
F56 DC DC TRANS 1 (LD) F57 DC DC TRANS 2 (LD)
F58 –
Page 375 of 440

GMC Sierra/Sierra Denali 2500 HD/3500 HD Owner Manual (GMNA-
Localizing-U.S./Canada-16908340) - 2024 - CRC - 12/7/22
Vehicle Care 373
Caution (Continued)
pointing up can damage the wheel.
Always stow the wheel with the valve
stem pointing down and have the
wheel/tire repaired as soon as possible.
Caution
The tire hoist can be damaged if there is
no tension on the cable when using it. To
have the necessary tension, the spare or
road tire and wheel assembly must be
installed on the tire hoist to use it.
{Warning
An improperly stored spare tire could
come loose and cause a crash. To avoid
personal injury or property damage,
always store the spare tire when the
vehicle is parked on a level surface.
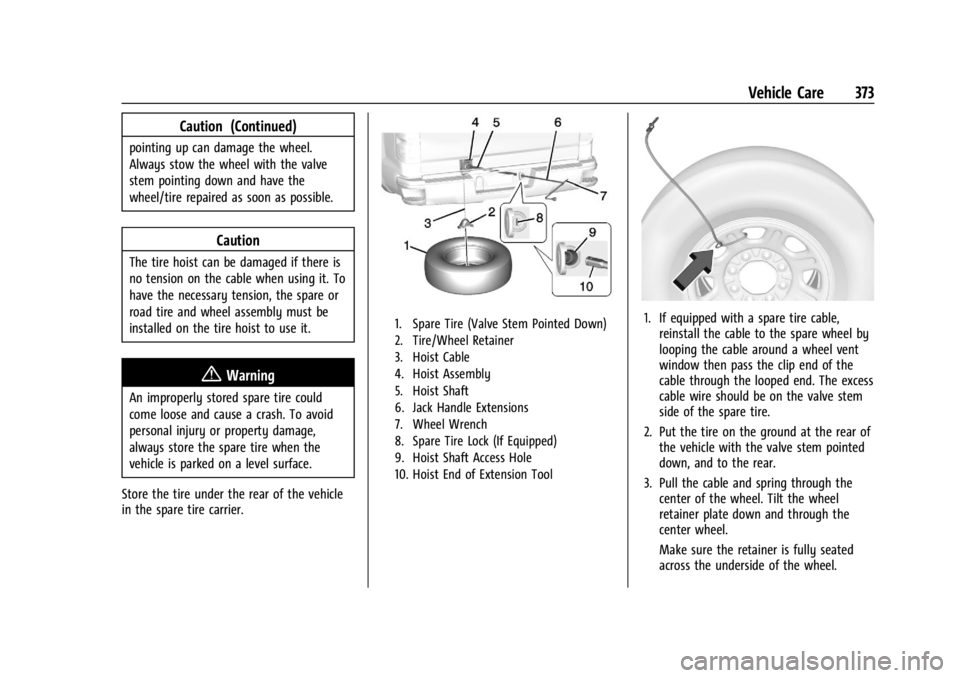
Store the tire under the rear of the vehicle
in the spare tire carrier.
1. Spare Tire (Valve Stem Pointed Down)
2. Tire/Wheel Retainer
3. Hoist Cable
4. Hoist Assembly
5. Hoist Shaft
6. Jack Handle Extensions
7. Wheel Wrench
8. Spare Tire Lock (If Equipped)
9. Hoist Shaft Access Hole
10. Hoist End of Extension Tool1. If equipped with a spare tire cable, reinstall the cable to the spare wheel by
looping the cable around a wheel vent
window then pass the clip end of the
cable through the looped end. The excess
cable wire should be on the valve stem
side of the spare tire.
2. Put the tire on the ground at the rear of the vehicle with the valve stem pointed
down, and to the rear.
3. Pull the cable and spring through the center of the wheel. Tilt the wheel
retainer plate down and through the
center wheel.
Make sure the retainer is fully seated
across the underside of the wheel.
Page 386 of 440

GMC Sierra/Sierra Denali 2500 HD/3500 HD Owner Manual (GMNA-
Localizing-U.S./Canada-16908340) - 2024 - CRC - 12/7/22
384 Vehicle Care
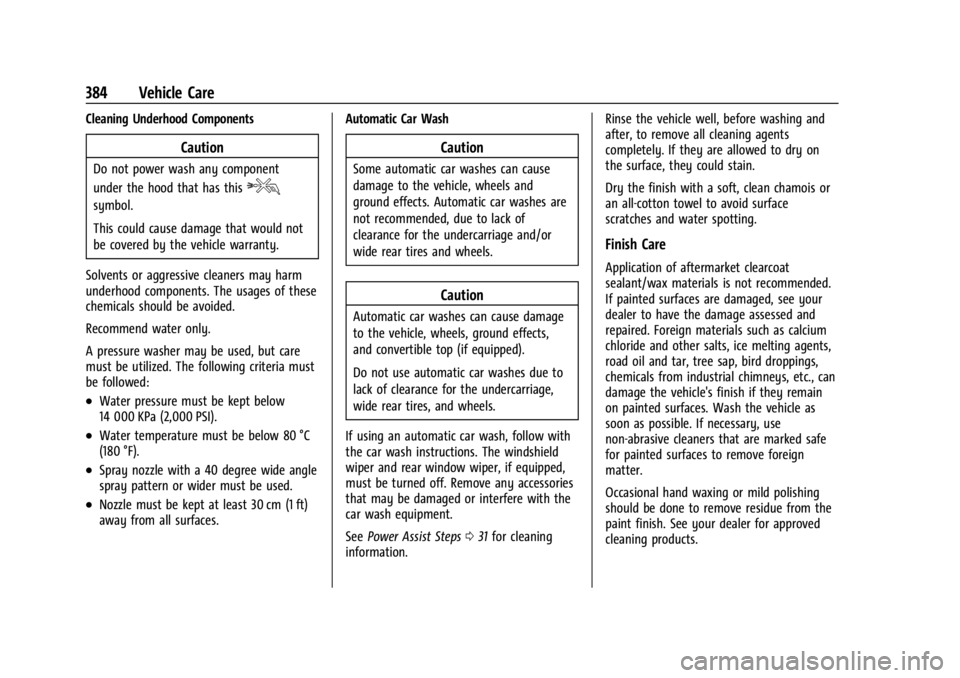
Cleaning Underhood Components
Caution
Do not power wash any component
under the hood that has this
e
symbol.
This could cause damage that would not
be covered by the vehicle warranty.
Solvents or aggressive cleaners may harm
underhood components. The usages of these
chemicals should be avoided.
Recommend water only.
A pressure washer may be used, but care
must be utilized. The following criteria must
be followed:
.Water pressure must be kept below
14 000 KPa (2,000 PSI).
.Water temperature must be below 80 °C
(180 °F).
.Spray nozzle with a 40 degree wide angle
spray pattern or wider must be used.
.Nozzle must be kept at least 30 cm (1 ft)
away from all surfaces. Automatic Car Wash
Caution
Some automatic car washes can cause
damage to the vehicle, wheels and
ground effects. Automatic car washes are
not recommended, due to lack of
clearance for the undercarriage and/or
wide rear tires and wheels.
Caution
Automatic car washes can cause damage
to the vehicle, wheels, ground effects,
and convertible top (if equipped).
Do not use automatic car washes due to
lack of clearance for the undercarriage,
wide rear tires, and wheels.
If using an automatic car wash, follow with
the car wash instructions. The windshield
wiper and rear window wiper, if equipped,
must be turned off. Remove any accessories
that may be damaged or interfere with the
car wash equipment.
See Power Assist Steps 031 for cleaning
information. Rinse the vehicle well, before washing and
after, to remove all cleaning agents
completely. If they are allowed to dry on
the surface, they could stain.
Dry the finish with a soft, clean chamois or
an all-cotton towel to avoid surface
scratches and water spotting.
Finish Care
Application of aftermarket clearcoat
sealant/wax materials is not recommended.
If painted surfaces are damaged, see your
dealer to have the damage assessed and
repaired. Foreign materials such as calcium
chloride and other salts, ice melting agents,
road oil and tar, tree sap, bird droppings,
chemicals from industrial chimneys, etc., can
damage the vehicle's finish if they remain
on painted surfaces. Wash the vehicle as
soon as possible. If necessary, use
non-abrasive cleaners that are marked safe
for painted surfaces to remove foreign
matter.
Occasional hand waxing or mild polishing
should be done to remove residue from the
paint finish. See your dealer for approved
cleaning products.
Page 390 of 440

GMC Sierra/Sierra Denali 2500 HD/3500 HD Owner Manual (GMNA-
Localizing-U.S./Canada-16908340) - 2024 - CRC - 12/7/22
388 Vehicle Care
Inspect power steering for proper
attachment, connections, binding, cracks,
chafing, etc.
Visually check constant velocity joint boots
and axle seals for leaks.
2500/3500 Series vehicles, at least every
engine oil change lubricate the upper and
lower control arm ball joints.
2500/3500 Series vehicles equipped with
steering linkage, at least every engine oil
change lubricate the tie rod ball joints, idler
arm pivot shaft bearings, idler arm socket,
and pitman arm socket.
Caution
Lubrication of applicable suspension
points should not be done unless the
temperature is−12 °C (10 °F) or higher,
or damage could result.
Body Component Lubrication
Lubricate all key lock cylinders, hood hinges,
liftgate hinges, and the steel fuel door hinge
unless the components are plastic. Applying
silicone grease on weatherstrips with a clean
cloth will make them last longer, seal better,
and not stick or squeak.
Underbody Maintenance
At least twice a year, spring and fall, use
plain water to flush any corrosive materials
from the underbody. Take care to
thoroughly clean any areas where mud and
other debris can collect. If equipped with
power assist steps, extend them and then
use a high pressure wash to clean all joints
and gaps.
Do not directly power wash the transfer
case and/or front/rear axle output seals.
High pressure water can overcome the seals
and contaminate the fluid. Contaminated
fluid will decrease the life of the transfer
case and/or axles and should be replaced.
Sheet Metal Damage
If the vehicle is damaged and requires sheet
metal repair or replacement, make sure the
body repair shop applies anti-corrosion
material to parts repaired or replaced to
restore corrosion protection.
Original manufacturer replacement parts will
provide the corrosion protection while
maintaining the vehicle warranty.
Finish Damage
Quickly repair minor chips and scratches
with touch-up materials available from your
dealer to avoid corrosion. Larger areas of
finish damage can be corrected in your
dealer's body and paint shop.
Chemical Paint Spotting
Airborne pollutants can fall upon and attack
painted vehicle surfaces causing blotchy,
ring-shaped discolorations, and small,
irregular dark spots etched into the paint
surface. Refer to “Finish Care”previously in
this section.
Interior Care
To prevent dirt particle abrasions, regularly
clean the vehicle's interior. Before using
cleaners, read and follow all safety
instructions on the label. While cleaning the
interior, open the doors and windows to get
proper ventilation. Newspapers or dark
garments can transfer color to the vehicle’s
interior.