2024 GMC SIERRA DENALI window
[x] Cancel search: windowPage 141 of 440

GMC Sierra/Sierra Denali 2500 HD/3500 HD Owner Manual (GMNA-
Localizing-U.S./Canada-16908340) - 2024 - CRC - 12/15/22
Instruments and Controls 139
The windshield is part of the HUD system.
SeeWindshield Replacement 0332.
Vehicle Messages
Messages displayed on the Driver
Information Center (DIC) indicate the status
of the vehicle or some action that may be
needed to correct a condition. Multiple
messages may appear one after another.
The messages that do not require
immediate action can be acknowledged and
cleared by pressing the thumbwheel. The
messages that require immediate action
cannot be cleared until that action is
performed.
All messages should be taken seriously;
clearing the message does not correct the
problem.
If a SERVICE message appears, see your
dealer.
Follow the instructions given in the
messages. The system displays messages
regarding the following topics:
.Service Messages
.Fluid Levels
.Vehicle Security
.Brakes
.Steering
.Ride Control Systems
.Advanced Driver Assistance Systems
.Cruise Control
.Lighting and Bulb Replacement
.Wiper/Washer Systems
.Doors and Windows
.Seat Belts
.Airbag Systems
.Engine and Transmission
.Tire Pressure
.Battery
Engine Power Messages
REDUCED ACCELERATION DRIVE
WITH CARE
This message displays when the vehicle's
propulsion power is reduced. A reduction in
propulsion power can affect the vehicle's
ability to accelerate. If this message is on,
but there is no observed reduction in
performance, proceed to your destination.
Under certain conditions the performance
may be reduced the next time the vehicle is
driven. The vehicle may be driven while this
message is on, but maximum acceleration
and speed may be reduced. Anytime this message stays on, or displays repeatedly,
the vehicle should be taken to your dealer
for service as soon as possible.
Under certain operating conditions,
propulsion will be disabled. Try restarting
after the ignition has been off for
two minutes.
Vehicle Speed Messages
SPEED LIMITED TO XXX KM/H (MPH)
This message shows that the vehicle speed
has been limited to the speed displayed. The
limited speed is a protection for various
propulsion and vehicle systems, such as
lubrication, thermal, brakes, suspension,
Teen Driver if equipped, or tires.
(If equipped with a diesel engine, see the
Duramax Diesel supplement.)
–For Diesel
Page 154 of 440

GMC Sierra/Sierra Denali 2500 HD/3500 HD Owner Manual (GMNA-
Localizing-U.S./Canada-16908340) - 2024 - CRC - 12/7/22
152 Lighting
Battery Load Management
The vehicle has Electric Power Management
(EPM), which estimates the battery's
temperature and state of charge. It then
adjusts the voltage for best performance
and extended life of the battery.
When the battery's state of charge is low,
the voltage is raised slightly to quickly bring
the charge back up. When the state of
charge is high, the voltage is lowered
slightly to prevent overcharging. The
voltmeter gauge or the voltage display on
the Driver Information Center (DIC),
if equipped, may show the voltage moving
up or down. This is normal. If there is a
problem, an alert will be displayed.
The battery can be discharged at idle if the
electrical loads are very high. This is true for
all vehicles. This is because the generator
(alternator) may not be spinning fast
enough at idle to produce all the power that
is needed for very high electrical loads.A high electrical load occurs when several of
the following are on, such as: headlamps,
high beams, fog lamps, rear window
defogger, climate control fan at high speed,
heated seats, engine cooling fans, trailer
loads, and loads plugged into accessory
power outlets.
EPM works to prevent excessive discharge of
the battery. It does this by balancing the
generator's output and the vehicle's
electrical needs. It can increase engine idle
speed to generate more power, whenever
needed. It can temporarily reduce the power
demands of some accessories.
Normally, these actions occur in steps or
levels, without being noticeable. In rare
cases at the highest levels of corrective
action, this action may be noticeable to the
driver. If so, a DIC message might be
displayed and it is recommended that the
driver reduce the electrical loads as much as
possible.
Battery Power Protection
This feature helps prevent the battery from
being drained, if the interior courtesy lamps
or reading lamps are accidentally left on.
If any of these lamps are left on, they
automatically turn off after 10 minutes,
if the ignition is off. The lamps will not
come back on again until one of the
following occurs:
.The ignition is turned on.
.The doors are closed and then re-opened.
Exterior Lighting Battery Saver
The exterior lamps turn off about 10 minutes
after the vehicle is turned off, if the parking
lamps or headlamps have been manually
left on. This protects against draining the
battery. To restart the 10-minute timer, turn
the exterior lamp control to the
Oposition
and then back to the
;or2position.
To keep the lamps on for more than
10 minutes, the vehicle must be on or in
accessory mode.
Page 161 of 440

GMC Sierra/Sierra Denali 2500 HD/3500 HD Owner Manual (GMNA-
Localizing-U.S./Canada-16908340) - 2024 - CRC - 12/7/22
Infotainment System 159
Spread
Spread is used to zoom in on a map, certain
images, or a web page. Place finger and
thumb together on the display, then move
them apart.
Pinch
Pinch is used to zoom out on a map, certain
images, or a web page. Place finger and
thumb apart on the display, then move
them together.
Cleaning High Gloss Surfaces and Vehicle
Information and Radio Displays
For vehicles with high gloss surfaces or
vehicle displays, use a microfiber cloth to
wipe surfaces. Before wiping the surface
with the microfiber cloth, use a soft bristle
brush to remove dirt that could scratch the
surface. Then use the microfiber cloth by
gently rubbing to clean. Never use window
cleaners or solvents. Periodically hand wash
the microfiber cloth separately, using mild
soap. Do not use bleach or fabric softener.
Rinse thoroughly and air dry before
next use.
Software Updates
Over-the-Air Software Updates
If equipped, see“Updates”underSettings
(Uplevel Radio) 0183 or
Settings (Base Radio) 0181 for details on
software updates.
Radio
AM-FM Radio (Base Radio)
Playing the Radio
From the Home Page, touch the Audio icon
to display the active audio source page.
Choose from a list of the three most
recently used sources listed at the left side
of the screen. Choose More to display a list
of available Sources. Examples of available
sources are AM, FM, SiriusXM (if equipped),
MyMedia, USB, AUX (if equipped), and
Bluetooth.
Infotainment System Sound Menu
From any of the audio source main pages,
touch Sound to display the following:
Equalizer : Touch to adjust Bass, Midrange,
and Treble using the controls on the
infotainment display.
Fade/Balance : Touch to adjust using the
controls on the infotainment display or by
tapping/dragging the crosshair.
Page 171 of 440
GMC Sierra/Sierra Denali 2500 HD/3500 HD Owner Manual (GMNA-
Localizing-U.S./Canada-16908340) - 2024 - CRC - 12/7/22
Infotainment System 169
.Use direct commands without a lot of
extra words. For example,“Call
at work,” “Play” followed by the artist or
song name, or “Play”followed by the
radio station number.
Direct commands are more clearly
understood by the system. An example of a
direct command is “Dial
If a cell phone number was saved with a
name and a place, the direct command
should include both. For example “Call
Voice Recognition for the Radio
When voice is started, the voice recognition
commands for AM, FM, SiriusXM (if
equipped), and media apps (if supported) are
available.
“Play
radio station frequency identified in the
command (like “nine fifty”).
“Play
radio station frequency identified in the
command (like “one oh one point one”). “Play channel
SiriusXM”
:Tune to the SiriusXM radio
station channel number identified in the
command. This command may require an
online connection.
“Play
Tune to the SiriusXM radio station channel
name identified in the command. This
command may require an online connection.
“Play
Page 175 of 440
GMC Sierra/Sierra Denali 2500 HD/3500 HD Owner Manual (GMNA-
Localizing-U.S./Canada-16908340) - 2024 - CRC - 12/7/22
Infotainment System 173
2. Touch the new cell phone to link to fromthe list of available phones. See “First to
Connect Paired Phones” previously in this
section.
Switching to Handset or
Hands-Free Mode
To switch between handset or
hands-free mode:
.While the active call is hands-free, touch
the Audio Output option, then touch
Phone to switch to the handset mode.
The mute icon will not be available or
functional while Handset mode is active.
.While the active call is on the handset,
touch the Audio Output option, then
touch Car Speakers to switch to the
hands-free mode.
Making a Call Using Contacts
Calls can be made through the Bluetooth
system using personal cell phone contact
information for all cell phones that support
the Phone Book feature. Become familiar
with the cell phone settings and operation
and that the phone is set to allow the
sharing of contacts over Bluetooth with the
vehicle. Verify the cell phone supports this feature and that the phone is set to allow
the sharing of contacts over Bluetooth with
the vehicle.
The Contacts menu accesses the phone book
stored in the cell phone.
To make a call using the Contacts menu:
1. Touch the Phone icon on the Home Page or on the shortcut tray near the left of
the display.
2. Touch Contacts.
3. There are two methods to search for contacts:
.Search bar –Touch the search icon
on the top right of the Phones
window and type the name or
number of the contact on the
keyboard. Search results will be
displayed corresponding to the user
input. Touch the name to call.
.Scroll –Touch the list and scroll,
or use the scrollbar on the left side
of the Phones window. Touch the
name to call.
Making a Call Using the Recents Menu
The Recents menu accesses the recents call
list from your cell phone.
To make a call using the Recents menu:
1. Touch the Phone icon on the Home Page or on the shortcut tray near the left of
the display.
2. Touch Recents.
3. Touch the name or number to call.
Making a Call Using the Keypad
To make a call by dialing the numbers: 1. Touch the Phone icon on the Home Page or on the shortcut tray near the left of
the display.
2. Touch Keypad and enter a phone number.
3. Touch the phone icon on the infotainment display to start dialing the
number.
Searching Contacts Using the Keypad
To search for contacts using the keypad:
1. Touch the Phone icon on the Home Page.
2. Touch Keypad and enter partial phone numbers or contact names using the
digits on the keypad to search.
Page 193 of 440
GMC Sierra/Sierra Denali 2500 HD/3500 HD Owner Manual (GMNA-
Localizing-U.S./Canada-16908340) - 2024 - CRC - 12/7/22
Climate Controls 191
Climate Controls
Climate Control Systems
Climate Control Systems . . . . . . . . . . . . . . . 191
Dual Automatic Climate ControlSystem . . . . . . . . . . . . . . . . . . . . . . . . . . . . . . 193
Air Vents
Air Vents . . . . . . . . . . . . . . . . . . . . . . . . . . . . . . 196
Maintenance
Passenger Compartment Air Filter . . . . . 196
Service . . . . . . . . . . . . . . . . . . . . . . . . . . . . . . . . . 197
Climate Control Systems
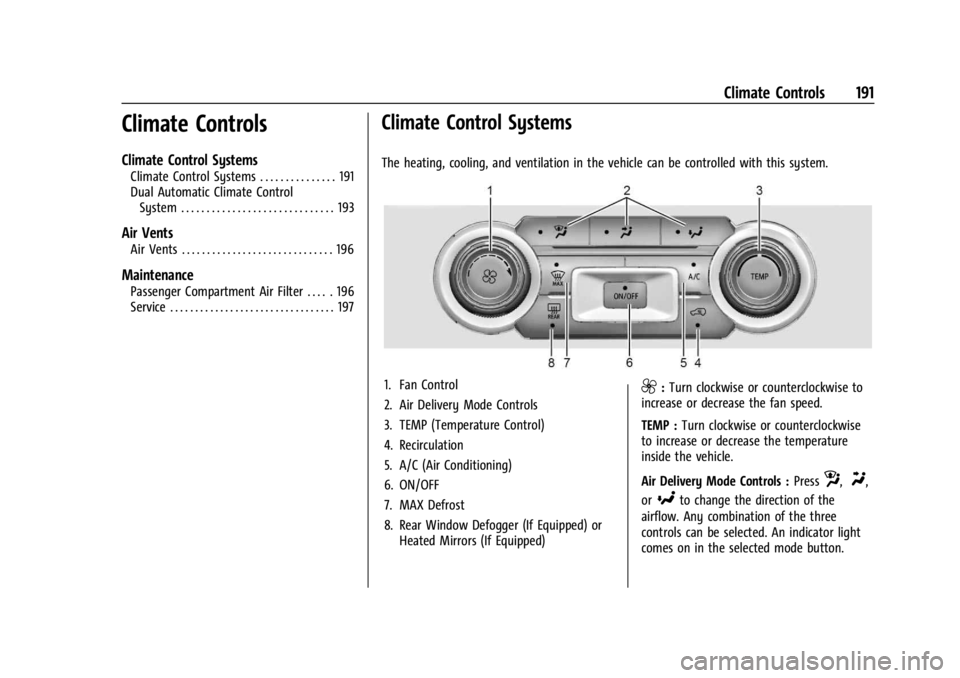
The heating, cooling, and ventilation in the vehicle can be controlled with this system.
1. Fan Control
2. Air Delivery Mode Controls
3. TEMP (Temperature Control)
4. Recirculation
5. A/C (Air Conditioning)
6. ON/OFF
7. MAX Defrost
8. Rear Window Defogger (If Equipped) or Heated Mirrors (If Equipped)9:Turn clockwise or counterclockwise to
increase or decrease the fan speed.
TEMP : Turn clockwise or counterclockwise
to increase or decrease the temperature
inside the vehicle.
Air Delivery Mode Controls : Press
z,Y,
or
[to change the direction of the
airflow. Any combination of the three
controls can be selected. An indicator light
comes on in the selected mode button.
Page 194 of 440
GMC Sierra/Sierra Denali 2500 HD/3500 HD Owner Manual (GMNA-
Localizing-U.S./Canada-16908340) - 2024 - CRC - 12/7/22
192 Climate Controls
To change the current mode, select one or
more of the following. An indicator light will
illuminate:
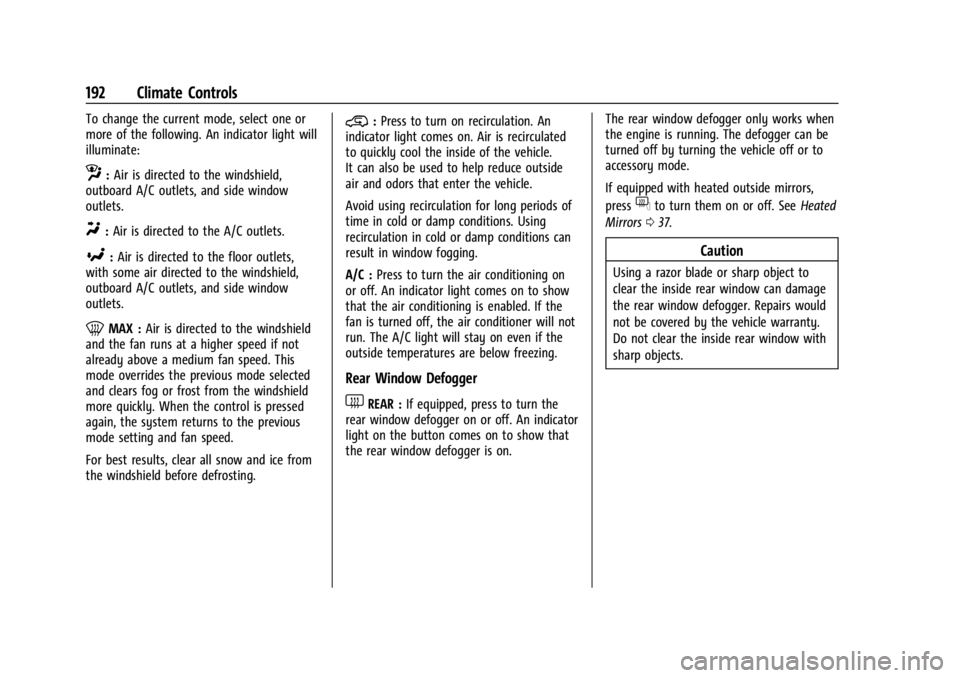
z:Air is directed to the windshield,
outboard A/C outlets, and side window
outlets.
Y: Air is directed to the A/C outlets.
[:Air is directed to the floor outlets,
with some air directed to the windshield,
outboard A/C outlets, and side window
outlets.
0MAX : Air is directed to the windshield
and the fan runs at a higher speed if not
already above a medium fan speed. This
mode overrides the previous mode selected
and clears fog or frost from the windshield
more quickly. When the control is pressed
again, the system returns to the previous
mode setting and fan speed.
For best results, clear all snow and ice from
the windshield before defrosting.
@: Press to turn on recirculation. An
indicator light comes on. Air is recirculated
to quickly cool the inside of the vehicle.
It can also be used to help reduce outside
air and odors that enter the vehicle.
Avoid using recirculation for long periods of
time in cold or damp conditions. Using
recirculation in cold or damp conditions can
result in window fogging.
A/C : Press to turn the air conditioning on
or off. An indicator light comes on to show
that the air conditioning is enabled. If the
fan is turned off, the air conditioner will not
run. The A/C light will stay on even if the
outside temperatures are below freezing.
Rear Window Defogger
1REAR : If equipped, press to turn the
rear window defogger on or off. An indicator
light on the button comes on to show that
the rear window defogger is on. The rear window defogger only works when
the engine is running. The defogger can be
turned off by turning the vehicle off or to
accessory mode.
If equipped with heated outside mirrors,
press
fto turn them on or off. See
Heated
Mirrors 037.
Caution
Using a razor blade or sharp object to
clear the inside rear window can damage
the rear window defogger. Repairs would
not be covered by the vehicle warranty.
Do not clear the inside rear window with
sharp objects.
Page 195 of 440
GMC Sierra/Sierra Denali 2500 HD/3500 HD Owner Manual (GMNA-
Localizing-U.S./Canada-16908340) - 2024 - CRC - 12/7/22
Climate Controls 193
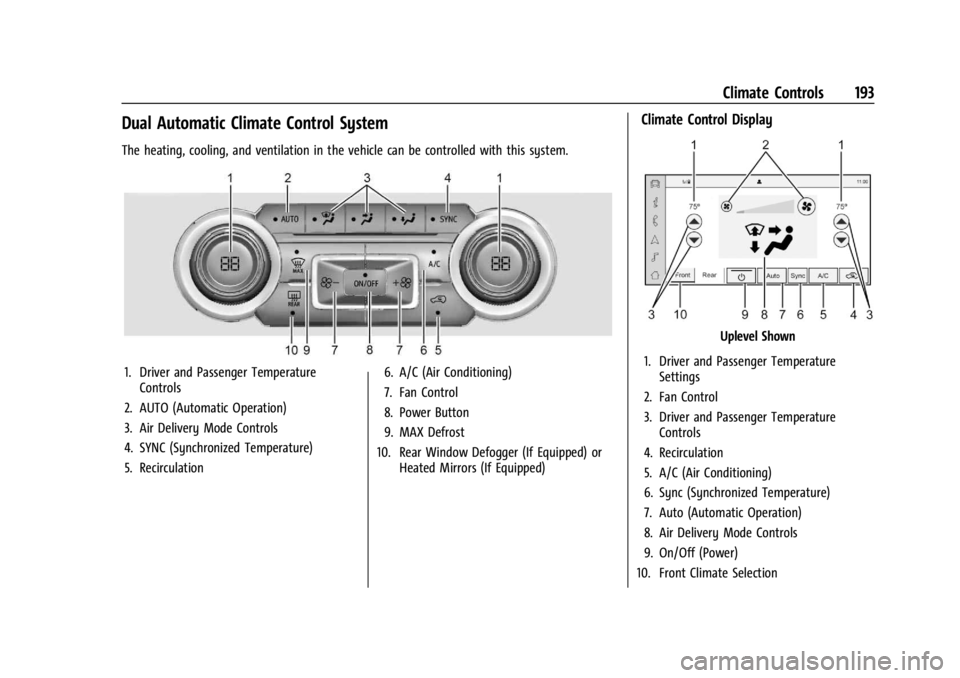
Dual Automatic Climate Control System
The heating, cooling, and ventilation in the vehicle can be controlled with this system.
1. Driver and Passenger TemperatureControls
2. AUTO (Automatic Operation)
3. Air Delivery Mode Controls
4. SYNC (Synchronized Temperature)
5. Recirculation 6. A/C (Air Conditioning)
7. Fan Control
8. Power Button
9. MAX Defrost
10. Rear Window Defogger (If Equipped) or Heated Mirrors (If Equipped)
Climate Control Display
Uplevel Shown
1. Driver and Passenger Temperature Settings
2. Fan Control
3. Driver and Passenger Temperature Controls
4. Recirculation
5. A/C (Air Conditioning)
6. Sync (Synchronized Temperature)
7. Auto (Automatic Operation)
8. Air Delivery Mode Controls
9. On/Off (Power)
10. Front Climate Selection