2024 GMC SIERRA DENALI lock
[x] Cancel search: lockPage 375 of 440
GMC Sierra/Sierra Denali 2500 HD/3500 HD Owner Manual (GMNA-
Localizing-U.S./Canada-16908340) - 2024 - CRC - 12/7/22
Vehicle Care 373
Caution (Continued)
pointing up can damage the wheel.
Always stow the wheel with the valve
stem pointing down and have the
wheel/tire repaired as soon as possible.
Caution
The tire hoist can be damaged if there is
no tension on the cable when using it. To
have the necessary tension, the spare or
road tire and wheel assembly must be
installed on the tire hoist to use it.
{Warning
An improperly stored spare tire could
come loose and cause a crash. To avoid
personal injury or property damage,
always store the spare tire when the
vehicle is parked on a level surface.
Store the tire under the rear of the vehicle
in the spare tire carrier.
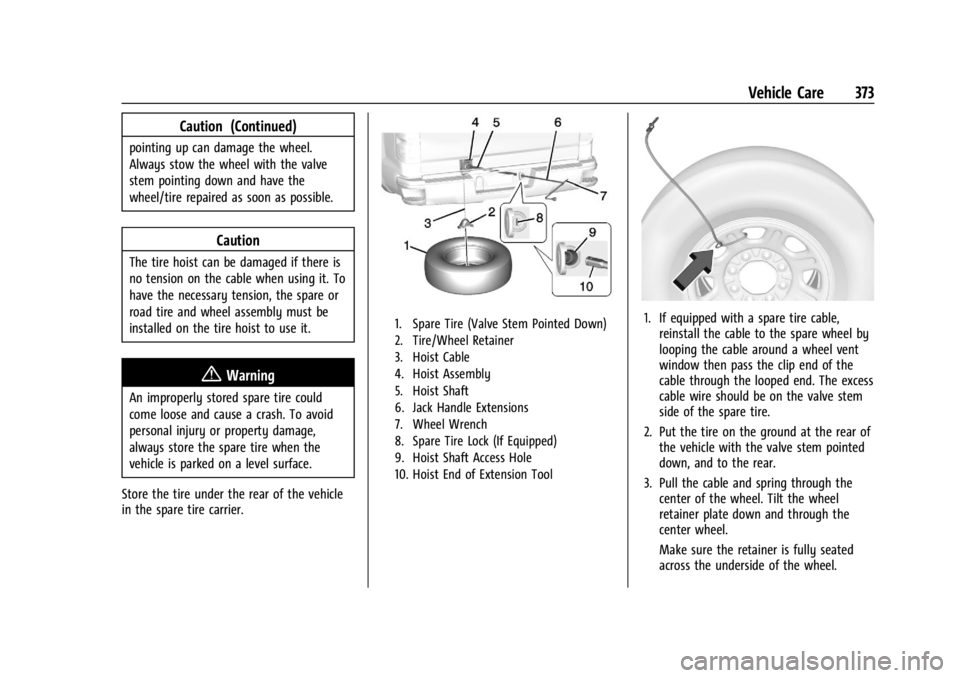
1. Spare Tire (Valve Stem Pointed Down)
2. Tire/Wheel Retainer
3. Hoist Cable
4. Hoist Assembly
5. Hoist Shaft
6. Jack Handle Extensions
7. Wheel Wrench
8. Spare Tire Lock (If Equipped)
9. Hoist Shaft Access Hole
10. Hoist End of Extension Tool1. If equipped with a spare tire cable, reinstall the cable to the spare wheel by
looping the cable around a wheel vent
window then pass the clip end of the
cable through the looped end. The excess
cable wire should be on the valve stem
side of the spare tire.
2. Put the tire on the ground at the rear of the vehicle with the valve stem pointed
down, and to the rear.
3. Pull the cable and spring through the center of the wheel. Tilt the wheel
retainer plate down and through the
center wheel.
Make sure the retainer is fully seated
across the underside of the wheel.
Page 376 of 440
GMC Sierra/Sierra Denali 2500 HD/3500 HD Owner Manual (GMNA-
Localizing-U.S./Canada-16908340) - 2024 - CRC - 12/7/22
374 Vehicle Care
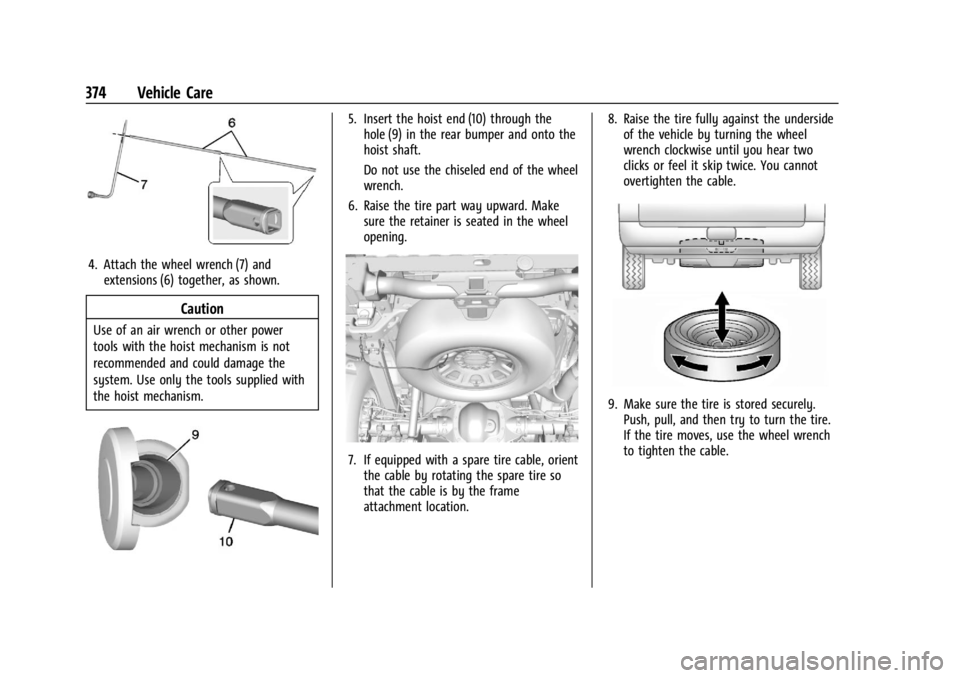
4. Attach the wheel wrench (7) andextensions (6) together, as shown.
Caution
Use of an air wrench or other power
tools with the hoist mechanism is not
recommended and could damage the
system. Use only the tools supplied with
the hoist mechanism.
5. Insert the hoist end (10) through thehole (9) in the rear bumper and onto the
hoist shaft.
Do not use the chiseled end of the wheel
wrench.
6. Raise the tire part way upward. Make sure the retainer is seated in the wheel
opening.
7. If equipped with a spare tire cable, orientthe cable by rotating the spare tire so
that the cable is by the frame
attachment location. 8. Raise the tire fully against the underside
of the vehicle by turning the wheel
wrench clockwise until you hear two
clicks or feel it skip twice. You cannot
overtighten the cable.
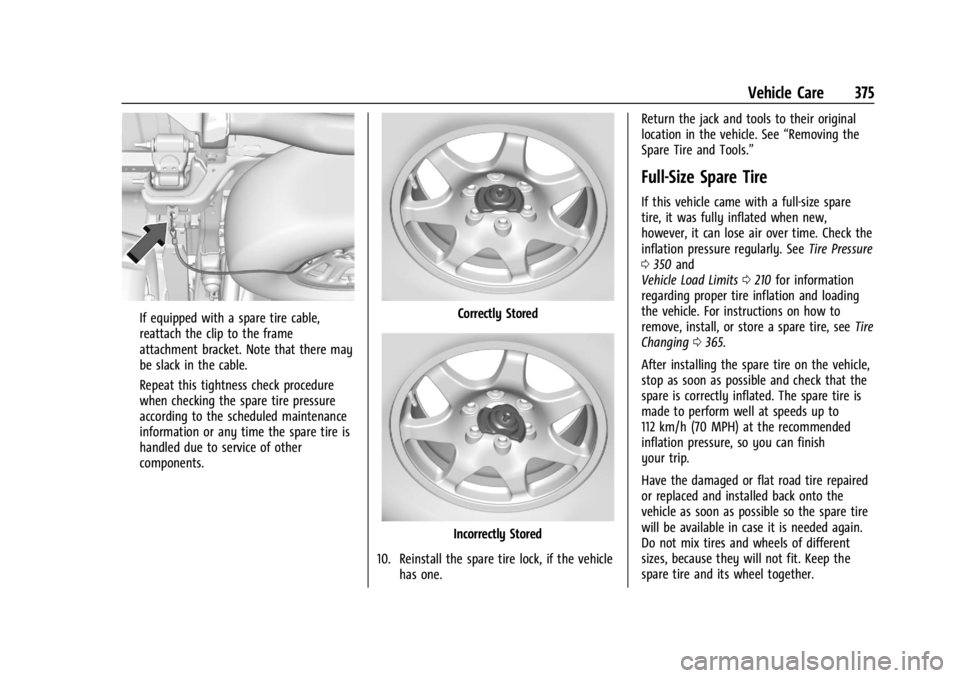
9. Make sure the tire is stored securely.Push, pull, and then try to turn the tire.
If the tire moves, use the wheel wrench
to tighten the cable.
Page 377 of 440
GMC Sierra/Sierra Denali 2500 HD/3500 HD Owner Manual (GMNA-
Localizing-U.S./Canada-16908340) - 2024 - CRC - 12/7/22
Vehicle Care 375
If equipped with a spare tire cable,
reattach the clip to the frame
attachment bracket. Note that there may
be slack in the cable.
Repeat this tightness check procedure
when checking the spare tire pressure
according to the scheduled maintenance
information or any time the spare tire is
handled due to service of other
components.Correctly Stored
Incorrectly Stored
10. Reinstall the spare tire lock, if the vehicle has one. Return the jack and tools to their original
location in the vehicle. See
“Removing the
Spare Tire and Tools.”
Full-Size Spare Tire
If this vehicle came with a full-size spare
tire, it was fully inflated when new,
however, it can lose air over time. Check the
inflation pressure regularly. See Tire Pressure
0 350 and
Vehicle Load Limits 0210 for information
regarding proper tire inflation and loading
the vehicle. For instructions on how to
remove, install, or store a spare tire, see Tire
Changing 0365.
After installing the spare tire on the vehicle,
stop as soon as possible and check that the
spare is correctly inflated. The spare tire is
made to perform well at speeds up to
112 km/h (70 MPH) at the recommended
inflation pressure, so you can finish
your trip.
Have the damaged or flat road tire repaired
or replaced and installed back onto the
vehicle as soon as possible so the spare tire
will be available in case it is needed again.
Do not mix tires and wheels of different
sizes, because they will not fit. Keep the
spare tire and its wheel together.
Page 383 of 440
GMC Sierra/Sierra Denali 2500 HD/3500 HD Owner Manual (GMNA-
Localizing-U.S./Canada-16908340) - 2024 - CRC - 12/7/22
Vehicle Care 381
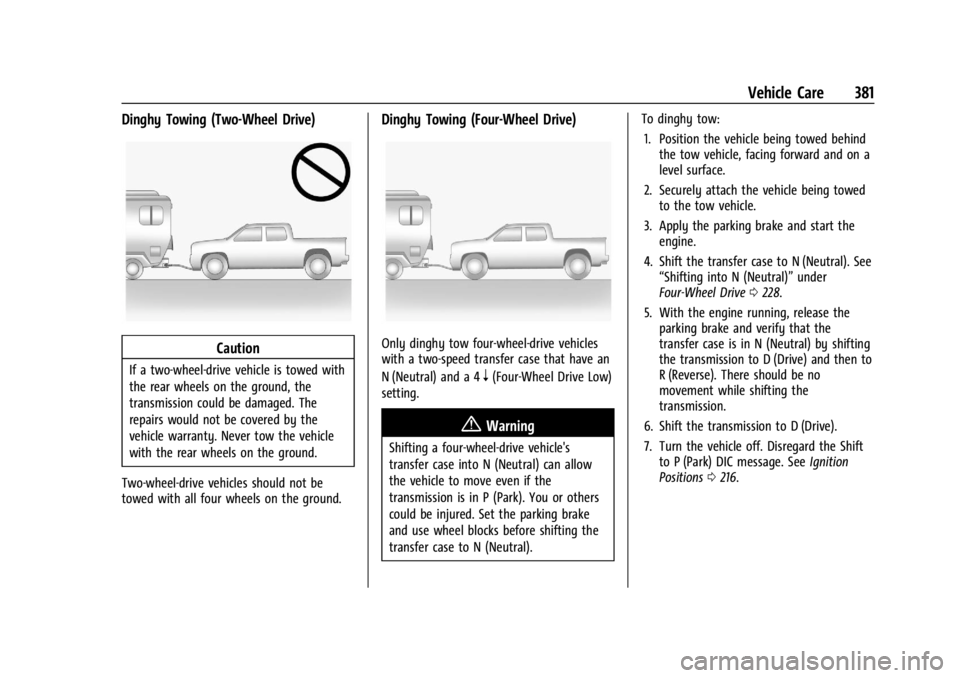
Dinghy Towing (Two-Wheel Drive)
Caution
If a two-wheel-drive vehicle is towed with
the rear wheels on the ground, the
transmission could be damaged. The
repairs would not be covered by the
vehicle warranty. Never tow the vehicle
with the rear wheels on the ground.
Two-wheel-drive vehicles should not be
towed with all four wheels on the ground.
Dinghy Towing (Four-Wheel Drive)
Only dinghy tow four-wheel-drive vehicles
with a two-speed transfer case that have an
N (Neutral) and a 4
n(Four-Wheel Drive Low)
setting.
{Warning
Shifting a four-wheel-drive vehicle's
transfer case into N (Neutral) can allow
the vehicle to move even if the
transmission is in P (Park). You or others
could be injured. Set the parking brake
and use wheel blocks before shifting the
transfer case to N (Neutral). To dinghy tow:
1. Position the vehicle being towed behind the tow vehicle, facing forward and on a
level surface.
2. Securely attach the vehicle being towed to the tow vehicle.
3. Apply the parking brake and start the engine.
4. Shift the transfer case to N (Neutral). See “Shifting into N (Neutral)” under
Four-Wheel Drive 0228.
5. With the engine running, release the parking brake and verify that the
transfer case is in N (Neutral) by shifting
the transmission to D (Drive) and then to
R (Reverse). There should be no
movement while shifting the
transmission.
6. Shift the transmission to D (Drive).
7. Turn the vehicle off. Disregard the Shift to P (Park) DIC message. See Ignition
Positions 0216.
Page 384 of 440
GMC Sierra/Sierra Denali 2500 HD/3500 HD Owner Manual (GMNA-
Localizing-U.S./Canada-16908340) - 2024 - CRC - 12/7/22
382 Vehicle Care
{Warning
To avoid death, serious injury,
or property damage, before dinghy
towing the vehicle, always disconnect and
secure the negative battery cable and
cover the negative battery post and cable
with a non-conductive material. If the
battery is left connected or the battery
cable contacts the post, the Electric
Parking Brake may activate during
towing, which could cause a crash.
8. Disconnect the negative (–) battery cable. See “Negative Battery Cable
Disconnection” inBattery - North
America 0327.
9. Shift the transmission to P (Park).
Caution
If the steering column is locked, vehicle
damage may occur.
10. Move the steering wheel to make sure the steering column is unlocked.
11. Keep the remote key outside of the vehicle and manually lock the doors.
Access the vehicle by using the key in
the door lock. See Door Locks022. Disconnecting the Towed Vehicle
Before disconnecting from the tow vehicle:
1. Park on a level surface. Secure the vehicle with wheel blocks.
2. Reconnect the negative (–) battery. See Battery - North America 0327.
3. Turn on the vehicle. With your foot off the brake pedal, press and hold ENGINE
START/STOP for five seconds until the
green light comes on in the button. See
Ignition Positions 0216.
4. Set the parking brake. See Electric
Parking Brake 0234.
5. Disconnect from the tow vehicle.
6. Shift the transmission to N (Neutral).
7. Shift the transfer case to 2
m(Two-Wheel
Drive High). When the shift to 2
m
(Two-Wheel Drive High) is complete, the
light in the instrument cluster will stop
flashing and stay lit. See
Four-Wheel-Drive Light 0125.
8. Start the engine. Check that the vehicle is in 2
m(Two-Wheel Drive High) by
starting the engine and shifting the
transmission to D (Drive) and then to
R (Reverse). There should be movement
of the vehicle while shifting. 9. Shift the transmission to P (Park) and
turn off the vehicle.
10. Release the parking brake and remove the wheel blocks.
11. Reset any lost presets.
The outside temperature display will
default to 0 °C (32 °F) but will reset with
normal usage.
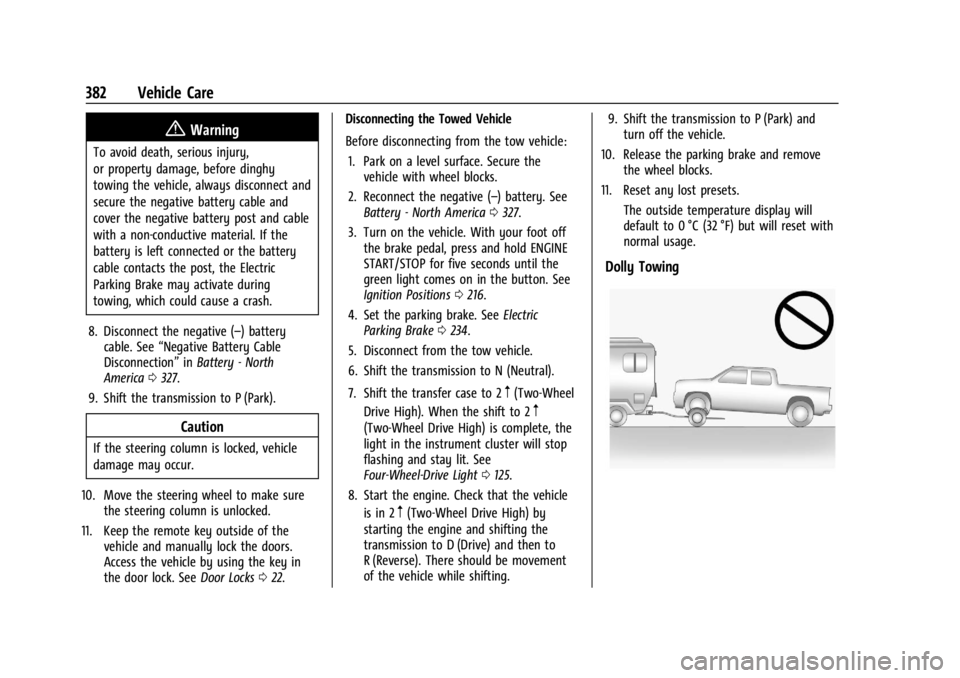
Dolly Towing
Page 385 of 440
GMC Sierra/Sierra Denali 2500 HD/3500 HD Owner Manual (GMNA-
Localizing-U.S./Canada-16908340) - 2024 - CRC - 12/7/22
Vehicle Care 383
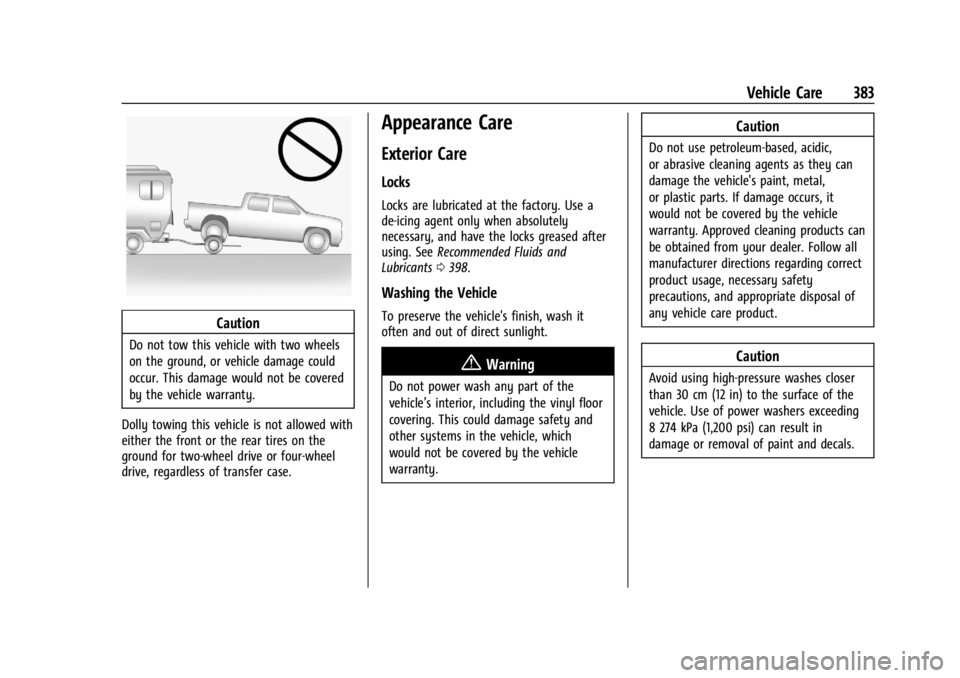
Caution
Do not tow this vehicle with two wheels
on the ground, or vehicle damage could
occur. This damage would not be covered
by the vehicle warranty.
Dolly towing this vehicle is not allowed with
either the front or the rear tires on the
ground for two-wheel drive or four-wheel
drive, regardless of transfer case.
Appearance Care
Exterior Care
Locks
Locks are lubricated at the factory. Use a
de-icing agent only when absolutely
necessary, and have the locks greased after
using. See Recommended Fluids and
Lubricants 0398.
Washing the Vehicle
To preserve the vehicle's finish, wash it
often and out of direct sunlight.
{Warning
Do not power wash any part of the
vehicle’s interior, including the vinyl floor
covering. This could damage safety and
other systems in the vehicle, which
would not be covered by the vehicle
warranty.
Caution
Do not use petroleum-based, acidic,
or abrasive cleaning agents as they can
damage the vehicle's paint, metal,
or plastic parts. If damage occurs, it
would not be covered by the vehicle
warranty. Approved cleaning products can
be obtained from your dealer. Follow all
manufacturer directions regarding correct
product usage, necessary safety
precautions, and appropriate disposal of
any vehicle care product.
Caution
Avoid using high-pressure washes closer
than 30 cm (12 in) to the surface of the
vehicle. Use of power washers exceeding
8 274 kPa (1,200 psi) can result in
damage or removal of paint and decals.
Page 390 of 440
GMC Sierra/Sierra Denali 2500 HD/3500 HD Owner Manual (GMNA-
Localizing-U.S./Canada-16908340) - 2024 - CRC - 12/7/22
388 Vehicle Care
Inspect power steering for proper
attachment, connections, binding, cracks,
chafing, etc.
Visually check constant velocity joint boots
and axle seals for leaks.
2500/3500 Series vehicles, at least every
engine oil change lubricate the upper and
lower control arm ball joints.
2500/3500 Series vehicles equipped with
steering linkage, at least every engine oil
change lubricate the tie rod ball joints, idler
arm pivot shaft bearings, idler arm socket,
and pitman arm socket.
Caution
Lubrication of applicable suspension
points should not be done unless the
temperature is−12 °C (10 °F) or higher,
or damage could result.
Body Component Lubrication
Lubricate all key lock cylinders, hood hinges,
liftgate hinges, and the steel fuel door hinge
unless the components are plastic. Applying
silicone grease on weatherstrips with a clean
cloth will make them last longer, seal better,
and not stick or squeak.
Underbody Maintenance
At least twice a year, spring and fall, use
plain water to flush any corrosive materials
from the underbody. Take care to
thoroughly clean any areas where mud and
other debris can collect. If equipped with
power assist steps, extend them and then
use a high pressure wash to clean all joints
and gaps.
Do not directly power wash the transfer
case and/or front/rear axle output seals.
High pressure water can overcome the seals
and contaminate the fluid. Contaminated
fluid will decrease the life of the transfer
case and/or axles and should be replaced.
Sheet Metal Damage
If the vehicle is damaged and requires sheet
metal repair or replacement, make sure the
body repair shop applies anti-corrosion
material to parts repaired or replaced to
restore corrosion protection.
Original manufacturer replacement parts will
provide the corrosion protection while
maintaining the vehicle warranty.
Finish Damage
Quickly repair minor chips and scratches
with touch-up materials available from your
dealer to avoid corrosion. Larger areas of
finish damage can be corrected in your
dealer's body and paint shop.
Chemical Paint Spotting
Airborne pollutants can fall upon and attack
painted vehicle surfaces causing blotchy,
ring-shaped discolorations, and small,
irregular dark spots etched into the paint
surface. Refer to “Finish Care”previously in
this section.
Interior Care
To prevent dirt particle abrasions, regularly
clean the vehicle's interior. Before using
cleaners, read and follow all safety
instructions on the label. While cleaning the
interior, open the doors and windows to get
proper ventilation. Newspapers or dark
garments can transfer color to the vehicle’s
interior.
Page 394 of 440
GMC Sierra/Sierra Denali 2500 HD/3500 HD Owner Manual (GMNA-
Localizing-U.S./Canada-16908340) - 2024 - CRC - 12/7/22
392 Vehicle Care
.Use the floor mat/liner insert with the
correct side up. Do not turn it over.
.Do not place anything on top of the
driver side floor mat/liner.
.Use only a single floor mat/liner on the
driver side.
.Do not place one floor mat/liner on top
of another.
Removing and Replacing the Floor Mats/
Liners
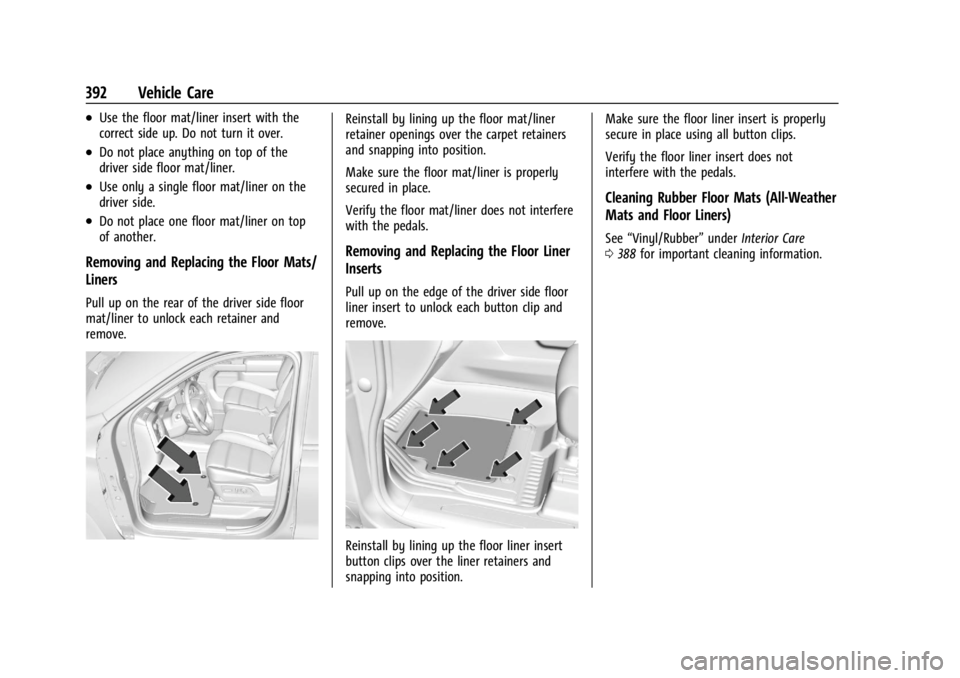
Pull up on the rear of the driver side floor
mat/liner to unlock each retainer and
remove.
Reinstall by lining up the floor mat/liner
retainer openings over the carpet retainers
and snapping into position.
Make sure the floor mat/liner is properly
secured in place.
Verify the floor mat/liner does not interfere
with the pedals.
Removing and Replacing the Floor Liner
Inserts
Pull up on the edge of the driver side floor
liner insert to unlock each button clip and
remove.
Reinstall by lining up the floor liner insert
button clips over the liner retainers and
snapping into position.Make sure the floor liner insert is properly
secure in place using all button clips.
Verify the floor liner insert does not
interfere with the pedals.
Cleaning Rubber Floor Mats (All-Weather
Mats and Floor Liners)
See
“Vinyl/Rubber” underInterior Care
0 388 for important cleaning information.