2024 GMC SIERRA DENALI lock
[x] Cancel search: lockPage 269 of 440

GMC Sierra/Sierra Denali 2500 HD/3500 HD Owner Manual (GMNA-
Localizing-U.S./Canada-16908340) - 2024 - CRC - 12/13/22
Driving and Operating 267
(50 mph). During daytime driving, the
system detects pedestrians up to a distance
of approximately 40 m (131 ft). During
nighttime driving, system performance is
very limited.
{Warning
FPB does not provide an alert or
automatically brake the vehicle, unless it
detects a pedestrian. FPB may not detect
pedestrians, including children:
.When the pedestrian is not directly
ahead, fully visible, or standing
upright, or when part of a group.
.Due to poor visibility, including
nighttime conditions, fog, rain,
or snow.
.If the FPB sensor is blocked by dirt,
snow, or ice.
.If the headlamps or windshield are not
cleaned or in proper condition.
Be ready to take action and apply the
brakes. For more information, see
Defensive Driving 0200. Keep the
windshield, headlamps, and FPB sensor
clean and in good repair. FPB can be set to Off, Alert, or Alert and
Brake through vehicle personalization.
To view available settings from the
infotainment screen, touch Settings >
Vehicle > Collision/Detection Systems.
Detecting the Pedestrian Ahead
FPB alerts and automatic braking will not
occur unless the FPB system detects a
pedestrian. When a pedestrian that may
enter the vehicle’s forward path is detected,
the pedestrian ahead indicator will be
displayed.
Front Pedestrian Alert
With Head-Up Display
Without Head-Up Display
When the vehicle approaches a pedestrian
ahead too rapidly, the red FPB alert display
will flash on the windshield. Eight rapid
high-pitched beeps will sound from the
front, or both sides of the Safety Alert Seat
will pulse five times. When this Pedestrian
Alert occurs, the brake system may prepare
for driver braking to occur more rapidly
which can cause a brief, mild deceleration.
Continue to apply the brake pedal as
needed. Cruise control may be disengaged
when the Front Pedestrian Alert occurs.
Automatic Braking
If FPB detects it is about to crash into a
pedestrian directly ahead, and the brakes
have not been applied, FPB may
automatically brake moderately or brake
hard. This can help to avoid some very low
speed pedestrian crashes or reduce
pedestrian injury. FPB can automatically
brake to detected pedestrians between
Page 273 of 440

GMC Sierra/Sierra Denali 2500 HD/3500 HD Owner Manual (GMNA-
Localizing-U.S./Canada-16908340) - 2024 - CRC - 12/13/22
Driving and Operating 271
direction of lane departure, or if LDW
detects that you are accelerating, braking or
actively steering.
{Warning
The LDW system does not steer the
vehicle. The LDW system may not:
.Provide enough time to avoid a crash.
.Detect lane markings under poor
weather or visibility conditions. This
can occur if the windshield or
headlamps are blocked by dirt, snow,
or ice; if they are not in proper
condition; or if the sun shines directly
into the camera.
.Detect road edges.
.Detect lanes on winding or hilly roads.
If LDW only detects lane markings on one
side of the road, it will only warn you
when departing the lane on the side
where it has detected a lane marking.
Always keep your attention on the road
and maintain proper vehicle position
within the lane, or vehicle damage,
injury, or death could occur. Always keep (Continued)
Warning (Continued)
the windshield, headlamps, and camera
sensors clean and in good repair. Do not
use LDW in bad weather conditions.
How the System Works
LDW utilizes a camera sensor installed on
the windshield ahead of the rearview mirror
to detect lane markings.
To turn LDW on and off, press
@on the
center stack. The control indicator will light
when LDW is on.
BaseUplevel
When LDW is on,
@ornis green if
LDW is available to warn of a lane
departure. If the vehicle crosses a detected
lane marking without using the turn signal
in that direction,
@ornchanges to
amber and flashes. Additionally, there will
be three beeps, on the right or left, depending on the lane departure direction.
LDW will not alert if the turn signal is active
in the direction of lane departure or if LDW
detects that you are accelerating, braking or
actively steering.
Fuel
Top Tier Fuel
GM recommends the use of TOP TIER
Detergent Gasoline to keep the engine clean,
reduce engine deposits, and maintain
optimal vehicle performance. Look for the
TOP TIER Logo or see www.toptiergas.com
for a list of TOP TIER Detergent Gasoline
marketers and applicable countries.
Page 277 of 440
GMC Sierra/Sierra Denali 2500 HD/3500 HD Owner Manual (GMNA-
Localizing-U.S./Canada-16908340) - 2024 - CRC - 12/13/22
Driving and Operating 275
Filling the Tank (Chassis Cab and
Box Delete Models)
If the vehicle has a diesel engine, see the
Duramax diesel supplement.
An arrow on the fuel gauge indicates which
side of the vehicle the fuel fill is on. See
Fuel Gauge0116.
{Warning
Fuel vapors and fuel fires burn violently
and can cause injury or death.
Follow these guidelines to help avoid
injuries to you and others:
.Read and follow all the instructions on
the fuel pump island.
.Turn off the engine when refueling.
.Keep sparks, flames, and smoking
materials away from fuel.
.Do not leave the fuel pump
unattended.
.Avoid using electronic devices while
refueling.
.Do not re-enter the vehicle while
pumping fuel.
(Continued)
Warning (Continued)
.Keep children away from the fuel
pump and never let children
pump fuel.
.Before touching the fill nozzle, touch a
metallic object to discharge static
electricity from your body.
.Fuel can spray out if the fuel cap is
opened too quickly. This spray can
happen if the tank is nearly full, and is
more likely in hot weather. Open the
fuel cap slowly and wait for any hiss
noise to stop, then unscrew the cap all
the way.
Turn the fuel cap counterclockwise to
remove. Fully insert and latch the fill nozzle,
begin fueling. For models with dual fuel
tanks, the fuel gauge shows an average of
both tanks. When refueling, refuel the
primary front tank first, then add fuel to the
auxiliary rear tank.
{Warning
Overfilling the fuel tank by more than
three clicks of a standard fill nozzle may
cause:
.Vehicle performance issues, including
engine stalling and damage to the fuel
system.
.Fuel spills.
.Under certain conditions, fuel fires.
Be careful not to spill fuel. Wait five seconds
after you have finished pumping before
removing the fill nozzle. Clean fuel from
painted surfaces as soon as possible. See
Exterior Care 0383. Reinstall the cap by
turning it clockwise until it clicks.
{Warning
If a fire starts while you are refueling, do
not remove the fill nozzle. Shut off the
flow of fuel by shutting off the pump or
by notifying the station attendant. Leave
the area immediately.
Page 286 of 440

GMC Sierra/Sierra Denali 2500 HD/3500 HD Owner Manual (GMNA-
Localizing-U.S./Canada-16908340) - 2024 - CRC - 12/13/22
284 Driving and Operating
The trailer load balance percentage is
calculated as: weight (1) divided by
weight (2) times 100.
After loading the trailer, separately weigh
the trailer and then the trailer tongue and
calculate the trailer load balance percentage
to see if the weights and distribution are
appropriate for your vehicle. If the trailer
weight is too high, it may be possible to
transfer some of the cargo into your vehicle.
If the trailer tongue weight is too high or
too low, it may be possible to rearrange
some of the cargo inside of the trailer.
Do not exceed the maximum allowable
tongue weight for your vehicle. Use the
shortest hitch extension available to position
the hitch ball closer to your vehicle. This will
help reduce the effect of the trailer tongue
weight on the trailer hitch and the rear axle.
If a cargo carrier is used in the trailer hitch
receiver, choose a carrier that positions the
load as close to the vehicle as possible.
Make sure the total weight, including the
carrier, is no more than half of the
maximum allowable tongue weight for the
vehicle or 227 kg (500 lb), whichever is less.Rear Gross Axle Weight Rating
(GAWR-RR)
The GAWR-RR is the total weight that can be
supported by the rear axle of the vehicle. Do
not exceed the GAWR-RR for the vehicle,
with the tow vehicle and trailer fully loaded
for the trip including the weight of the
trailer tongue. If using a weight-distributing
hitch, do not exceed the GAWR-RR before
applying the weight distribution spring bars.
The GAWR-RR for the vehicle is on the
Trailering Information Label.
Ask your dealer for trailering information or
assistance.
Towing Equipment
Hitches
{Warning
In order to avoid serious injury or
property damage, always follow the hitch
manufacturer's instructions when securing
your draw bar/coupling device to the
vehicle's hitch receiver.
Ensure that the draw bar/coupling device
is secured with a locking retainer pin or
other means such that rotation of the pin
or locking mechanism will not cause the
pin to back out or loosen during use.
Failure to correctly secure the draw bar/
coupling device to the receiver can result
in separation of the hitch/receiver while
towing.
Conventional Hitch
A conventional hitch is bolted to the frame
or cross member of the tow vehicle, and is
generally rated Class 2, 3, or 4.
Page 290 of 440
GMC Sierra/Sierra Denali 2500 HD/3500 HD Owner Manual (GMNA-
Localizing-U.S./Canada-16908340) - 2024 - CRC - 12/13/22
288 Driving and Operating
to the attaching points on the bumper;
otherwise, safety chains should be attached
to holes on the trailer hitch.
Cross the safety chains under the tongue of
the trailer to help prevent the tongue from
contacting the road if it becomes separated
from the hitch. Always leave enough slack in
the safety chains to allow the combination
to turn. Never allow safety chains to drag
on the ground.
Trailer Brakes
Loaded trailers over 900 kg (2,000 lb) must
be equipped with brake systems and with
brakes for each axle. Trailer braking
equipment conforming to Canadian
Standards Association (CSA) requirement
CAN3-D313, or its equivalent, is
recommended.
State or local regulations may require
trailers to have their own braking system if
the loaded weight of the trailer exceeds
certain minimums that can vary from state
to state. Read and follow the instructions for
the trailer brakes so they are installed,
adjusted, and maintained properly. Never
attempt to tap into your vehicle's hydraulicbrake system. If you do, both the vehicle
antilock brakes and the trailer brakes may
not function, which could result in a crash.
Auxiliary Battery
If equipped, the vehicle's auxiliary battery
can be used to supply electrical power to
additional equipment that may be added,
such as a slide-in camper.
Locate the auxiliary battery connector under
the hood on the driver side of the vehicle,
next to the engine compartment fuse block.
Follow the proper installation instructions
included with any electrical equipment that
is installed.
Caution
To prevent draining the auxiliary battery,
always turn off electrical equipment
when not in use and do not use any
equipment that may exceed the
maximum amperage rating of 30 amps.
Trailer Wiring Harness
Basic Trailer Wiring
If the vehicle is not equipped with a trailer
connector on the rear bumper, a seven-wire
trailering harness is tied to the vehiclesframe. The harness requires the installation
of a trailer connector, which is available
through your dealer.
Use only a round, seven-wire connector with
flat blade terminals meeting SAE J2863
specifications for proper electrical
connectivity.
The seven-wire harness contains the
following trailer circuits:
Stop/Turn
Signal Left Yellow/Blue
Stop/Turn Signal
Right Green/Violet
Tail/Parking Lamps Gray/Brown
Reverse Lamps White/Green
Battery Feed Red/Green
Ground White
Electric Trailer Brake Blue
Heavy-Duty Trailer Wiring Harness Package
If equipped, the trailer wiring harness, with
a seven-pin connector and a four-pin
connector, is mounted on the vehicle's rear
bumper.
Page 293 of 440
GMC Sierra/Sierra Denali 2500 HD/3500 HD Owner Manual (GMNA-
Localizing-U.S./Canada-16908340) - 2024 - CRC - 12/13/22
Driving and Operating 291
Turn Signals When Towing a Trailer
When properly connected, the trailer turn
signals will illuminate to indicate the vehicle
is turning, changing lanes, or stopping.
When towing a trailer, the arrows on the
instrument cluster will illuminate even if the
trailer is not properly connected or the bulbs
are burned out.
Tow/Haul Mode
For instructions on how to enter Tow/Haul
Mode, seeDriver Mode Control 0238.
Tow/Haul assists when pulling a heavy
trailer or a large or heavy load. See Tow/
Haul Mode 0227.
Tow/Haul Mode is designed to be most
effective when the vehicle and trailer
combined weight is at least 75% of the
vehicle's Gross Combined Weight Rating
(GCWR). See “Trailer Weight” underTrailer
Towing 0280.
Tow/Haul Mode is most useful when towing
a heavy trailer or carrying a large or
heavy load:
.Through rolling terrain.
.In stop-and-go traffic.
.In busy parking lots. Operating the vehicle in Tow/Haul Mode
when lightly loaded or not towing will not
cause damage; however, it is not
recommended and may result in unpleasant
engine and transmission driving
characteristics, heavy or light steering
efforts, and reduced fuel economy.
Integrated Trailer Brake Control System
The vehicle may have an Integrated Trailer
Brake Control (ITBC) system for use with
electric trailer brakes or most electric over
hydraulic trailer brake systems. These
instructions apply to both types of electric
trailer brakes.
This symbol is on the Trailer Brake Control
Panel on vehicles with an ITBC system. The
power output to the trailer brakes is
proportional to the amount of vehicle
braking. This available power output to the
trailer brakes can be adjusted to a wide
range of trailering situations.
The ITBC system is integrated with the
vehicle’s brake, antilock brake, and
StabiliTrak/Electronic Stability Control (ESC)
systems. In trailering conditions that cause
the vehicle’s antilock brake or StabiliTrak/
ESC systems to activate, power sent to the
trailer's brakes will be automatically
adjusted to minimize trailer wheel lock-up.
This does not imply that the trailer has
StabiliTrak/ESC.
If the vehicle’s brake, antilock brake,
or StabiliTrak/ESC systems are not
functioning properly, the ITBC system may
not function fully or at all. Make sure all of
these systems are fully operational to allow
the ITBC system to function properly.
The ITBC system is powered through the
vehicle's electrical system. Turning the
ignition off will also turn off the ITBC
system. The ITBC system is fully functional
only when the ignition is in on.{Warning
Connecting a trailer that has an air brake
system may result in reduced or
complete loss of trailer braking, including
increased stopping distance or trailer
instability which could result in serious
(Continued)
Page 295 of 440
GMC Sierra/Sierra Denali 2500 HD/3500 HD Owner Manual (GMNA-
Localizing-U.S./Canada-16908340) - 2024 - CRC - 12/13/22
Driving and Operating 293
Manual Trailer Brake Apply Lever
Slide this lever to apply the trailer’s electric
brakes independent of the vehicle’s brakes.
Use this lever to adjust the Trailer Gain to
achieve proper power output to the trailer
brakes. Under certain circumstances, this
lever can also be used to apply additional
trailer braking. The trailer and vehicle brake
lamps will come on when either the vehicle
brakes or trailer brakes are applied and
properly connected.
Trailer Gain Adjustment Procedure
Trailer Gain should be set for a specific
trailering condition and it must be
readjusted anytime vehicle loading, trailer
loading, or road surface conditions change.
{Warning
Trailer brakes that are over-gained or
under-gained may not stop the vehicle
and the trailer as intended and can result
in a crash. Always follow the instructions
to set the Trailer Gain for the proper
trailer stopping performance.To adjust Trailer Gain for each towing
condition:
1. Drive the vehicle with the trailer attached on a level road surface
representative of the towing condition
and free of traffic at about 32–40 km/h
(20–25 mph) and fully apply the Manual
Trailer Brake Apply Lever.
Adjusting Trailer Gain at speeds lower
than 32–40 km/h (20–25 mph) may
result in an incorrect gain setting.
2. Adjust the Trailer Gain, using the Trailer Gain (+) or (−) adjustment buttons, to
just below the point of trailer wheel
lock-up, indicated by trailer wheel squeal
or tire smoke when a trailer wheel locks.
Trailer wheel lock-up may not occur if
towing a heavily loaded trailer. Adjust
the Trailer Gain to the highest allowable
setting for the towing condition.
3. Readjust Trailer Gain anytime vehicle loading, trailer loading, or road surface
conditions change or if trailer wheel
lock-up is noticed at any time while
towing.
Other ITBC-Related DIC Messages
TRAILER BRAKES CONNECTED: This message
will briefly display when a trailer with
electric brakes is first connected to the
vehicle. This message will automatically turn
off in about 10 seconds. This message can
be acknowledged before it automatically
turns off.
CHECK TRAILER WIRING: This message will
display if:
.The ITBC system first determines
connection to a trailer with electric brakes
and then the trailer harness becomes
disconnected from the vehicle.
.The disconnect occurs while the vehicle is
stationary, this message will
automatically turn off in about
30 seconds. This message will also turn
off if it is acknowledged or if the trailer
harness is reconnected.
.The disconnect occurs while the vehicle is
moving, this message will continue until
the vehicle is turned off. This message
will also turn off if it is acknowledged or
if the trailer harness is reconnected.
Page 309 of 440
GMC Sierra/Sierra Denali 2500 HD/3500 HD Owner Manual (GMNA-
Localizing-U.S./Canada-16908340) - 2024 - CRC - 12/13/22
Driving and Operating 307
The plow the vehicle can carry depends on
many things, such as:
.The options the vehicle came with, and
the weight of those options.
.The weight and number of passengers to
be carried.
.The weight of items added to the vehicle,
like a tool box or truck cap.
.The total weight of any additional cargo
to be carried.
To safely carry a snow plow on the vehicle:
.With a snow plow attached, the engine
coolant temperature gauge may show a
higher temperature than while driving
without one. The snow plow could block
the airflow to the radiator. This could be
more noticeable as vehicle speed
increases. At speeds above 72 km/h
(45 mph), this may cause the engine
coolant to overheat. Move or angle the
snow plow blade to allow increased
airflow to the radiator.
.To increase the airflow, move the snow
plow blade position.
.If driving more than 24 km/h (15 mph),
angle the plow blade position.
.Make sure the weight on the front and
rear axles does not exceed the axle rating
for each.
.Follow the snowplow manufacturer’s
recommendations for any rear ballast that
may be required. Rear ballast may be
required to ensure a proper front and rear
weight distribution ratio even though the
actual weight at the front axle may be
less than the front axle rating.
.The snowplow manufacturer or installer
can assist in determining the amount of
rear ballast required to ensure that the
vehicle with the attached snowplow does
not exceed the GVW rating, the front and
rear axle ratings, or the front and rear
weight distribution ratio (refer to the GM
Upfitter Manual).
Front axle reserve capacity is the difference
between the Front Gross Axle Weight
Rating (GAWR) and the front axle weight of
the vehicle with full fuel, passengers, and
any other cargo. This is the amount of
weight that can be added to the front axle
before reaching the Front GAWR. To calculate the amount of weight any front
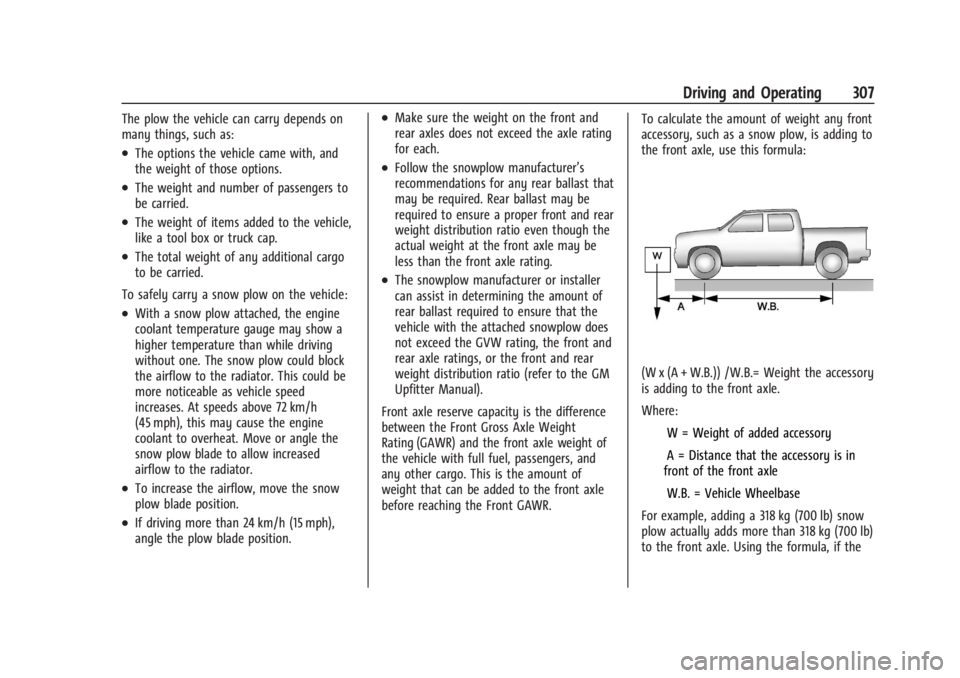
accessory, such as a snow plow, is adding to
the front axle, use this formula:
(W x (A + W.B.)) /W.B.= Weight the accessory
is adding to the front axle.
Where:
IW = Weight of added accessory
IA = Distance that the accessory is in
front of the front axle
IW.B. = Vehicle Wheelbase
For example, adding a 318 kg (700 lb) snow
plow actually adds more than 318 kg (700 lb)
to the front axle. Using the formula, if the