2024 FORD F650/750 oil reset
[x] Cancel search: oil resetPage 8 of 386

Jump Starting the Vehicle........................190
Transporting the Vehicle...........................192
Towing Points...............................................193
Crash and BreakdownInformation
Roadside Assistance..................................194
Automatic Crash Shutoff.........................195
Customer Assistance
Getting the Services You Need..............196
In California (U.S. Only).............................197
The Better Business Bureau (BBB) AutoLine Program (U.S. Only).....................198
Getting Assistance Outside the U.S. andCanada.......................................................199
Ordering Additional Owner's Literature.......................................................................200
Reporting Safety Defects (U.S. Only).......................................................................200
Reporting Safety Defects (Canada Only).........................................................................201
Fuses
Fuse Specification Chart.........................202
Changing a Fuse............................................211
Vehicle Inspection Guide
Vehicle Inspection Information..............213
Maintenance
General Information...................................222
Opening and Closing the Hood.............223
Under Hood Overview - 6.7L Diesel......225
Under Hood Overview - 7.3L...................226
Engine Oil Dipstick - 6.7L Diesel............227
Engine Oil Dipstick - 7.3L..........................227
Engine Oil Check..........................................227
Changing the Engine Oil and Oil Filter........................................................................228
Oil Change Indicator Reset.....................229
Changing the Engine Air Filter - 6.7LDiesel..........................................................230
Changing the Engine Air Filter - 7.3L.....232
Draining the Fuel Filter Water Trap - 6.7LDiesel...........................................................234
Engine Coolant Check - 6.7L Diesel......235
Engine Coolant Check - 7.3L...................238
Automatic Transmission Fluid Check........................................................................243
Brake Fluid Check.......................................245
Power Steering Fluid Check...................246
Changing the 12V Battery........................246
Adjusting the Headlamps.......................248
Washer Fluid Check...................................249
Fuel Filter - 7.3L...........................................249
Checking the Wiper Blades....................249
Changing the Wiper Blades....................250
Removing a Headlamp............................250
Changing a Bulb.........................................250
Changing the Engine-Mounted andDiesel Fuel Conditioner Module FuelFilters - 6.7L Diesel..................................251
Electrical System Inspection..................254
Air Induction System Inspection...........255
Exhaust System Inspection....................255
Brake System Inspection.........................256
Axle Inspection............................................259
Steering System Inspection...................259
Suspension System Inspection............260
Frame and Tow Hook Inspection.........260
Rear Axle Fluid Check...............................260
Spring U-Bolt Check...................................261
Vehicle Care
General Information..................................262
Cleaning Products......................................262
Cleaning the Exterior.................................263
Waxing............................................................264
Cleaning the Engine..................................264
Cleaning the Windows and Wiper Blades........................................................................265
4
2024 F-650/750 (TBC) , enUSA, Edition date: 202210, First-PrintingTable of Contents
Page 14 of 386

•The gearshift lever must be in P (Park)or N (Neutral) in order for the starterto operate.
•Try operating the starter switch severaltimes. This operation may cleanpotentially corroded contacts or makethe switch temporarily operable untilyou can reach the dealer.
•If all electrical connections are tightand you need assistance to start, SeeJump Starting the Vehicle (page 190).
If engine cranks but won’t start
Prolonged starter cranking (in excess of 10seconds) could cause damage to thestarter motor or the high-pressure fuelpump.
•Check the fuel gauge. You may be outof fuel. If the gauge shows that thereis fuel in the tank, the trouble may bein the electrical system or the fuelsystem. If equipped with an auxiliarytank, be sure that the tank controlswitch is set for the tank with fuel andnot on an empty tank.
•Leaving your ignition key turned to onfor over two minutes without startingmay make starting difficult becausethe glow plugs will cease activation.Reset the system by turning the ignitionkey to off and then back to on again.
Note:If the system is out of fuel and theengine will not start, do not continuecranking the engine. Continued cranking candamage the high-pressure fuel pump.
If the engine runs hot
The following could cause the engine tooverheat:
•Lack of coolant
•Dirty cooling system.
•Plugged radiator fins, A/C condenserand/or oil cooler
•Malfunctioning fan drive
•Driving with frozen coolant
•Sticking thermostat
•Overloading or pulling heavy trailersduring hot weather
•Grill or radiator air blockage
•Slipping or missing drive belt
•Plugged or very dirty air filter
If fuses burn out
WARNING: Replacement fuses andcircuit breakers must always be thesame rating as the original equipmentshown. Never replace a fuse or circuitbreaker with one of a higher rating.Higher rated fuses or circuit breakerscould allow circuit overloading in theevent of a circuit malfunction, resultingin severe vehicle damage or personalinjury due to fire.
Burned-out or blown fuses usually indicatean electrical short-circuit, although a fusemay occasionally burn out from vibration.Insert a second fuse. If this fuseimmediately burns out and you cannotlocate the cause, return your vehicle toyour dealer for a circuit check. SeeChanging a Fuse (page 211).
Selective catalytic reduction systemspeed limit and Idle-only modes
If the vehicle’s speed is limited or in anidle-only mode, the selective catalyticreduction system may be limiting thevehicle’s functions due to low orcontaminated DEF. Check the DEF. SeeSelective Catalytic Reductant System(page 120).
10
2024 F-650/750 (TBC) , enUSA, Edition date: 202210, First-PrintingIntroduction
Page 76 of 386
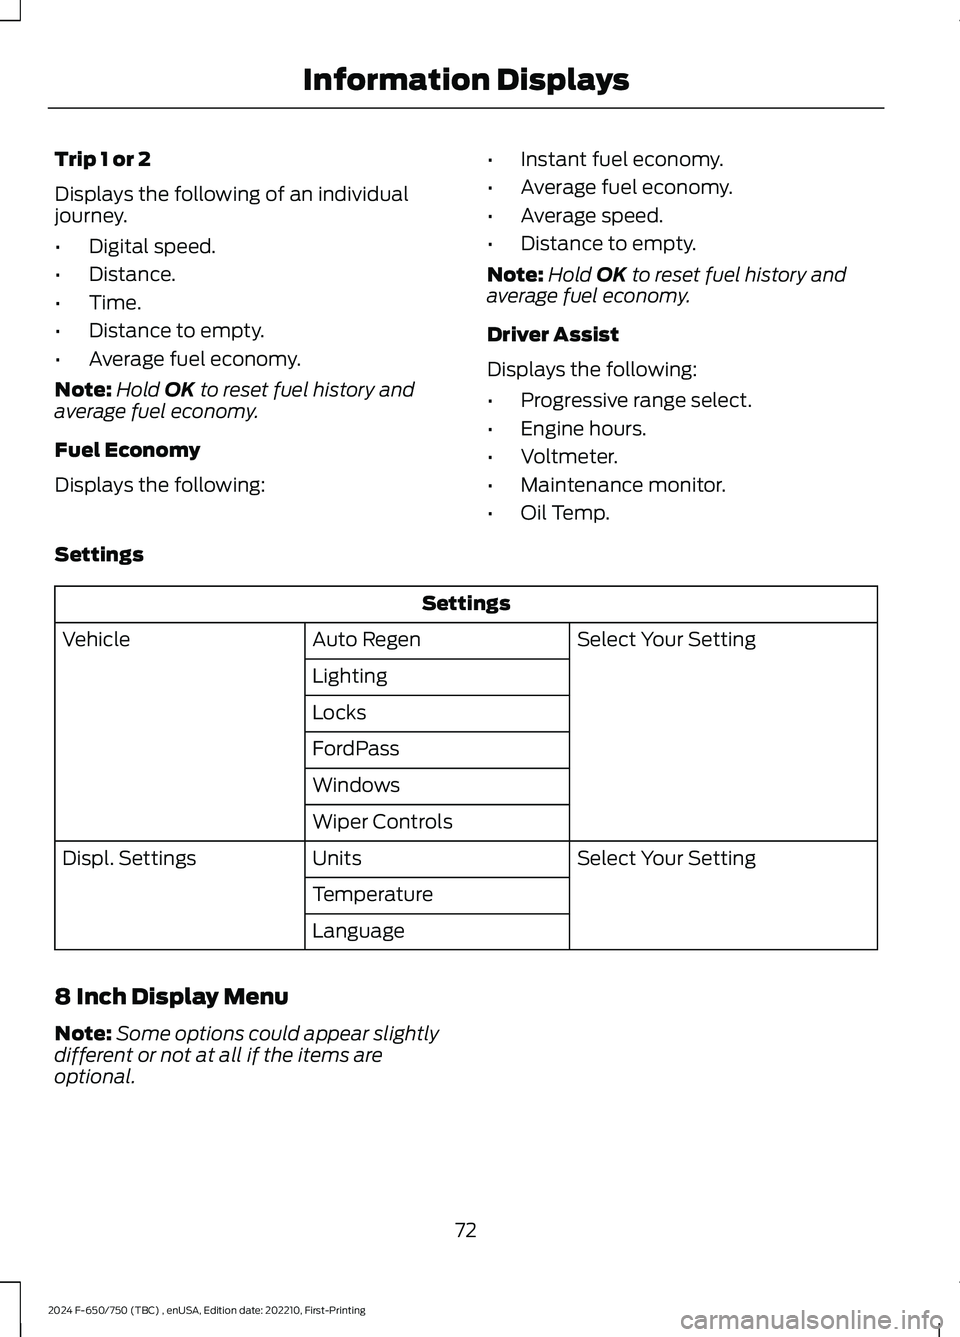
Trip 1 or 2
Displays the following of an individualjourney.
•Digital speed.
•Distance.
•Time.
•Distance to empty.
•Average fuel economy.
Note:Hold OK to reset fuel history andaverage fuel economy.
Fuel Economy
Displays the following:
•Instant fuel economy.
•Average fuel economy.
•Average speed.
•Distance to empty.
Note:Hold OK to reset fuel history andaverage fuel economy.
Driver Assist
Displays the following:
•Progressive range select.
•Engine hours.
•Voltmeter.
•Maintenance monitor.
•Oil Temp.
Settings
Settings
Select Your SettingAuto RegenVehicle
Lighting
Locks
FordPass
Windows
Wiper Controls
Select Your SettingUnitsDispl. Settings
Temperature
Language
8 Inch Display Menu
Note:Some options could appear slightlydifferent or not at all if the items areoptional.
72
2024 F-650/750 (TBC) , enUSA, Edition date: 202210, First-PrintingInformation Displays
Page 108 of 386
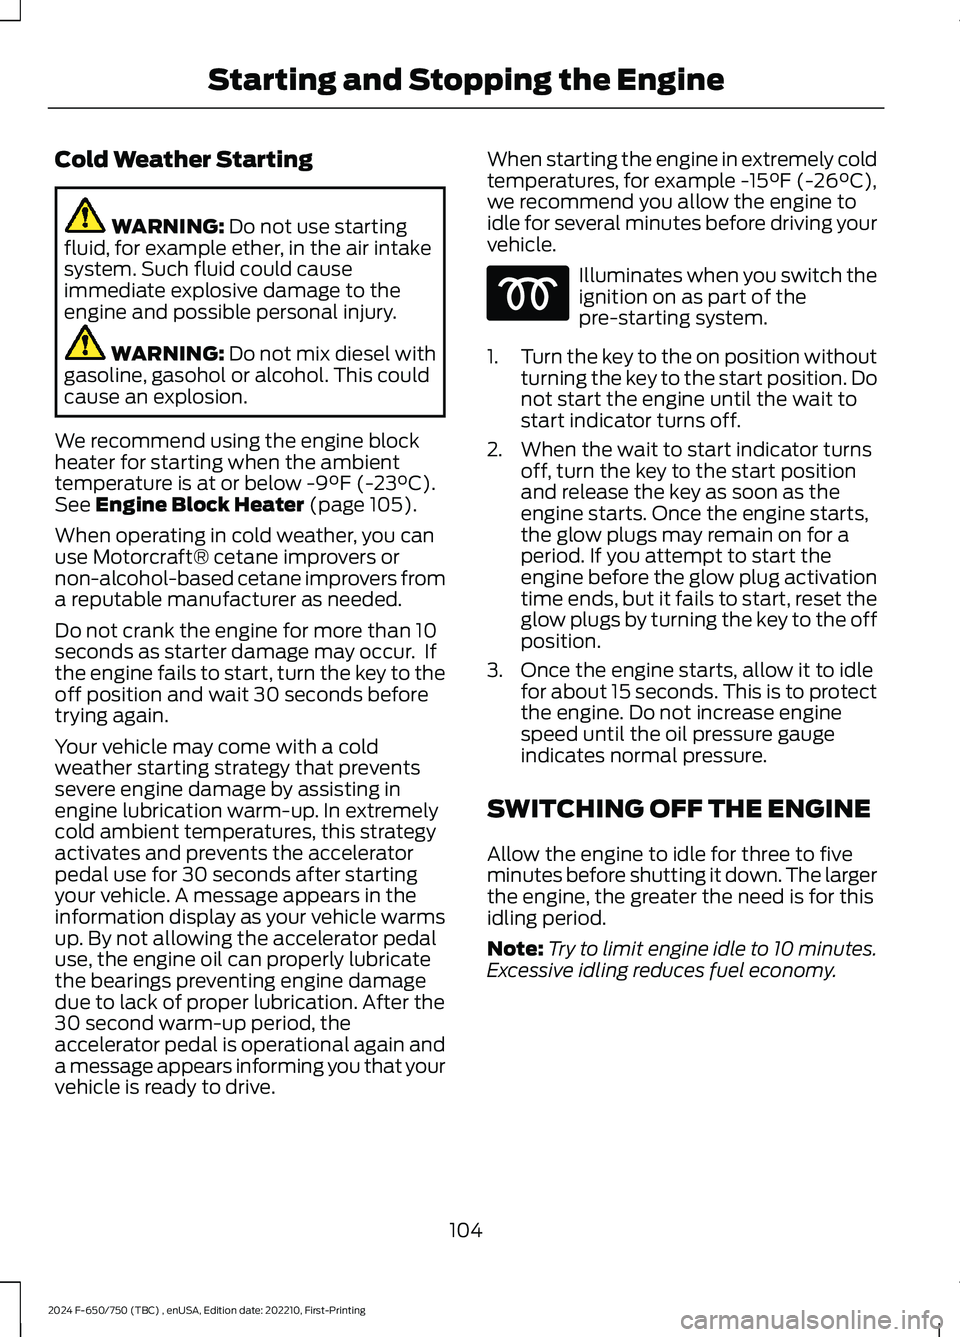
Cold Weather Starting
WARNING: Do not use startingfluid, for example ether, in the air intakesystem. Such fluid could causeimmediate explosive damage to theengine and possible personal injury.
WARNING: Do not mix diesel withgasoline, gasohol or alcohol. This couldcause an explosion.
We recommend using the engine blockheater for starting when the ambienttemperature is at or below -9°F (-23°C).See Engine Block Heater (page 105).
When operating in cold weather, you canuse Motorcraft® cetane improvers ornon-alcohol-based cetane improvers froma reputable manufacturer as needed.
Do not crank the engine for more than 10seconds as starter damage may occur. Ifthe engine fails to start, turn the key to theoff position and wait 30 seconds beforetrying again.
Your vehicle may come with a coldweather starting strategy that preventssevere engine damage by assisting inengine lubrication warm-up. In extremelycold ambient temperatures, this strategyactivates and prevents the acceleratorpedal use for 30 seconds after startingyour vehicle. A message appears in theinformation display as your vehicle warmsup. By not allowing the accelerator pedaluse, the engine oil can properly lubricatethe bearings preventing engine damagedue to lack of proper lubrication. After the30 second warm-up period, theaccelerator pedal is operational again anda message appears informing you that yourvehicle is ready to drive.
When starting the engine in extremely coldtemperatures, for example -15°F (-26°C),we recommend you allow the engine toidle for several minutes before driving yourvehicle.
Illuminates when you switch theignition on as part of thepre-starting system.
1.Turn the key to the on position withoutturning the key to the start position. Donot start the engine until the wait tostart indicator turns off.
2.When the wait to start indicator turnsoff, turn the key to the start positionand release the key as soon as theengine starts. Once the engine starts,the glow plugs may remain on for aperiod. If you attempt to start theengine before the glow plug activationtime ends, but it fails to start, reset theglow plugs by turning the key to the offposition.
3.Once the engine starts, allow it to idlefor about 15 seconds. This is to protectthe engine. Do not increase enginespeed until the oil pressure gaugeindicates normal pressure.
SWITCHING OFF THE ENGINE
Allow the engine to idle for three to fiveminutes before shutting it down. The largerthe engine, the greater the need is for thisidling period.
Note:Try to limit engine idle to 10 minutes.Excessive idling reduces fuel economy.
104
2024 F-650/750 (TBC) , enUSA, Edition date: 202210, First-PrintingStarting and Stopping the Engine
Page 232 of 386

Do not use supplemental engine oiladditives because they are unnecessaryand could lead to engine damage that thevehicle warranty may not cover.
1.Clean the area surrounding the engineoil filler cap before you remove it.
2.Remove the engine oil filler cap.
3.Add engine oil that meets ourspecifications. See Capacities andSpecifications (page 291).
4.Reinstall the engine oil filler cap. Turnit clockwise until you feel a strongresistance.
Note: Do not add oil further than themaximum mark. Oil levels above themaximum mark may cause engine damage.
Note:Immediately soak up any oil spillagewith an absorbent cloth.
Engine Oil Pressure Warning Lamp
WARNING: If it illuminates whenyou are driving do not continue yourjourney, even if the oil level is correct.Have your vehicle checked.
It illuminates when you switchthe ignition on.
If it illuminates when the engineis running this indicates a malfunction.Stop your vehicle as soon as it is safe todo so and switch the engine off. Check theengine oil level. If the oil level is sufficient,this indicates a system malfunction. Haveyour vehicle checked as soon as possible.
CHANGING THE ENGINE OIL
AND OIL FILTER
WARNING: Do not add engine oilwhen the engine is hot. Failure to followthis instruction could result in personalinjury.
Your vehicle has an Intelligent Oil LifeMonitor™ that calculates the proper oilchange service interval. When theinformation display indicates: OIL CHANGEREQUIRED, change the engine oil and oilfilter. See Information Displays (page71).
The engine oil filter protects your engineby filtering harmful, abrasive or sludgeparticles and particles significantly smallerthan most available will-fit filters. SeeMotorcraft Parts (page 293).
1.Unscrew the oil filter and oil pan drainplug and wait for the oil to drain.
2.Replace the filter.
3.Reinstall the oil pan drain plug.
4.Refill the engine with new oil. SeeEngine Oil Capacity andSpecification (page 299).
5.Reset the Intelligent Oil Life Monitor™.See Information Displays (page 71).
Engine Lubrication for SevereService Operation
The following conditions define severeoperation:
•Frequent or extended idling such asover 10 minutes per hour of normaldriving.
•Low-speed operation or stationary use.
•If the vehicle is operated in sustained,ambient temperatures below -9°F(-23°C) or above 100°F (38°C).
228
2024 F-650/750 (TBC) , enUSA, Edition date: 202210, First-PrintingMaintenanceE67022
Page 233 of 386
•Frequent low-speed operation, orconsistent heavy traffic less than25 mph (40 km/h).
•Operating in severe dust conditions.
•Operating the vehicle off road.
•Towing a trailer over 1,000 mi(1,600 km).
•Sustained, high-speed driving at thegross vehicle weight rating.
•Use of fuels with sulfur content otherthan ultra-low sulfur diesel (ULSD).
•Use of high-sulfur diesel fuel.
Only use engine oil that meets ourspecifications. See Capacities andSpecifications (page 291).
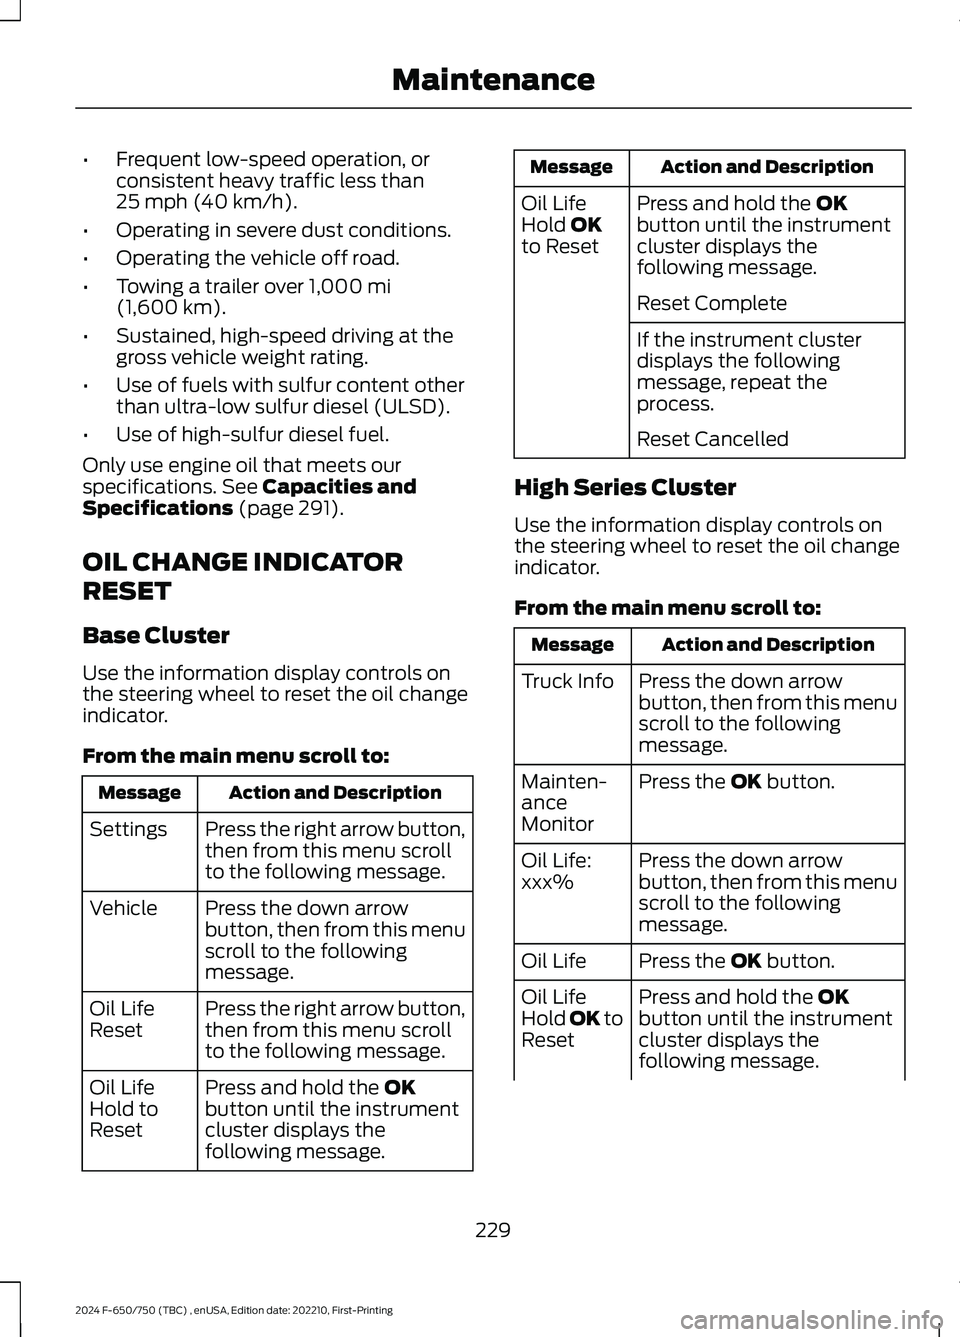
OIL CHANGE INDICATOR
RESET
Base Cluster
Use the information display controls onthe steering wheel to reset the oil changeindicator.
From the main menu scroll to:
Action and DescriptionMessage
Press the right arrow button,then from this menu scrollto the following message.
Settings
Press the down arrowbutton, then from this menuscroll to the followingmessage.
Vehicle
Press the right arrow button,then from this menu scrollto the following message.
Oil LifeReset
Press and hold the OKbutton until the instrumentcluster displays thefollowing message.
Oil LifeHold toReset
Action and DescriptionMessage
Press and hold the OKbutton until the instrumentcluster displays thefollowing message.
Oil LifeHold OKto Reset
Reset Complete
If the instrument clusterdisplays the followingmessage, repeat theprocess.
Reset Cancelled
High Series Cluster
Use the information display controls onthe steering wheel to reset the oil changeindicator.
From the main menu scroll to:
Action and DescriptionMessage
Press the down arrowbutton, then from this menuscroll to the followingmessage.
Truck Info
Press the OK button.Mainten-anceMonitor
Press the down arrowbutton, then from this menuscroll to the followingmessage.
Oil Life:xxx%
Press the OK button.Oil Life
Press and hold the OKbutton until the instrumentcluster displays thefollowing message.
Oil LifeHold OK toReset
229
2024 F-650/750 (TBC) , enUSA, Edition date: 202210, First-PrintingMaintenance
Page 234 of 386
Action and DescriptionMessage
Oil Life: 100%
When the oil change indic-ator resets, the instrumentcluster displays 100%.
Repeat the process if the oilchange indicator does notreset.
CHANGING THE ENGINE AIR
FILTER - 6.7L DIESEL
Air Filter Restriction Gauge
WARNING: To reduce the risk ofvehicle damage and personal burninjuries, do not start your engine with theair cleaner removed and do not removeit while the engine is running.
Note:Operating your vehicle in heavysnowfall or extreme rain conditions mayallow excessive amounts of snow or waterinto the air intake system. This could plugor soak the air filter and cause the engine tolose power or shut down.
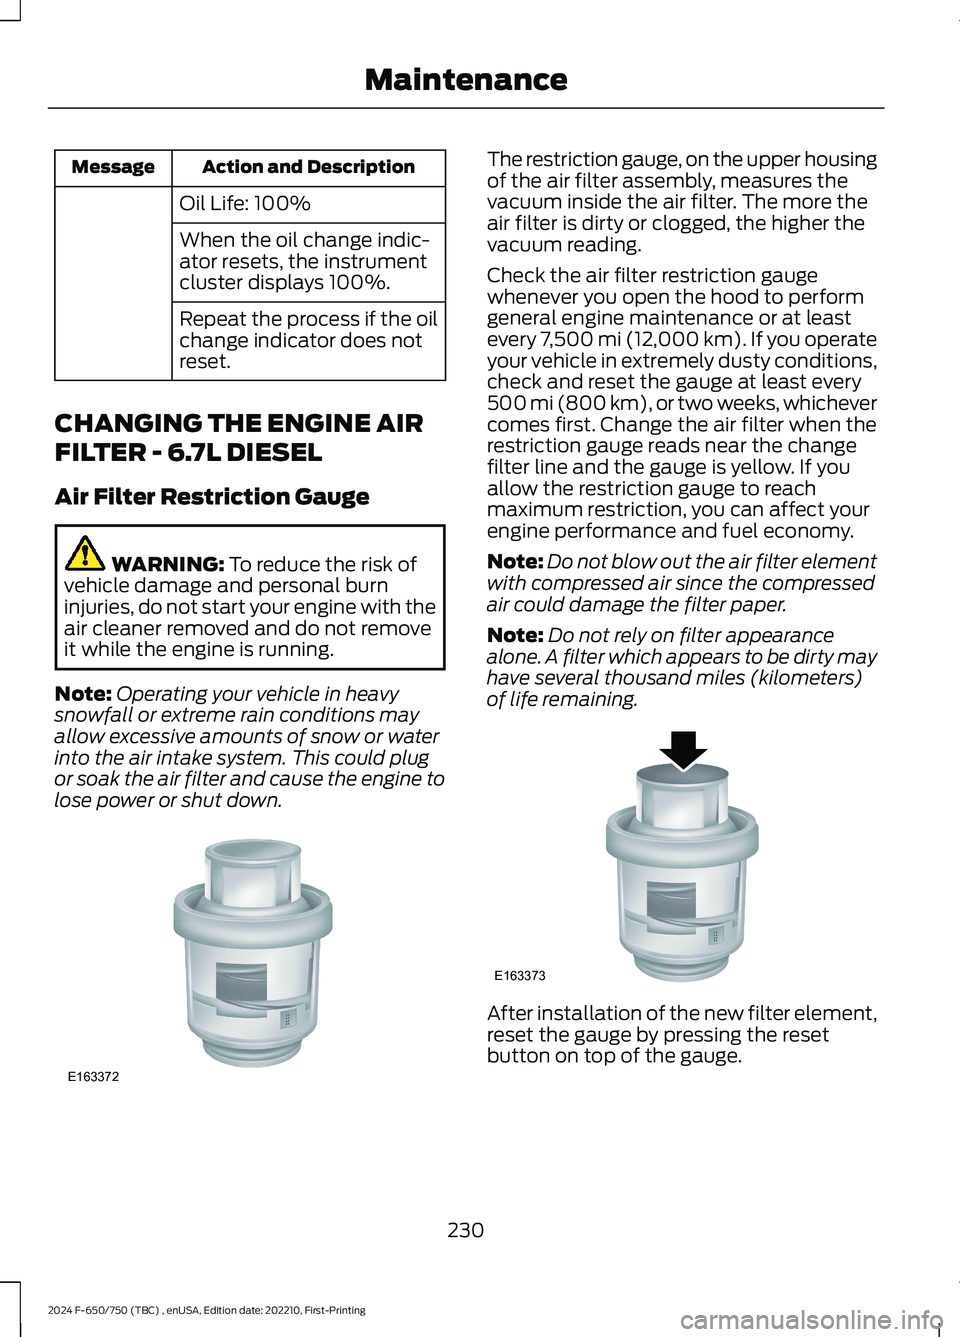
The restriction gauge, on the upper housingof the air filter assembly, measures thevacuum inside the air filter. The more theair filter is dirty or clogged, the higher thevacuum reading.
Check the air filter restriction gaugewhenever you open the hood to performgeneral engine maintenance or at leastevery 7,500 mi (12,000 km). If you operateyour vehicle in extremely dusty conditions,check and reset the gauge at least every500 mi (800 km), or two weeks, whichevercomes first. Change the air filter when therestriction gauge reads near the changefilter line and the gauge is yellow. If youallow the restriction gauge to reachmaximum restriction, you can affect yourengine performance and fuel economy.
Note:Do not blow out the air filter elementwith compressed air since the compressedair could damage the filter paper.
Note:Do not rely on filter appearancealone. A filter which appears to be dirty mayhave several thousand miles (kilometers)of life remaining.
After installation of the new filter element,reset the gauge by pressing the resetbutton on top of the gauge.
230
2024 F-650/750 (TBC) , enUSA, Edition date: 202210, First-PrintingMaintenanceE163372 E163373
Page 272 of 386
Cooling system
•Protect against freezing temperatures.
•When removing your vehicle fromstorage, check coolant fluid level.Confirm that there are no coolingsystem leaks and that fluid is at therecommended level.
Disconnecting Your 12 Volt Battery
•Check and recharge as necessary. Keepconnections clean.
•If storing your vehicle for more than 30days without recharging the battery,we recommend that you disconnectthe battery cables to maintain batterycharge for quick starting.
Note:It is necessary to reset memoryfeatures if you disconnect the batterycables.
Brakes
•Make sure the brakes and parking brakerelease fully.
Tires
•Maintain recommended air pressure.
Miscellaneous
•Make sure all linkages, cables, leversand pins under your vehicle are coveredwith grease to prevent rust.
•Move vehicles at least 25 ft (7.5 m)every 15 days to lubricate working partsand prevent corrosion.
Removing Vehicle From Storage
When your vehicle is ready to come out ofstorage, do the following:
•Wash your vehicle to remove any dirtor grease film build-up on windowsurfaces.
•Check windshield wipers for anydeterioration.
•Check under the hood for any foreignmaterial that may have collectedduring storage such as mice or squirrelnests.
•Check the exhaust for any foreignmaterial that may have collectedduring storage.
•Check tire pressures and set tireinflation per the Tire Label.
•Check brake pedal operation. Driveyour vehicle 15 ft (4.5 m) back andforth to remove rust build-up.
•Check fluid levels (including coolant,oil and gas) to make sure there are noleaks, and fluids are at recommendedlevels.
•If you remove the battery, clean thebattery cable ends and check fordamage.
Contact an authorized dealer if you haveany concerns or issues.
268
2024 F-650/750 (TBC) , enUSA, Edition date: 202210, First-PrintingVehicle Care