2024 FORD F650/750 transmission fluid
[x] Cancel search: transmission fluidPage 140 of 386
GENERAL INFORMATION
WARNING: Exceeding these ratingsby overloading can cause componentfailure resulting in property damage,personal injury or death.
Fluid Temperature
If the operating temperature exceeds250°F (121°C), the rate of axle lubricationoxidation increases and shortens the lifeof the lubricant and seals, requiring axlelubrication changes to become morefrequent to preserve the axle. Do notconsistently run extreme pressure (EP)lubricants above 250°F (121°C).
Axle Conversions
WARNING: When operating aloaded vehicle, the driver must keep alladjustable axles on the ground at alltimes, supporting their share of thevehicle’s load. Failure to do so canoverload other axles, tires, wheels,springs, steering components, brakesand frames, resulting in early componentfailure, loss of vehicle control, possibleproperty damage and personal injury.
We do not recommend, or approve,performing axle conversions. However, weunderstand that, on occasion, others installaftermarket add-on axles on the truckchassis that allow operator control forweight transfer from other axles (such asair lift axles).
2-SPEED REAR AXLE (IF EQUIPPED)
WARNING: Never shift atwo-speed axle when descending asteep grade as this may cause loss ofvehicle control and result in personalinjury.
Note:Do not shift between ranges whenthe speed control is on.
A two-speed rear axle allows the driver toselect a low range for greater pulling powerand a high range for greater road speedand fuel economy. You can also use theseranges to provide extra steps betweentransmission shifts when driving on steepgrades or fuel economy may be factors.
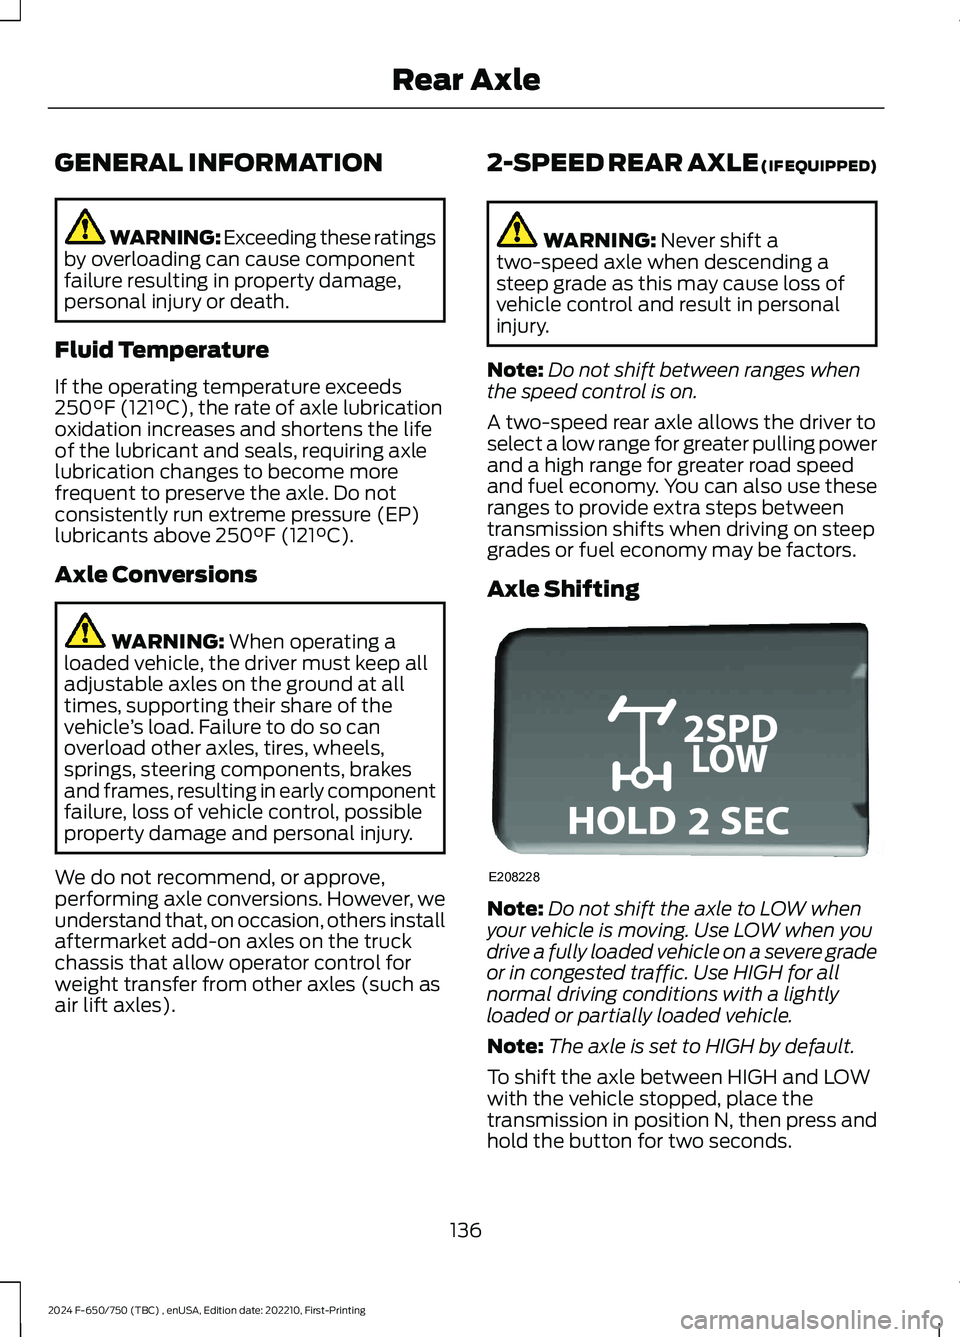
Axle Shifting
Note:Do not shift the axle to LOW whenyour vehicle is moving. Use LOW when youdrive a fully loaded vehicle on a severe gradeor in congested traffic. Use HIGH for allnormal driving conditions with a lightlyloaded or partially loaded vehicle.
Note:The axle is set to HIGH by default.
To shift the axle between HIGH and LOWwith the vehicle stopped, place thetransmission in position N, then press andhold the button for two seconds.
136
2024 F-650/750 (TBC) , enUSA, Edition date: 202210, First-PrintingRear AxleE208228
Page 219 of 386
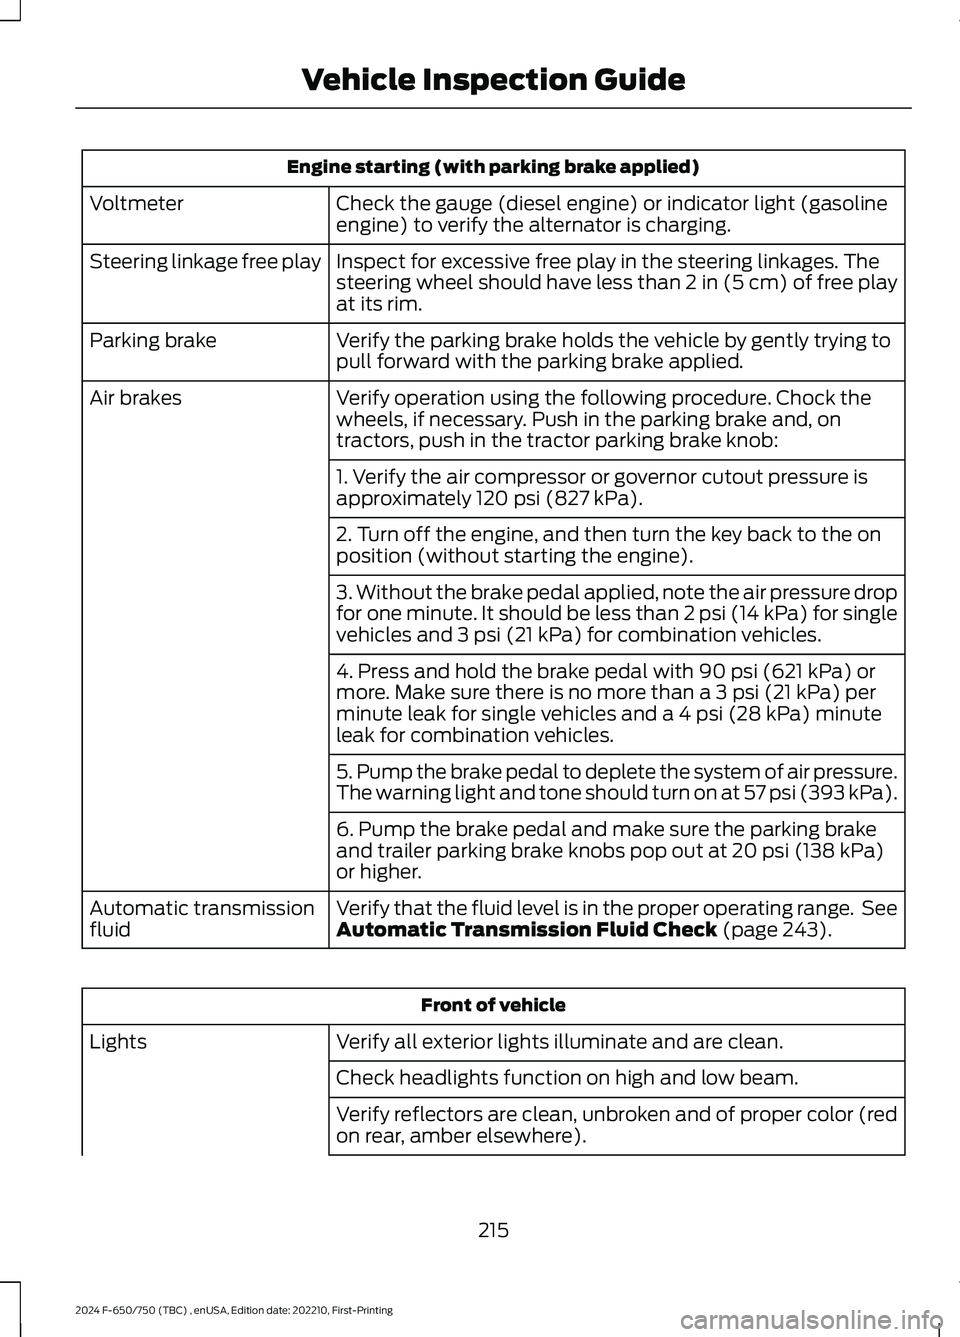
Engine starting (with parking brake applied)
Check the gauge (diesel engine) or indicator light (gasolineengine) to verify the alternator is charging.Voltmeter
Inspect for excessive free play in the steering linkages. Thesteering wheel should have less than 2 in (5 cm) of free playat its rim.
Steering linkage free play
Verify the parking brake holds the vehicle by gently trying topull forward with the parking brake applied.Parking brake
Verify operation using the following procedure. Chock thewheels, if necessary. Push in the parking brake and, ontractors, push in the tractor parking brake knob:
Air brakes
1. Verify the air compressor or governor cutout pressure isapproximately 120 psi (827 kPa).
2. Turn off the engine, and then turn the key back to the onposition (without starting the engine).
3. Without the brake pedal applied, note the air pressure dropfor one minute. It should be less than 2 psi (14 kPa) for singlevehicles and 3 psi (21 kPa) for combination vehicles.
4. Press and hold the brake pedal with 90 psi (621 kPa) ormore. Make sure there is no more than a 3 psi (21 kPa) perminute leak for single vehicles and a 4 psi (28 kPa) minuteleak for combination vehicles.
5. Pump the brake pedal to deplete the system of air pressure.The warning light and tone should turn on at 57 psi (393 kPa).
6. Pump the brake pedal and make sure the parking brakeand trailer parking brake knobs pop out at 20 psi (138 kPa)or higher.
Verify that the fluid level is in the proper operating range. SeeAutomatic Transmission Fluid Check (page 243).Automatic transmissionfluid
Front of vehicle
Verify all exterior lights illuminate and are clean.Lights
Check headlights function on high and low beam.
Verify reflectors are clean, unbroken and of proper color (redon rear, amber elsewhere).
215
2024 F-650/750 (TBC) , enUSA, Edition date: 202210, First-PrintingVehicle Inspection Guide
Page 225 of 386
Inspect the transmission fluid level andshift linkage for proper operation.
221
2024 F-650/750 (TBC) , enUSA, Edition date: 202210, First-PrintingVehicle Inspection Guide
Page 230 of 386

UNDER HOOD OVERVIEW - 7.3L
Engine compartment fuse box. See Fuses (page 202).A
Engine oil dipstick. See Engine Oil Dipstick (page 227).B
Windshield washer fluid reservoir. See Washer Fluid Check (page 249).C
Automatic transmission fluid dipstick. See Automatic Transmission FluidCheck (page 243).D
Engine coolant reservoir. See Engine Coolant Check (page 238).E
Engine oil filler cap. See Engine Oil Check (page 227).F
Brake fluid reservoir. See Brake Fluid Check (page 245).G
Power steering fluid reservoir. See Power Steering Fluid Check (page 246).H
Air cleaner assembly. See Changing the Engine Air Filter (page 232).I
226
2024 F-650/750 (TBC) , enUSA, Edition date: 202210, First-PrintingMaintenanceE330964
Page 247 of 386
At this time, you may notice the coolanttemperature gauge moves toward the redzone and a message may appear in theinformation display.
You may notice a reduction in vehiclespeed caused by reduced engine power inorder to manage the engine coolanttemperature. Your vehicle may enter thismode if certain high-temperature andhigh-load conditions take place. Theamount of speed reduction depends onvehicle loading, grade and ambienttemperature. If this occurs, there is noneed to pull off the road. You can continueto drive your vehicle.
The air conditioning may turn on and offduring severe operating conditions toprotect the engine from overheating. Whenthe coolant temperature decreases to thenormal operating temperature, the airconditioning turns on.
If the coolant temperature gauge movesfully into the red zone, or if the coolanttemperature warning or service enginesoon messages appear in your informationdisplay, do the following:
1.Pull off the road as soon as safelypossible and shift the transmission intopark (P).
2.Leave the engine running until thecoolant temperature gauge needlereturns to the normal position. Afterseveral minutes, if the temperaturedoes not drop, follow the remainingsteps.
3.Switch the engine off and wait for it tocool. Check the coolant level.
4.If the coolant level is at or below theminimum mark, add prediluted coolantimmediately.
5.If the coolant level is normal, restartthe engine and continue.
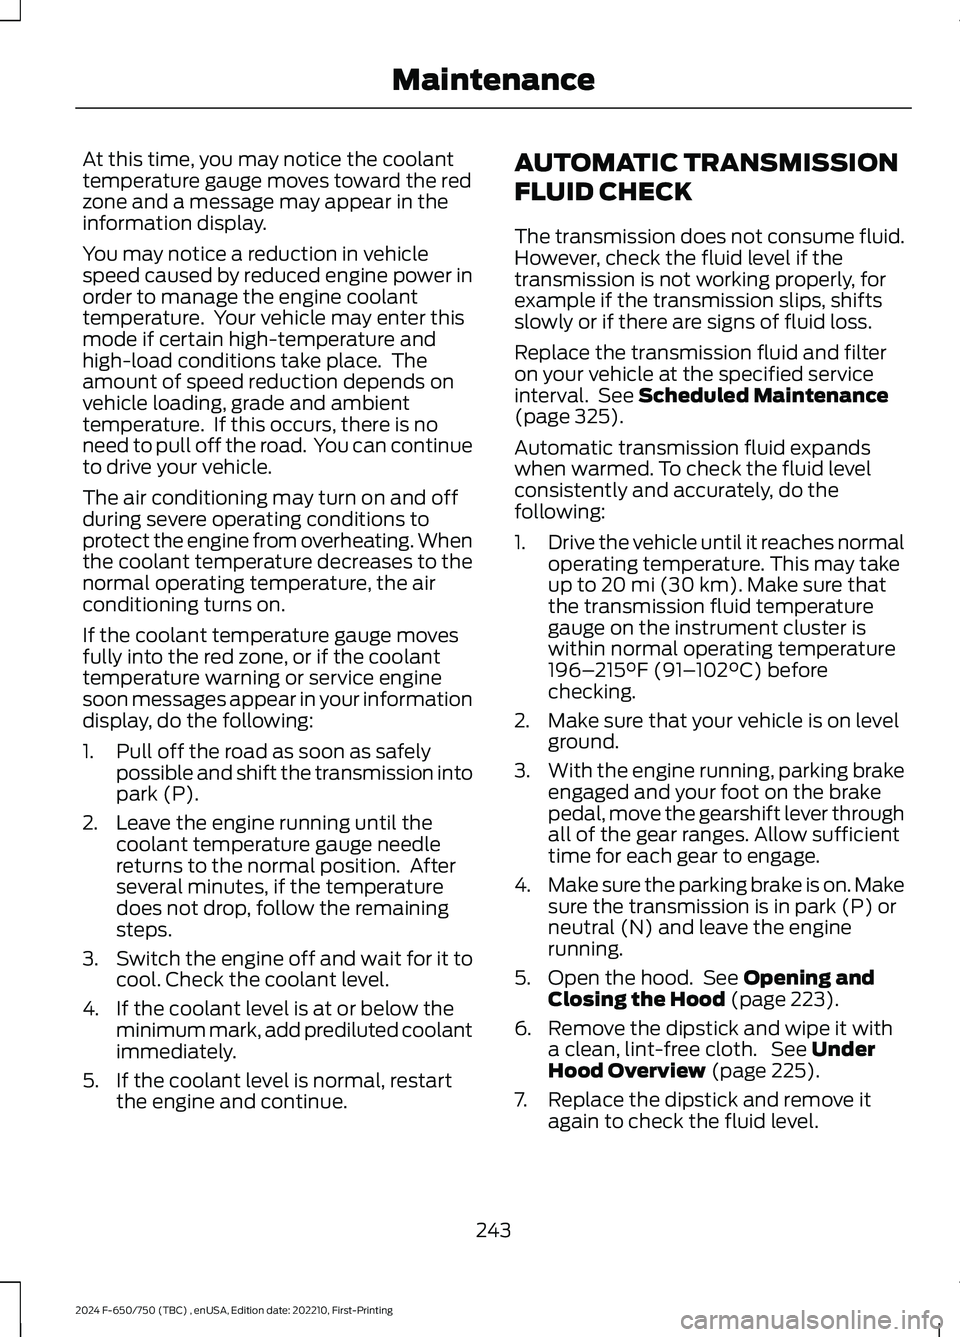
AUTOMATIC TRANSMISSION
FLUID CHECK
The transmission does not consume fluid.However, check the fluid level if thetransmission is not working properly, forexample if the transmission slips, shiftsslowly or if there are signs of fluid loss.
Replace the transmission fluid and filteron your vehicle at the specified serviceinterval. See Scheduled Maintenance(page 325).
Automatic transmission fluid expandswhen warmed. To check the fluid levelconsistently and accurately, do thefollowing:
1.Drive the vehicle until it reaches normaloperating temperature. This may takeup to 20 mi (30 km). Make sure thatthe transmission fluid temperaturegauge on the instrument cluster iswithin normal operating temperature196–215°F (91–102°C) beforechecking.
2.Make sure that your vehicle is on levelground.
3.With the engine running, parking brakeengaged and your foot on the brakepedal, move the gearshift lever throughall of the gear ranges. Allow sufficienttime for each gear to engage.
4.Make sure the parking brake is on. Makesure the transmission is in park (P) orneutral (N) and leave the enginerunning.
5.Open the hood. See Opening andClosing the Hood (page 223).
6.Remove the dipstick and wipe it witha clean, lint-free cloth. See UnderHood Overview (page 225).
7.Replace the dipstick and remove itagain to check the fluid level.
243
2024 F-650/750 (TBC) , enUSA, Edition date: 202210, First-PrintingMaintenance
Page 248 of 386
8.If the fluid level is correct, replace thedipstick and make sure it is fully seated.
Note:If the fluid level is between themaximum and minimum marks, the fluidlevel is acceptable. Do not add fluid.
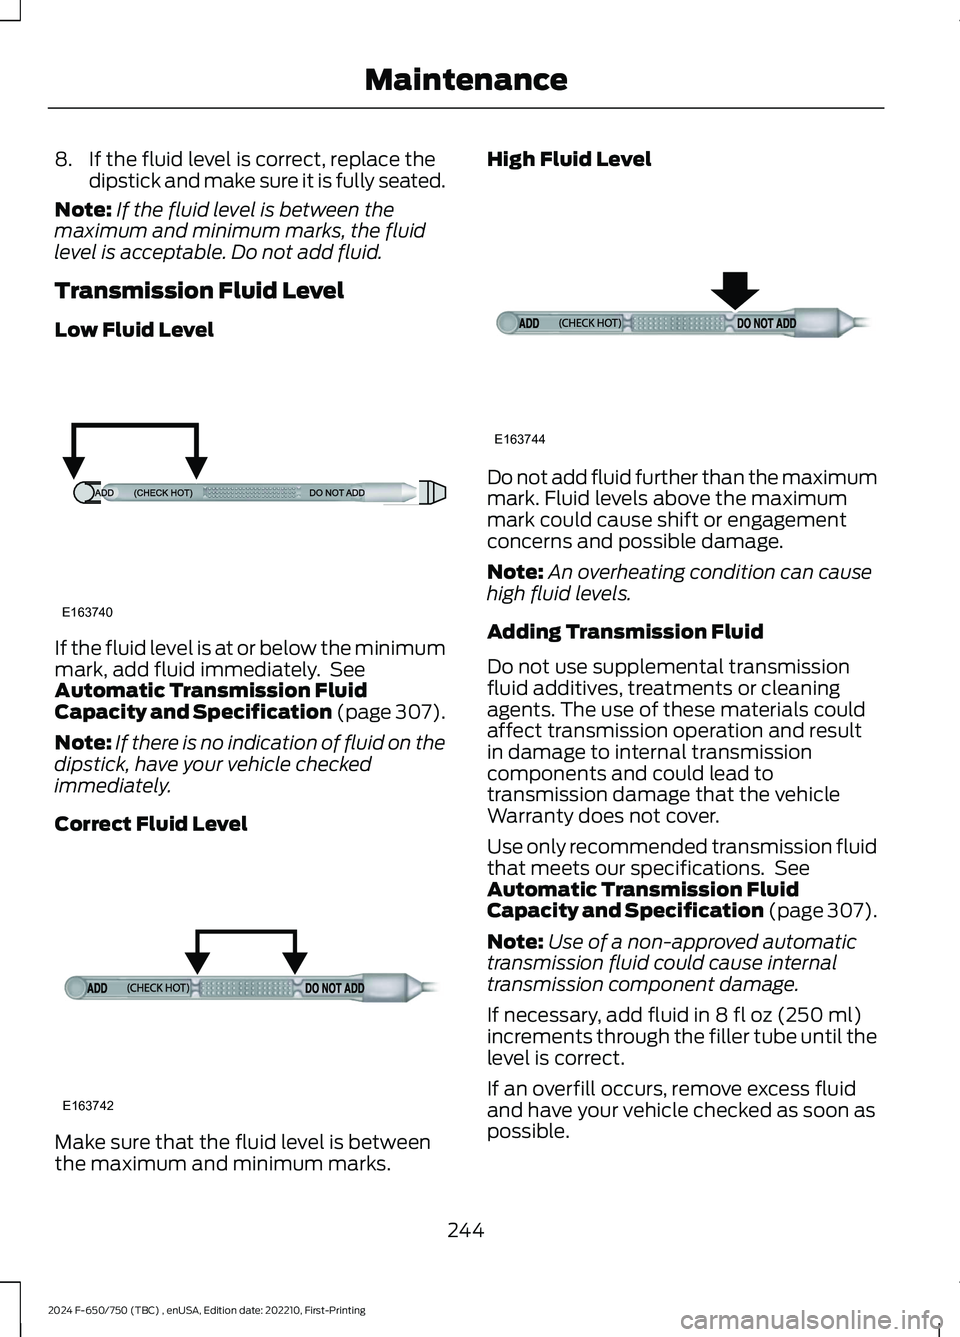
Transmission Fluid Level
Low Fluid Level
If the fluid level is at or below the minimummark, add fluid immediately. SeeAutomatic Transmission FluidCapacity and Specification (page 307).
Note:If there is no indication of fluid on thedipstick, have your vehicle checkedimmediately.
Correct Fluid Level
Make sure that the fluid level is betweenthe maximum and minimum marks.
High Fluid Level
Do not add fluid further than the maximummark. Fluid levels above the maximummark could cause shift or engagementconcerns and possible damage.
Note:An overheating condition can causehigh fluid levels.
Adding Transmission Fluid
Do not use supplemental transmissionfluid additives, treatments or cleaningagents. The use of these materials couldaffect transmission operation and resultin damage to internal transmissioncomponents and could lead totransmission damage that the vehicleWarranty does not cover.
Use only recommended transmission fluidthat meets our specifications. SeeAutomatic Transmission FluidCapacity and Specification (page 307).
Note:Use of a non-approved automatictransmission fluid could cause internaltransmission component damage.
If necessary, add fluid in 8 fl oz (250 ml)increments through the filler tube until thelevel is correct.
If an overfill occurs, remove excess fluidand have your vehicle checked as soon aspossible.
244
2024 F-650/750 (TBC) , enUSA, Edition date: 202210, First-PrintingMaintenanceE163740 E163742 E163744
Page 264 of 386

•Maintaining proper steering gear andpower steering pump lubricant levels.
•Checking steering column joint boltsand steering linkage, particularly forbody-to-chassis clearance.
Steering Column Joint Bolts
As a good maintenance practice, checksteering column joint bolt tightness every60,000 mi (96,000 km) or annually,whichever occurs first. Do not overtightenthe bolts.
Hydraulic System
Whenever draining and refilling the powersteering's hydraulic system for any reason,bleed air from the system before returningthe vehicle to service. Failure to bleed thehydraulic system properly can result indegradation of power system performance.
Consult an authorized dealer who is awareof the proper procedures for filling andbleeding the system.
SUSPENSION SYSTEM
INSPECTION (IF EQUIPPED)
Note:Do not adjust air suspension heightto any setting other than the specifiedsetting. Altering the height setting changesthe driveline angle and may result inunwarrantable component damage, suchas transmission component damage.
Verify drive axle air suspension height andheight control valve performance at engineoil change intervals.
Periodically check:
•Condition of spring leaves for evidenceof fatigue, bending or breakage.
•Condition of suspension mountingbrackets and bushings.
•Torque rod mounting fasteners fortightness.
•For proper suspension alignment.Maintain proper alignment at all times.
•U-bolts. After the chassis has beenoperating under load for 1,000 mi(1,600 km) or six months (whichevercomes first), the U-bolt nuts must bere-torqued. Re-torque the U-bolt nutsevery 37,000 mi (60,000 km)thereafter. Clean and lubricate theU-bolt and nut threads and seats tomake sure a like new condition whenre-torqueing. See Spring U-BoltCheck (page 261).
FRAME AND TOW HOOK
INSPECTION
Your vehicle's chassis is manufacturedwith frame rails of either HSLA steel orheat-treated steel. Handle each in aspecific manner to make sure maximumservice life. Consult the service manual oran authorized dealer before attemptingframe repair or modification.
It is important, particularly on vehicles thatuse tow hooks frequently, to inspect thefront and rear tow hooks for damage or aloose mounting.
REAR AXLE FLUID CHECK
Your rear axle may have an optionalsynthetic lubricant that allows the use ofextended service intervals. A tag on thefiller plug identifies the use of the syntheticlubricant.
Only use a lubricant that meetsmanufacturer specifications. Use of anon-approved rear axle lubricant maycause internal axle component damage.See Rear Axle Fluid Capacity andSpecification (page 311).
Checking the Fluid Level
1.Park your vehicle on level ground.
260
2024 F-650/750 (TBC) , enUSA, Edition date: 202210, First-PrintingMaintenance
Page 299 of 386
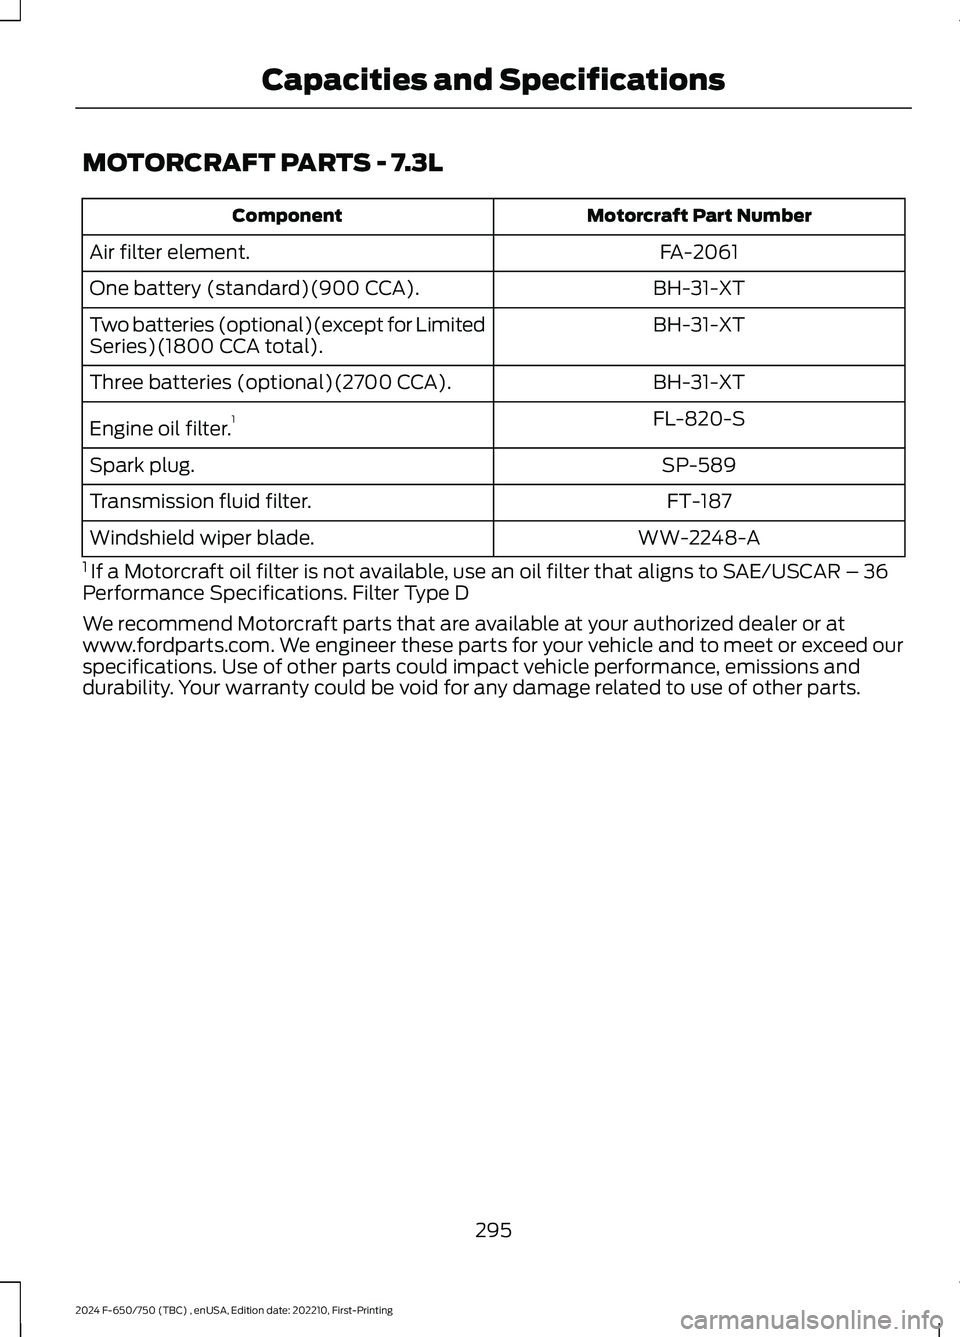
MOTORCRAFT PARTS - 7.3L
Motorcraft Part NumberComponent
FA-2061Air filter element.
BH-31-XTOne battery (standard)(900 CCA).
BH-31-XTTwo batteries (optional)(except for LimitedSeries)(1800 CCA total).
BH-31-XTThree batteries (optional)(2700 CCA).
FL-820-SEngine oil filter.1
SP-589Spark plug.
FT-187Transmission fluid filter.
WW-2248-AWindshield wiper blade.
1 If a Motorcraft oil filter is not available, use an oil filter that aligns to SAE/USCAR – 36Performance Specifications. Filter Type D
We recommend Motorcraft parts that are available at your authorized dealer or atwww.fordparts.com. We engineer these parts for your vehicle and to meet or exceed ourspecifications. Use of other parts could impact vehicle performance, emissions anddurability. Your warranty could be void for any damage related to use of other parts.
295
2024 F-650/750 (TBC) , enUSA, Edition date: 202210, First-PrintingCapacities and Specifications