2024 CHEVROLET SILVERADO trailer
[x] Cancel search: trailerPage 8 of 433

Chevrolet Silverado 2500 HD/3500 HD Owner Manual (GMNA-Localizing-U.
S./Canada/Mexico-16908339) - 2024 - CRC - 12/5/22
6 Introduction
1. Tow/Haul Mode (On Some Models). SeeDriver Mode Control 0232.
Automatic Transfer Case Control (If
Equipped). See Four-Wheel Drive 0221.
Driver Mode Control 0232 (If Equipped).
2. Air Vents 0190.
3. Turn Signal Lever. See Turn and
Lane-Change Signals 0142.
Windshield Wiper/Washer 0101.
4. Head-Up Display (HUD) 0130 (If
Equipped).
5. Instrument Cluster (Base Level) 0107 or
Instrument Cluster (Uplevel) 0108.
6. Shift Lever. See Automatic Transmission
0 218.
Range Selection Mode. See Manual Mode
0 220.
7. Light Sensor. See Automatic Headlamp
System 0140.
Vehicle Alarm System. See Vehicle
Security 029.
8. Infotainment Controls. See Overview
(Uplevel Radio) 0150 or
Overview (Base Radio) 0149.
9. Upper Glove Box. See Glove Box094.
10. Lower Glove Box. See Glove Box094. 11.
Climate Control Systems 0185 (If
Equipped).
Dual Automatic Climate Control System
0 187 (If Equipped).
12. Park Assist Switch (If Equipped). See Assistance Systems for Parking or Backing
0247.
Traction Control/Electronic Stability
Control 0230.
Hazard Warning Flashers 0141.
Hill Descent Control Switch (If Equipped).
See Hill Descent Control (HDC) 0231.
Power Assist Steps 028 (If Equipped).
Power Release Tailgate (If Equipped). See
Tailgate 021.
Express Window Down Button (If
Equipped). See Power Windows 039.
Tow/Haul Mode 0221 (On Some
Models).
Exhaust Brake (If Equipped). See Duramax
Diesel Supplement.
Power Take-Off (PTO) (If Equipped). See
Duramax Diesel Supplement.
13. Power Outlet (Alternating Current) (If Equipped). See Power Outlets0102.
14. Power Outlet (Direct Current). See Power
Outlets 0102. 15.
USB Port 0158.
16. Trailer Brake Control Panel (If Equipped). See“Integrated Trailer Brake Control
System” underTowing Equipment 0278.
17. ENGINE START/STOP. See Ignition
Positions 0211.
18. Steering Wheel Controls 0151.
Driver Information Center (DIC) Controls.
See Driver Information Center (DIC) (Base
Level) 0126 or
Driver Information Center (DIC) (Uplevel)
0 128.
19. Horn 0101.
20. Hood Release. See Hood0305.
21. Steering Wheel Adjustment 0100 (Out
of View).
22. Cruise Control 0233.
Adaptive Cruise Control (Camera) 0235
(If Equipped).
Forward Collision Alert (FCA) System
0 257 (If Equipped).
Heated Steering Wheel 0100 (If
Equipped).
23. Data Link Connector (DLC) (Out of View). SeeMalfunction Indicator Lamp (Check
Engine Light) 0117.
24. Electric Parking Brake 0228.
Page 11 of 433

Chevrolet Silverado 2500 HD/3500 HD Owner Manual (GMNA-Localizing-U.
S./Canada/Mexico-16908339) - 2024 - CRC - 12/5/22
Introduction 9
1.Head-Up Display (HUD) 0130 (If
Equipped).
2. Air Vents 0190.
3. Turn Signal Lever. See Turn and
Lane-Change Signals 0142.
Windshield Wiper/Washer 0101.
4. Instrument Cluster (Base Level) 0107 or
Instrument Cluster (Uplevel) 0108.
5. Shift Lever. See Automatic Transmission
0 218.
Range Selection Mode. See Manual Mode
0 220.
6. Infotainment System. See Overview
(Uplevel Radio) 0150 or
Overview (Base Radio) 0149.
7. Light Sensor. See Automatic Headlamp
System 0140.
Vehicle Alarm System. See Vehicle
Security 029.
8. Upper Glove Box. See Glove Box094.
9. Lower Glove Box. See Glove Box094.
10. Upper Glove Box Button. See Glove Box
0 94.
11. Power Release Tailgate (If Equipped). See Tailgate 021.
Hazard Warning Flashers 0141. Traction Control/Electronic Stability
Control
0230.
Hill Descent Control Switch (If Equipped).
See Hill Descent Control (HDC) 0231.
Power Assist Steps 028 (If Equipped).
Express Window Down Button (If
Equipped). See Power Windows 039.
Tow/Haul Mode 0221 (On Some
Models).
Exhaust Brake (If Equipped). See Duramax
Diesel Supplement.
Power Take-Off (PTO) (If Equipped). See
Duramax Diesel Supplement.
12. USB Port 0158.
13. Climate Control Systems 0185 (If
Equipped).
Dual Automatic Climate Control System
0 187 (If Equipped).
Heated and Ventilated Front Seats 050
(If Equipped).
14. Front Center Console Storage.
15. Cupholders 094.
16. Trailer Brake Control Panel (If Equipped). See“Integrated Trailer Brake Control
System” underTowing Equipment 0278. 17. ENGINE START/STOP. See
Ignition
Positions 0211.
18. Steering Wheel Controls 0151.
Driver Information Center (DIC) Controls.
See Driver Information Center (DIC) (Base
Level) 0126 or
Driver Information Center (DIC) (Uplevel)
0 128.
19. Horn 0101.
20. Steering Wheel Adjustment 0100 (Out
of View).
21. Hood Release. See Hood0305.
22. Cruise Control 0233.
Adaptive Cruise Control (Camera) 0235
(If Equipped).
Forward Collision Alert (FCA) System
0 257 (If Equipped).
Heated Steering Wheel 0100 (If
Equipped).
23. Fog Lamps 0142 (If Equipped).
Instrument Panel Illumination Control
0 144.
Exterior Cargo Lamps 0144.
Exterior Lamp Controls 0138.
Task Lighting 0143 (If Equipped).
Page 13 of 433

Chevrolet Silverado 2500 HD/3500 HD Owner Manual (GMNA-Localizing-U.
S./Canada/Mexico-16908339) - 2024 - CRC - 12/5/22
Keys, Doors, and Windows 11
Keys, Doors, and
Windows
Keys and Locks
Keys . . . . . . . . . . . . . . . . . . . . . . . . . . . . . . . . . . . . 11
Remote Key . . . . . . . . . . . . . . . . . . . . . . . . . . . . . 12
Remote Key Operation . . . . . . . . . . . . . . . . . . 12
Remote Vehicle Start . . . . . . . . . . . . . . . . . . . 18
Door Locks . . . . . . . . . . . . . . . . . . . . . . . . . . . . . . 19
Power Door Locks . . . . . . . . . . . . . . . . . . . . . . 20
Delayed Locking . . . . . . . . . . . . . . . . . . . . . . . . 20
Automatic Door Locks . . . . . . . . . . . . . . . . . . 20
Lockout Protection . . . . . . . . . . . . . . . . . . . . . 20
Safety Locks . . . . . . . . . . . . . . . . . . . . . . . . . . . . 20
Doors
Tailgate . . . . . . . . . . . . . . . . . . . . . . . . . . . . . . . . . 21
Transporting Items That CanCatch Fire . . . . . . . . . . . . . . . . . . . . . . . . . . . . . 28
Power Assist Steps . . . . . . . . . . . . . . . . . . . . . 28
Vehicle Security
Vehicle Security . . . . . . . . . . . . . . . . . . . . . . . . 29
Vehicle Alarm System . . . . . . . . . . . . . . . . . . 29
Steering Column Lock . . . . . . . . . . . . . . . . . . 30
Immobilizer . . . . . . . . . . . . . . . . . . . . . . . . . . . . 30
Immobilizer Operation . . . . . . . . . . . . . . . . . . 30
Exterior Mirrors
Convex Mirrors . . . . . . . . . . . . . . . . . . . . . . . . . 31 Manual Mirrors . . . . . . . . . . . . . . . . . . . . . . . . . 31
Trailer-Tow Mirrors . . . . . . . . . . . . . . . . . . . . . 32
Power Mirrors . . . . . . . . . . . . . . . . . . . . . . . . . . 32
Folding Mirrors . . . . . . . . . . . . . . . . . . . . . . . . . 33
Heated Mirrors . . . . . . . . . . . . . . . . . . . . . . . . . 34
Automatic Dimming Mirror . . . . . . . . . . . . . 34
Blind Spot Mirrors . . . . . . . . . . . . . . . . . . . . . . 34
Reverse Tilt Mirrors . . . . . . . . . . . . . . . . . . . . . 35
Interior Mirrors
Interior Rearview Mirrors . . . . . . . . . . . . . . . 35
Manual Rearview Mirror . . . . . . . . . . . . . . . . 35
Automatic Dimming Rearview Mirror . . . 35
Rear Camera Mirror . . . . . . . . . . . . . . . . . . . . . 35
Truck Bed Camera Rearview Mirror . . . . . 38
Windows
Windows . . . . . . . . . . . . . . . . . . . . . . . . . . . . . . . 38
Power Windows . . . . . . . . . . . . . . . . . . . . . . . . 39
Rear Windows . . . . . . . . . . . . . . . . . . . . . . . . . . 41
Sun Visors . . . . . . . . . . . . . . . . . . . . . . . . . . . . . . 41
Roof
Sunroof . . . . . . . . . . . . . . . . . . . . . . . . . . . . . . . . . 41
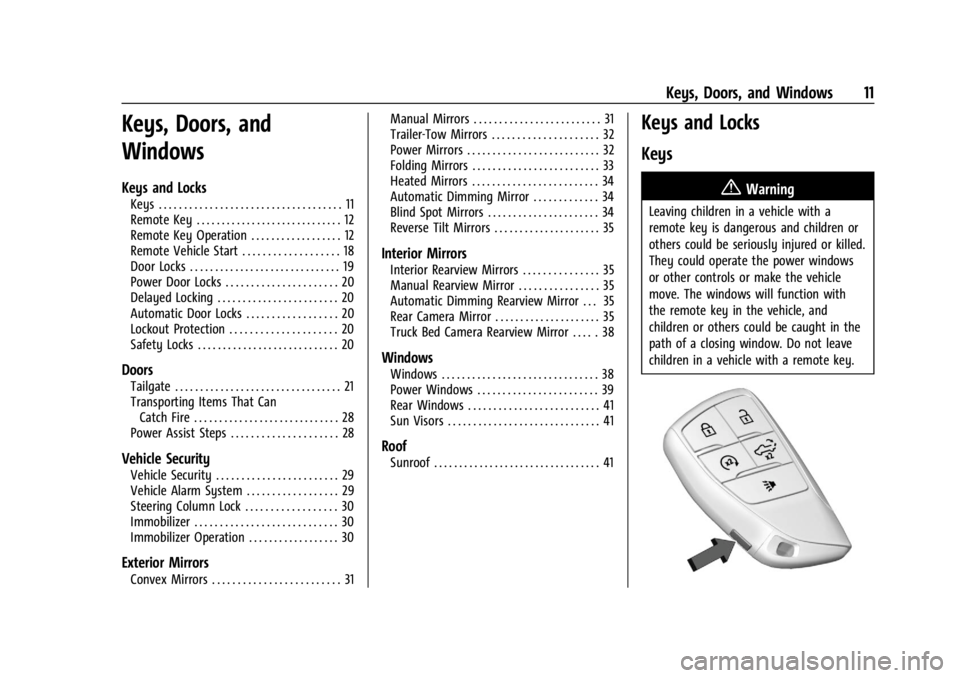
Keys and Locks
Keys
{Warning
Leaving children in a vehicle with a
remote key is dangerous and children or
others could be seriously injured or killed.
They could operate the power windows
or other controls or make the vehicle
move. The windows will function with
the remote key in the vehicle, and
children or others could be caught in the
path of a closing window. Do not leave
children in a vehicle with a remote key.
Page 28 of 433

Chevrolet Silverado 2500 HD/3500 HD Owner Manual (GMNA-Localizing-U.
S./Canada/Mexico-16908339) - 2024 - CRC - 12/5/22
26 Keys, Doors, and Windows
Caution
Do not open the inner tailgate with the
primary tailgate open if there is a hitch
ball or trailer attached. This may damage
the tailgate.
To close the inner tailgate with the primary
tailgate closed, firmly push or pull it upward
until it latches. Pull it back to be sure it is
latched securely.
To close the inner tailgate with the primary
tailgate open:
.Hold the primary tailgate and firmly close
the inner tailgate.
.Raise the inner tailgate so it meets the
primary tailgate and close together at the
same time.
When using the tailgate step as a load stop,
the load must be secured as the load could
shift. See Cargo Tie-Downs 097.
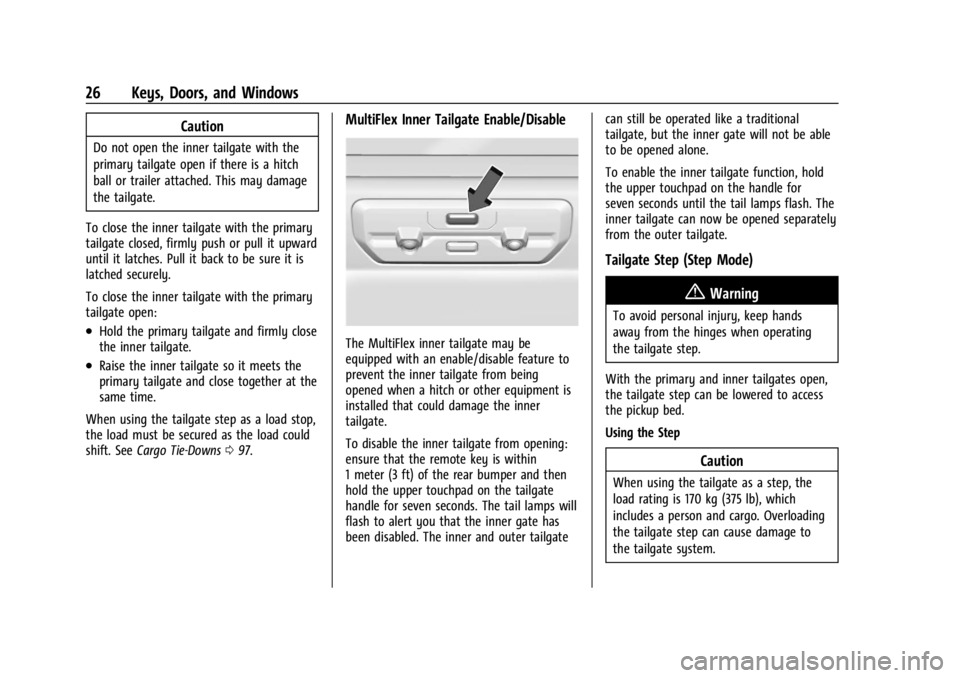
MultiFlex Inner Tailgate Enable/Disable
The MultiFlex inner tailgate may be
equipped with an enable/disable feature to
prevent the inner tailgate from being
opened when a hitch or other equipment is
installed that could damage the inner
tailgate.
To disable the inner tailgate from opening:
ensure that the remote key is within
1 meter (3 ft) of the rear bumper and then
hold the upper touchpad on the tailgate
handle for seven seconds. The tail lamps will
flash to alert you that the inner gate has
been disabled. The inner and outer tailgate can still be operated like a traditional
tailgate, but the inner gate will not be able
to be opened alone.
To enable the inner tailgate function, hold
the upper touchpad on the handle for
seven seconds until the tail lamps flash. The
inner tailgate can now be opened separately
from the outer tailgate.
Tailgate Step (Step Mode)
{Warning
To avoid personal injury, keep hands
away from the hinges when operating
the tailgate step.
With the primary and inner tailgates open,
the tailgate step can be lowered to access
the pickup bed.
Using the Step
Caution
When using the tailgate as a step, the
load rating is 170 kg (375 lb), which
includes a person and cargo. Overloading
the tailgate step can cause damage to
the tailgate system.
Page 33 of 433

Chevrolet Silverado 2500 HD/3500 HD Owner Manual (GMNA-Localizing-U.
S./Canada/Mexico-16908339) - 2024 - CRC - 12/5/22
Keys, Doors, and Windows 31
The security light, in the instrument cluster,
comes on if there is a problem with arming
or disarming the theft-deterrent system.
The system has one or more remote keys
matched to an immobilizer control unit in
your vehicle. Only a correctly matched
remote key will start the vehicle. If the
remote key is ever damaged, you may not
be able to start your vehicle.
When trying to start the vehicle, the
security light may come on briefly when the
ignition is turned on. If the engine does not
start and the security light stays on, there is
a problem with the system. Turn the
ignition off and try again.
If the vehicle will not change ignition modes
(accessory mode, on, off), and the remote
key appears to be undamaged, try another
remote key. Or, you may try placing the
remote key in the remote key pocket
located in the center console. SeeRemote
Key Operation 012.
If the ignition mode will not change with
the other remote key or with the remote
key in the remote key pocket, your vehicle
needs service. If the ignition does change
modes, the first remote key may be faulty. See your dealer who can service the
theft-deterrent system and have a new
remote key programmed to the vehicle.
It is possible for the immobilizer system to
learn new or replacement remote keys. Up
to eight remote keys can be programmed
for the vehicle. To program additional
remote keys, see "Programming Remote
Keys to the Vehicle" under
Remote Key
Operation 012.
Do not leave the remote key or device that
disarms or deactivates the vehicle theft
system in the vehicle.
Exterior Mirrors
Convex Mirrors
{Warning
A convex mirror can make things, like
other vehicles, look farther away than
they really are. If you cut too sharply
into the right lane, you could hit a
vehicle on the right. Check the inside
mirror or glance over your shoulder
before changing lanes. Standard Mirrors
If equipped, the passenger side mirror is
convex shaped. A convex mirror surface is
curved so more can be seen from the
driver seat.
Trailer-Tow Mirrors
The upper portion of both the driver and
passenger mirrors is flat.
The lower portion of both the driver and
passenger mirrors is convex. A convex mirror
surface is curved so more can be seen from
the driver seat. The lower portion is
adjusted manually.
Manual Mirrors
If equipped, adjust manual mirrors by
moving the mirror up and down or left to
right to see a little of the side of the vehicle
and to have a clear view behind the vehicle.
Using hood-mounted air deflectors and
add-on convex mirror attachments could
decrease mirror performance.
Page 34 of 433

Chevrolet Silverado 2500 HD/3500 HD Owner Manual (GMNA-Localizing-U.
S./Canada/Mexico-16908339) - 2024 - CRC - 12/5/22
32 Keys, Doors, and Windows
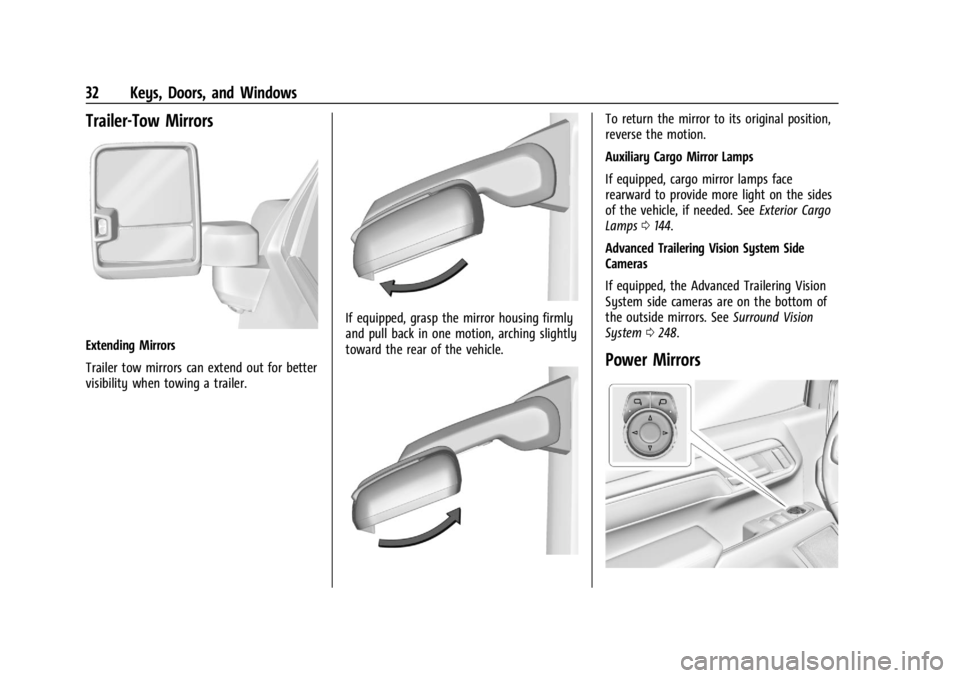
Trailer-Tow Mirrors
Extending Mirrors
Trailer tow mirrors can extend out for better
visibility when towing a trailer.
If equipped, grasp the mirror housing firmly
and pull back in one motion, arching slightly
toward the rear of the vehicle.
To return the mirror to its original position,
reverse the motion.
Auxiliary Cargo Mirror Lamps
If equipped, cargo mirror lamps face
rearward to provide more light on the sides
of the vehicle, if needed. SeeExterior Cargo
Lamps 0144.
Advanced Trailering Vision System Side
Cameras
If equipped, the Advanced Trailering Vision
System side cameras are on the bottom of
the outside mirrors. See Surround Vision
System 0248.
Power Mirrors
Page 40 of 433

Chevrolet Silverado 2500 HD/3500 HD Owner Manual (GMNA-Localizing-U.
S./Canada/Mexico-16908339) - 2024 - CRC - 12/5/22
38 Keys, Doors, and Windows
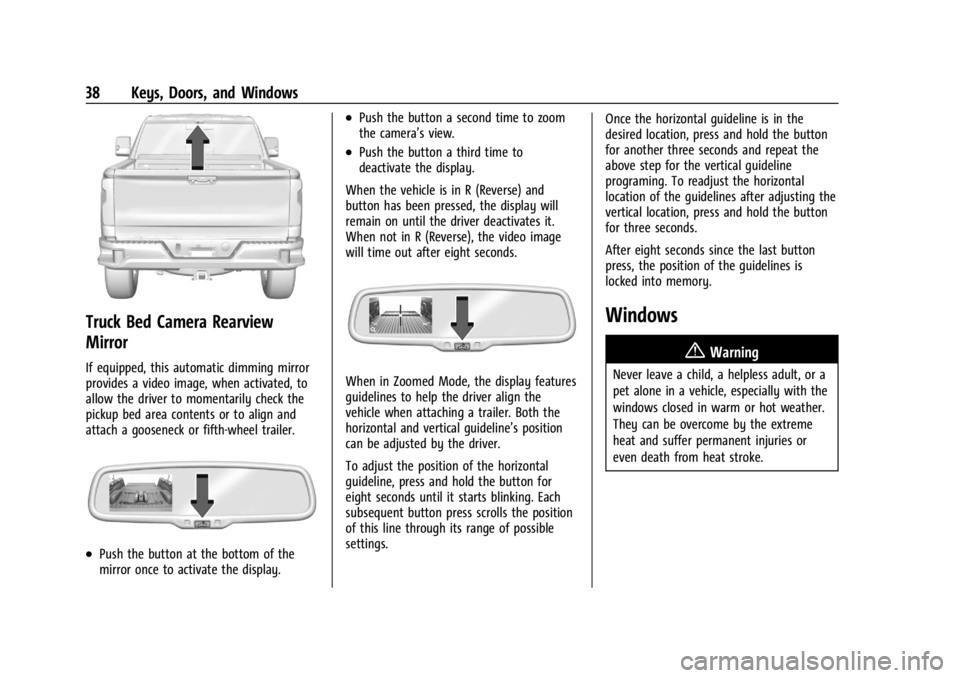
Truck Bed Camera Rearview
Mirror
If equipped, this automatic dimming mirror
provides a video image, when activated, to
allow the driver to momentarily check the
pickup bed area contents or to align and
attach a gooseneck or fifth-wheel trailer.
.Push the button at the bottom of the
mirror once to activate the display.
.Push the button a second time to zoom
the camera’s view.
.Push the button a third time to
deactivate the display.
When the vehicle is in R (Reverse) and
button has been pressed, the display will
remain on until the driver deactivates it.
When not in R (Reverse), the video image
will time out after eight seconds.
When in Zoomed Mode, the display features
guidelines to help the driver align the
vehicle when attaching a trailer. Both the
horizontal and vertical guideline’s position
can be adjusted by the driver.
To adjust the position of the horizontal
guideline, press and hold the button for
eight seconds until it starts blinking. Each
subsequent button press scrolls the position
of this line through its range of possible
settings. Once the horizontal guideline is in the
desired location, press and hold the button
for another three seconds and repeat the
above step for the vertical guideline
programing. To readjust the horizontal
location of the guidelines after adjusting the
vertical location, press and hold the button
for three seconds.
After eight seconds since the last button
press, the position of the guidelines is
locked into memory.
Windows
{
Warning
Never leave a child, a helpless adult, or a
pet alone in a vehicle, especially with the
windows closed in warm or hot weather.
They can be overcome by the extreme
heat and suffer permanent injuries or
even death from heat stroke.
Page 120 of 433

Chevrolet Silverado 2500 HD/3500 HD Owner Manual (GMNA-Localizing-U.
S./Canada/Mexico-16908339) - 2024 - CRC - 12/15/22
118 Instruments and Controls
Caution
If the vehicle is driven continually with
this light on, the emission control system
may not work as well, the fuel economy
may be lower, and the vehicle may not
run smoothly. This could lead to costly
repairs that might not be covered by the
vehicle warranty.
Caution
Modifications to the engine, transmission,
exhaust, intake, or fuel system, or the
use of replacement tires that do not
meet the original tire specifications, can
cause this light to come on. This could
lead to costly repairs not covered by the
vehicle warranty. This could also affect
the vehicle’s ability to pass an Emissions
Inspection/Maintenance test. See
Accessories and Modifications0304.
If the light is flashing : A malfunction has
been detected that could damage the
emission control system and increase vehicle
emissions. Diagnosis and service may be
required. To help prevent damage, reduce vehicle
speed and avoid hard accelerations and
uphill grades. If towing a trailer, reduce the
amount of cargo being hauled as soon as
possible.
If the light continues to flash, find a safe
place to park. Turn the vehicle off and wait
at least 10 seconds before restarting the
engine. If the light is still flashing, follow
the previous guidelines and see your dealer
for service as soon as possible.
If the light is on steady :
A malfunction has
been detected. Diagnosis and service may be
required.
Check the following:
.If fuel has been added to the vehicle
using the capless funnel adapter, make
sure that it has been removed. See
“Filling the Tank with a Portable Gas Can”
under Filling the Tank (Chassis Cab and
Box Delete Models) 0269 or
Filling the Tank (Pickup Models) 0267.
The diagnostic system can detect if the
adapter has been left installed in the
vehicle, allowing fuel to evaporate into
the atmosphere. A few driving trips with
the adapter removed may turn off the
light.
.Poor fuel quality can cause inefficient
engine operation and poor driveability,
which may go away once the engine is
warmed up. If this occurs, change the fuel
brand. It may require at least one full
tank of the proper fuel to turn the light
off. See Recommended Fuel 0266.
If the light remains on, see your dealer.
Emissions Inspection and Maintenance
Programs
If the vehicle requires an Emissions
Inspection/Maintenance test, the test
equipment will likely connect to the
vehicle's Data Link Connector (DLC).
The DLC is under the instrument panel to
the left of the steering wheel. Connecting
devices that are not used to perform an
Emissions Inspection/Maintenance test or to
service the vehicle may affect vehicle