2024 CHEVROLET SILVERADO settings
[x] Cancel search: settingsPage 222 of 433

Chevrolet Silverado 2500 HD/3500 HD Owner Manual (GMNA-Localizing-U.
S./Canada/Mexico-16908339) - 2024 - CRC - 12/12/22
220 Driving and Operating
vehicle is being used, such as with a heavy
load or when the temperature changes.
During this adaptive shift control process,
shifting might feel different as the
transmission determines the best settings.
When temperatures are very cold, the
transmission's gear shifting may be delayed
to provide more stable shifts until the
engine warms up. Shifts could be more
noticeable with a cold transmission. This
difference in shifting is normal.
L :This position allows selection of a range
of gears appropriate for current driving
conditions. If equipped, see “Range Selection
Mode” underManual Mode 0220.
Caution
Spinning the tires or holding the vehicle
in one place on a hill using only the
accelerator pedal may damage the
transmission. The repair will not be
covered by the vehicle warranty. If the
vehicle is stuck, do not spin the tires.
When stopping on a hill, use the brakes
to hold the vehicle in place.
Manual Mode
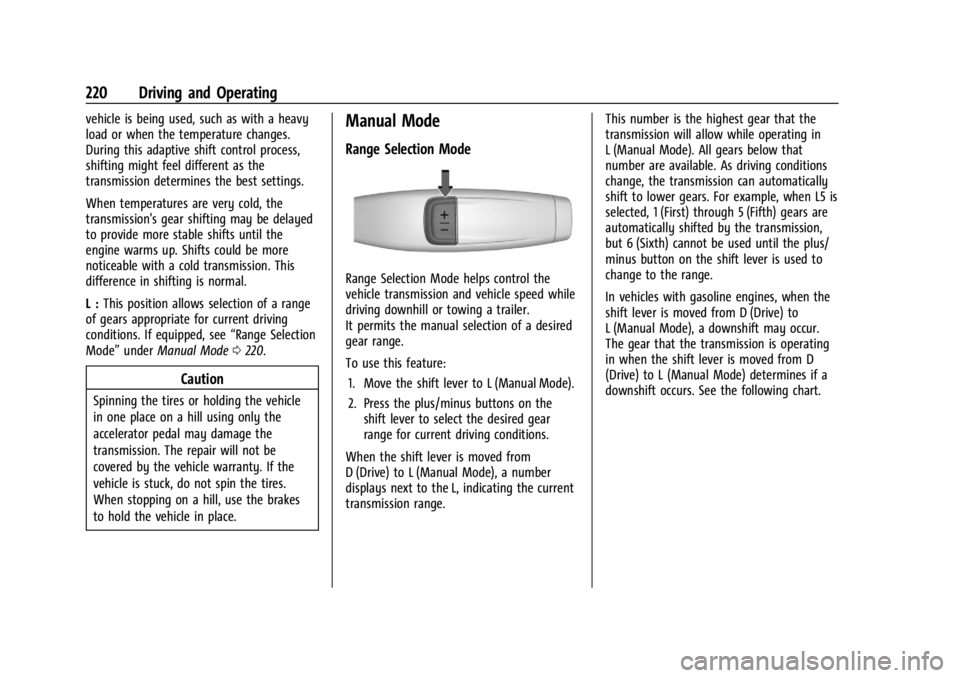
Range Selection Mode
Range Selection Mode helps control the
vehicle transmission and vehicle speed while
driving downhill or towing a trailer.
It permits the manual selection of a desired
gear range.
To use this feature:
1. Move the shift lever to L (Manual Mode).
2. Press the plus/minus buttons on the shift lever to select the desired gear
range for current driving conditions.
When the shift lever is moved from
D (Drive) to L (Manual Mode), a number
displays next to the L, indicating the current
transmission range. This number is the highest gear that the
transmission will allow while operating in
L (Manual Mode). All gears below that
number are available. As driving conditions
change, the transmission can automatically
shift to lower gears. For example, when L5 is
selected, 1 (First) through 5 (Fifth) gears are
automatically shifted by the transmission,
but 6 (Sixth) cannot be used until the plus/
minus button on the shift lever is used to
change to the range.
In vehicles with gasoline engines, when the
shift lever is moved from D (Drive) to
L (Manual Mode), a downshift may occur.
The gear that the transmission is operating
in when the shift lever is moved from D
(Drive) to L (Manual Mode) determines if a
downshift occurs. See the following chart.
Page 225 of 433

Chevrolet Silverado 2500 HD/3500 HD Owner Manual (GMNA-Localizing-U.
S./Canada/Mexico-16908339) - 2024 - CRC - 12/12/22
Driving and Operating 223
When the shift is complete the indicator will
stop flashing. The DIC message turns off
once the shift is complete. If the transfer
case cannot complete a shift request, it will
go back to its last chosen setting.
The settings are:
N (Neutral) :Use only when the vehicle
needs to be towed. See Recreational Vehicle
Towing 0374 or
Transporting a Disabled Vehicle 0373.
2
m(Two-Wheel Drive High) : Use for driving
on most streets and highways. The front
axle is not engaged. This setting provides
the best fuel economy.
AUTO (Automatic Four-Wheel Drive) : Use
when road surface conditions are variable.
When driving in AUTO, the front axle is
engaged, and the vehicle's power is sent to
the front and rear wheels automatically
based on driving conditions. This setting
provides slightly lower fuel economy
than 2
m.
4
m(Four-Wheel Drive High) : Use this
setting when extra traction is needed, such
as when driving on snowy or icy roads,
when off-roading, or when plowing snow. 4
n(Four-Wheel Drive Low) :
This setting
engages the front axle and delivers extra
torque. Choose 4
nwhen driving off-road in
deep sand, deep mud, or deep snow, and
while climbing or descending steep hills.
While driving in 4
n, keep vehicle speed
below 60 km/h (36 mph).
Shifting into 4
nwill turn Traction Control
and StabiliTrak/ESC off. See Traction Control/
Electronic Stability Control 0230.
Shifts between 2
m, 4m, and AUTO
Any of these shifts can be made at normal
driving speed.
The actual 4x4 shift request is only made
after the button is released. The
4x4 indicator will remain flashing until the
shift request has completed. A DIC message
displays to indicate that the 4x4 transfer
case has been requested to shift to the new
desired state.
Once the 4x4 shift has completed, the DIC
message disappears, the 4x4 indicator stops
flashing, and the current setting is indicated.
When a shift to 2
mis completed successfully
while in P (Park), the parking brake will
engage. To resume driving, shift the transmission to the desired gear and
manually release the parking brake or press
the accelerator pedal to begin driving. See
Electric Parking Brake
0228.
If equipped, use 4
n, AUTO, or 4mto provide
additional traction when parking on a steep
grade with poor traction such as ice, snow,
mud, or gravel.
Shifting Into 4
n
1. The ignition must be on and the vehicle must be stopped or moving less than
5 km/h (3 mph) with the transmission in
N (Neutral). It is best for the vehicle to
be moving 1.6 to 3.2 km/h (1 to 2 mph).
2. Press 4
n. The actual 4x4 shift request is
only made after the button is released.
The 4x4 indicator will remain flashing
until the shift request has completed.
A DIC message displays to indicate that
the 4x4 transfer case has been requested
to shift to the new desired state.
Once the 4x4 shift has completed, the
DIC message disappears, the
4x4 indicator stops flashing and the
current setting is indicated.
If vehicle speed is higher when shift request
occurs, a DIC message displays. Reduce
vehicle speed.
Page 227 of 433

Chevrolet Silverado 2500 HD/3500 HD Owner Manual (GMNA-Localizing-U.
S./Canada/Mexico-16908339) - 2024 - CRC - 12/12/22
Driving and Operating 225
Shifting Out of N (Neutral)
To shift out of N (Neutral):1. Turn the ignition on with the engine off. See Ignition Positions 0211.
2. Set the parking brake. See Electric
Parking Brake 0228.
3. Shift the transmission to N (Neutral).
4. Shift the transfer case to 2
m. Transfer
case shifts out of N (Neutral) can only be
made into 2
m. When the shift to 2mis
complete, the indicator in the instrument
cluster will stop flashing. If the transfer
case cannot complete a shift, the
indicator will return to the previously
selected setting.
Part-time Transfer Case
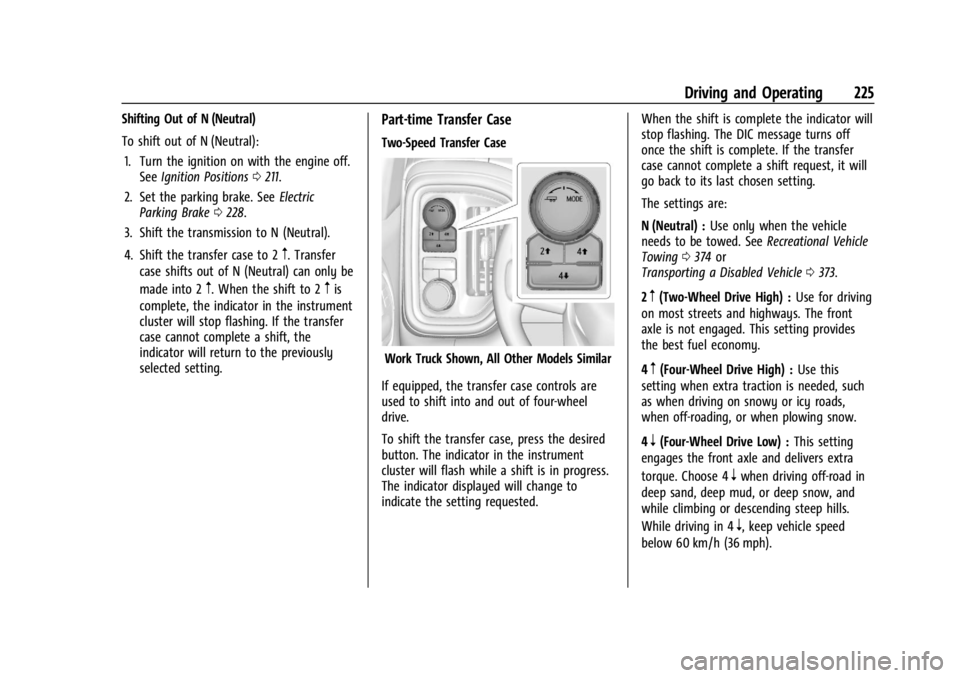
Two-Speed Transfer Case
Work Truck Shown, All Other Models Similar
If equipped, the transfer case controls are
used to shift into and out of four-wheel
drive.
To shift the transfer case, press the desired
button. The indicator in the instrument
cluster will flash while a shift is in progress.
The indicator displayed will change to
indicate the setting requested. When the shift is complete the indicator will
stop flashing. The DIC message turns off
once the shift is complete. If the transfer
case cannot complete a shift request, it will
go back to its last chosen setting.
The settings are:
N (Neutral) :
Use only when the vehicle
needs to be towed. See Recreational Vehicle
Towing 0374 or
Transporting a Disabled Vehicle 0373.
2
m(Two-Wheel Drive High) : Use for driving
on most streets and highways. The front
axle is not engaged. This setting provides
the best fuel economy.
4
m(Four-Wheel Drive High) : Use this
setting when extra traction is needed, such
as when driving on snowy or icy roads,
when off-roading, or when plowing snow.
4
n(Four-Wheel Drive Low) : This setting
engages the front axle and delivers extra
torque. Choose 4
nwhen driving off-road in
deep sand, deep mud, or deep snow, and
while climbing or descending steep hills.
While driving in 4
n, keep vehicle speed
below 60 km/h (36 mph).
Page 241 of 433

Chevrolet Silverado 2500 HD/3500 HD Owner Manual (GMNA-Localizing-U.
S./Canada/Mexico-16908339) - 2024 - CRC - 12/12/22
Driving and Operating 239
Reducing Speed While ACC Is at a Set Speed
If ACC is already activated, do one of the
following:
.Use the brake to get to the desired lower
speed. Release the brake and press SET–.
The vehicle will now cruise at the lower
speed.
.Press and hold SET–until the desired
lower speed is reached, then release it.
.To decrease the vehicle speed in smaller
increments, press SET− briefly. For each
press, the vehicle goes about 1 km/h
(1 mph) slower.
.To decrease the vehicle speed in larger
increments, hold SET−. While holding
SET−, the vehicle speed decreases to the
next 5 km/h (5 mph) step, then continues
to decrease by 5 km/h (5 mph) at a time.
The set speed can also be decreased while
the vehicle is stopped.
.If stopped with the brake applied, press
or hold SET− until the desired set speed is
displayed. Selecting the Follow Distance Gap
When a slower moving vehicle is detected
ahead within the selected following gap,
ACC will adjust the vehicle's speed and
attempt to maintain the follow distance gap
selected.
Press
[on the steering wheel to adjust
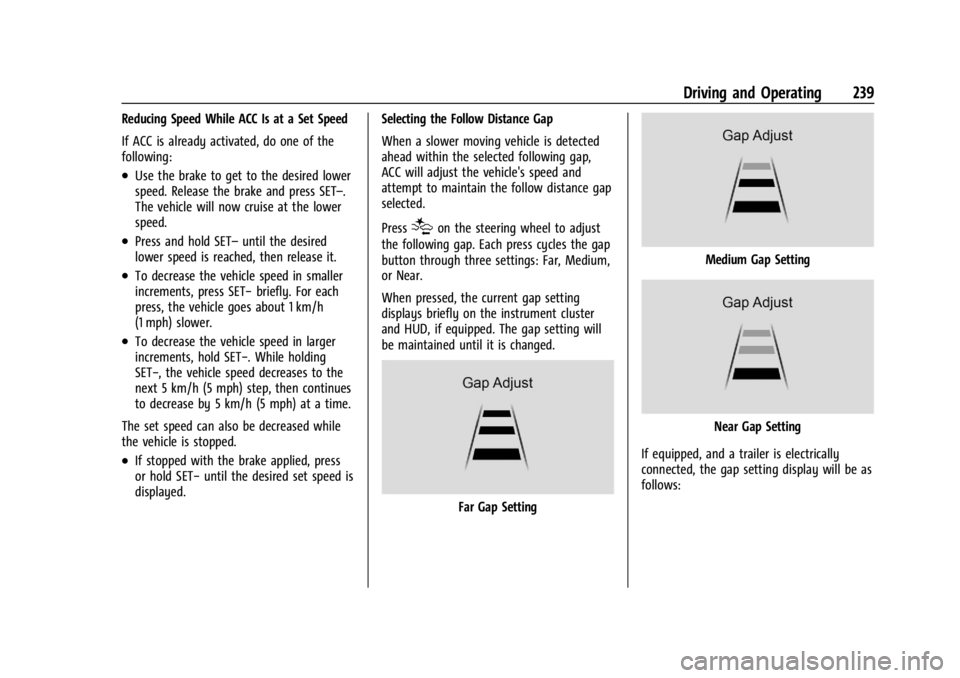
the following gap. Each press cycles the gap
button through three settings: Far, Medium,
or Near.
When pressed, the current gap setting
displays briefly on the instrument cluster
and HUD, if equipped. The gap setting will
be maintained until it is changed.
Far Gap Setting
Medium Gap Setting
Near Gap Setting
If equipped, and a trailer is electrically
connected, the gap setting display will be as
follows:
Page 243 of 433

Chevrolet Silverado 2500 HD/3500 HD Owner Manual (GMNA-Localizing-U.
S./Canada/Mexico-16908339) - 2024 - CRC - 12/12/22
Driving and Operating 241
Without Head-Up Display
If ACC is engaged, driver action may be
required when ACC cannot apply sufficient
braking because of approaching a vehicle
too rapidly.
When this condition occurs, the collision
alert symbol will flash on the windshield.
Either eight beeps will sound from the front,
or both sides of the Safety Alert Seat,
if equipped, will pulse five times. To view
available settings from the infotainment
screen, touch Settings > Vehicle > Collision/
Detection Systems.
See Defensive Driving 0194.
Approaching and Following a Vehicle
The vehicle ahead indicator is in the
instrument cluster and HUD (if equipped).
It only displays when a vehicle is detected
in your vehicle’s path moving in the same
direction. If this symbol is not displaying,
ACC will not respond to or brake for vehicles
ahead.
ACC automatically slows the vehicle down
and adjusts vehicle speed to follow a
detected vehicle ahead at the selected
following gap. The vehicle speed increases or
decreases to follow a detected vehicle in
front of your vehicle when that vehicle is
traveling slower than your vehicle set speed.
It may apply limited braking, if necessary.
When braking is active, the brake lamps will
come on. The automatic braking may feel or
sound different than if the brakes were
applied manually. This is normal.
Passing a Vehicle While Using ACC
If the set speed is high enough, and the left
turn signal is used to pass a vehicle ahead
in the selected following gap, ACC may
assist by gradually accelerating the vehicle
prior to the lane change.{Warning
When using ACC to pass a vehicle or
perform a lane change, the following
distance to the vehicle being passed may
be reduced. ACC may not apply sufficient
acceleration or braking when passing a
vehicle or performing a lane change.
Always be ready to manually accelerate
or brake to complete the pass or lane
change.
Stationary or Very Slow-Moving Objects
{Warning
ACC may not detect and react to stopped
or slow-moving vehicles ahead of you. For
example, the system may not brake for a
vehicle it has never detected moving. This
can occur in stop-and-go traffic or when a
vehicle suddenly appears due to a vehicle
ahead changing lanes. Your vehicle may
not stop and could cause a crash. Use
caution when using ACC. Your complete
attention is always required while driving
and you should be ready to take action
and apply the brakes.
Page 244 of 433

Chevrolet Silverado 2500 HD/3500 HD Owner Manual (GMNA-Localizing-U.
S./Canada/Mexico-16908339) - 2024 - CRC - 12/12/22
242 Driving and Operating
Irregular Objects Affecting ACC
ACC may have difficulty detecting the
following objects:
.Vehicles in front of your vehicle that have
a rear aspect that is low, small,
or irregular
.An empty truck or trailer that has no
cargo in the cargo bed
.Vehicles with cargo extending from the
back end
.Non-standard shaped vehicles, such as
vehicle transport, vehicles with a side car
fitted, or horse carriages
.Vehicles that are low to the road surface
.Objects that are close to the front of your
vehicle
.Vehicles on which extremely heavy cargo
is loaded in the cargo area or rear seat
ACC Automatically Disengages
ACC may automatically disengage and the
driver will need to manually apply the
brakes to slow the vehicle if:
.The front camera is blocked or visibility is
reduced.
.The Traction Control System (TCS) or
StabiliTrak/ESC system has activated or
been disabled.
.There is a fault in the system.
.A DIC message displays to indicate that
ACC is temporarily unavailable.
The ACC indicator will turn white when ACC
is no longer active.
In some cases, when ACC is temporarily
unavailable, regular cruise control may be
used. See “Switching Between ACC and
Regular Cruise Control” previously in this
section. Always consider driving conditions
before using either cruise control system.
Notification to Resume ACC
ACC will maintain a follow gap behind a
detected vehicle and slow your vehicle to a
stop behind that vehicle.
If the stopped vehicle ahead has driven
away and ACC has not resumed, the vehicle
ahead indicator will flash as a reminder to check traffic ahead before proceeding. In
addition, the left and right sides of the
Safety Alert Seat (if equipped) will pulse
three times, or three beeps will sound. To
view available settings from the
infotainment screen, touch Settings >
Vehicle > Collision/Detection Systems > Alert
Type > Adaptive Cruise Go Notifier.
When the vehicle ahead drives away, ACC
resumes automatically if the stop was brief.
If necessary, press RES+ or the accelerator
pedal to resume ACC. If stopped for more
than two minutes or if the driver door is
opened and the driver seat belt is
unbuckled, the ACC automatically applies the
Electric Parking Brake (EPB) to hold the
vehicle. The EPB status light will turn on.
See
Electric Parking Brake 0228. To release
the EPB, press the accelerator pedal.
A DIC warning message may display
indicating to shift to P (Park) before exiting
the vehicle. See Vehicle Messages 0134.
{Warning
If ACC has stopped the vehicle, and if ACC
is disengaged, turned off, or canceled, the
vehicle will no longer be held at a stop.
(Continued)
Page 248 of 433

Chevrolet Silverado 2500 HD/3500 HD Owner Manual (GMNA-Localizing-U.
S./Canada/Mexico-16908339) - 2024 - CRC - 12/12/22
246 Driving and Operating
Cleaning the Sensing System
The camera sensor on the windshield behind
the rearview mirror can become blocked by
snow, ice, dirt, mud, or debris. This area
needs to be cleaned for ACC to operate
properly.
The vehicle headlamps may need to be
cleaned due to dirt, snow, or ice. Objects
that are not illuminated correctly may be
difficult to detect.
If ACC will not operate, regular cruise control
may be available. See“Switching Between
ACC and Regular Cruise Control” previously
in this section. Always consider driving
conditions before using either cruise control
system.
For cleaning instructions, see “Washing the
Vehicle” underExterior Care 0377.
Advanced Driver Assistance
Systems
This vehicle may have features that work
together to help avoid crashes or reduce
crash damage while driving, backing, and
parking. Read this entire section before
using these systems.
{Warning
Do not rely on the Driver Assistance
Systems. These systems do not replace
the need for paying attention and driving
safely. You may not hear or feel alerts or
warnings provided by these systems.
Failure to use proper care when driving
may result in injury, death, or vehicle
damage. See Defensive Driving 0194.
Under many conditions, these systems
will not:
.Detect children, pedestrians, bicyclists,
or animals.
.Detect vehicles or objects outside the
area monitored by the system.
.Work at all driving speeds.
.Warn you or provide you with enough
time to avoid a crash.
.Work under poor visibility or bad
weather conditions.
.Work if the detection sensor is not
cleaned or is covered by ice, snow,
mud, or dirt. (Continued)
Warning (Continued)
.Work if the detection sensor is
covered up, such as with a sticker,
magnet, or metal plate.
.Work if the area surrounding the
detection sensor is damaged or not
properly repaired.
Complete attention is always required
while driving, and you should be ready to
take action and apply the brakes and/or
steer the vehicle to avoid crashes.
Audible or Safety Alert Seat
Some driver assistance features alert the
driver of obstacles by beeping. To view
available settings from the infotainment
screen, touch Settings > Vehicle > Comfort
and Convenience.
If equipped with the Safety Alert Seat, the
driver seat cushion may provide a vibrating
pulse alert instead of beeping. To view
available settings from the infotainment
screen, touch Settings > Vehicle > Collision/
Detection Systems.
Page 253 of 433

Chevrolet Silverado 2500 HD/3500 HD Owner Manual (GMNA-Localizing-U.
S./Canada/Mexico-16908339) - 2024 - CRC - 12/12/22
Driving and Operating 251
7. Interior Trailer View
Displays a view of the interior of the
trailer. The feature is available when a
trailer is connected. The feature
requires user installation of an
accessory trailer camera on the
interior of the trailer per the accessory
trailer camera installation instructions
(see your dealer for accessory trailer
camera(s) and information). To view,
select Interior Trailer View on the
infotainment display when the Camera
App is active. To access this view
when in a forward gear above
12 km/h (8 mph), select CAMERA on
the infotainment display and select
Interior Trailer View. The view will
close after 8 seconds and can be
closed early by selecting X, Home
or Back.
8. Cargo Bed View/Bed Hitch View
Use the plus and minus icons on the
infotainment display to zoom in
or out.
.Cargo Bed View
Displays a view of the truck bed
and the area behind the vehicle to
assist in cargo or hitch monitoring
or hitching to a fifth wheel orgooseneck trailer. To view, select
Cargo Bed View on the
infotainment display when the
Camera App is active. To access
this view when in a forward gear
above 12 km/h (8 mph), select
CAMERA on the infotainment
display and select Cargo Bed View.
The view will close after 8 seconds
and can be closed early by
selecting X, Home or Back. When
the Cargo Bed View is selected
when not in Drive the cargo bed
lighting is turned on automatically.
The feature can be enabled or
disabled. To view available settings
from the infotainment screen,
touch Settings > Vehicle >
Collision/Detection Systems.
.Bed Hitch View
Displays a zoomed-in view of the
bed hitch area to assist with
aligning the vehicle’s hitch with
the trailer coupler and monitoring
the trailer connection. To view,
select Bed Hitch View on the
infotainment display when the
Camera App is active. To access
this view when in a forward gear
above 12 km/h (8 mph), selectCAMERA on the infotainment
display and select Bed Hitch View.
The view will close after 8 seconds
and can be closed early by
selecting X, Home or Back. When
the Bed Hitch View is selected
when not in Drive the cargo bed
lighting is turned on automatically.
The feature can be enabled or
disabled. To view available settings
from the infotainment screen,
touch Settings > Vehicle >
Collision/Detection Systems.
9. Transparent Trailer View
Displays a view that allows the driver
to virtually
“see through” the trailer.
The feature is available when a
compatible trailer is connected, a valid
profile is selected and the vehicle is
not in Reverse. The feature requires
user installation of an accessory trailer
camera on the rear exterior surface of
the trailer per the accessory trailer
camera installation instructions (see
your dealer for accessory trailer
camera(s) and information). To view,
select Transparent Trailer View on the
infotainment display when the Camera
App is active. To access this view
when in a forward gear above