2024 CHEVROLET SILVERADO Drive mode
[x] Cancel search: Drive modePage 40 of 433
Chevrolet Silverado 2500 HD/3500 HD Owner Manual (GMNA-Localizing-U.
S./Canada/Mexico-16908339) - 2024 - CRC - 12/5/22
38 Keys, Doors, and Windows
Truck Bed Camera Rearview
Mirror
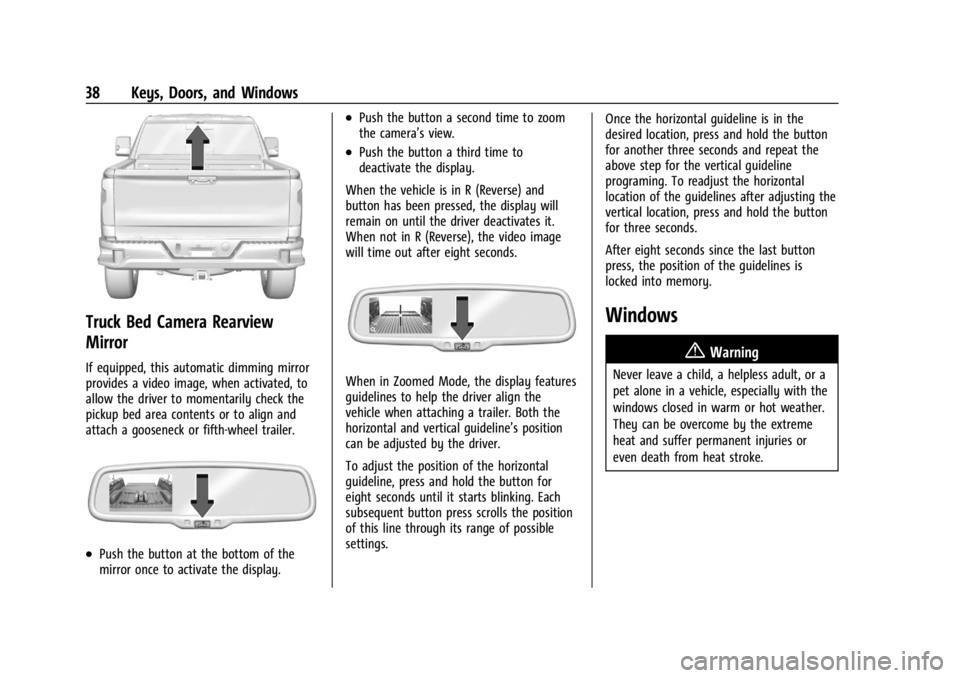
If equipped, this automatic dimming mirror
provides a video image, when activated, to
allow the driver to momentarily check the
pickup bed area contents or to align and
attach a gooseneck or fifth-wheel trailer.
.Push the button at the bottom of the
mirror once to activate the display.
.Push the button a second time to zoom
the camera’s view.
.Push the button a third time to
deactivate the display.
When the vehicle is in R (Reverse) and
button has been pressed, the display will
remain on until the driver deactivates it.
When not in R (Reverse), the video image
will time out after eight seconds.
When in Zoomed Mode, the display features
guidelines to help the driver align the
vehicle when attaching a trailer. Both the
horizontal and vertical guideline’s position
can be adjusted by the driver.
To adjust the position of the horizontal
guideline, press and hold the button for
eight seconds until it starts blinking. Each
subsequent button press scrolls the position
of this line through its range of possible
settings. Once the horizontal guideline is in the
desired location, press and hold the button
for another three seconds and repeat the
above step for the vertical guideline
programing. To readjust the horizontal
location of the guidelines after adjusting the
vertical location, press and hold the button
for three seconds.
After eight seconds since the last button
press, the position of the guidelines is
locked into memory.
Windows
{
Warning
Never leave a child, a helpless adult, or a
pet alone in a vehicle, especially with the
windows closed in warm or hot weather.
They can be overcome by the extreme
heat and suffer permanent injuries or
even death from heat stroke.
Page 41 of 433
Chevrolet Silverado 2500 HD/3500 HD Owner Manual (GMNA-Localizing-U.
S./Canada/Mexico-16908339) - 2024 - CRC - 12/5/22
Keys, Doors, and Windows 39
The vehicle aerodynamics are designed to
improve fuel economy performance. This
may result in a pulsing sound when either
rear window is down and the front windows
are up. To reduce the sound, open either a
front window or the sunroof, if equipped.
Power Windows
{Warning
Children could be seriously injured or
killed if caught in the path of a closing
window. Never leave the remote key in a
vehicle with children. When there are(Continued)
Warning (Continued)
children in the rear seat, use the window
lockout switch to prevent operation of
the windows. SeeKeys011.
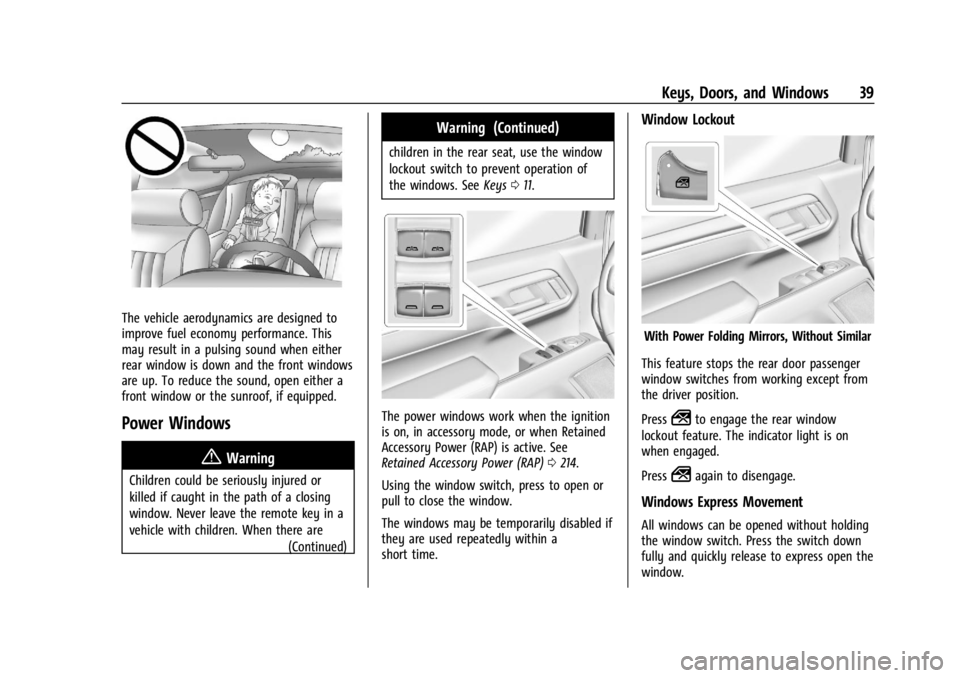
The power windows work when the ignition
is on, in accessory mode, or when Retained
Accessory Power (RAP) is active. See
Retained Accessory Power (RAP) 0214.
Using the window switch, press to open or
pull to close the window.
The windows may be temporarily disabled if
they are used repeatedly within a
short time.
Window Lockout
With Power Folding Mirrors, Without Similar
This feature stops the rear door passenger
window switches from working except from
the driver position.
Press
2to engage the rear window
lockout feature. The indicator light is on
when engaged.
Press
2again to disengage.
Windows Express Movement
All windows can be opened without holding
the window switch. Press the switch down
fully and quickly release to express open the
window.
Page 50 of 433
Chevrolet Silverado 2500 HD/3500 HD Owner Manual (GMNA-Localizing-U.
S./Canada/Mexico-16908339) - 2024 - CRC - 12/5/22
48 Seats and Restraints
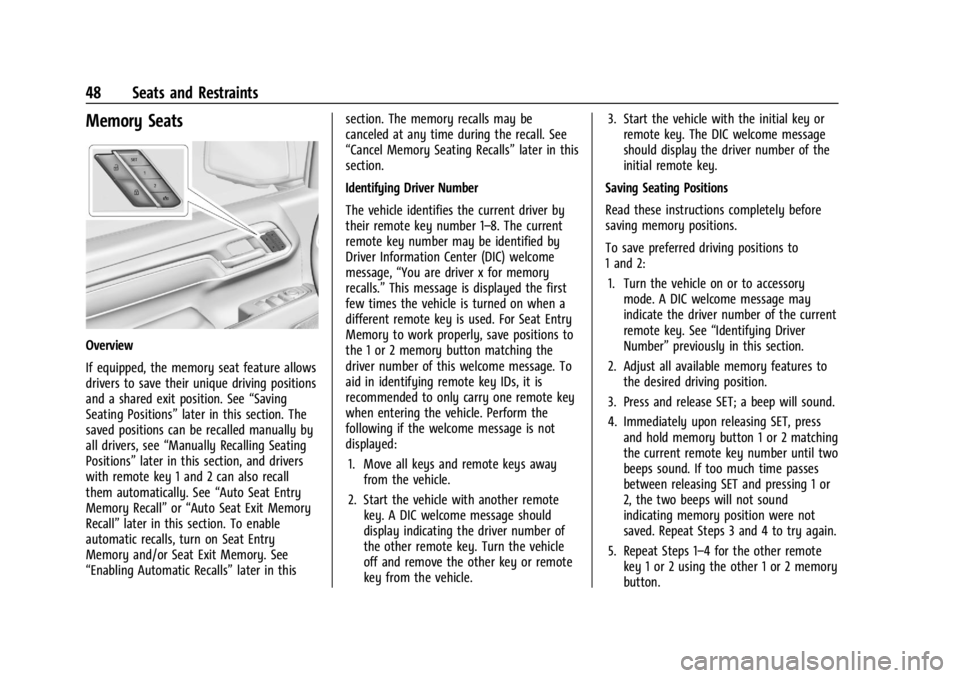
Memory Seats
Overview
If equipped, the memory seat feature allows
drivers to save their unique driving positions
and a shared exit position. See“Saving
Seating Positions” later in this section. The
saved positions can be recalled manually by
all drivers, see “Manually Recalling Seating
Positions” later in this section, and drivers
with remote key 1 and 2 can also recall
them automatically. See “Auto Seat Entry
Memory Recall” or“Auto Seat Exit Memory
Recall” later in this section. To enable
automatic recalls, turn on Seat Entry
Memory and/or Seat Exit Memory. See
“Enabling Automatic Recalls” later in thissection. The memory recalls may be
canceled at any time during the recall. See
“Cancel Memory Seating Recalls”
later in this
section.
Identifying Driver Number
The vehicle identifies the current driver by
their remote key number 1–8. The current
remote key number may be identified by
Driver Information Center (DIC) welcome
message, “You are driver x for memory
recalls.” This message is displayed the first
few times the vehicle is turned on when a
different remote key is used. For Seat Entry
Memory to work properly, save positions to
the 1 or 2 memory button matching the
driver number of this welcome message. To
aid in identifying remote key IDs, it is
recommended to only carry one remote key
when entering the vehicle. Perform the
following if the welcome message is not
displayed:
1. Move all keys and remote keys away from the vehicle.
2. Start the vehicle with another remote key. A DIC welcome message should
display indicating the driver number of
the other remote key. Turn the vehicle
off and remove the other key or remote
key from the vehicle. 3. Start the vehicle with the initial key or
remote key. The DIC welcome message
should display the driver number of the
initial remote key.
Saving Seating Positions
Read these instructions completely before
saving memory positions.
To save preferred driving positions to
1 and 2: 1. Turn the vehicle on or to accessory mode. A DIC welcome message may
indicate the driver number of the current
remote key. See “Identifying Driver
Number” previously in this section.
2. Adjust all available memory features to the desired driving position.
3. Press and release SET; a beep will sound.
4. Immediately upon releasing SET, press and hold memory button 1 or 2 matching
the current remote key number until two
beeps sound. If too much time passes
between releasing SET and pressing 1 or
2, the two beeps will not sound
indicating memory position were not
saved. Repeat Steps 3 and 4 to try again.
5. Repeat Steps 1–4 for the other remote key 1 or 2 using the other 1 or 2 memory
button.
Page 56 of 433
Chevrolet Silverado 2500 HD/3500 HD Owner Manual (GMNA-Localizing-U.
S./Canada/Mexico-16908339) - 2024 - CRC - 12/5/22
54 Seats and Restraints
Questions and Answers About Seat Belts
Q: Will I be trapped in the vehicle after acrash if I am wearing a seat belt?
A: You could be— whether you are
wearing a seat belt or not. Your chance
of being conscious during and after a
crash, so you canunbuckle and get out,
is much greater if you are belted.
Q: If my vehicle has airbags, why should I have to wear seat belts?
A: Airbags are supplemental systems only.
They work withseat belts —not instead
of them. Whether or not an airbag is
provided, all occupants still have to
buckle up to get the most protection.
Also, in nearly all states and in all
Canadian provinces, the law requires
wearing seat belts.
Buckle To Drive
If equipped, this feature delays the vehicle
from shifting out of P (Park) when the driver
seat belt is not buckled. The Buckle to Drive
feature must be turned ON in the
infotainment system to work. To turn the
Buckle to Drive feature on or off, select
Settings > Vehicle > Buckle to Drive. See
Teen Driver 0179, if equipped. If the vehicle is on and the brake pedal is
pressed with the vehicle in P (Park) but the
driver seat belt is not buckled, a message
displays in the Driver Information
Center (DIC) and the vehicle will be delayed
from shifting out of P (Park). Buckle the
driver seat belt to clear the message and
shift out of P (Park). Shifting from P (Park)
will be delayed once for each time the
vehicle is started.
For some fleet vehicles, the feature is
always ON and cannot be turned OFF in the
infotainment system. The vehicle will be
delayed from shifting from P (Park) each
time the driver attempts to do so while the
driver seat belt is not buckled. Turning the
vehicle off then on will not change this
condition.
On some models, Buckle to Drive may also
delay shifting out of P (Park) if a front
passenger seat belt is unbuckled. A message
displays in the DIC. Buckle the front
passenger seat belt to shift out of P (Park).
This feature may delay the vehicle from
shifting out of P (Park) if an object, such as
a briefcase, handbag, grocery bag, laptop,
or other electronic device, is on the front
passenger seat. If this happens, remove the
object from the seat or buckle the seat belt
to shift out of P (Park).
If the driver, or on some vehicles, the
present front passenger remains unbuckled,
the DIC message will turn off after several
seconds and the vehicle can be shifted out
of P (Park). See
“Seat Belts”and“Child
Restraints” in the Index for information
about the importance of proper
restraint use.
If the driver seat belt or the front passenger
seat belt is unbuckled when driving, the seat
belt reminder chime and light(s) will come
on. See Seat Belt Reminders 0115. This
feature may not function properly if the
airbag readiness light is on. See Airbag
Readiness Light 0116.
How to Wear Seat Belts Properly
Follow these rules for everyone's protection.
There are additional things to know about
seat belts and children, including smaller
children and infants. If a child will be riding
in the vehicle, see Older Children071 or
Infants and Young Children 072. Review and
follow the rules for children in addition to
the following rules.
Page 60 of 433
Chevrolet Silverado 2500 HD/3500 HD Owner Manual (GMNA-Localizing-U.
S./Canada/Mexico-16908339) - 2024 - CRC - 12/5/22
58 Seats and Restraints
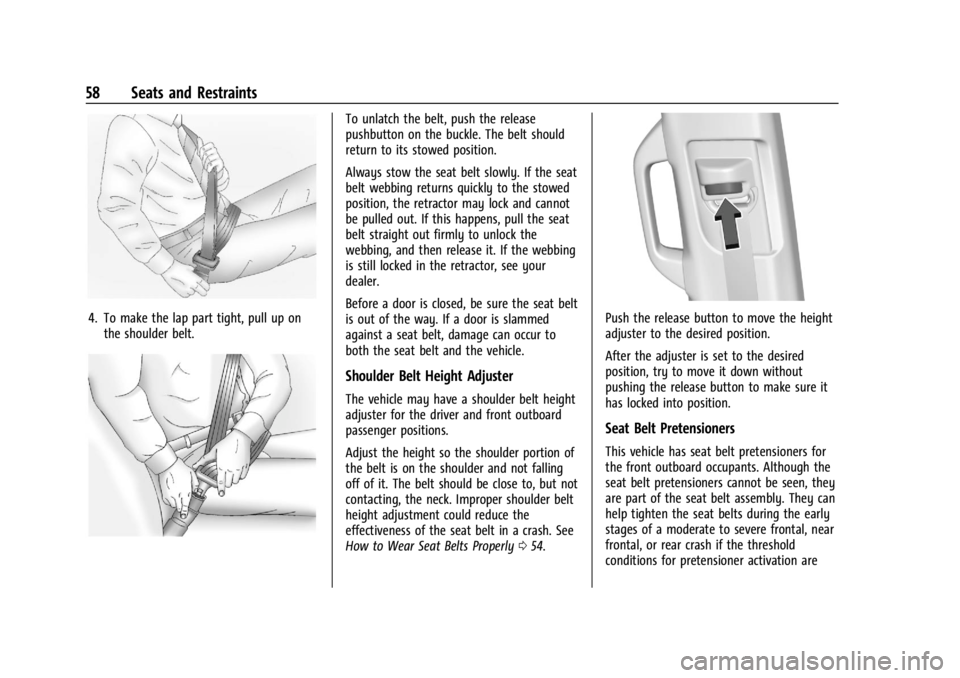
4. To make the lap part tight, pull up onthe shoulder belt.
To unlatch the belt, push the release
pushbutton on the buckle. The belt should
return to its stowed position.
Always stow the seat belt slowly. If the seat
belt webbing returns quickly to the stowed
position, the retractor may lock and cannot
be pulled out. If this happens, pull the seat
belt straight out firmly to unlock the
webbing, and then release it. If the webbing
is still locked in the retractor, see your
dealer.
Before a door is closed, be sure the seat belt
is out of the way. If a door is slammed
against a seat belt, damage can occur to
both the seat belt and the vehicle.
Shoulder Belt Height Adjuster
The vehicle may have a shoulder belt height
adjuster for the driver and front outboard
passenger positions.
Adjust the height so the shoulder portion of
the belt is on the shoulder and not falling
off of it. The belt should be close to, but not
contacting, the neck. Improper shoulder belt
height adjustment could reduce the
effectiveness of the seat belt in a crash. See
How to Wear Seat Belts Properly 054.
Push the release button to move the height
adjuster to the desired position.
After the adjuster is set to the desired
position, try to move it down without
pushing the release button to make sure it
has locked into position.
Seat Belt Pretensioners
This vehicle has seat belt pretensioners for
the front outboard occupants. Although the
seat belt pretensioners cannot be seen, they
are part of the seat belt assembly. They can
help tighten the seat belts during the early
stages of a moderate to severe frontal, near
frontal, or rear crash if the threshold
conditions for pretensioner activation are
Page 65 of 433

Chevrolet Silverado 2500 HD/3500 HD Owner Manual (GMNA-Localizing-U.
S./Canada/Mexico-16908339) - 2024 - CRC - 12/5/22
Seats and Restraints 63
Driver Side Crew Cab Shown, Passenger SideDouble and Regular Cabs Similar
The roof-rail airbags for the driver, front
outboard passenger, and second row
outboard passengers are in the ceiling above
the side windows.
{Warning
If something is between an occupant and
an airbag, the airbag might not inflate
properly or it might force the object into
that person causing severe injury or even
death. The path of an inflating airbag
must be kept clear. Do not put anything
between an occupant and an airbag, and (Continued)
Warning (Continued)
do not attach or put anything on the
steering wheel hub or on or near any
other airbag covering.
Do not use seat accessories that block the
inflation path of a seat-mounted side
impact airbag.
Never secure anything to the roof of a
vehicle with roof-rail airbags by routing a
rope or tie‐down through any door or
window opening. If you do, the path of
an inflating roof-rail airbag will be
blocked.
When Should an Airbag Inflate?
This vehicle is equipped with airbags. See
Airbag System060. Airbags are designed to
inflate if the impact exceeds the specific
airbag system's deployment threshold.
Deployment thresholds are used to predict
how severe a crash is likely to be in time
for the airbags to inflate and help restrain
the occupants. The vehicle has electronic
sensors that help the airbag system
determine the severity of the impact.
Deployment thresholds can vary with
specific vehicle design. Frontal airbags are designed to inflate in
moderate to severe frontal crashes to help
reduce the potential for severe injuries,
mainly to the driver's or front outboard
passenger's head and chest.
Whether the frontal airbags will or should
inflate is not based primarily on how fast
the vehicle is traveling. It depends on what
is hit, the direction of the impact, and how
quickly the vehicle slows down.
Frontal airbags may inflate at different crash
speeds depending on whether the vehicle
hits an object straight on or at an angle,
and whether the object is fixed or moving,
rigid or deformable, narrow or wide.
Frontal airbags are not intended to inflate
during vehicle rollovers, rear impacts,
or many side impacts.
In addition, the vehicle has advanced
technology frontal airbags. Advanced
technology frontal airbags adjust the
restraint according to either crash severity
or occupant interaction.
Seat-mounted side impact airbags are
designed to inflate in moderate to severe
side crashes depending on the location of
the impact. These airbags may also inflate
in some moderate to severe frontal impacts.
Page 83 of 433
Chevrolet Silverado 2500 HD/3500 HD Owner Manual (GMNA-Localizing-U.
S./Canada/Mexico-16908339) - 2024 - CRC - 12/5/22
Seats and Restraints 81
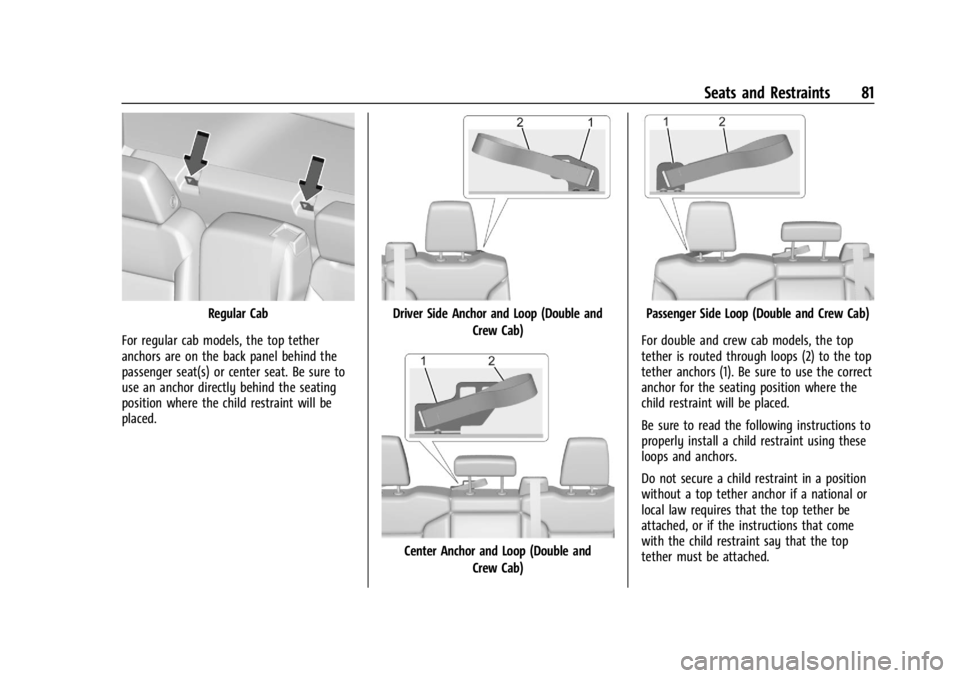
Regular Cab
For regular cab models, the top tether
anchors are on the back panel behind the
passenger seat(s) or center seat. Be sure to
use an anchor directly behind the seating
position where the child restraint will be
placed.Driver Side Anchor and Loop (Double and Crew Cab)
Center Anchor and Loop (Double andCrew Cab)
Passenger Side Loop (Double and Crew Cab)
For double and crew cab models, the top
tether is routed through loops (2) to the top
tether anchors (1). Be sure to use the correct
anchor for the seating position where the
child restraint will be placed.
Be sure to read the following instructions to
properly install a child restraint using these
loops and anchors.
Do not secure a child restraint in a position
without a top tether anchor if a national or
local law requires that the top tether be
attached, or if the instructions that come
with the child restraint say that the top
tether must be attached.
Page 101 of 433

Chevrolet Silverado 2500 HD/3500 HD Owner Manual (GMNA-Localizing-U.
S./Canada/Mexico-16908339) - 2024 - CRC - 12/15/22
Instruments and Controls 99
Instruments and Controls
Controls
Steering Wheel Adjustment . . . . . . . . . . . 100
Heated Steering Wheel . . . . . . . . . . . . . . . . 100
Horn . . . . . . . . . . . . . . . . . . . . . . . . . . . . . . . . . . . 101
Windshield Wiper/Washer . . . . . . . . . . . . . 101
Compass . . . . . . . . . . . . . . . . . . . . . . . . . . . . . . . 102
Clock . . . . . . . . . . . . . . . . . . . . . . . . . . . . . . . . . . 102
Power Outlets . . . . . . . . . . . . . . . . . . . . . . . . . 102
Wireless Charging . . . . . . . . . . . . . . . . . . . . . 104
Warning Lights, Gauges, and Indicators
Warning Lights, Gauges, andIndicators . . . . . . . . . . . . . . . . . . . . . . . . . . . . 106
Instrument Cluster (Base Level) . . . . . . . . 107
Instrument Cluster (Uplevel) . . . . . . . . . . . 108
Speedometer . . . . . . . . . . . . . . . . . . . . . . . . . . . 111
Odometer . . . . . . . . . . . . . . . . . . . . . . . . . . . . . . 111
Trip Odometer . . . . . . . . . . . . . . . . . . . . . . . . . 111
Tachometer . . . . . . . . . . . . . . . . . . . . . . . . . . . . 111
Fuel Gauge . . . . . . . . . . . . . . . . . . . . . . . . . . . . . 111
Engine Oil Pressure Gauge . . . . . . . . . . . . . 112
Engine Coolant Temperature Gauge . . . . 113
Transmission Temperature Gauge (Uplevel only) . . . . . . . . . . . . . . . . . . . . . . . . 114
Voltmeter Gauge . . . . . . . . . . . . . . . . . . . . . . 114
Seat Belt Reminders . . . . . . . . . . . . . . . . . . . . 115
Airbag Readiness Light . . . . . . . . . . . . . . . . . 116
Passenger Airbag Status Indicator . . . . . . 116 Charging System Light . . . . . . . . . . . . . . . . . 117
Malfunction Indicator Lamp (Check
Engine Light) . . . . . . . . . . . . . . . . . . . . . . . . . 117
Brake System Warning Light . . . . . . . . . . . 119
Electric Parking Brake Light . . . . . . . . . . . . 119
Service Electric Parking Brake Light . . . . 119
Antilock Brake System (ABS) Warning Light . . . . . . . . . . . . . . . . . . . . . . . . . . . . . . . . . 120
Four-Wheel-Drive Light . . . . . . . . . . . . . . . . 120
Tow/Haul Mode Light . . . . . . . . . . . . . . . . . 120
Hill Descent Control Light . . . . . . . . . . . . . . 121
Lane Departure Warning (LDW) Light . . . . . . . . . . . . . . . . . . . . . . . . . . . . . . . . . 121
Automatic Emergency Braking (AEB) Disabled Light . . . . . . . . . . . . . . . . . . . . . . . . 121
Vehicle Ahead Indicator . . . . . . . . . . . . . . . . 121
Pedestrian Ahead Indicator . . . . . . . . . . . . . 121
Traction Off Light . . . . . . . . . . . . . . . . . . . . . . 122
Traction Control System (TCS)/Electronic Stability Control Light . . . . . . . . . . . . . . . . 122
Electronic Stability Control (ESC) Off Light . . . . . . . . . . . . . . . . . . . . . . . . . . . . . . . . . 122
Engine Coolant Temperature Warning Light . . . . . . . . . . . . . . . . . . . . . . . . . . . . . . . . . 123
Driver Mode Control Light . . . . . . . . . . . . . 123
Tire Pressure Light . . . . . . . . . . . . . . . . . . . . . 123
Engine Oil Pressure Light (Uplevel Cluster) . . . . . . . . . . . . . . . . . . . . . . . . . . . . . . 124
Low Fuel Warning Light . . . . . . . . . . . . . . . 124
Security Light . . . . . . . . . . . . . . . . . . . . . . . . . . 125 High-Beam On Light . . . . . . . . . . . . . . . . . . . 125
Front Fog Lamp Light . . . . . . . . . . . . . . . . . . 125
Lamps On Reminder . . . . . . . . . . . . . . . . . . . 125
Cruise Control Light . . . . . . . . . . . . . . . . . . . 126
Door Ajar Light . . . . . . . . . . . . . . . . . . . . . . . . 126
Information Displays
Driver Information Center (DIC) (Base
Level) . . . . . . . . . . . . . . . . . . . . . . . . . . . . . . . . 126
Driver Information Center (DIC) (Uplevel) . . . . . . . . . . . . . . . . . . . . . . . . . . . . . 128
Head-Up Display (HUD) . . . . . . . . . . . . . . . . 130
Vehicle Messages
Vehicle Messages . . . . . . . . . . . . . . . . . . . . . . 134
Engine Power Messages . . . . . . . . . . . . . . . 134
Vehicle Speed Messages . . . . . . . . . . . . . . . 134
Universal Remote System
Universal Remote System . . . . . . . . . . . . . . 134
Universal Remote System Programming . . . . . . . . . . . . . . . . . . . . . . . . 135
Universal Remote System Operation . . . 136