2024 CHEVROLET SILVERADO EV service indicator
[x] Cancel search: service indicatorPage 286 of 429
Chevrolet Silverado EV Owner Manual (GMNA-Localizing-U.S./Canada-
16702912) - 2024 - CRC - 1/17/23
Driving and Operating 285
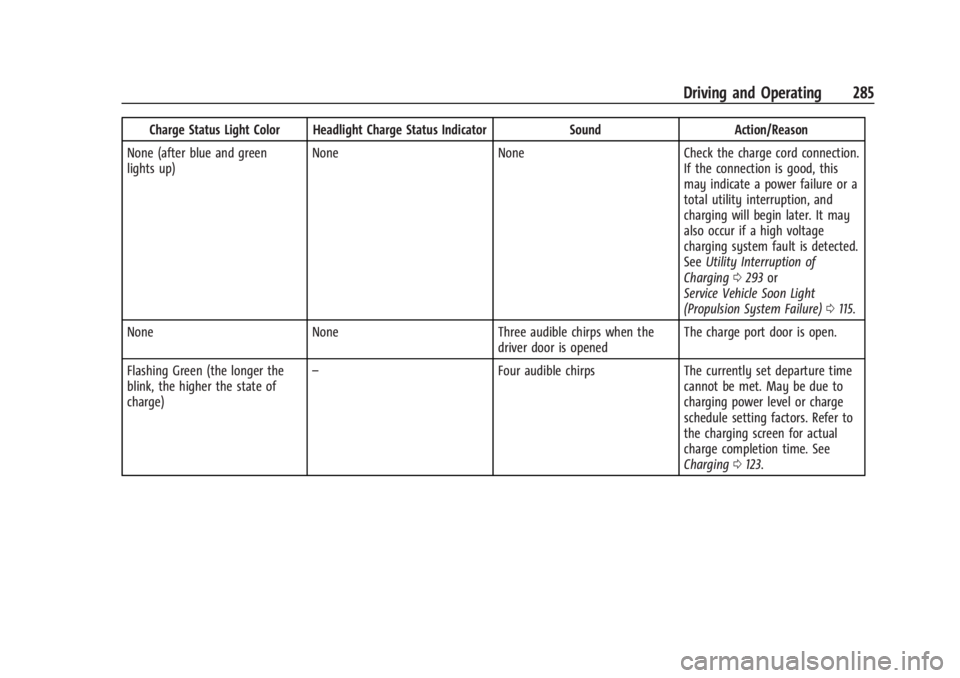
Charge Status Light Color Headlight Charge Status IndicatorSoundAction/Reason
None (after blue and green
lights up) None
NoneCheck the charge cord connection.
If the connection is good, this
may indicate a power failure or a
total utility interruption, and
charging will begin later. It may
also occur if a high voltage
charging system fault is detected.
See Utility Interruption of
Charging 0293 or
Service Vehicle Soon Light
(Propulsion System Failure) 0115.
None None Three audible chirps when the
driver door is opened The charge port door is open.
Flashing Green (the longer the
blink, the higher the state of
charge) –
Four audible chirpsThe currently set departure time
cannot be met. May be due to
charging power level or charge
schedule setting factors. Refer to
the charging screen for actual
charge completion time. See
Charging 0123.
Page 287 of 429
Chevrolet Silverado EV Owner Manual (GMNA-Localizing-U.S./Canada-
16702912) - 2024 - CRC - 1/17/23
286 Driving and Operating
Charge Cord
IMPORTANT SAFETY INSTRUCTIONS
This symbol indicates risk of electrical shock.
SeeRadio Frequency Statement 0404.
The vehicle comes with a portable charge
cord used to charge the high voltage
battery. When used correctly, the Charge
Cord provides a safe connection between a
standard electrical outlet and your vehicle's
on-board charger.
When storing the charge cord in the vehicle,
ensure the charge cord bag is secured.
Depending on the storage location, tether
the charge cord bag to vehicle.
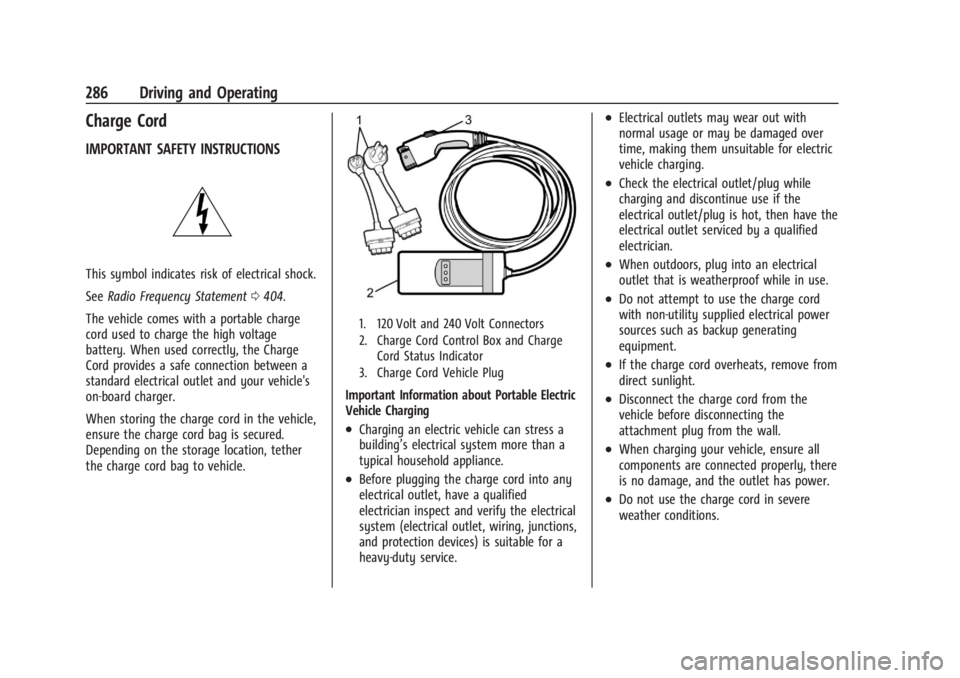
1. 120 Volt and 240 Volt Connectors
2. Charge Cord Control Box and Charge Cord Status Indicator
3. Charge Cord Vehicle Plug
Important Information about Portable Electric
Vehicle Charging
.Charging an electric vehicle can stress a
building’s electrical system more than a
typical household appliance.
.Before plugging the charge cord into any
electrical outlet, have a qualified
electrician inspect and verify the electrical
system (electrical outlet, wiring, junctions,
and protection devices) is suitable for a
heavy-duty service.
.Electrical outlets may wear out with
normal usage or may be damaged over
time, making them unsuitable for electric
vehicle charging.
.Check the electrical outlet/plug while
charging and discontinue use if the
electrical outlet/plug is hot, then have the
electrical outlet serviced by a qualified
electrician.
.When outdoors, plug into an electrical
outlet that is weatherproof while in use.
.Do not attempt to use the charge cord
with non-utility supplied electrical power
sources such as backup generating
equipment.
.If the charge cord overheats, remove from
direct sunlight.
.Disconnect the charge cord from the
vehicle before disconnecting the
attachment plug from the wall.
.When charging your vehicle, ensure all
components are connected properly, there
is no damage, and the outlet has power.
.Do not use the charge cord in severe
weather conditions.
Page 293 of 429
Chevrolet Silverado EV Owner Manual (GMNA-Localizing-U.S./Canada-
16702912) - 2024 - CRC - 1/17/23
292 Driving and Operating
the charging. If this error continues, stop
charging your vehicle. See your dealer for
service.
Charge Level Selection
Charge level selection can be made using
the Charging tab in the Energy Application
on the infotainment display. For instructions
to set cord limit settings for a charge
session, seeCharging0123.
{Warning
Using a charge level that exceeds the
electrical circuit or electrical outlet
capacity may start a fire or damage the
electrical circuit. Use the lowest charge
level until a qualified electrician inspects
the electrical circuit capacity. Use the
lowest charge level if the electrical circuit
or electrical outlet capacity is not known.
Troubleshooting
Disconnect the charge cord from the vehicle
and confirm that the attachment plug is not
too hot to grasp before removing. If it is not hot, manually reboot the charge
cord by unplugging and re-plugging the
attachment plug into the electrical outlet.
If the same fault reoccurs, test the charge
cord with a different electrical outlet.
The charge cord monitors temperature at
several locations and may reduce charging
power or interrupt charging if temperatures
become too high. The charge cord status
indicators illuminate and identify this fault.
In hot climates, move the charge cord away
from direct sunlight and/or hot surfaces
such as asphalt paving for approximately
30 minutes.
If there are signs of melting or scorching, do
not touch the charge cord or attachment
plug. Have a qualified electrician inspect and
repair the issue.
If there are no signs of damage, check how
firm the fit of the plug is. If the plug easily
pulls away from the electrical outlet, test
the plug on a known good electrical outlet.
If the fault condition returns, have your
charge cord inspected by your dealership.
If the fault does not return, stop using the
suspected circuit and have a qualified
electrician inspect and repair the issue.
Grounding Instructions
The charge circuit must be grounded. If the
charge circuit should malfunction or break
down, grounding provides a path of least
resistance for the electric current to reduce
the risk of electric shock. This product is
equipped with a cord that has an equipment
grounding conductor and a grounding plug.
The plug must be plugged into an
appropriate outlet that is properly installed
and grounded in accordance with all local
codes and ordinances.
{Warning
Improper connection of the charge cord
ground may cause electrical shock. Check
with a qualified electrician if there is
doubt as to whether the charge circuit is
properly grounded. Do not modify the
plug provided with the product. If it will
not fit the electrical outlet, have a proper
electrical outlet installed by a qualified
electrician.
FCC Information
See
Radio Frequency Statement 0404.
Page 294 of 429
Chevrolet Silverado EV Owner Manual (GMNA-Localizing-U.S./Canada-
16702912) - 2024 - CRC - 1/17/23
Driving and Operating 293
Utility Interruption of Charging
This vehicle responds to requests through
the utility company to limit or completely
block electrical power grid use. This feature
is inactive during DC charging. A utility
interruption will lengthen the vehicle
charge time.
When electrical grid power is completely
blocked, the vehicle will not charge until the
utility interruption has expired. The vehicle
should be left plugged in so that the vehicle
will automatically resume charging.
Changing the charge mode to Charge Now
or performing a delayed charging override
will not disable a utility interruption.
A message will display on the instrument
cluster indicating that a utility interruption
has occurred.
Charging Station Troubleshooting
If the vehicle does not charge after being
plugged in to a residential 240-volt charging
station:1. Verify that the charge mode is set to Charge Now.
2. Verify that the charging station circuit breaker is not tripped. 3. Plug the portable charge cord into the
wall outlet, verify that the indicator light
on the charge cord is solid green, and
connect it to the vehicle. See “Charge
Cord Status Indicators” inCharge Cord
0 286.
4. If the vehicle charges with the portable charge cord and a different 240-volt
charging station, such as a public station,
there may be a problem with the
charging station. Contact the charging
station manufacturer for service.
Electrical Requirements for
Battery Charging
The vehicle is designed for compatibility
with most standard vehicle charging
equipment in the region of sale. Check for
charger compatibility before purchasing a
charger
The portable charge cord defaults to
120 volts and 8 amps. Have the outlet
inspected before changing to 12 amps on the
Charging Screens. If 12 amps is selected, a
pop-up will show on the infotainment
display to confirm the change to 12 amps.
See the “Active Charging” section under
Charging 0123.
Caution
Do not use portable or stationary backup
generating equipment to charge the
vehicle. This may cause damage to the
vehicle's charging system. Only charge
the vehicle from utility supplied power.
Trailer Towing
General Towing Information
Only use towing equipment that has been
designed for the vehicle. Contact your dealer
or trailering dealer for assistance with
preparing the vehicle to tow a trailer. Read
the entire section before towing a trailer.
To tow a disabled vehicle, see Transporting
a Disabled Vehicle 0378. To tow the vehicle
behind another vehicle such as a motor
home, see Recreational Vehicle Towing
0 379.
Page 329 of 429
Chevrolet Silverado EV Owner Manual (GMNA-Localizing-U.S./Canada-
16702912) - 2024 - CRC - 1/13/23
328 Vehicle Care
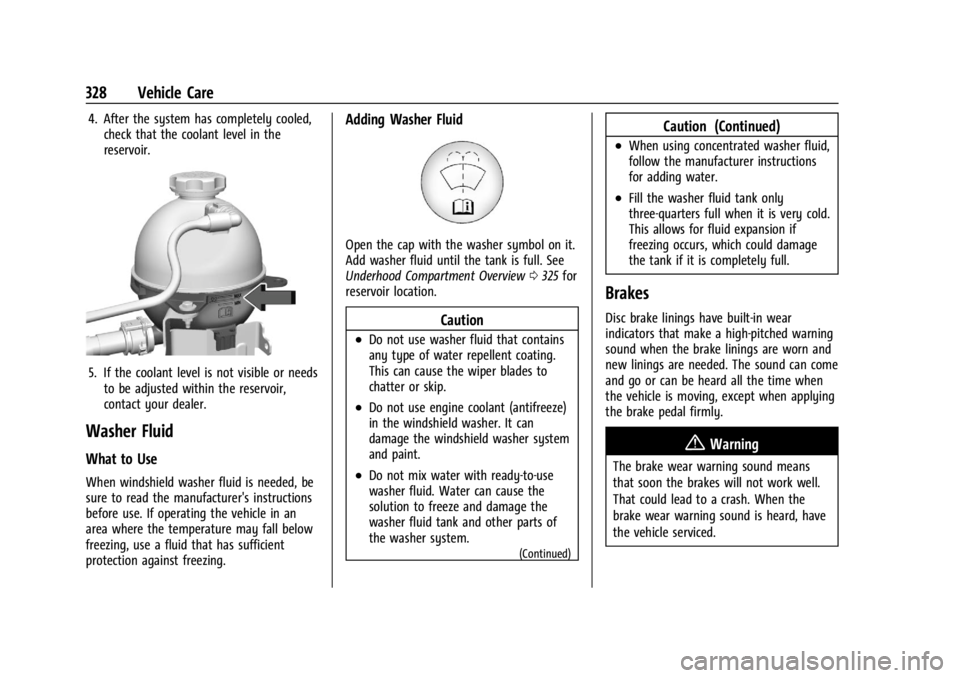
4. After the system has completely cooled,check that the coolant level in the
reservoir.
5. If the coolant level is not visible or needsto be adjusted within the reservoir,
contact your dealer.
Washer Fluid
What to Use
When windshield washer fluid is needed, be
sure to read the manufacturer's instructions
before use. If operating the vehicle in an
area where the temperature may fall below
freezing, use a fluid that has sufficient
protection against freezing.
Adding Washer Fluid
Open the cap with the washer symbol on it.
Add washer fluid until the tank is full. See
Underhood Compartment Overview 0325 for
reservoir location.
Caution
.Do not use washer fluid that contains
any type of water repellent coating.
This can cause the wiper blades to
chatter or skip.
.Do not use engine coolant (antifreeze)
in the windshield washer. It can
damage the windshield washer system
and paint.
.Do not mix water with ready-to-use
washer fluid. Water can cause the
solution to freeze and damage the
washer fluid tank and other parts of
the washer system.
(Continued)
Caution (Continued)
.When using concentrated washer fluid,
follow the manufacturer instructions
for adding water.
.Fill the washer fluid tank only
three-quarters full when it is very cold.
This allows for fluid expansion if
freezing occurs, which could damage
the tank if it is completely full.
Brakes
Disc brake linings have built-in wear
indicators that make a high-pitched warning
sound when the brake linings are worn and
new linings are needed. The sound can come
and go or can be heard all the time when
the vehicle is moving, except when applying
the brake pedal firmly.
{Warning
The brake wear warning sound means
that soon the brakes will not work well.
That could lead to a crash. When the
brake wear warning sound is heard, have
the vehicle serviced.
Page 356 of 429
Chevrolet Silverado EV Owner Manual (GMNA-Localizing-U.S./Canada-
16702912) - 2024 - CRC - 1/13/23
Vehicle Care 355
The system is compatible with trailer tires
that have placard pressure values from
103–689 kpa (15–100 psi) or 103–1020 kpa
(15–148 psi). The hole in the wheel for the
tire stem must be 11.43 mm (0.453 in) in
diameter. Use of the pressure sensors on a
wheel with a different stem hole size could
result in loss of air from the tire.
If a low trailer tire pressure condition is
detected, the TTPMS displays a warning
message on the DIC. If the warning message
is displayed, stop as soon as possible and
inflate the tires to the recommended
pressure shown on the tire placard on the
trailer.
In addition, the TTPMS monitors the
temperature of the trailer tires. If the
system detects a high temperature on one
or more of the trailer tires, a warning
message will be displayed on the DIC. If this
warning message is displayed, stop as soon
as possible, and inspect the overheated
trailer tire. Common causes for high trailer
tire temperature are underinflation,
overloading, or tire damage.TTPMS Malfunction Message
The TTPMS will not function properly if one
or more of the trailer tire sensors are
missing or inoperable. If the system detects
a malfunction, a DIC message indicates that
the system requires service. Some of the
conditions that can cause the service
message to occur are:
.One of the trailer tires has been replaced
with the spare tire which does not have a
learned TTPMS sensor. The DIC message
should turn off after the pressure sensor
is installed in the tire, and the learning
process is performed successfully. See
"TTPMS Sensor Learning Process" under
Trailering App0310.
.The TTPMS sensor learning process was
not done or not completed successfully.
The DIC message should go off after
successfully completing the sensor
learning process. See "TTPMS Sensor
Learning Process" under Trailering App
0 310.
.One or more TTPMS sensors are missing
or damaged. The DIC message should go
off when the TTPMS sensors are installed
and the sensor learning process is performed successfully. See "TTPMS
Sensor Learning Process" under
Trailering
App 0310.
.Operating electronic devices or being near
facilities using radio wave frequencies
similar to the TTPMS could cause
interference to the TTPMS which could
cause loss of signal reception from the
sensor.
.If the system does not receive the signal
from an individual sensor, an error
message may not occur until the vehicle
has been driver for a period of time.
If the TTPMS is not functioning properly, it
cannot detect or signal a low tire condition.
See your dealer for service if the DIC
message comes on and stays on when the
trailer tire pressures have been checked and
determined to be correct.
Tire Inspection
We recommend that the tires, including
the spare tire, if the vehicle has one, be
inspected for signs of wear or damage
at least once a month.
Replace the tire if:
.The indicators at three or more
places around the tire can be seen.
Page 421 of 429

Chevrolet Silverado EV Owner Manual (GMNA-Localizing-U.S./Canada-
16702912) - 2024 - CRC - 1/13/23
420 Index
Folding Mirrors . . . . . . . . . . . . . . . . . . . . . . . . . . . .35
Four-WheelSteering Light . . . . . . . . . . . . . . . . . . . . . . . . . . . 119
Four-Wheel Drive . . . . . . . . . . . . . . . . . . . . . . . . 204
Four-Wheel Steering . . . . . . . . . . . . . . . . . . . . . 210
Four-Wheel-Drive Light . . . . . . . . . . . . . . . . . . . . . . . . . . . . . . . . . . . . 117
Frequency Statement Radio . . . . . . . . . . . . . . . . . . . . . . . . . . . . . . . . . . 404
Front Heated and Ventilated Seats . . . . . . . . . . . . 47
Front Seats Adjustment . . . . . . . . . . . . . . . . . . . . . . . . . . . . . 43
Full-Size Spare Tire . . . . . . . . . . . . . . . . . . . . . . . 374
Fuses Fuses and Circuit Breakers . . . . . . . . . . . . . 337
Instrument Panel Fuse Block . . . . . . 340, 342
Underhood Compartment . . . . . . . . . . . . . . 337
G
Garage Door Opener . . . . . . . . . . . . . . . . . . . . . . 137
Programming . . . . . . . . . . . . . . . . . . . . . . . . . . . 137
Gas Strut(s) . . . . . . . . . . . . . . . . . . . . . . . . . . . . . . 334
Gauges Battery . . . . . . . . . . . . . . . . . . . . . . . . . . . . . . . . 110
Odometer . . . . . . . . . . . . . . . . . . . . . . . . . . . . . 110
Power Indicator . . . . . . . . . . . . . . . . . . . . . . . . . 111
Speedometer . . . . . . . . . . . . . . . . . . . . . . . . . . 110 Gauges (cont'd)
Trip Odometer . . . . . . . . . . . . . . . . . . . . . . . . . 110
Warning Lights and Indicators . . . . . . . . . 107
General Information Service and Maintenance . . . . . . . . . . . . . . 388
Towing . . . . . . . . . . . . . . . . . . . . . . . . . . . . . . . . 293
Vehicle Care . . . . . . . . . . . . . . . . . . . . . . . . . . . 324
Generator Onboard . . . . . . . . . . . . . . . . . . . . . . . . . . . . . . . 101
Glass Replacement . . . . . . . . . . . . . . . . . . . . . . . 333
Global Positioning System (GPS) . . . . . . . . . . 157
Glove Box . . . . . . . . . . . . . . . . . . . . . . . . . . . . . . . . .91
GM Mobility Reimbursement Program . . . . . . . . . . . . . . . . . . . . . . . . . . . . . . . 399
Guidance Problems with the Route . . . . . . . . . . . . . . 158
H
Hazard Warning Flashers . . . . . . . . . . . . . . . . .142
Head Restraints . . . . . . . . . . . . . . . . . . . . . . . . . . . .41
Head-Up Display (HUD) . . . . . . . . . . . . . . . . . . . 133
Headlamps
Aiming . . . . . . . . . . . . . . . . . . . . . . . . . . . . . . . . 335
Automatic . . . . . . . . . . . . . . . . . . . . . . . . . . . . . 142
Daytime Running Lamps (DRL) . . . . . . . . . . 141
Flash-to-Pass . . . . . . . . . . . . . . . . . . . . . . . . . . . . 141
High-Beam On Light . . . . . . . . . . . . . . . . . . . . 121
High/Low Beam Changer . . . . . . . . . . . . . . . 141 Headlamps (cont'd)
Lamps On Reminder . . . . . . . . . . . . . . . . . . . . 121
Heated Mirrors . . . . . . . . . . . . . . . . . . . . . . . . . . . . . . . . . 36
Rear Seats . . . . . . . . . . . . . . . . . . . . . . . . . . . . . . . 51
Steering Wheel . . . . . . . . . . . . . . . . . . . . . . . . . 97
Ventilated Front Seats . . . . . . . . . . . . . . . . . . 47
Heating . . . . . . . . . . . . . . . . . . . . . . . . . . . . . . . . . . .174
High Voltage Battery Gauge . . . . . . . . . . . . . .110
High Voltage Devices and Wiring . . . . . . . . 335
High-Beam On Light . . . . . . . . . . . . . . . . . . . . . . 121
High-Speed Operation . . . . . . . . . . . . . . . . . . . 350
Hill and Mountain Roads . . . . . . . . . . . . . . . . 190
Hill Start Assist (HSA) . . . . . . . . . . . . . . . . . . . . 206
Hood . . . . . . . . . . . . . . . . . . . . . . . . . . . . . . . . . . . . . .19
Horn . . . . . . . . . . . . . . . . . . . . . . . . . . . . . . . . . . . . . . 98
How to Wear Seat Belts Properly . . . . . . . . . 54
HVAC . . . . . . . . . . . . . . . . . . . . . . . . . . . . . . . . . . . . .174
I
Immobilizer . . . . . . . . . . . . . . . . . . . . . . . . . . . . . . . .33
Indicator Pedestrian Ahead . . . . . . . . . . . . . . . . . . . . . . . 118
Speed Limiter . . . . . . . . . . . . . . . . . . . . . . . . . . . 112
Vehicle Ahead . . . . . . . . . . . . . . . . . . . . . . . . . . 117
Indicators
Warning Lights and Gauges . . . . . . . . . . . . 107
Infants and Young Children, Restraints . . . . . 71
Page 422 of 429

Chevrolet Silverado EV Owner Manual (GMNA-Localizing-U.S./Canada-
16702912) - 2024 - CRC - 1/13/23
Index 421
InformationPublication Ordering . . . . . . . . . . . . . . . . . . . 404
Infotainment Using the System . . . . . . . . . . . . . . . . . . . . . . 149
Infotainment System . . . . . . . . . . . . . . . . . . . . 407
Inspection Multi-Point Vehicle . . . . . . . . . . . . . . . . . . . . 390
Instrument Cluster . . . . . . . . . . . . . . . . . . .107, 109
Instrument Panel Overview . . . . . . . . . . . . . . . . 4
Interior Rearview Mirrors . . . . . . . . . . . . . . . . . 36
Introduction . . . . . . . . . . . . . . . . . . . . . . . . . . . 2, 147
J
Jump Starting - North America . . . . . . . . . . . . . . . 375
K
Keys . . . . . . . . . . . . . . . . . . . . . . . . . . . . . . . . . . . . . . . 8Digital . . . . . . . . . . . . . . . . . . . . . . . . . . . . . . . . . . 18
Remote . . . . . . . . . . . . . . . . . . . . . . . . . . . . . . . . . . 9
Remote Operation . . . . . . . . . . . . . . . . . . . . . . . 9
L
Labeling, Tire Sidewall . . . . . . . . . . . . . . . . . . . 346
LampsDaytime Running (DRL) . . . . . . . . . . . . . . . . . 141
Dome . . . . . . . . . . . . . . . . . . . . . . . . . . . . . . . . . . 144
Exterior Cargo . . . . . . . . . . . . . . . . . . . . . . . . . 143
Exterior Controls . . . . . . . . . . . . . . . . . . . . . . . 140 Lamps (cont'd)
Exterior Lamps Off Reminder . . . . . . . . . . . 141
Exterior Lighting Battery Saver . . . . . . . . 146
Flash-to-Pass . . . . . . . . . . . . . . . . . . . . . . . . . . . . 141
High/Low Beam Changer . . . . . . . . . . . . . . . 141
On Reminder . . . . . . . . . . . . . . . . . . . . . . . . . . . 121
Reading . . . . . . . . . . . . . . . . . . . . . . . . . . . . . . . . 144
Lane Keep Assist Light . . . . . . . . . . . . . . . . . . . . . . . 117
Lap-Shoulder Belt . . . . . . . . . . . . . . . . . . . . . . . . . 56
LATCH System Replacing Parts after a Crash . . . . . . . . . . . 85
LATCH, Lower Anchors and Tethers for Children . . . . . . . . . . . . . . . . . . . . . . . . . . . . . . . . . 76
LED Lighting . . . . . . . . . . . . . . . . . . . . . . . . . . . . . 335
Lighting Entry . . . . . . . . . . . . . . . . . . . . . . . . . . . . . . . . . . 144
Exit . . . . . . . . . . . . . . . . . . . . . . . . . . . . . . . . . . . . 145
Illumination Control . . . . . . . . . . . . . . . . . . . 143
LED . . . . . . . . . . . . . . . . . . . . . . . . . . . . . . . . . . . . 335
Lights
Air Suspension . . . . . . . . . . . . . . . . . . . . . . . . . . 119
Airbag Readiness . . . . . . . . . . . . . . . . . . . . . . . 113
Antilock Brake System (ABS)Warning . . . . . . . . . . . . . . . . . . . . . . . . . . . . . . 116
Automatic Emergency Braking (AEB)
Disabled . . . . . . . . . . . . . . . . . . . . . . . . . . . . . . 117
Battery Fault . . . . . . . . . . . . . . . . . . . . . . . . . . . 115 Lights (cont'd)
Brake System Warning . . . . . . . . . . . . . . . . . 115
Charge Cord Connected . . . . . . . . . . . . . . . . . 114
Charging System . . . . . . . . . . . . . . . . . . . . . . . 114
Cruise Control Light . . . . . . . . . . . . . . . . . . . . 122
Door Ajar . . . . . . . . . . . . . . . . . . . . . . . . . . . . . . 122
Driver Attention Assist . . . . . . . . . . . . . . . . . 122
Driver Mode Control . . . . . . . . . . . . . . . . . . . . 119
Electric Parking Brake . . . . . . . . . . . . . . . . . . . 116
Electronic Stability Control
(ESC), Off . . . . . . . . . . . . . . . . . . . . . . . . . . . . . 119
Four-Wheel Steering . . . . . . . . . . . . . . . . . . . . 119
Four-Wheel-Drive . . . . . . . . . . . . . . . . . . . . . . . 117
Gauges and Indicators . . . . . . . . . . . . . . . . . 107
High-Beam On . . . . . . . . . . . . . . . . . . . . . . . . . . 121
Lane Keep Assist . . . . . . . . . . . . . . . . . . . . . . . . 117
Low State of Charge . . . . . . . . . . . . . . . . . . . . 114
One-Pedal Driving . . . . . . . . . . . . . . . . . . . . . . . 121
Seat Belt Reminders . . . . . . . . . . . . . . . . . . . . 112
Security . . . . . . . . . . . . . . . . . . . . . . . . . . . . . . . . . 121
Service Electric Parking Brake . . . . . . . . . . . 116
Service Vehicle Soon . . . . . . . . . . . . . . . . . . . . 115
Tire Pressure . . . . . . . . . . . . . . . . . . . . . . . . . . . 120
Traction Control System
(TCS)/Electronic Stability Control
Light . . . . . . . . . . . . . . . . . . . . . . . . . . . . . . . . . . 118
Traction Off . . . . . . . . . . . . . . . . . . . . . . . . . . . . . 118
Vehicle Ready . . . . . . . . . . . . . . . . . . . . . . . . . . 121