2024 CHEVROLET CORVETTE seats
[x] Cancel search: seatsPage 2 of 362

Chevrolet Corvette Owner Manual (GMNA-Localizing-U.S./Canada/Mexico-
17272984) - 2024 - CRC - 2/20/23
Contents
Introduction . . . . . . . . . . . . . . . . . . . . . . . . . . . . . . 1
Keys, Doors, and Windows . . . . . . . . . . . . . . . 6
Seats and Restraints . . . . . . . . . . . . . . . . . . . . . 39
Storage . . . . . . . . . . . . . . . . . . . . . . . . . . . . . . . . . . 71
Instruments and Controls . . . . . . . . . . . . . . . . 74
Lighting . . . . . . . . . . . . . . . . . . . . . . . . . . . . . . . . 109
Infotainment System . . . . . . . . . . . . . . . . . . . 116
Climate Controls . . . . . . . . . . . . . . . . . . . . . . . . 150
Driving and Operating . . . . . . . . . . . . . . . . . . 155
Vehicle Care . . . . . . . . . . . . . . . . . . . . . . . . . . . . 231
Service and Maintenance . . . . . . . . . . . . . . . 315
Technical Data . . . . . . . . . . . . . . . . . . . . . . . . . 324
Customer Information . . . . . . . . . . . . . . . . . . 329
Reporting Safety Defects . . . . . . . . . . . . . . . 338
OnStar . . . . . . . . . . . . . . . . . . . . . . . . . . . . . . . . . . 341
Connected Services . . . . . . . . . . . . . . . . . . . . . 346
Index . . . . . . . . . . . . . . . . . . . . . . . . . . 349
Introduction
California Proposition 65 Warning
Litho in U.S.A.
Part No. 84948178 A First Printing©2023 General Motors LLC. All Rights Reserved.
Page 6 of 362

Chevrolet Corvette Owner Manual (GMNA-Localizing-U.S./Canada/Mexico-
17272984) - 2024 - CRC - 2/20/23
Introduction 5
1.Air Vents 0153.
2. Turn Signal Lever. See Turn and
Lane-Change Signals 0112.
Exterior Lamp Controls 0109.
3. Manual Shift Paddles. See Manual Mode
0 187.
4. Instrument Cluster 081.
5. Windshield Wiper/Washer 075.
6. Volume Control Knob and Infotainment Home Button. See Overview0117.
7. Infotainment Display. See Using the
System 0120.
8. Alarm System Indicator Light. See Vehicle
Alarm System 022.
Light Sensor. See Automatic Headlamp
System 0111.
9. Dual Automatic Climate Control System
0150.
Driver and Passenger Heated and
Ventilated Seat Controls (If Equipped).
See Heated and Ventilated Front Seats
0 44. 10.
Traction Control/Electronic Stability
Control 0194.
Curb View Camera (If Equipped). See
Assistance Systems for Parking or Backing
0 215.
Front Lift System Control (If Equipped).
See Front Lift System 0205.
11. Driver Mode Control 0196.
12. Shift Switches. See Dual Clutch
Transmission 0184.
13. Hybrid Battery Charging (Charge+). See Driver Mode Control 0196.
Auto Stop Disable Switch. See Stop/Start
System 0180.
14. Keyless Ignition. See Ignition Positions
0 178.
15. Driver Information Center (DIC) Controls. SeeDriver Information Center (DIC) 099.
16. Heated Steering Wheel 075 (If
Equipped).
17. Bluetooth Controls. See Steering Wheel
Controls 0119.
Voice Recognition Controls. See Steering
Wheel Controls 0119. 18. Volume Control Buttons. See
Steering
Wheel Controls 0119.
19. Horn 075.
20. Favorites Select Buttons. Steering Wheel
Controls 0119.
21. Z-Mode Control. See Driver Mode Control
0 196.
Forward Collision Alert (FCA) System
0 218.
22. Cruise Control 0212.
23. Electric Parking Brake 0192.
24. Data Link Connector (DLC) (Out of View). SeeMalfunction Indicator Lamp (Check
Engine Light) 090.
25. Instrument Panel Illumination Control
0113.
26. Head-Up Display Controls (If Equipped). SeeHead-Up Display (HUD) 0102.
Page 10 of 362

Chevrolet Corvette Owner Manual (GMNA-Localizing-U.S./Canada/Mexico-
17272984) - 2024 - CRC - 2/20/23
Keys, Doors, and Windows 9
Convertible Top
.Do not try to start the vehicle while using
the remote key to open the convertible
top. Release both the remote key button
and ENGINE START/STOP and wait a few
seconds before starting the vehicle
normally.
Keyless Access Operation
This Keyless Access system allows you to
unlock and unlatch the doors and hatch/
trunk without removing the remote key
from your pocket, purse, briefcase, etc. The
remote key must be within 1 m (3 ft) of the
trunk or door being opened. A touchpad is
located on the door handle.
The Keyless Access system can be
programmed to unlock both doors on the
first door handle touchpad press from the
driver door. Keyless Access can also be
turned Off. To view available settings from
the infotainment screen, touch Settings >
Vehicle > Remote Lock, Unlock, Start.
If equipped with memory seats, remote keys
1 and 2 are linked to seating positions of
memory 1 or 2. SeeMemory Seats041. Keyless Unlocking
Press the door handle touchpad to unlock
and open the doors if the remote key is
within 1 m (3 ft). See
Door Locks013. To
view available settings from the
infotainment screen, touch Settings >
Vehicle > Remote Lock, Unlock, Start.
Disable/Enable Keyless Unlocking of Exterior
Door Handles and Trunk
If equipped, keyless unlocking of the exterior
door handles and trunk can be disabled and
enabled.
Disabling Keyless Unlocking:
With the vehicle off, press and hold
Hand
Ion the remote key at the same time for
approximately three seconds. The turn signal
lamps will flash four times quickly to
indicate access is disabled. Using any
exterior handle to unlock the doors or open
the hood or hatch/trunk will cause the turn
signal lamps to flash four times quickly,
indicating access is disabled. If disabled,
disarm the alarm system before starting the
vehicle. Disabling Keyless Unlocking may
also be configured under Vehicle
Personalization. Enabling Keyless Unlocking:
With the vehicle off, press and hold
Hand
Ion the remote key at the same time for
approximately three seconds. The turn signal
lamps will flash twice quickly to indicate
access is enabled. Enabling Keyless
Unlocking may also be configured under
Vehicle Personalization.
Passive Locking
Keyless Access will lock several seconds after
all doors are closed if the vehicle is off and
at least one remote key has been removed
or none remain in the vehicle.
The fuel door will also lock.
If other electronic devices interfere with the
remote key signal, the vehicle may not
detect the remote key inside the vehicle.
If passive locking is enabled, the doors may
lock with the remote key inside the vehicle.
Do not leave the remote key in an
unattended vehicle.
If the vehicle is locked with a remote key
inside the vehicle, that remote key will be
disabled for starting the vehicle and other
keyless access operations. To re-enable that
remote key, press any button on that
remote key. The remote key will also be
Page 13 of 362

Chevrolet Corvette Owner Manual (GMNA-Localizing-U.S./Canada/Mexico-
17272984) - 2024 - CRC - 2/20/23
12 Keys, Doors, and Windows
1. Press the button on the side of theremote key and pull the mechanical key
out. Never pull the mechanical key out
without pressing the button.
2. Use the mechanical key blade in the slotto remove the battery cover by hand.
3. Remove the seal by pulling on the tab toaccess the battery.
4. Remove the old battery. Do not use a metal object.
5. Insert the new battery, negative side facing down. Replace with a CR2450 or
equivalent battery.
6. Replace the seal, pushing it into the groove around the battery compartment.
7. Replace the battery cover by snapping it back into the remote key.
8. Reinsert the mechanical key.
Remote Vehicle Start
This feature allows the engine to be started
from outside the vehicle.
S: This button on the remote key is for
remote start.
The climate control system will use the
previous settings during a remote start. The
rear window defogger may come on during
remote start based on cold ambient
conditions. The rear window defogger
indicator light does not come on during
remote start.
If equipped, the heated and ventilated front
seats may also come on when the vehicle
personalization setting is enabled. See
Heated and Ventilated Front Seats 044.
If equipped with a remote start heated
steering wheel, it may come on during a
remote start. See Heated Steering Wheel
0 75.
Laws in some local communities may restrict
the use of remote starters. For example,
some laws may require a person using
remote start to have the vehicle in view.
Check local regulations for any
requirements.
Page 26 of 362

Chevrolet Corvette Owner Manual (GMNA-Localizing-U.S./Canada/Mexico-
17272984) - 2024 - CRC - 2/20/23
Keys, Doors, and Windows 25
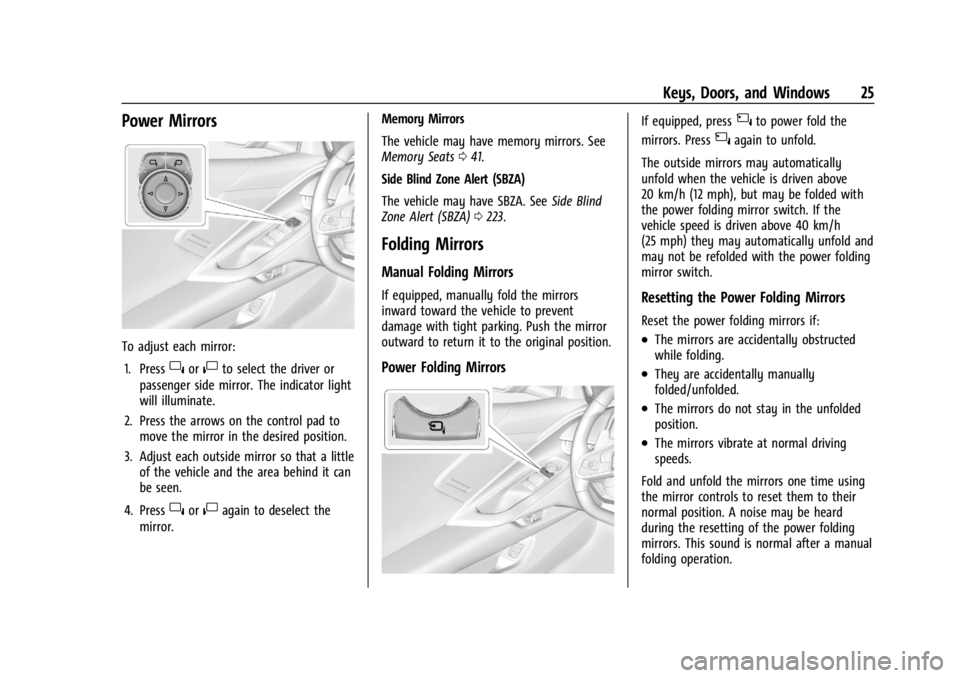
Power Mirrors
To adjust each mirror:1. Press
}or|to select the driver or
passenger side mirror. The indicator light
will illuminate.
2. Press the arrows on the control pad to move the mirror in the desired position.
3. Adjust each outside mirror so that a little of the vehicle and the area behind it can
be seen.
4. Press
}or|again to deselect the
mirror. Memory Mirrors
The vehicle may have memory mirrors. See
Memory Seats
041.
Side Blind Zone Alert (SBZA)
The vehicle may have SBZA. See Side Blind
Zone Alert (SBZA) 0223.
Folding Mirrors
Manual Folding Mirrors
If equipped, manually fold the mirrors
inward toward the vehicle to prevent
damage with tight parking. Push the mirror
outward to return it to the original position.
Power Folding Mirrors
If equipped, press{to power fold the
mirrors. Press
{again to unfold.
The outside mirrors may automatically
unfold when the vehicle is driven above
20 km/h (12 mph), but may be folded with
the power folding mirror switch. If the
vehicle speed is driven above 40 km/h
(25 mph) they may automatically unfold and
may not be refolded with the power folding
mirror switch.
Resetting the Power Folding Mirrors
Reset the power folding mirrors if:
.The mirrors are accidentally obstructed
while folding.
.They are accidentally manually
folded/unfolded.
.The mirrors do not stay in the unfolded
position.
.The mirrors vibrate at normal driving
speeds.
Fold and unfold the mirrors one time using
the mirror controls to reset them to their
normal position. A noise may be heard
during the resetting of the power folding
mirrors. This sound is normal after a manual
folding operation.
Page 27 of 362

Chevrolet Corvette Owner Manual (GMNA-Localizing-U.S./Canada/Mexico-
17272984) - 2024 - CRC - 2/20/23
26 Keys, Doors, and Windows
Remote Mirror Folding
If equipped with power folding mirrors and
the mirrors have not been folded with the
power folding mirror switch and the vehicle
is in P (Park), they may be automatically
folded/unfolded as follows:1. If doors are locked by double pressing
H
on the remote key, the mirrors may fold.
If doors are unlocked by double pressing
Ion the remote key, the mirrors may
unfold. See Remote Key Operation 07.
2. If doors are locked by pressing the door handle button, the mirrors will fold.
If doors are unlocked by pressing the
driver door handle button, the mirrors
may unfold. See “Keyless Unlocking/
Locking from the Driver Door” inRemote
Key Operation 07.
3. If passive locking is enabled and doors are locked by that feature, the mirrors
may fold. See “Passive Locking” in
Remote Key Operation 07.
If equipped with power folding mirrors,
remote mirror folding is on, and the mirrors
have been folded with the power folding
mirror switch, they may not be
automatically unfolded. To view available settings from the infotainment screen, touch
Settings > Vehicle > Comfort and
Convenience.
Heated Mirrors
1:
Press to heat the mirrors.
See “Rear Window Defogger” underDual
Automatic Climate Control System 0150.
Automatic Dimming Mirror
If equipped, the driver side mirror
automatically adjusts for the glare of
headlamps from behind.
Reverse Tilt Mirrors
If equipped with reverse tilt mirrors and
memory seats, the passenger and/or driver
mirror tilts to a preselected position when
the vehicle is in R (Reverse). This allows the
curb to be seen when parallel parking.
The mirror(s) may move from their tilted
position when:
.The vehicle is shifted out of R (Reverse) or
remains in R (Reverse) for about
30 seconds.
.The vehicle is turned off.
.The vehicle is driven in R (Reverse) above
a set speed.
To view available settings from the
infotainment screen, touch Settings >
Vehicle > Comfort and Convenience.
Interior Mirrors
Interior Rearview Mirrors
Adjust the rearview mirror for a clear view
of the area behind your vehicle.
Do not spray glass cleaner directly on the
mirror. Use a soft towel dampened with
water.
Automatic Dimming Rearview
Mirror
If equipped, automatic dimming reduces the
glare of headlamps from behind. The
dimming feature comes on when the vehicle
is started.
Page 40 of 362

Chevrolet Corvette Owner Manual (GMNA-Localizing-U.S./Canada/Mexico-
17272984) - 2024 - CRC - 2/20/23
Seats and Restraints 39
Seats and Restraints
Head Restraints
Head Restraints . . . . . . . . . . . . . . . . . . . . . . . . 39
Front Seats
Power Seat Adjustment . . . . . . . . . . . . . . . . 39
Reclining Seatbacks . . . . . . . . . . . . . . . . . . . . 40
Lumbar Adjustment . . . . . . . . . . . . . . . . . . . . . 41
Memory Seats . . . . . . . . . . . . . . . . . . . . . . . . . . 41
Heated and Ventilated Front Seats . . . . . 44
Seat Belts
Seat Belts . . . . . . . . . . . . . . . . . . . . . . . . . . . . . . 45
Buckle To Drive . . . . . . . . . . . . . . . . . . . . . . . . 46
How to Wear Seat Belts Properly . . . . . . 46
Lap-Shoulder Belt . . . . . . . . . . . . . . . . . . . . . . . 48
Seat Belt Use During Pregnancy . . . . . . . . 51
Seat Belt Extender . . . . . . . . . . . . . . . . . . . . . . 52
Safety System Check . . . . . . . . . . . . . . . . . . . 52
Seat Belt Care . . . . . . . . . . . . . . . . . . . . . . . . . . 52
Replacing Seat Belt System Parts after aCrash . . . . . . . . . . . . . . . . . . . . . . . . . . . . . . . . . 52
Airbag System
Airbag System . . . . . . . . . . . . . . . . . . . . . . . . . . 53
Where Are the Airbags? . . . . . . . . . . . . . . . . 54
When Should an Airbag Inflate? . . . . . . . . 55
What Makes an Airbag Inflate? . . . . . . . . . 55
How Does an Airbag Restrain? . . . . . . . . . 56 What Will You See after an Airbag
Inflates? . . . . . . . . . . . . . . . . . . . . . . . . . . . . . . 56
Passenger Sensing System . . . . . . . . . . . . . . 57
Servicing the Airbag-Equipped Vehicle . . . . . . . . . . . . . . . . . . . . . . . . . . . . . . . 60
Adding Equipment to the Airbag-Equipped Vehicle . . . . . . . . . . . . . . 61
Airbag System Check . . . . . . . . . . . . . . . . . . . 61
Replacing Airbag System Parts after a Crash . . . . . . . . . . . . . . . . . . . . . . . . . . . . . . . . . 62
Child Restraints
Older Children . . . . . . . . . . . . . . . . . . . . . . . . . . 62
Infants and Young Children . . . . . . . . . . . . . 63
Child Restraint Systems . . . . . . . . . . . . . . . . 65
Lower Anchors and Tethers for Children(LATCH System) . . . . . . . . . . . . . . . . . . . . . . . 67
Securing Child Restraints . . . . . . . . . . . . . . . 67
Head Restraints
The vehicle's front seats have head restraints
in the outboard seating positions that
cannot be adjusted.
The front seat outboard head restraints are
not removable.
Front Seats
Power Seat Adjustment
{Warning
The power seats will work with the
ignition off. Children could operate the
power seats and be injured. Never leave
children alone in the vehicle.
{Warning
You can lose control of the vehicle if you
try to adjust a driver seat while the
vehicle is moving. Adjust the driver seat
only when the vehicle is not moving.
Page 41 of 362

Chevrolet Corvette Owner Manual (GMNA-Localizing-U.S./Canada/Mexico-
17272984) - 2024 - CRC - 2/20/23
40 Seats and Restraints
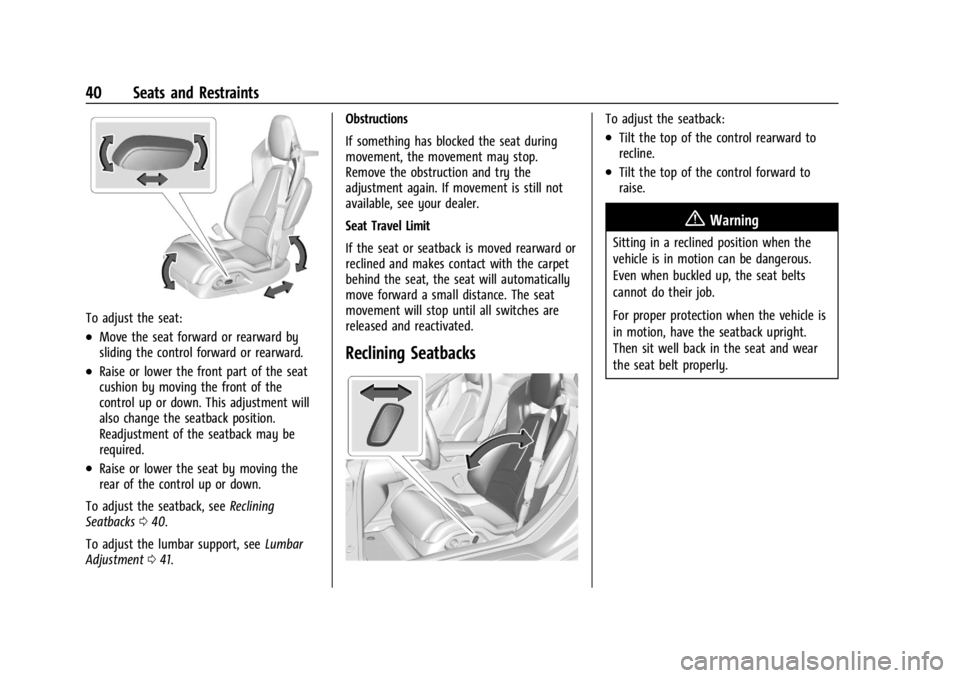
To adjust the seat:
.Move the seat forward or rearward by
sliding the control forward or rearward.
.Raise or lower the front part of the seat
cushion by moving the front of the
control up or down. This adjustment will
also change the seatback position.
Readjustment of the seatback may be
required.
.Raise or lower the seat by moving the
rear of the control up or down.
To adjust the seatback, see Reclining
Seatbacks 040.
To adjust the lumbar support, see Lumbar
Adjustment 041. Obstructions
If something has blocked the seat during
movement, the movement may stop.
Remove the obstruction and try the
adjustment again. If movement is still not
available, see your dealer.
Seat Travel Limit
If the seat or seatback is moved rearward or
reclined and makes contact with the carpet
behind the seat, the seat will automatically
move forward a small distance. The seat
movement will stop until all switches are
released and reactivated.
Reclining Seatbacks
To adjust the seatback:
.Tilt the top of the control rearward to
recline.
.Tilt the top of the control forward to
raise.
{Warning
Sitting in a reclined position when the
vehicle is in motion can be dangerous.
Even when buckled up, the seat belts
cannot do their job.
For proper protection when the vehicle is
in motion, have the seatback upright.
Then sit well back in the seat and wear
the seat belt properly.