2024 CHEVROLET CORVETTE jump cable
[x] Cancel search: jump cablePage 269 of 362
Chevrolet Corvette Owner Manual (GMNA-Localizing-U.S./Canada/Mexico-
17272984) - 2024 - CRC - 2/20/23
268 Vehicle Care
operate again, it must be serviced at your
dealer. If a crash occurs or an airbag(s)
inflates, see“If a Crash Occurs” under
Collision Damage Repair 0335 and
What Will You See after an Airbag Inflates?
0 56 for additional information.
Propulsion power may be reduced in
extremely cold temperatures, or if the high
voltage battery is too cold.
A vehicle cover, which can reduce sun
loading on the vehicle and improve high
voltage battery life, is available from your
dealer.
See Radio Frequency Statement 0337.
Federal Communications Commission (FCC)
Radiation Exposure Statement
This equipment has been evaluated to be
installed and operated at a minimum
distance of 5.7 cm (2.2 in) between the
device and your body. The vehicle design
ensures this distance is maintained during
normal use. Changes or modifications to any
of these systems by other than an
authorized service facility could void
authorization to use this equipment. Innovation, Science, and Economic
Development (ISED) Radiation Exposure
Statement
This equipment complies with RSS-102
radiation exposure limits set forth for an
uncontrolled environment. This equipment
should be installed and operated with a
minimum distance of 5.7 cm (2.2 in) between
the radiator and any part of your body. The
vehicle design ensures this distance is
maintained during normal use. Changes or
modifications to any of these systems by
other than an authorized service facility
could void authorization to use this
equipment.
Vehicle Storage
{Warning
Batteries have acid that can burn you and
gas that can explode. You can be badly
hurt if you are not careful. Always wear
eye protection. See
Jump Starting - North
America 0299 for tips on working
around a battery without getting hurt.
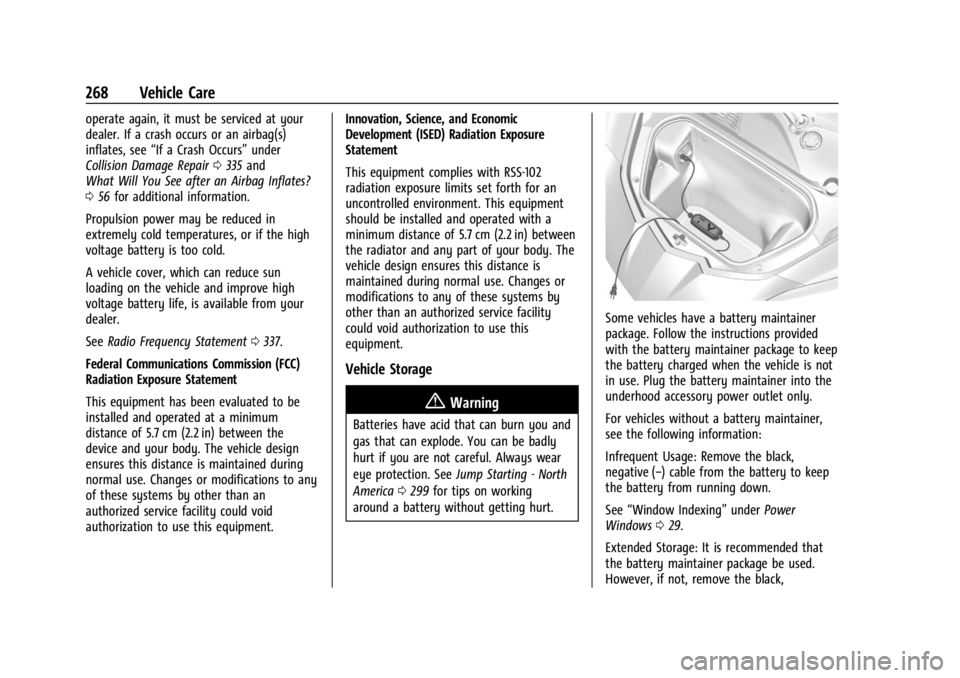
Some vehicles have a battery maintainer
package. Follow the instructions provided
with the battery maintainer package to keep
the battery charged when the vehicle is not
in use. Plug the battery maintainer into the
underhood accessory power outlet only.
For vehicles without a battery maintainer,
see the following information:
Infrequent Usage: Remove the black,
negative (−) cable from the battery to keep
the battery from running down.
See “Window Indexing” underPower
Windows 029.
Extended Storage: It is recommended that
the battery maintainer package be used.
However, if not, remove the black,
Page 270 of 362
Chevrolet Corvette Owner Manual (GMNA-Localizing-U.S./Canada/Mexico-
17272984) - 2024 - CRC - 2/20/23
Vehicle Care 269
negative (−) cable from the battery. All
vehicle memory settings will need to be
reset when battery power is restored.
12-volt Lithium-ion Battery (E-Ray)
When the vehicle is going to be stored for
longer than one week, the 12-volt lithium-ion
battery negative and Controller Area
Network (CAN) signal connectors should be
disconnected to preserve the life of the
12-volt lithium-ion battery. Ensure the signal
connector is facing downwards and shielded
from direct water exposure to prevent
corrosion while disconnected. A battery
maintainer package can be used to keep the
battery charged when the vehicle is not
in use.
{Warning
Lithium-ion battery cells contain
chemicals that can burn you and gas that
can explode under extreme conditions.
Explosive gases can cause blindness and/
or injury. You can be badly hurt if you
are not careful. Always wear eye
protection. SeeJump Starting - North
America 0299 for tips on working
around a lithium-ion battery without
getting hurt.
{Warning
Use only GM approved jump start boxes
and charging tools. Use of unapproved
jump start boxes, charging tools, a loose
battery, or battery charger may cause
personal injury, death, or damage to the
vehicle. For GM approved jump start
boxes or charging tools, see
https://gmdesolutions.com.
When storing the vehicle on a long-term
basis:
‐ Attach a compatible battery tender or
trickle charger to the 12-volt lithium-ion
battery.
‐ Keep the remote key more than 3 m
(10 ft) away from the vehicle.
High Voltage Battery (E-Ray)
After extended storage, it is possible that
the vehicle may not operate. If this happens,
the high voltage battery may need to be
plugged in and charged.
Park Brake and P (Park)
Mechanism Check
{Warning
When you are doing this check, the
vehicle could begin to move. You or
others could be injured and property
could be damaged. Make sure there is
room in front of the vehicle in case it
begins to roll. Be ready to apply the
regular brake at once should the vehicle
begin to move.
Park on a fairly steep hill, with the vehicle
facing downhill. Keeping your foot on the
regular brake, set the parking brake.
.To check the parking brake's holding
ability: With the engine running and the
transmission in N (Neutral), slowly remove
foot pressure from the regular brake
pedal. Do this until the vehicle is held by
the parking brake only.
.To check the P (Park) mechanism's holding
ability: With the engine running, shift to
P (Park). Then release the parking brake
followed by the regular brake.
Contact your dealer if service is required.
Page 300 of 362
Chevrolet Corvette Owner Manual (GMNA-Localizing-U.S./Canada/Mexico-
17272984) - 2024 - CRC - 2/20/23
Vehicle Care 299
Jump Starting
Jump Starting - North America
For more information about the vehicle
battery, seeBattery - North America 0266.
If the battery has run down, use another
vehicle and some jumper cables to start the
vehicle. Be sure to use the following steps
to do it safely.
{Warning
WARNING: Battery posts, terminals and
related accessories can expose you to
chemicals including lead and lead
compounds, which are known to the
State of California to cause cancer and
birth defects or other reproductive harm.
Wash hands after handling. For more
information go to
www.P65Warnings.ca.gov.
See California Proposition 65 Warning 01.
{Warning
Batteries can hurt you. They can be
dangerous because:
.They contain acid that can burn you.
.They contain gas that can explode or
ignite.
.They contain enough electricity to
burn you.
Use eye protection when handling the
battery. If you do not follow these steps
exactly, some or all of these things can
hurt you.
The battery is under a battery cover and
side extensions/shields in the underhood
compartment.
To access the battery under the hood, the
right hand and left hand sight shields need
to be removed to be able to remove the
second cover assembly to access the battery.
The positive battery terminal is on the
driver side and the negative terminal is on
the passenger side. Before you connect the cables, here are
some basic things you should know.
Positive (+) will go to the positive (+)
terminal. Negative (−) will go the remote
jump starting negative (−) post.
E-Ray Only
The vehicle is equipped with a lithium-ion
battery. The 12-volt lithium-ion battery
requires a higher voltage than lead acid
batteries for jump starting. Jumper cables
will only work with some vehicles and under
some circumstances. Follow the steps below
to safely jump start the discharged
lithium-ion batteries.
{Warning
Use only GM approved jump start boxes
and charging tools. Use of unapproved
jump start boxes, charging tools, a loose
battery, or battery charger may cause
personal injury, death, or damage to the
vehicle. For GM approved jump start
boxes or charging tools, see
https://gmdesolutions.com.
Page 301 of 362
Chevrolet Corvette Owner Manual (GMNA-Localizing-U.S./Canada/Mexico-
17272984) - 2024 - CRC - 2/20/23
300 Vehicle Care
{Warning
Lithium-ion batteries contain chemicals
known to the State of California to cause
cancer and birth defects or other
reproductive harm.WASH HANDS AFTER
HANDLING.
See California Proposition 65 Warning
0 1.
Caution
Ignoring these steps could result in costly
damage to the vehicle that would not be
covered by the vehicle warranty. Trying
to start the vehicle by pushing or pulling
it will not work, and it could damage the
vehicle.
Caution
If the jumper cables are connected or
removed in the wrong order, electrical
shorting may occur and damage the
vehicle. The repairs would not be covered
by the vehicle warranty. Always connect
(Continued)
Caution (Continued)
and remove the jumper cables in the
correct order, making sure that the cables
do not touch each other or other metal.
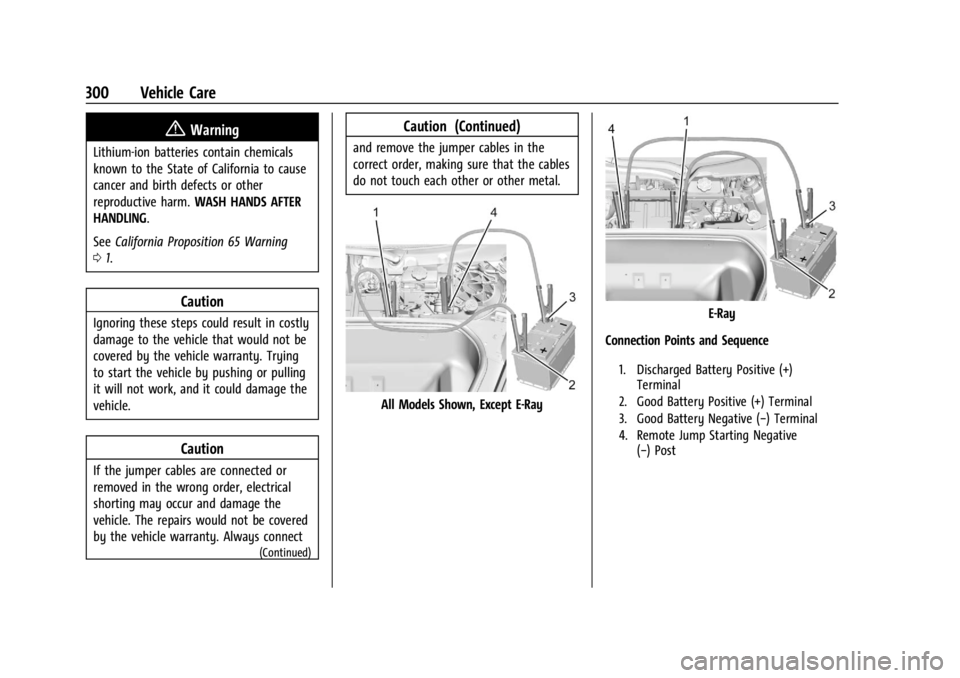
All Models Shown, Except E-Ray
E-Ray
Connection Points and Sequence
1. Discharged Battery Positive (+) Terminal
2. Good Battery Positive (+) Terminal
3. Good Battery Negative (−) Terminal
4. Remote Jump Starting Negative (−) Post
Page 302 of 362
Chevrolet Corvette Owner Manual (GMNA-Localizing-U.S./Canada/Mexico-
17272984) - 2024 - CRC - 2/20/23
Vehicle Care 301
Jump Starting Procedure (All Models)
1. Check the other vehicle. It must have a12-volt battery with a negative ground
system.
Caution
If the other vehicle does not have a
12-volt system with a negative ground,
both vehicles can be damaged. Only use
a vehicle that has a 12-volt system with a
negative ground for jump starting.
2. Get the vehicles close enough so the jumper cables can reach, but be sure the
vehicles are not touching each other.
If they are, it could cause a ground
connection you do not want. You would
not be able to start the vehicle, and the
bad grounding could damage the
electrical systems.
To avoid the possibility of the vehicles
rolling, set the parking brake firmly on
both vehicles involved in the jump start
procedure. Put an automatic transmission
in P (Park) or a manual transmission in
Neutral before setting the parking
brakes.
Caution
If any accessories are left on or plugged
in during the jump starting procedure,
they could be damaged. The repairs
would not be covered by the vehicle
warranty. Whenever possible, turn off or
unplug all accessories on either vehicle
when jump starting.
3. Turn off the ignition on both vehicles. Unplug unnecessary accessories plugged
into the accessory power outlet. Turn off
the radio and all lamps that are not
needed. This will avoid sparks and help
save both batteries. And it could save
the radio!
4. Open the hood. See Hood017.
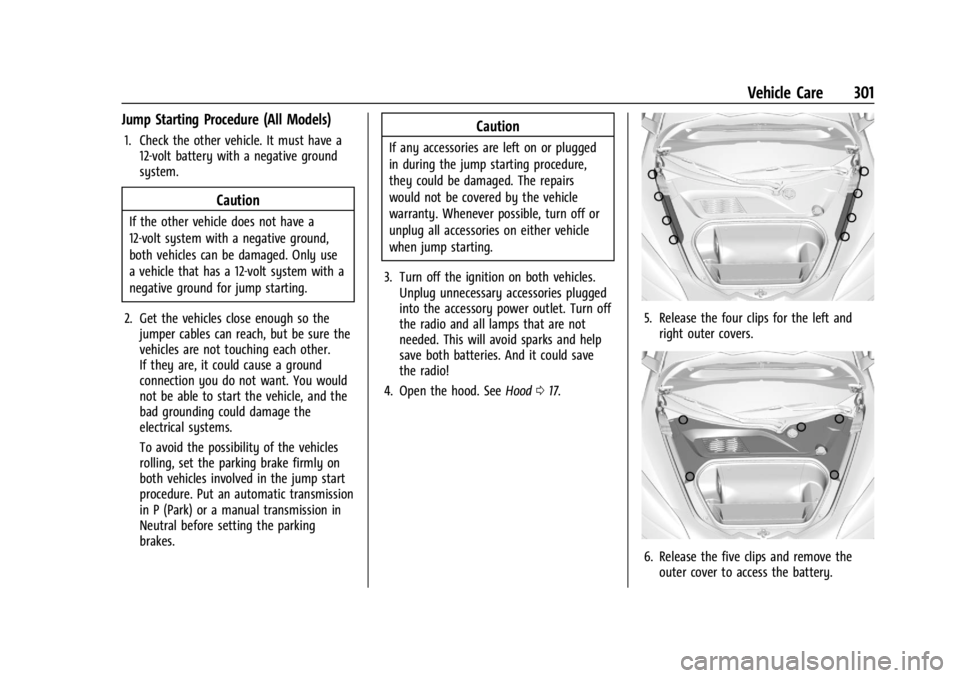
5. Release the four clips for the left and
right outer covers.
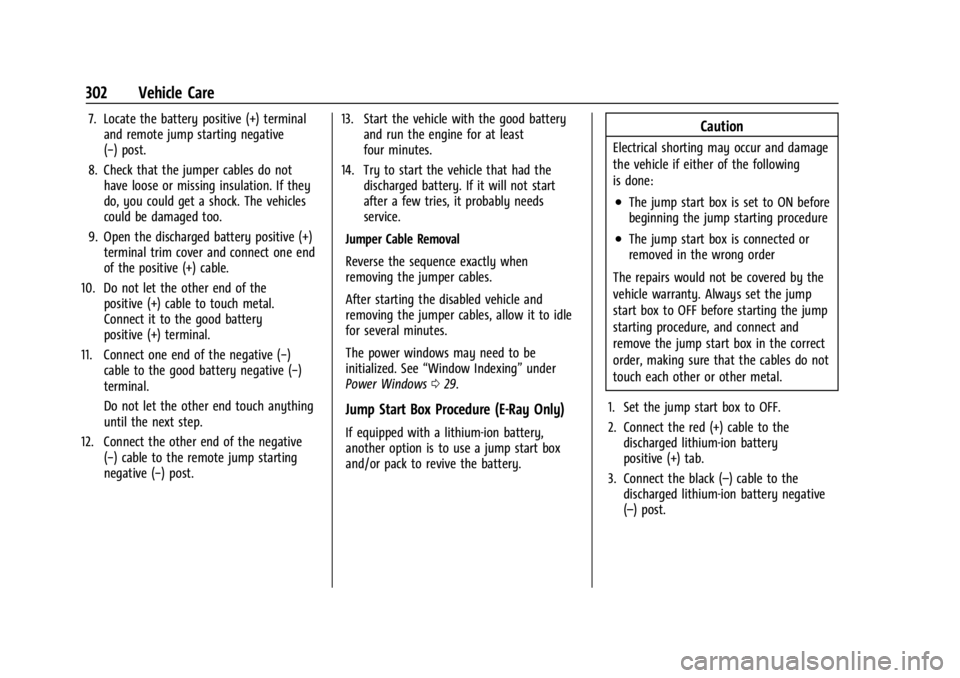
6. Release the five clips and remove theouter cover to access the battery.
Page 303 of 362
Chevrolet Corvette Owner Manual (GMNA-Localizing-U.S./Canada/Mexico-
17272984) - 2024 - CRC - 2/20/23
302 Vehicle Care
7. Locate the battery positive (+) terminaland remote jump starting negative
(−) post.
8. Check that the jumper cables do not have loose or missing insulation. If they
do, you could get a shock. The vehicles
could be damaged too.
9. Open the discharged battery positive (+) terminal trim cover and connect one end
of the positive (+) cable.
10. Do not let the other end of the positive (+) cable to touch metal.
Connect it to the good battery
positive (+) terminal.
11. Connect one end of the negative (−) cable to the good battery negative (−)
terminal.
Do not let the other end touch anything
until the next step.
12. Connect the other end of the negative (−) cable to the remote jump starting
negative (−) post. 13. Start the vehicle with the good battery
and run the engine for at least
four minutes.
14. Try to start the vehicle that had the discharged battery. If it will not start
after a few tries, it probably needs
service.
Jumper Cable Removal
Reverse the sequence exactly when
removing the jumper cables.
After starting the disabled vehicle and
removing the jumper cables, allow it to idle
for several minutes.
The power windows may need to be
initialized. See “Window Indexing” under
Power Windows 029.
Jump Start Box Procedure (E-Ray Only)
If equipped with a lithium-ion battery,
another option is to use a jump start box
and/or pack to revive the battery.
Caution
Electrical shorting may occur and damage
the vehicle if either of the following
is done:
.The jump start box is set to ON before
beginning the jump starting procedure
.The jump start box is connected or
removed in the wrong order
The repairs would not be covered by the
vehicle warranty. Always set the jump
start box to OFF before starting the jump
starting procedure, and connect and
remove the jump start box in the correct
order, making sure that the cables do not
touch each other or other metal.
1. Set the jump start box to OFF.
2. Connect the red (+) cable to the discharged lithium-ion battery
positive (+) tab.
3. Connect the black (–) cable to the discharged lithium-ion battery negative
(–) post.
Page 304 of 362

Chevrolet Corvette Owner Manual (GMNA-Localizing-U.S./Canada/Mexico-
17272984) - 2024 - CRC - 2/20/23
Vehicle Care 303
4. Once the jump start box has beenconnected, set the jump start box to ON.
After the jump start box is powered on,
ensure the instrument cluster lights up
before starting the vehicle.
5. After the instrument cluster lights up, use a GM approved battery charger to
fully charge the battery.
Jumper Cable Removal 1. Set the jump start box to OFF.
2. Disconnect the black (–) cable to the negative post (–) on the discharged
lithium-ion battery.
3. Disconnect the red (+) cable to the discharged lithium-ion battery
positive (+) tab.
Charging The 12-Volt Lithium-Ion Battery
The 12-volt lithium-ion battery can be
charged using a GM approved charger
designed for lithium-ion batteries. Follow the
instructions listed in the charger operating
manual. See Battery - North America 0266
for more information.
Towing the Vehicle
Transporting a Disabled Vehicle
Caution
Incorrectly transporting a disabled vehicle
may cause damage to the vehicle. Use
proper tire straps to secure the vehicle to
the flatbed tow truck. Do not strap or
hook to any frame, underbody,
or suspension component not specified
below. Do not move vehicles with rear
axle tires on the ground. Damage is not
covered by the vehicle warranty.
Caution
The vehicle may be equipped with an
electric parking brake and/or an
electronic shifter. In the event of a loss of
12-volt battery power, the electric parking
brake cannot be released, and the vehicle
cannot be shifted to N (Neutral). Tire
skates or dollies must be used under the
non-rolling tires to prevent damage while
loading/unloading the vehicle. Dragging
the vehicle will cause damage not
covered by the vehicle warranty.
Caution
The vehicle may be equipped with a tow
eye. Improper use of the tow eye may
cause damage to the vehicle and is not
covered by the vehicle warranty.
If equipped, use the tow eye to load the
vehicle onto a flatbed tow truck from a
flat road surface, or to move the vehicle
a very short distance at a walking pace.
The tow eye is not designed for off-road
recovery. The vehicle must be in
N (Neutral) with the electric parking
brake released when using the tow eye.
Contact a professional towing service if the
disabled vehicle must be transported. GM
recommends a flatbed tow truck to
transport a disabled vehicle. Use ramps to
help reduce approach angles, if necessary.
If equipped, a tow eye may be located near
the spare tire or emergency jack. Do not use
the tow eye to pull the vehicle from the
snow, mud, sand, or ditch. Tow eye threads
may have right or left-hand threads. Use
caution when installing or removing the
tow eye.