2024 CHEVROLET CORVETTE ECO mode
[x] Cancel search: ECO modePage 206 of 362
Chevrolet Corvette Owner Manual (GMNA-Localizing-U.S./Canada/Mexico-
17272984) - 2024 - CRC - 2/20/23
Driving and Operating 205
To confirm, and enter PTM, press the
Z-Mode button again. The PTM state can
now be modified using the mode knob or
changing the Z-Mode setting in the center
stack. Both the Z-Mode and PTM indicators
will be displayed.
To cancel, press the center dismiss button
on the steering wheel (Z-Mode remains
active). Selecting PTM states may modify
other Z-Mode customization options.
.Off, Wet, Dry, Sport, Race 1, Race 2
Front Lift System
A two-position lift actuator (one per damper)
with 35 mm (1.5 in) of stroke will
hydraulically raise the front of the vehicle to
provide approximately 50 mm (2 in) of
increased clearance in approximately
three seconds (height and time will vary by
vehicle). The Front Lift System will allow
you to lift the front of the vehicle to enter a
driveway, driving over curbs, speed bumps
or onto ramps or a trailer.
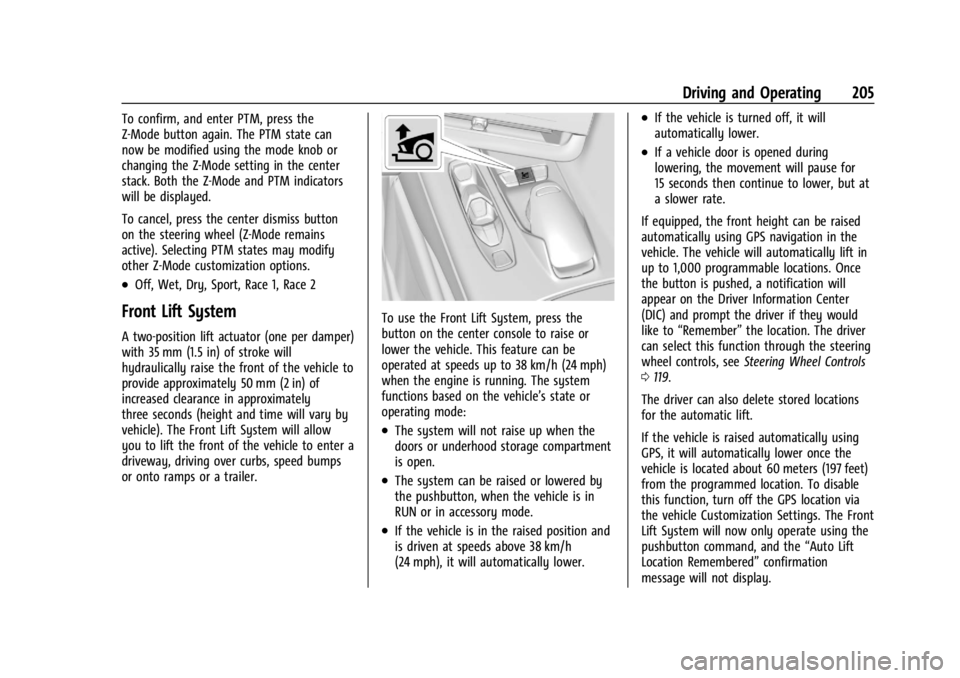
To use the Front Lift System, press the
button on the center console to raise or
lower the vehicle. This feature can be
operated at speeds up to 38 km/h (24 mph)
when the engine is running. The system
functions based on the vehicle’s state or
operating mode:
.The system will not raise up when the
doors or underhood storage compartment
is open.
.The system can be raised or lowered by
the pushbutton, when the vehicle is in
RUN or in accessory mode.
.If the vehicle is in the raised position and
is driven at speeds above 38 km/h
(24 mph), it will automatically lower.
.If the vehicle is turned off, it will
automatically lower.
.If a vehicle door is opened during
lowering, the movement will pause for
15 seconds then continue to lower, but at
a slower rate.
If equipped, the front height can be raised
automatically using GPS navigation in the
vehicle. The vehicle will automatically lift in
up to 1,000 programmable locations. Once
the button is pushed, a notification will
appear on the Driver Information Center
(DIC) and prompt the driver if they would
like to “Remember” the location. The driver
can select this function through the steering
wheel controls, see Steering Wheel Controls
0 119.
The driver can also delete stored locations
for the automatic lift.
If the vehicle is raised automatically using
GPS, it will automatically lower once the
vehicle is located about 60 meters (197 feet)
from the programmed location. To disable
this function, turn off the GPS location via
the vehicle Customization Settings. The Front
Lift System will now only operate using the
pushbutton command, and the “Auto Lift
Location Remembered” confirmation
message will not display.
Page 207 of 362
Chevrolet Corvette Owner Manual (GMNA-Localizing-U.S./Canada/Mexico-
17272984) - 2024 - CRC - 2/20/23
206 Driving and Operating
The Front Lift System can also be used in
accessory mode. Put the vehicle in accessory
mode and press and hold the button on the
center console for 10 consecutive seconds to
automatically raise the vehicle.
The Driver Information Center (DIC) may
display the message“Lift System
Unavailable” if:
.any doors are ajar
.the hood is open
.the vehicle is moving over 38 km/h
(24 mph)
.too many lift requests within a short
period
The Front Lift System should not be used to
service the vehicle. Do not place anything or
body parts under the vehicle while lifted.
See Recommended Fluids and Lubricants
0 320.
Performance Driving
If equipped, Competitive Driving mode,
Performance Traction Management (PTM),
and Launch Control are systems designed to
allow increased performance while
accelerating and/or cornering. This is
accomplished by regulating and optimizing
the engine, brakes, and suspension performance. These modes are for use at a
closed course race track and are not
intended for use on public roads. They will
not compensate for driver inexperience or
lack of familiarity with a race track.
Drivers who prefer to allow the system to
have more control of the engine, brakes,
and suspension are advised to turn on the
normal traction control and StabiliTrak/
Electronic Stability Control (ESC) systems on.
If equipped with E-Ray, there is a
Performance app on the infotainment screen
that shows the vehicle electric and engine
power/torque. See
“E-Ray Performance App”
later in this section for more information.
E-Ray Performance App
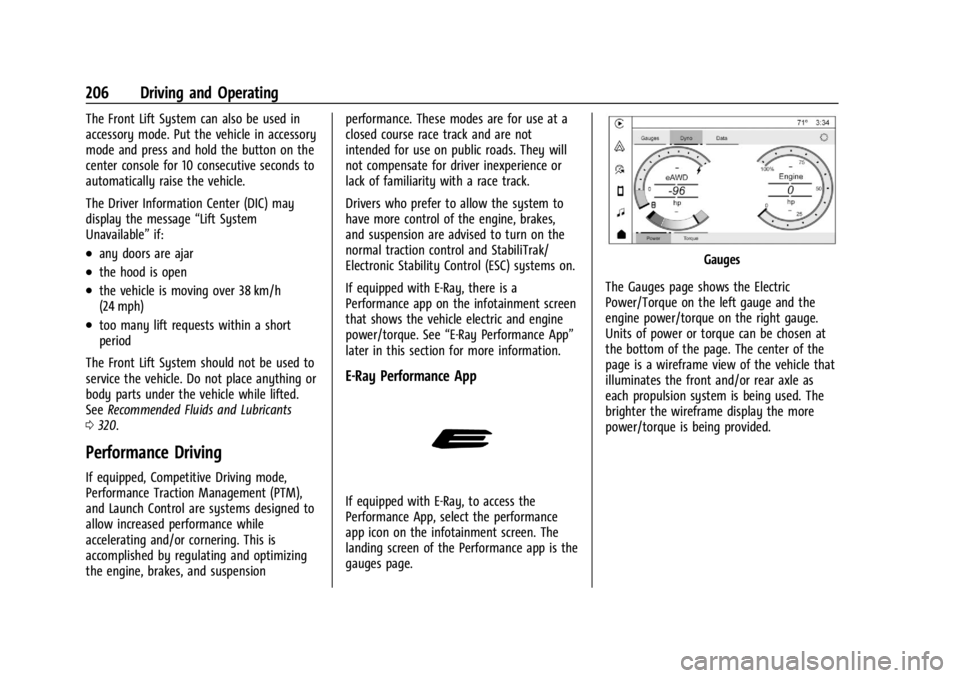
If equipped with E-Ray, to access the
Performance App, select the performance
app icon on the infotainment screen. The
landing screen of the Performance app is the
gauges page.
Gauges
The Gauges page shows the Electric
Power/Torque on the left gauge and the
engine power/torque on the right gauge.
Units of power or torque can be chosen at
the bottom of the page. The center of the
page is a wireframe view of the vehicle that
illuminates the front and/or rear axle as
each propulsion system is being used. The
brighter the wireframe display the more
power/torque is being provided.
Page 208 of 362
Chevrolet Corvette Owner Manual (GMNA-Localizing-U.S./Canada/Mexico-
17272984) - 2024 - CRC - 2/20/23
Driving and Operating 207
Dyno
While Driving
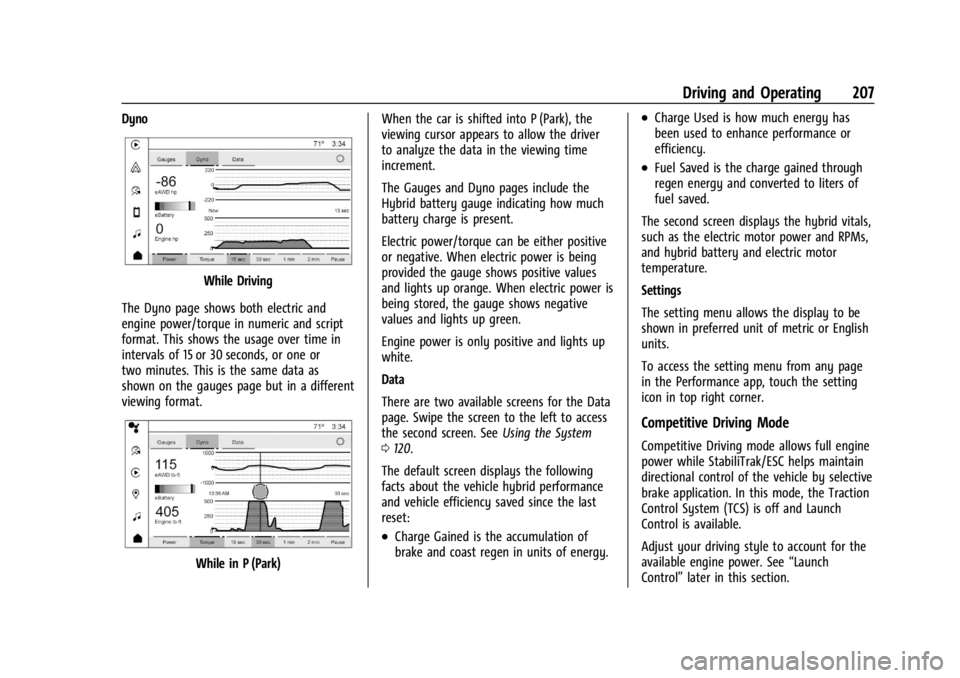
The Dyno page shows both electric and
engine power/torque in numeric and script
format. This shows the usage over time in
intervals of 15 or 30 seconds, or one or
two minutes. This is the same data as
shown on the gauges page but in a different
viewing format.
While in P (Park) When the car is shifted into P (Park), the
viewing cursor appears to allow the driver
to analyze the data in the viewing time
increment.
The Gauges and Dyno pages include the
Hybrid battery gauge indicating how much
battery charge is present.
Electric power/torque can be either positive
or negative. When electric power is being
provided the gauge shows positive values
and lights up orange. When electric power is
being stored, the gauge shows negative
values and lights up green.
Engine power is only positive and lights up
white.
Data
There are two available screens for the Data
page. Swipe the screen to the left to access
the second screen. See
Using the System
0 120.
The default screen displays the following
facts about the vehicle hybrid performance
and vehicle efficiency saved since the last
reset:
.Charge Gained is the accumulation of
brake and coast regen in units of energy.
.Charge Used is how much energy has
been used to enhance performance or
efficiency.
.Fuel Saved is the charge gained through
regen energy and converted to liters of
fuel saved.
The second screen displays the hybrid vitals,
such as the electric motor power and RPMs,
and hybrid battery and electric motor
temperature.
Settings
The setting menu allows the display to be
shown in preferred unit of metric or English
units.
To access the setting menu from any page
in the Performance app, touch the setting
icon in top right corner.
Competitive Driving Mode
Competitive Driving mode allows full engine
power while StabiliTrak/ESC helps maintain
directional control of the vehicle by selective
brake application. In this mode, the Traction
Control System (TCS) is off and Launch
Control is available.
Adjust your driving style to account for the
available engine power. See “Launch
Control” later in this section.
Page 209 of 362
Chevrolet Corvette Owner Manual (GMNA-Localizing-U.S./Canada/Mexico-
17272984) - 2024 - CRC - 2/20/23
208 Driving and Operating
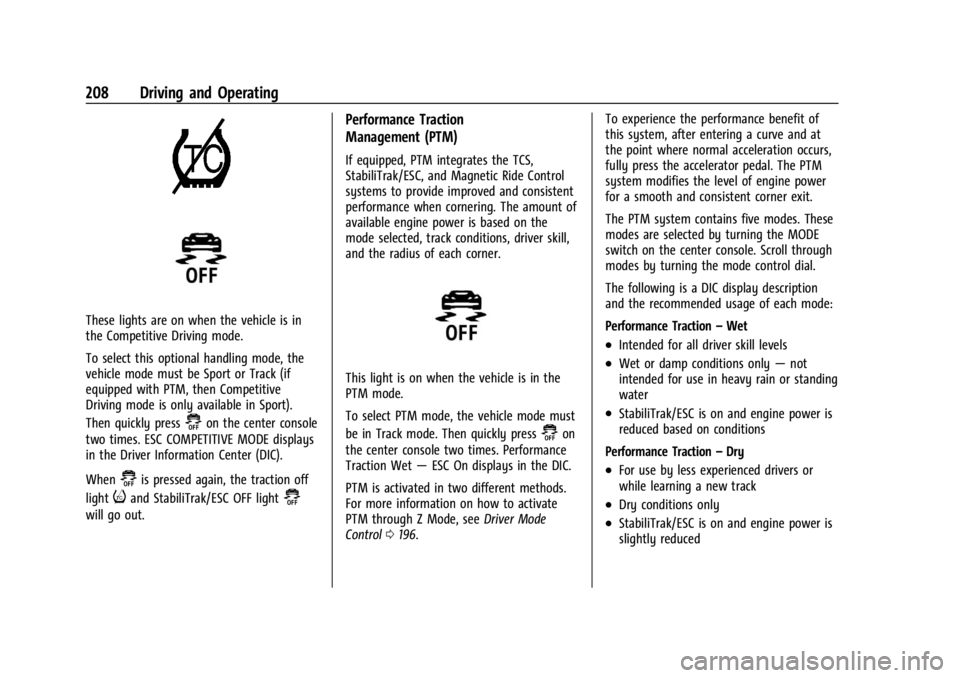
These lights are on when the vehicle is in
the Competitive Driving mode.
To select this optional handling mode, the
vehicle mode must be Sport or Track (if
equipped with PTM, then Competitive
Driving mode is only available in Sport).
Then quickly press
@on the center console
two times. ESC COMPETITIVE MODE displays
in the Driver Information Center (DIC).
When
@is pressed again, the traction off
light
iand StabiliTrak/ESC OFF light@
will go out.
Performance Traction
Management (PTM)
If equipped, PTM integrates the TCS,
StabiliTrak/ESC, and Magnetic Ride Control
systems to provide improved and consistent
performance when cornering. The amount of
available engine power is based on the
mode selected, track conditions, driver skill,
and the radius of each corner.
This light is on when the vehicle is in the
PTM mode.
To select PTM mode, the vehicle mode must
be in Track mode. Then quickly press
@on
the center console two times. Performance
Traction Wet —ESC On displays in the DIC.
PTM is activated in two different methods.
For more information on how to activate
PTM through Z Mode, see Driver Mode
Control 0196. To experience the performance benefit of
this system, after entering a curve and at
the point where normal acceleration occurs,
fully press the accelerator pedal. The PTM
system modifies the level of engine power
for a smooth and consistent corner exit.
The PTM system contains five modes. These
modes are selected by turning the MODE
switch on the center console. Scroll through
modes by turning the mode control dial.
The following is a DIC display description
and the recommended usage of each mode:
Performance Traction
–Wet
.Intended for all driver skill levels
.Wet or damp conditions only —not
intended for use in heavy rain or standing
water
.StabiliTrak/ESC is on and engine power is
reduced based on conditions
Performance Traction –Dry
.For use by less experienced drivers or
while learning a new track
.Dry conditions only
.StabiliTrak/ESC is on and engine power is
slightly reduced
Page 212 of 362

Chevrolet Corvette Owner Manual (GMNA-Localizing-U.S./Canada/Mexico-
17272984) - 2024 - CRC - 2/20/23
Driving and Operating 211
6. Return to the landing page of LaunchControl. Firmly press and hold the brake
pedal to activate Launch Control.
7. Fully press the accelerator. Release thebrake pedal to launch the vehicle.
Limited-Slip Differential
The standard mechanical limited-slip
differential provides more traction on snow,
mud, ice, sand, or gravel. It works like a
standard axle most of the time, but when traction is low, this feature allows the drive
wheel with the most traction to move the
vehicle. See
Performance Driving 0206 and
Maintenance Schedule 0316.
Stingray, E-Ray, and Z06 Models Only
The Electrical Limited-Slip Differential (eLSD)
located on the rear axle is a hydraulically
actuated clutch system. It can infinitely vary
the clutch engagement between 0 and
2250 N*m (1659 lb-ft) of breakaway torque
between the rear wheels. When necessary it
responds from open to full engagement in
fractions of a second. Smaller clutch
adjustments happen even faster.
The eLSD:
.Uses the vehicle sensors and driver inputs
to determine the optimum amount of
clutch engagement for the conditions.
.Improves traction while cornering by
changing the engagement to achieve a
balance between directional control and
acceleration.
.Provides optimal engagement for
high-speed control and stability without
affecting precise steering and turn-in.
.Improves vehicle stability during spirited
driving and evasive maneuvers. It is fully
integrated with the Active Handling and
Performance Traction Management (PTM)
systems (if equipped).
There are unique calibrations based on the
Traction Control System (TCS) setting. eLSD
modes change automatically when the
traction control button is pressed. No unique
input from the driver is required.
.Mode 1 is the standard mode when the
vehicle is started. It provides a touring
calibration with an emphasis on vehicle
stability. Mode 1 is also used in PTM
Wet mode.
.Mode 2 is engaged when both TCS and
StabiliTrak are turned off. This calibration
provides more nimble corner turn-in, and
is biased for better traction out of
corners.
.Mode 3 is engaged when PTM is engaged
in Dry, Sport 1 & 2, and Race modes. This
is a nimble calibration with similar
functionality as eLSD Mode 2, however, it
is integrated to work with PTM.
.Mode 4 is engaged when TCS is selected
off, but StabiliTrak remains on. Vehicle
stability is still the priority, while allowing
for optimized traction out of corners.
Page 221 of 362

Chevrolet Corvette Owner Manual (GMNA-Localizing-U.S./Canada/Mexico-
17272984) - 2024 - CRC - 2/20/23
220 Driving and Operating
The Collision Alert control is on the steering
wheel. Press
[to set the FCA timing to
Far, Medium, or Near. The first button press
shows the current setting on the DIC.
Additional button presses will change this
setting. The chosen setting will remain until
it is changed and will affect the timing of
both the Collision Alert and the Tailgating
Alert features. The timing of both alerts will
vary based on vehicle speed. The faster the
vehicle speed, the farther away the alert will
occur. Consider traffic and weather
conditions when selecting the alert timing.
The range of selectable alert timings may
not be appropriate for all drivers and driving
conditions.
Following Distance Indicator
The following distance to a moving vehicle
ahead in your path is indicated in following
time in seconds on the Driver Information
Center (DIC). The minimum following time is
0.5 seconds away. If there is no vehicle
detected ahead, or the vehicle ahead is out
of sensor range, dashes will be displayed.
Unnecessary Alerts
FCA may provide unnecessary alerts for
turning vehicles, vehicles in other lanes,
objects that are not vehicles, or shadows.
These alerts are normal operation and the
vehicle does not need service.
Cleaning the System
If the FCA system does not seem to operate
properly, this may correct the issue:
.Clean the outside of the windshield in
front of the rearview mirror.
.Clean the entire front of the vehicle.
.Clean the headlamps.
Automatic Emergency
Braking (AEB)
The AEB system may help avoid or reduce
the harm caused by front-end crashes. AEB
also includes Intelligent Brake Assist (IBA).
When the system detects a vehicle ahead in
your path that is traveling in the same
direction that you may be about to crash
into, it can provide a boost to braking or
automatically brake the vehicle. This can
help avoid or lessen the severity of crashes
when driving in a forward gear. Depending
on the situation, the vehicle may automatically brake moderately or hard.
Always wear a seat belt and ensure that all
passengers are properly restrained. This
automatic emergency braking can only occur
if a vehicle is detected. This is shown by the
FCA vehicle ahead indicator being lit. See
Forward Collision Alert (FCA) System
0218.
The system works when driving in a forward
gear between 8 km/h (5 mph) and 135 km/h
(84 mph). It can detect vehicles up to
approximately 60 m (197 ft).
{Warning
AEB is an emergency crash preparation
feature and is not designed to avoid
crashes. Do not rely on AEB to brake the
vehicle. AEB will not brake outside of its
operating speed range and only responds
to detected vehicles.
AEB may not:
.Detect a vehicle ahead on winding or
hilly roads.
.Detect all vehicles, especially vehicles
with a trailer, tractors, muddy
vehicles, etc. (Continued)
Page 235 of 362
Chevrolet Corvette Owner Manual (GMNA-Localizing-U.S./Canada/Mexico-
17272984) - 2024 - CRC - 2/20/23
234 Vehicle Care
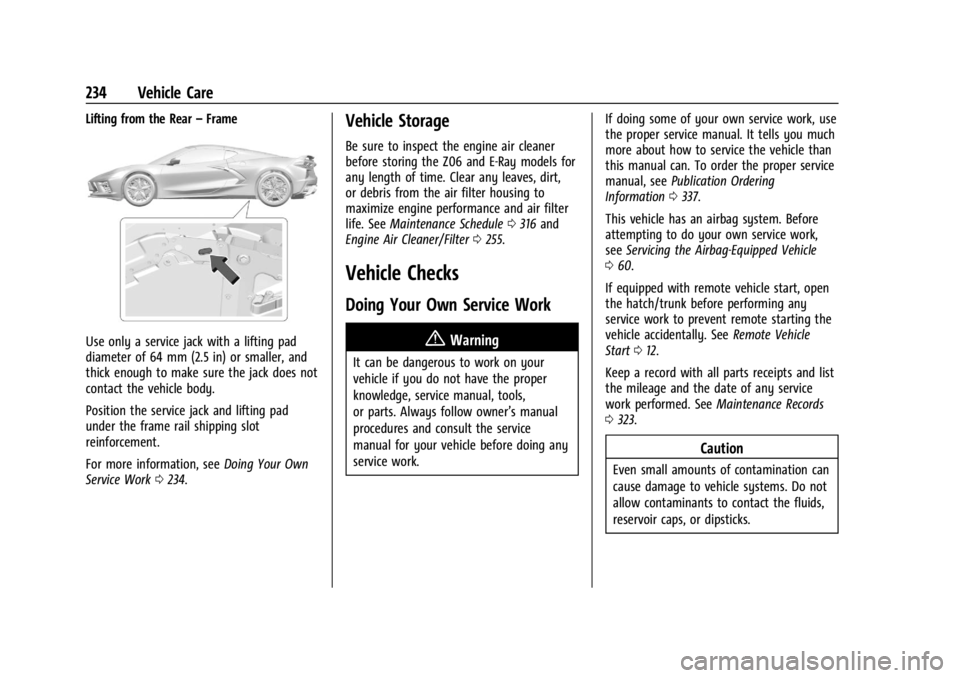
Lifting from the Rear–Frame
Use only a service jack with a lifting pad
diameter of 64 mm (2.5 in) or smaller, and
thick enough to make sure the jack does not
contact the vehicle body.
Position the service jack and lifting pad
under the frame rail shipping slot
reinforcement.
For more information, see Doing Your Own
Service Work 0234.
Vehicle Storage
Be sure to inspect the engine air cleaner
before storing the Z06 and E-Ray models for
any length of time. Clear any leaves, dirt,
or debris from the air filter housing to
maximize engine performance and air filter
life. See Maintenance Schedule 0316 and
Engine Air Cleaner/Filter 0255.
Vehicle Checks
Doing Your Own Service Work
{Warning
It can be dangerous to work on your
vehicle if you do not have the proper
knowledge, service manual, tools,
or parts. Always follow owner’s manual
procedures and consult the service
manual for your vehicle before doing any
service work. If doing some of your own service work, use
the proper service manual. It tells you much
more about how to service the vehicle than
this manual can. To order the proper service
manual, see
Publication Ordering
Information 0337.
This vehicle has an airbag system. Before
attempting to do your own service work,
see Servicing the Airbag-Equipped Vehicle
0 60.
If equipped with remote vehicle start, open
the hatch/trunk before performing any
service work to prevent remote starting the
vehicle accidentally. See Remote Vehicle
Start 012.
Keep a record with all parts receipts and list
the mileage and the date of any service
work performed. See Maintenance Records
0 323.
Caution
Even small amounts of contamination can
cause damage to vehicle systems. Do not
allow contaminants to contact the fluids,
reservoir caps, or dipsticks.
Page 268 of 362
Chevrolet Corvette Owner Manual (GMNA-Localizing-U.S./Canada/Mexico-
17272984) - 2024 - CRC - 2/20/23
Vehicle Care 267
12-Volt Lithium-Ion Battery (E-Ray)
{Warning
WARNING:Battery posts, terminals and
related accessories can expose you to
chemicals including lead and lead
compounds, which are known to the
State of California to cause cancer and
birth defects or other reproductive harm.
Wash hands after handling. For more
information go to
www.P65Warnings.ca.gov.
See California Proposition 65 Warning 01.
Charging the 12-volt Lithium-ion battery
The 12-volt lithium-ion battery can be
charged using a GM approved charger
designed for lithium-Ion batteries. Follow the
instructions that come with the GM
approved charger.
{Warning
Use only GM approved jump start boxes
and charging tools. Use of unapproved
jump start boxes, charging tools, a loose
battery, or battery charger may cause
personal injury, death, or damage to the (Continued)
Warning (Continued)
vehicle. For GM approved jump start
boxes or charging tools, see
https://gmdesolutions.com.
Use the Battery Voltage info tile to
determine if your battery is low and needs
to be charged. See Instrument Cluster081
under the “Info Tiles” section for more
information.
GM recommends charging your 12-volt
lithium-ion battery when storing your
vehicle for long periods of time. See “Vehicle
Storage” later on in this section.
If the vehicle isn’t starting and the 12-volt
lithium-ion battery has run down, charging
the 12-volt lithium-ion battery may solve the
issue. See Jump Starting - North America
0 299.
High Voltage Battery (E-Ray)
Only a trained service technician should
inspect, test, or replace the high voltage
battery. The dealer has information on
how to recycle the high voltage battery.
There is also information available at
https://www.recyclemybattery.com.
{Warning
Damage to the high voltage battery or
high voltage system can create a risk of
electric shock, overheating, or fire.
If the vehicle is damaged from a
moderate to severe crash, flood, fire,
or other event, the vehicle should be
inspected as soon as possible. Until the
vehicle has been inspected, store it
outside at least 15 m (50 ft) from any
structure or anything that can burn.
Ventilate the vehicle by opening a
window or a door.
Contact Customer Assistance as soon as
possible to determine whether an
inspection is needed. See Customer
Assistance Offices 0331.
If the vehicle is in a crash, the sensing
system may shut down the high voltage
system. When this occurs, the high voltage
battery is disconnected and the vehicle will
not start. The SERVICE VEHICLE SOON
message in the Driver Information Center
(DIC) will display. Before the vehicle can