2023 TOYOTA YARIS CROSS belt
[x] Cancel search: beltPage 64 of 698

62
Owners Manual_Europe_M52N75_en
1-2. Child safety
■ISOFIX lower anchorages
(ISOFIX child restraint system)
Lower anchorages are provided for
the outboard rear seats. (Marks dis-
playing the location of the anchor-
ages are attached to the seats.)
■Installation with ISOFIX lower
anchorage (ISOFIX child
restraint system)
Install the child restraint system in
accordance to the operation man-
ual enclosed with the child restraint
system.
If the child restraint system on hand
is not within the “universal” cate-
gory (or the necessary information
is not in the table), refer to the
“Vehicle List” provided by the child
restraint system maker for various
possible installation positions, or
check the compatibility after asking
the retailer of the child seat.
( P.53, 54)
1 If the head restraint interferes
with your child restraint system,
and the head restraint can be
removed, remove the head
restraint. Otherwise, put the
head restraint in the upper most
position. ( P.160)
2 Remove the anchorage covers,
and install the child restraint
system to the seat.
WARNING
■When installing a child restraint system
Observe the following precautions. Failure to do so may result in death or serious injury.
●Do not allow children to play with the seat belt. If the seat belt
becomes twisted around a child’s neck, it may lead to choking or other serious injuries that could
result in death. If this occurs and the buckle cannot be unfastened, scissors should be used to cut the
belt.
●Ensure that the belt and plate are
securely locked and the seat belt is not twisted.
●Shake the child restraint system left and right, and forward and back-ward to ensure that it has been
securely installed.
●After securing a child restraint sys-
tem, never adjust the seat.
●When a junior seat is installed,
always ensure that the shoulder belt is positioned across the center of the child’s shoulder. The belt
should be kept away from the child’s neck, but not so that it could fall off the child’s shoulder.
●Follow all installation instructions provided by the child restraint sys-
tem manufacturer.
Child restraint system fixed
with an ISOFIX lower
anchorage
Page 65 of 698

63
1
Owners Manual_Europe_M52N75_en
1-2. Child safety
For safety and security
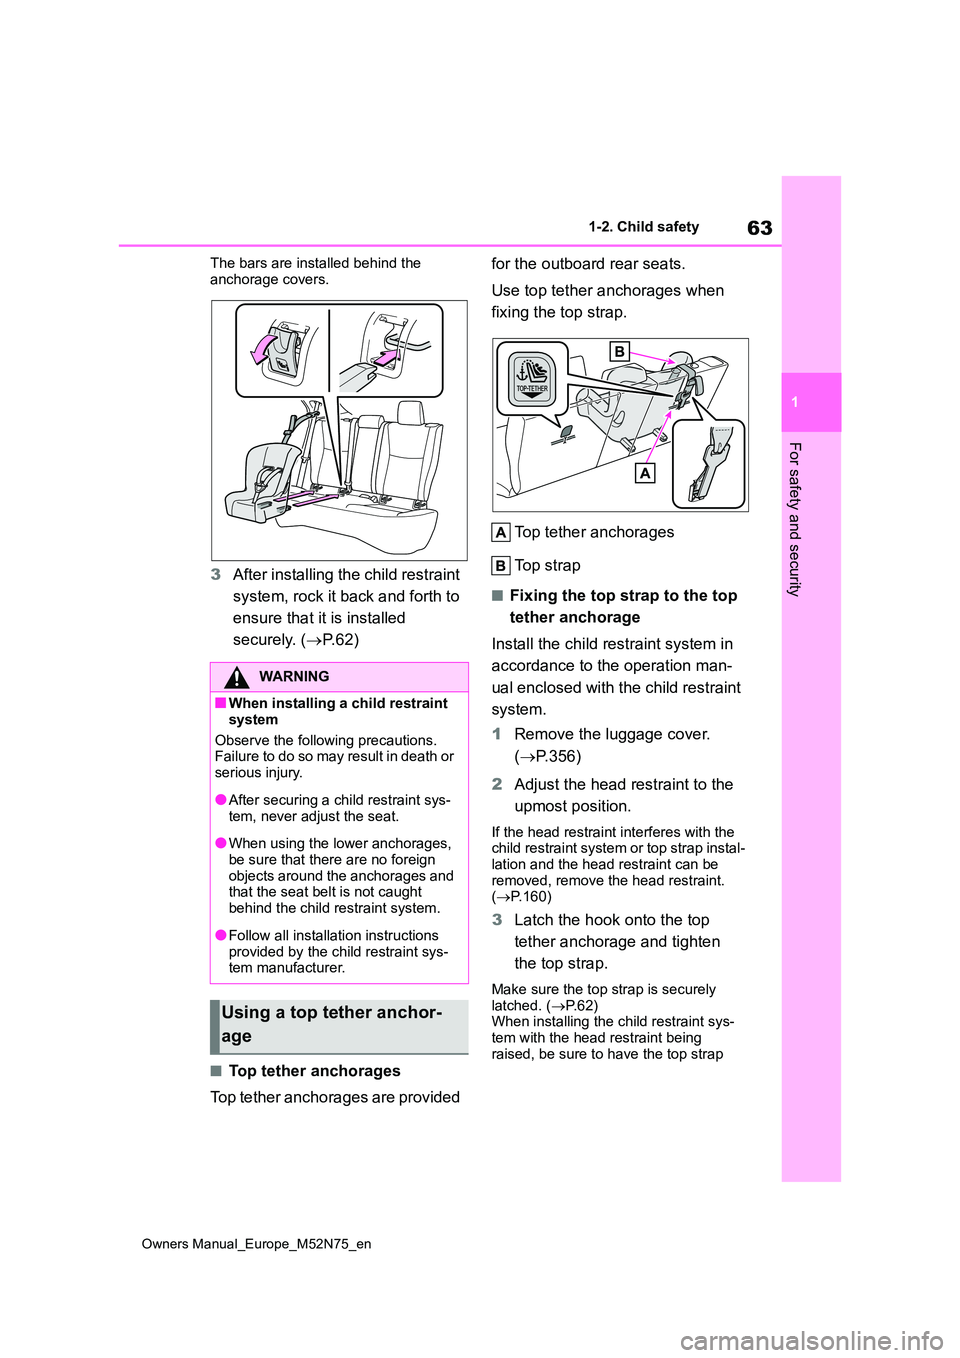
The bars are installed behind the
anchorage covers.
3 After installing the child restraint
system, rock it back and forth to
ensure that it is installed
securely. ( P. 6 2 )
■Top tether anchorages
Top tether anchorages are provided
for the outboard rear seats.
Use top tether anchorages when
fixing the top strap.
Top tether anchorages
Top strap
■Fixing the top strap to the top
tether anchorage
Install the child restraint system in
accordance to the operation man-
ual enclosed with the child restraint
system.
1 Remove the luggage cover.
( P.356)
2 Adjust the head restraint to the
upmost position.
If the head restraint interferes with the child restraint system or top strap instal-
lation and the head restraint can be removed, remove the head restraint. ( P.160)
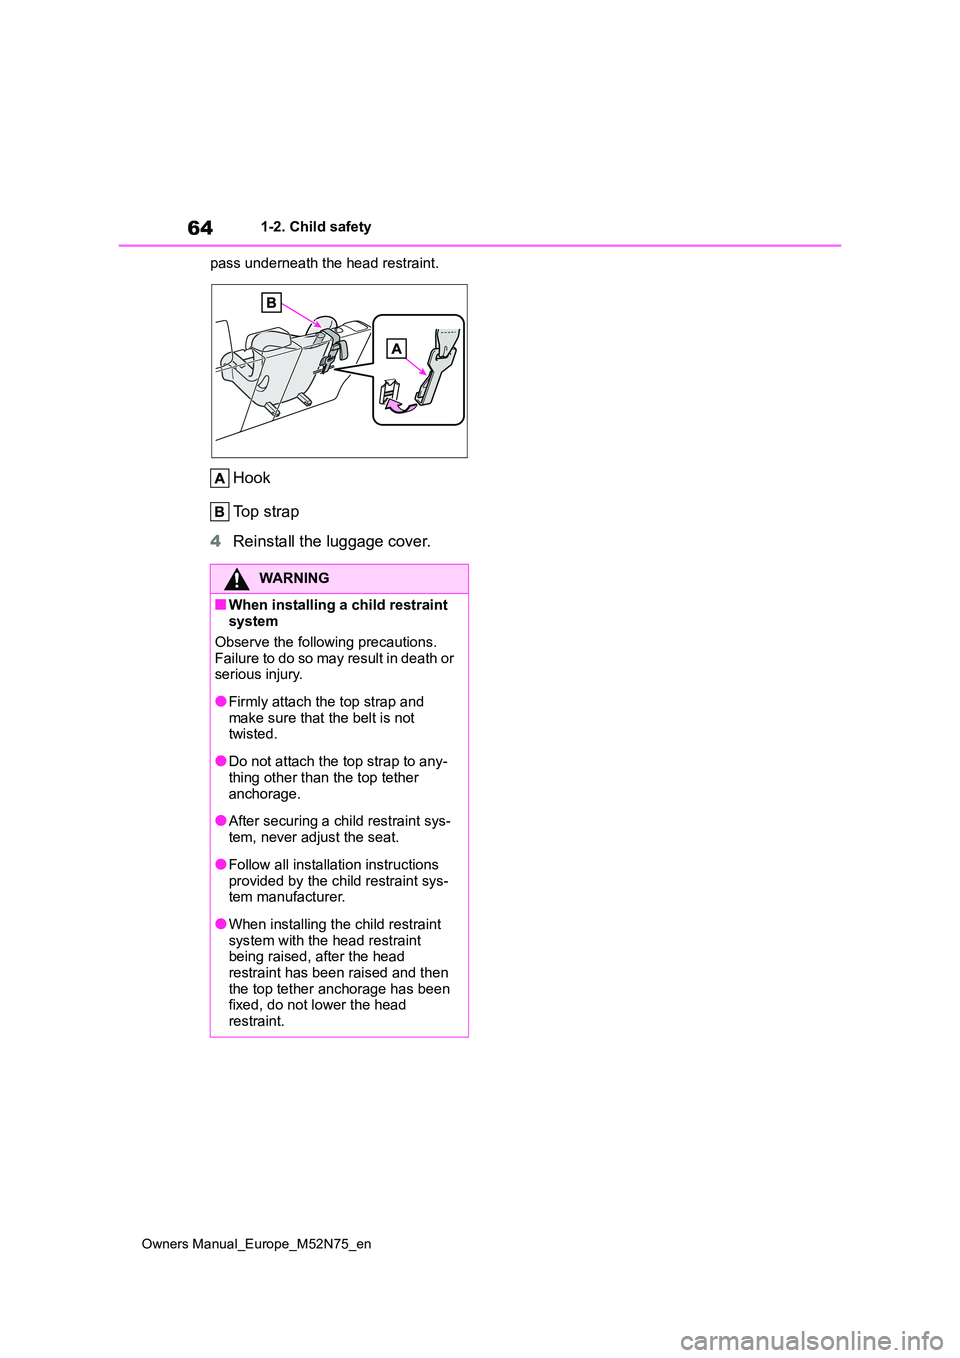
3Latch the hook onto the top
tether anchorage and tighten
the top strap.
Make sure the top strap is securely latched. ( P. 6 2 ) When installing the child restraint sys-
tem with the head restraint being raised, be sure to have the top strap
WARNING
■When installing a child restraint
system
Observe the following precautions. Failure to do so may result in death or
serious injury.
●After securing a child restraint sys-
tem, never adjust the seat.
●When using the lower anchorages,
be sure that there are no foreign objects around the anchorages and that the seat belt is not caught
behind the child restraint system.
●Follow all installation instructions
provided by the child restraint sys- tem manufacturer.
Using a top tether anchor-
age
Page 66 of 698

64
Owners Manual_Europe_M52N75_en
1-2. Child safety
pass underneath the head restraint.
Hook
Top strap
4 Reinstall the luggage cover.
WARNING
■When installing a child restraint system
Observe the following precautions.
Failure to do so may result in death or serious injury.
●Firmly attach the top strap and make sure that the belt is not twisted.
●Do not attach the top strap to any-thing other than the top tether
anchorage.
●After securing a child restraint sys-
tem, never adjust the seat.
●Follow all installation instructions
provided by the child restraint sys- tem manufacturer.
●When installing the child restraint system with the head restraint being raised, after the head
restraint has been raised and then the top tether anchorage has been fixed, do not lower the head
restraint.
Page 93 of 698

91
2
Owners Manual_Europe_M52N75_en
2-1. Instrument cluster
Vehicle status information and indicators
Vehicles with 7-inch display (when digital speedometer is displayed)
Warning lights inform the driver of
malfunctions in the indicated vehi-
cle’s systems.
Warning lights
(Red)
Brake system warning light*1
( P.435)
(Yellow)
Brake system warning light*1
( P.435)
High coolant temperature
warning light*2 ( P.435)
Hybrid system overheat
warning light*2 ( P.436)
Charging system warning
light*2 ( P.436)
Low engine oil pressure
warning light*2 ( P.436)
Malfunction indicator lamp*1,
3 ( P.436)
SRS warning light*1
( P.437)
ABS warning light*1
( P.437)
Inappropriate pedal opera-
tion warning light*2 ( P. 4 3 7 )
(Red)
Electric power steering sys-
tem warning light*1, 3
( P.438)
(Yellow)
Electric power steering sys-
tem warning light*1, 3
( P.438)
Low fuel level warning light
( P.438)
Driver’s and front passen-
ger’s seat belt reminder light
( P.438)
Rear passengers’ seat
belt reminder lights*2
( P.438)
Tire pressure warning light*1,
3 ( P.439)
(Orange)
LTA i n d i c a t o r*2 (if equipped)
( P.439)
(Flashes)
Toyota parking assist-sensor
OFF indicator*1, 3 (if
equipped) ( P.440)
Page 159 of 698

157
3
Owners Manual_Europe_M52N75_en
3-3. Adjusting the seats
Before driving
3-3.Adjusting the sea ts
Seat position adjustment lever
Seatback angle adjustment
lever
Vertical height adjustment lever
(if equipped)
Lumber support switch (if
equipped)
Front seats
Adjustment procedure
WARNING
■When adjusting the seat position
●Take care when adjusting the seat position to ensure that other pas-sengers are not injured by the mov-
ing seat.
●Do not put your hands under the
seat or near the moving parts to avoid injury.Fingers or hands may become
jammed in the seat mechanism.
●Make sure to leave enough space
around the feet so they do not get stuck.
■Seat adjustment
●Be careful that the seat does not hit passengers or luggage.
●To reduce the risk of sliding under the lap belt during a collision, do not
recline the seat more than neces- sary.If the seat is too reclined, the lap
belt may slide past the hips and apply restraint forces directly to the abdomen, or your neck may contact
the shoulder belt, increasing the risk of death or serious injury in the event of an accident.
Adjustments should not be made while driving as the seat may unex-pectedly move and cause the driver
to lose control of the vehicle.
●After adjusting the seat, make sure
that the seat is locked in position.
NOTICE
■When adjusting a front seat
When adjusting a front seat, make
sure that the head restraint does not contact the headliner. Otherwise, the head restraint and headliner may be
damaged.
Page 160 of 698

158
Owners Manual_Europe_M52N75_en
3-3. Adjusting the seats
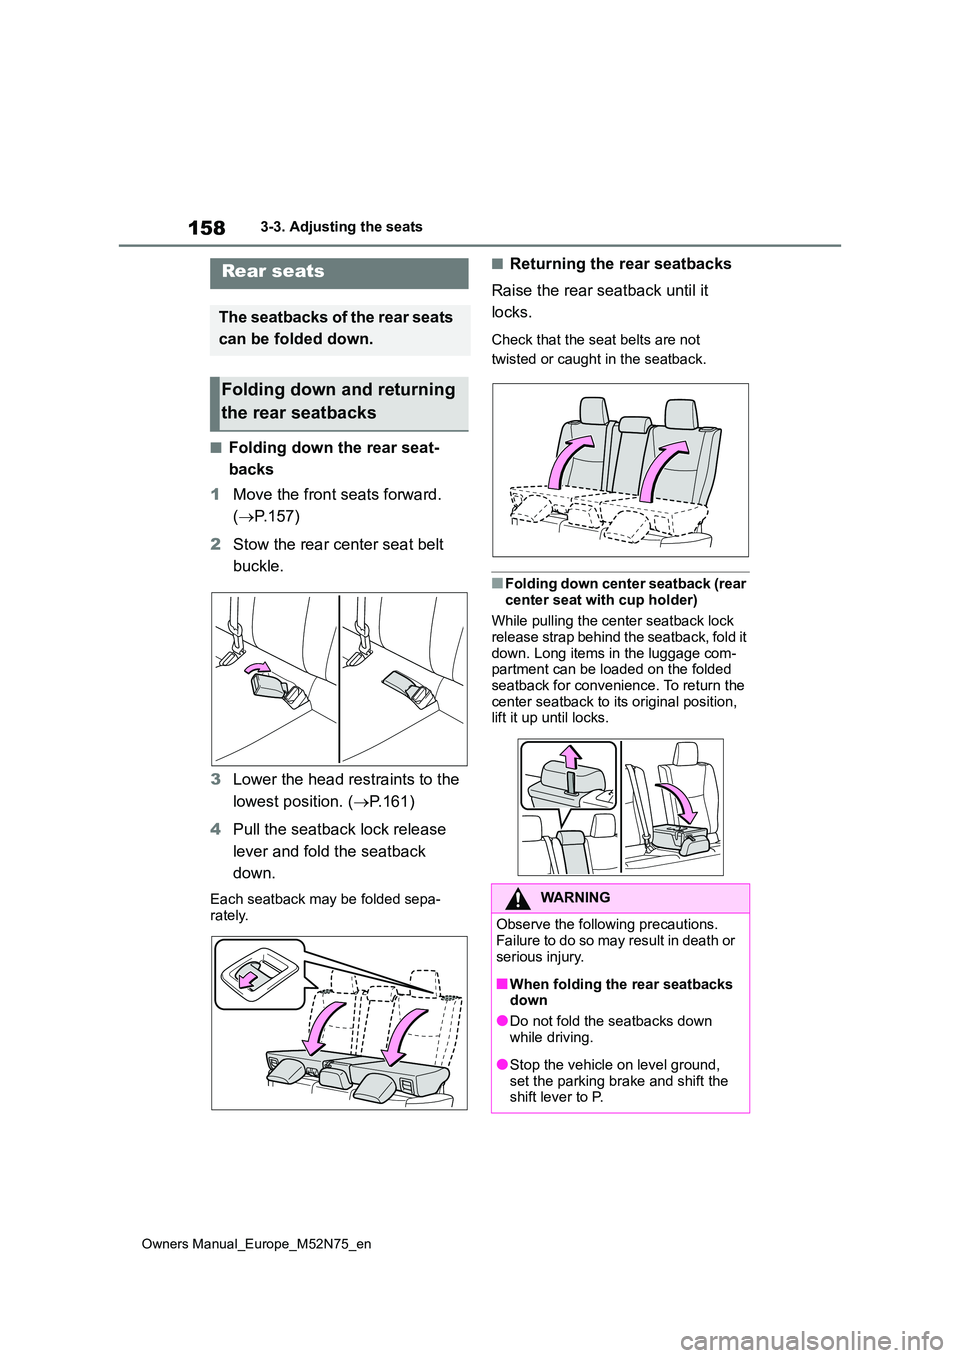
■Folding down the rear seat-
backs
1 Move the front seats forward.
( P.157)
2 Stow the rear center seat belt
buckle.
3 Lower the head restraints to the
lowest position. ( P.161)
4 Pull the seatback lock release
lever and fold the seatback
down.
Each seatback may be folded sepa-
rately.
■Returning the rear seatbacks
Raise the rear seatback until it
locks.
Check that the seat belts are not
twisted or caught in the seatback.
■Folding down center seatback (rear
center seat with cup holder)
While pulling the center seatback lock release strap behind the seatback, fold it
down. Long items in the luggage com- partment can be loaded on the folded seatback for convenience. To return the
center seatback to its original position, lift it up until locks.
Rear seats
The seatbacks of the rear seats
can be folded down.
Folding down and returning
the rear seatbacks
WARNING
Observe the following precautions.
Failure to do so may result in death or serious injury.
■When folding the rear seatbacks down
●Do not fold the seatbacks down
while driving.
●Stop the vehicle on level ground,
set the parking brake and shift the shift lever to P.
Page 161 of 698

159
3
Owners Manual_Europe_M52N75_en
3-3. Adjusting the seats
Before driving
WARNING
●Do not allow anyone to sit on a folded seatback or in the luggage
compartment while driving.
●Do not allow children to enter the
luggage compartment.
●Do not allow anyone to sit on the
rear center seat if the rear right seat is folded down, as the seat belt buckle for the rear center seat belt
is then concealed under the folded seat and cannot be used.
●Be careful not to get your hand caught when folding the rear seat-backs.
●Adjust the position of the front seats before folding down the rear seat-
backs so that the front seats do not interfere with the rear seatbacks when folding down the rear seat-
backs.
■After returning the rear seatback
to the upright position
●Make sure that the seatback is securely locked in position by lightly
pushing it back and forth.
If the seatback is not securely locked,
the red marking will be visible on the
seatback lock release lever. Make
sure that the red mark is not visible.
●Check that the seat belts are not twisted or caught in the seatback.
If the seat belt gets caught between
the seatback’s securing hook and
latch, it may damage the seat belt.
Page 184 of 698

182
Owners Manual_Europe_M52N75_en
4-1. Before driving
WARNING
●Secure all items in the occupant compartment.
●Never allow anyone to ride in the luggage compartment. It is not
designed for passengers. They should ride in their seats with their seat belts properly fastened.
■Load and distribution
●Do not overload your vehicle.
●Do not apply loads unevenly.Improper loading may cause deteri-
oration of steering or braking con- trol which may cause death or serious injury.
■When loading cargo on the roof luggage carrier (if equipped)
Observe the following precautions:
●Place the cargo so that its weight is distributed evenly between the front
and rear axles.
●If loading long or wide cargo, never
exceed the vehicle overall length or width. ( P.484)
●Before driving, make sure the cargo is securely fastened on the roof lug-gage carrier.
●Loading cargo on the roof luggage carrier will make the center of grav-
ity of the vehicle higher. Avoid high speeds, sudden starts, sharp turns, sudden braking or abrupt maneu-
vers, otherwise it may result in loss of control or vehicle rollover due to failure to operate this vehicle cor-
rectly and result in death or serious injury.
●If driving for a long distance, on rough roads, or at high speeds, stop the vehicle now and then
during the trip to make sure the cargo remains in its place.
●Do not exceed 60 kg (132.3 lb.) cargo weight on the roof luggage carrier.