2023 TOYOTA TUNDRA HYBRID lights
[x] Cancel search: lightsPage 159 of 618

1593-4. Adjusting the steering wheel and mirrors
Owners Manual_USA_M0C052_en
3
Before driving■Automatic light off system
The lights will automat ically turn off
when any of the following conditions
are satisfied:
●When the shift lever is in N or D
●When the outer mirror is folded
( P.156)
Page 169 of 618

169
Owners Manual_USA_M0C052_en
4
4
Driving
Driving
4-1. Before drivingDriving the vehicle....... 171
Cargo and luggage ..... 178
Vehicle load limits ....... 180
Trailer towing............... 181
Dinghy towing ............. 194
4-2. Driving procedures Power (ignition) switch 195
Automatic transmission 200
Turn signal lever.......... 204
Parking brake .............. 205
Brake Hold .................. 208
4-3. Operating the lights and wipers
Headlight switch .......... 211
Fog light switch ........... 214
AHB (Automatic High Beam)........................ 214
Light bar ...................... 218
Windshield wipers and washer....................... 218
4-4. Refueling Opening the fuel tank cap.................................. 2224-5. Using the dr
iving support
systems
Toyota Safety Sense 2.5 .................................. 225
PCS (Pre-Collision System) .................................. 230
LTA (Lane Tracing Assist) .................................. 242
RSA (Road Sign Assist) .................................. 253
Dynamic radar cruise con- trol with full-speed range
.................................. 256
BSM (Blind Spot Monitor) .................................. 267
Intuitive parking assist . 274
RCTA (Rear Cross Traffic Alert) .......................... 281
PKSB (Parking Support Brake) ........................ 287
Parking Support Brake func- tion (static objects) .... 292
Parking Support Brake func- tion (rear-crossing vehi-
cles) ........................... 295
Toyota parking assist moni- tor .............................. 297
Panoramic view monitor .................................. 310
Multi-terrain Monitor .... 344
Electronically modulated air suspension ................ 355
Page 182 of 618

1824-1. Before driving
Owners Manual_USA_M0C052_en
■Trailer brake controller
P. 3 8 0
■Before towing
Check that the following conditions
are met:
●Ensure that your vehicle’s tires
are properly inflated. ( P.547)
●Trailer tires are inflated according
to the trailer manufacturer’s rec-
ommendation.
●All trailer lights work as required
by law.
●All lights work each time you con-
nect them.
●The trailer ball is set at the proper
height for the coupler on the
trailer.
●The trailer is level when it is
hitched. Do not dri ve if the trailer
is not level, and check for
improper tongue weight, overload-
ing, worn suspension, or other
possible causes.
●The trailer cargo is securely
loaded.
●The rear view mirrors conform to
all applicable federal, state/provin-
cial or local regu lations. If they do
not, install rear view mirrors
appropriate for towing purposes.
Contact your Toyota dealer for
further information about addi-
tional requirements such as a
towing kit, etc.WARNING
■Trailer towing precautions
To tow a traile r safely, use
extreme care and drive the vehi-
cle in accordance with the trailer’s
characteristics and operating con-
ditions. Failure to do so could
cause an accident resulting in
death or serious injury. Vehicle
stability and brak ing performance
are affected by trailer stability,
brake setting and performance,
and the hitch. Your vehicle will
handle differently when towing a
trailer.
■To avoid accident or injury
●Do not exceed the TWR,
unbraked TWR, GCWR, GVWR
or GAWR.
●If the gross trailer weight is over
2000 lb. (900 kg), a sway con-
trol device with sufficient capac-
ity is required.
●If the gross trailer weight is over
5000 lb. (2200 kg), a weight dis-
tributing hitch with sufficient
capacity is required.
●Adjust the tongue weight within
the appropriate range. Place
heavier loads as close to the
trailer axle as possible.
●Do not exceed 65 mph (104
km/h), the posted towing speed
limit or the spee d limit for your
trailer as set forth in your trailer
owner’s manual, whichever is
lowest. Slow down sufficiently
before making a turn, in cross
winds, on wet or slippery sur-
face, etc., to hel p avoid an acci-
dent. If you experience a
vehicle-trailer instability from
reducing a certain speed, slow
down and make sure you keep
your vehicle speed under the
speed of which you experience
the instability.
Page 189 of 618

1894-1. Before driving
Owners Manual_USA_M0C052_en
4
Driving
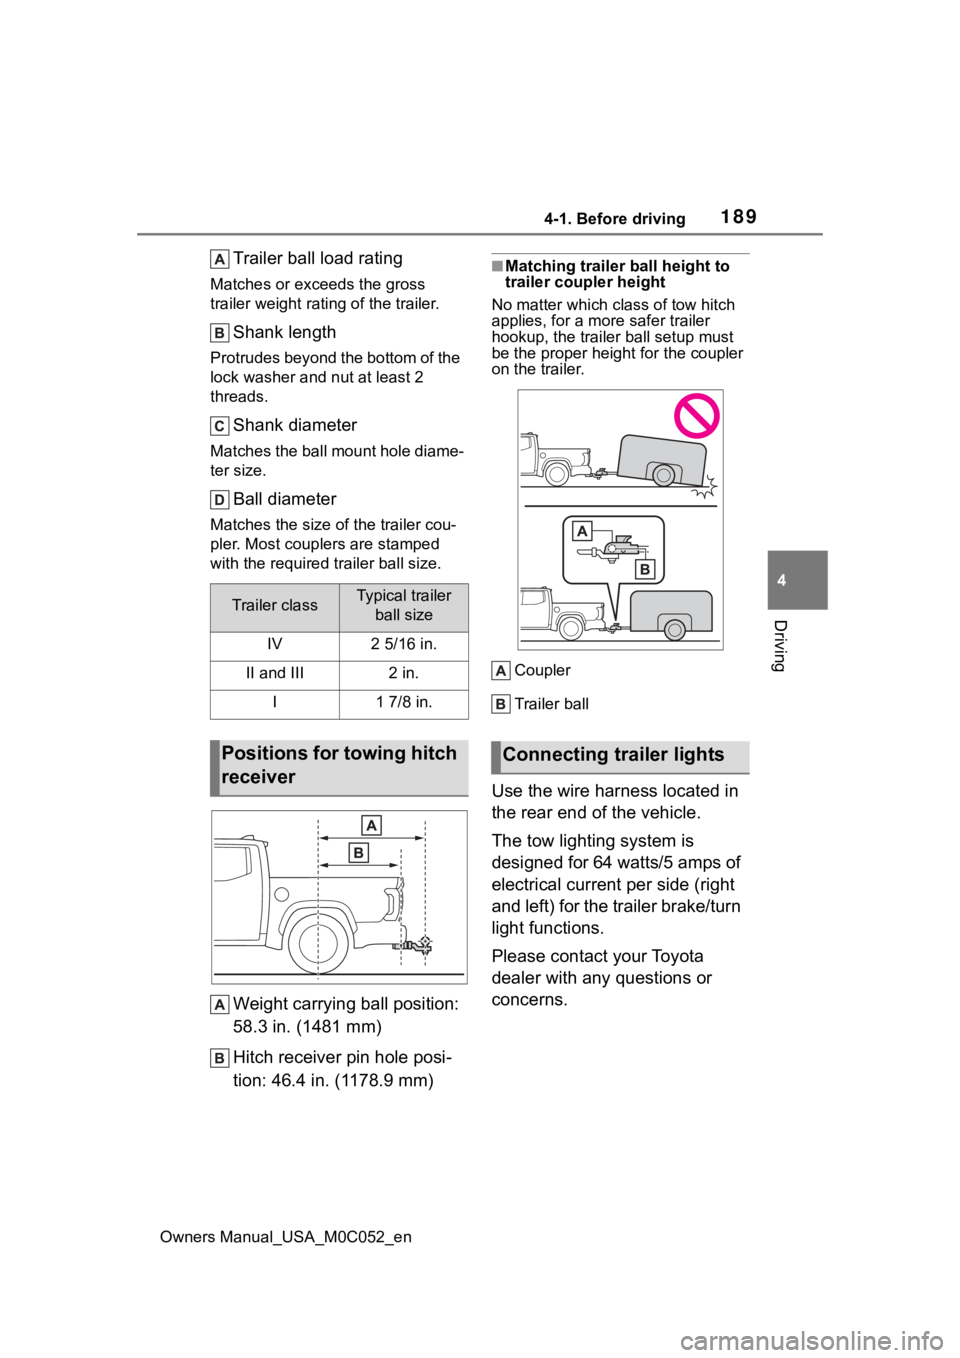
Trailer ball load rating
Matches or exceeds the gross
trailer weight rat ing of the trailer.
Shank length
Protrudes beyond the bottom of the
lock washer and nut at least 2
threads.
Shank diameter
Matches the ball mount hole diame-
ter size.
Ball diameter
Matches the size of the trailer cou-
pler. Most couplers are stamped
with the required tr ailer ball size.
Weight carrying ball position:
58.3 in. (1481 mm)
Hitch receiver pin hole posi-
tion: 46.4 in. (1178.9 mm)
■Matching trailer ball height to
trailer coupler height
No matter wh ich class of tow hitch
applies, for a mor e safer trailer
hookup, the trailer ball setup must
be the proper height for the coupler
on the trailer.
Coupler
Trailer ball
Use the wire harness located in
the rear end of the vehicle.
The tow lighting system is
designed for 64 watts/5 amps of
electrical current per side (right
and left) for the trailer brake/turn
light functions.
Please contact your Toyota
dealer with any questions or
concerns.
Trailer classTypical trailer ball size
IV2 5/16 in.
II and III2 in.
I1 7/8 in.
Positions for towing hitch
receiverConnecting trailer lights
Page 190 of 618

1904-1. Before driving
Owners Manual_USA_M0C052_en
■Auto current cut-off function
In case of over current, the auto cut-
off function stops the power flowing
to the trailer lights to prevent dam-
age to the vehicle’s electrical sys-
tem.
This function is activated when the
rated current of any of the following
trailer light circuit components is
exceeded:
●Stop/turn signal light (right): maxi-
mum 5 A
●Stop/turn signal light (left): maxi-
mum 5 A
■When the auto current cut func-
tion is activated
If a trailer light d oes not come on
due to the activation of the auto cur-
rent cut function , the light system
will need to be reset.
Follow the reset procedure shown
below.
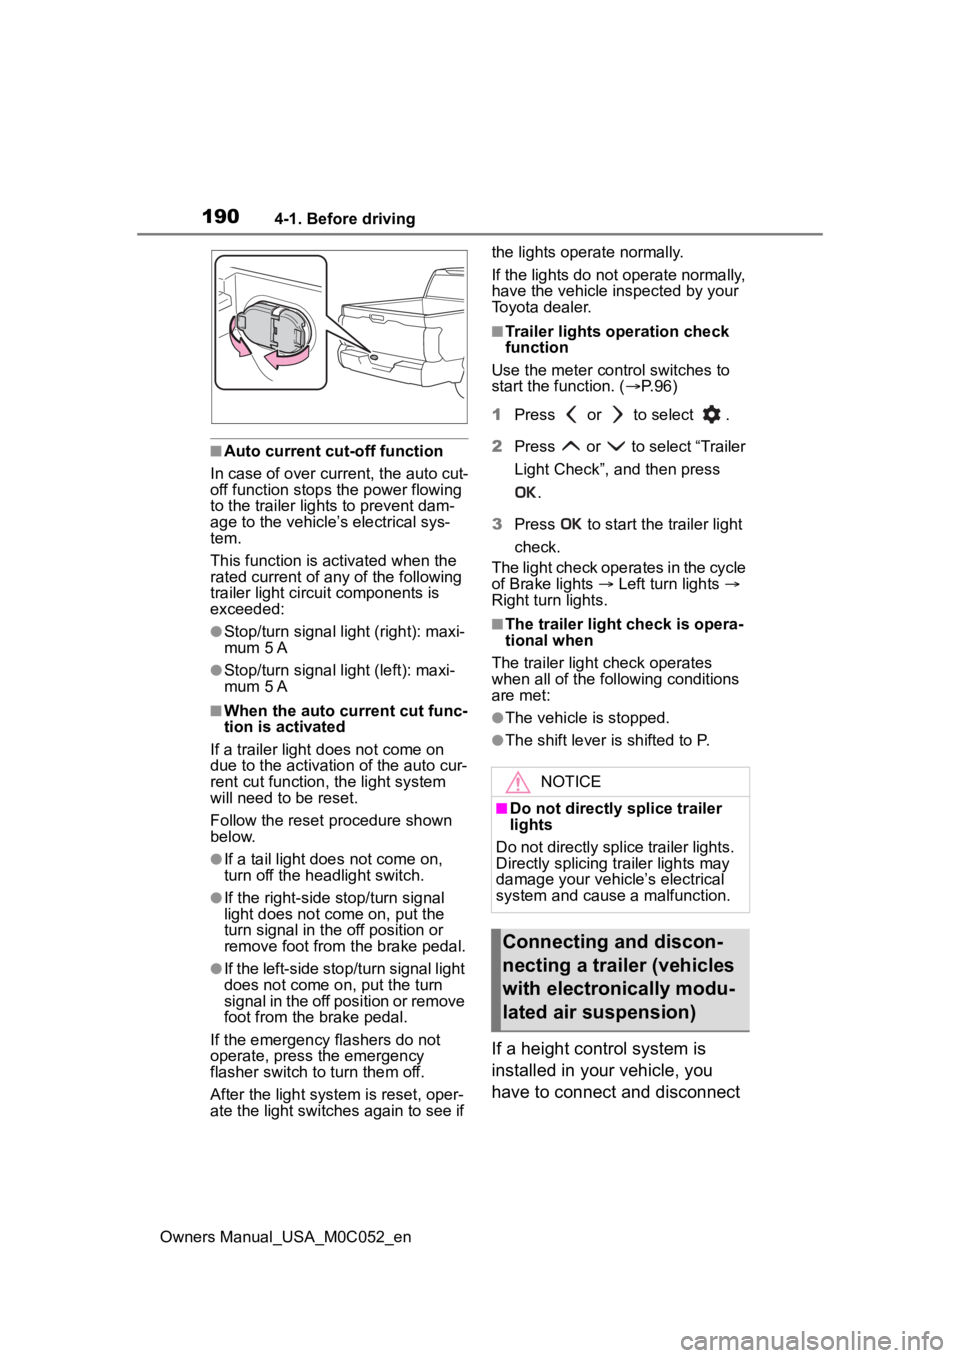
●If a tail light doe s not come on,
turn off the headlight switch.
●If the right-side stop/turn signal
light does not com e on, put the
turn signal in the off position or
remove foot from t he brake pedal.
●If the left-side stop/turn signal light
does not come on, put the turn
signal in the off position or remove
foot from the brake pedal.
If the emergency flashers do not
operate, press the emergency
flasher switch to turn them off.
After the light syst em is reset, oper-
ate the light switches again to see if the lights operate normally.
If the lights do not operate normally,
have the vehicle inspected by your
Toyota dealer.
■Trailer lights operation check
function
Use the meter control switches to
start the function. ( P. 9 6 )
1 Press or to select .
2 Press or to select “Trailer
Light Check”, and then press
.
3 Press to start the trailer light
check.
The light check operates in the cycle
of Brake lights Left turn lights
Right turn lights.
■The trailer light check is opera-
tional when
The trailer light check operates
when all of the fo llowing conditions
are met:
●The vehicle is stopped.
●The shift lever is shifted to P.
If a height control system is
installed in your vehicle, you
have to connect and disconnect
NOTICE
■Do not directly splice trailer
lights
Do not directly splice trailer lights.
Directly splicing trailer lights may
damage your vehicle’s electrical
system and cause a malfunction.
Connecting and discon-
necting a trailer (vehicles
with electronically modu-
lated air suspension)
Page 192 of 618

1924-1. Before driving
Owners Manual_USA_M0C052_en
sway) increases as speed
increases. Exceeding speed
limits may cause loss of con-
trol.
Before starting out, check the
trailer lights, tires and the
vehicle-trailer connections.
Recheck after driving a short
distance.
Practice turning, stopping and
reversing with the trailer
attached in an area away
from traffic until you become
accustomed to the feel of the
vehicle-trailer combination.
Reversing with a trailer
attached is difficult and
requires practice. Grip the
bottom of the steering wheel
and move your hand to the
left to move the trailer to the
left. Move your hand to the
right to move the trailer to the
right. (This is generally oppo-
site to reversing without a
trailer attached.) Avoid sharp
or prolonged turning. Have
someone guide you when
reversing to reduce the risk of
an accident.
As stopping distance is
increased when towing a
trailer, vehicle-to-vehicle dis-
tance should be increased.
For each 10 mph (16 km/h) of
speed, allow at least one
vehicle and trailer length.
Avoid sudden braking as you
may skid, resulting in the trailer jackknifing and a loss of
vehicle control. This is espe-
cially true on wet or slippery
surfaces.
Avoid jerky starts or sudden
acceleration.
Avoid jerky steering and
sharp turns, and slow down
before making a turn.
Note that when making a turn,
the trailer wheels will be
closer than the vehicle wheels
to the inside of the turn. Com-
pensate by making a wider
than normal turning radius.
Slow down before making a
turn, in crosswinds, on wet or
slippery surfaces, etc.
Increasing vehicle speed can
destabilize the trailer.
Take care when passing other
vehicles. Passing requires
considerable distance. After
passing a vehicle, do not for-
get the length of your trailer,
and be sure you have plenty
of room before changing
lanes.
Instability happens more fre-
quently when descending
steep or long downhill grades.
Before descending, slow
down and downshift. Do not
make sudden downshifts
while descending steep or
long downhill grades.
Avoid holding the brake pedal
down too long or applying the
Page 204 of 618

2044-2. Driving procedures
Owners Manual_USA_M0C052_enselected
■Differences with “TOW HAUL”
mode and “TOW+” mode
It is recommend ed to use each
mode according to the weight of the
trailer to be towed.
●“TOW HAUL” mode is used when
towing trailers that weigh less than
5000 lb. (2268 kg).
●“TOW+” mode is used when tow-
ing trailers that weigh more than
5000 lb. (2268 kg).
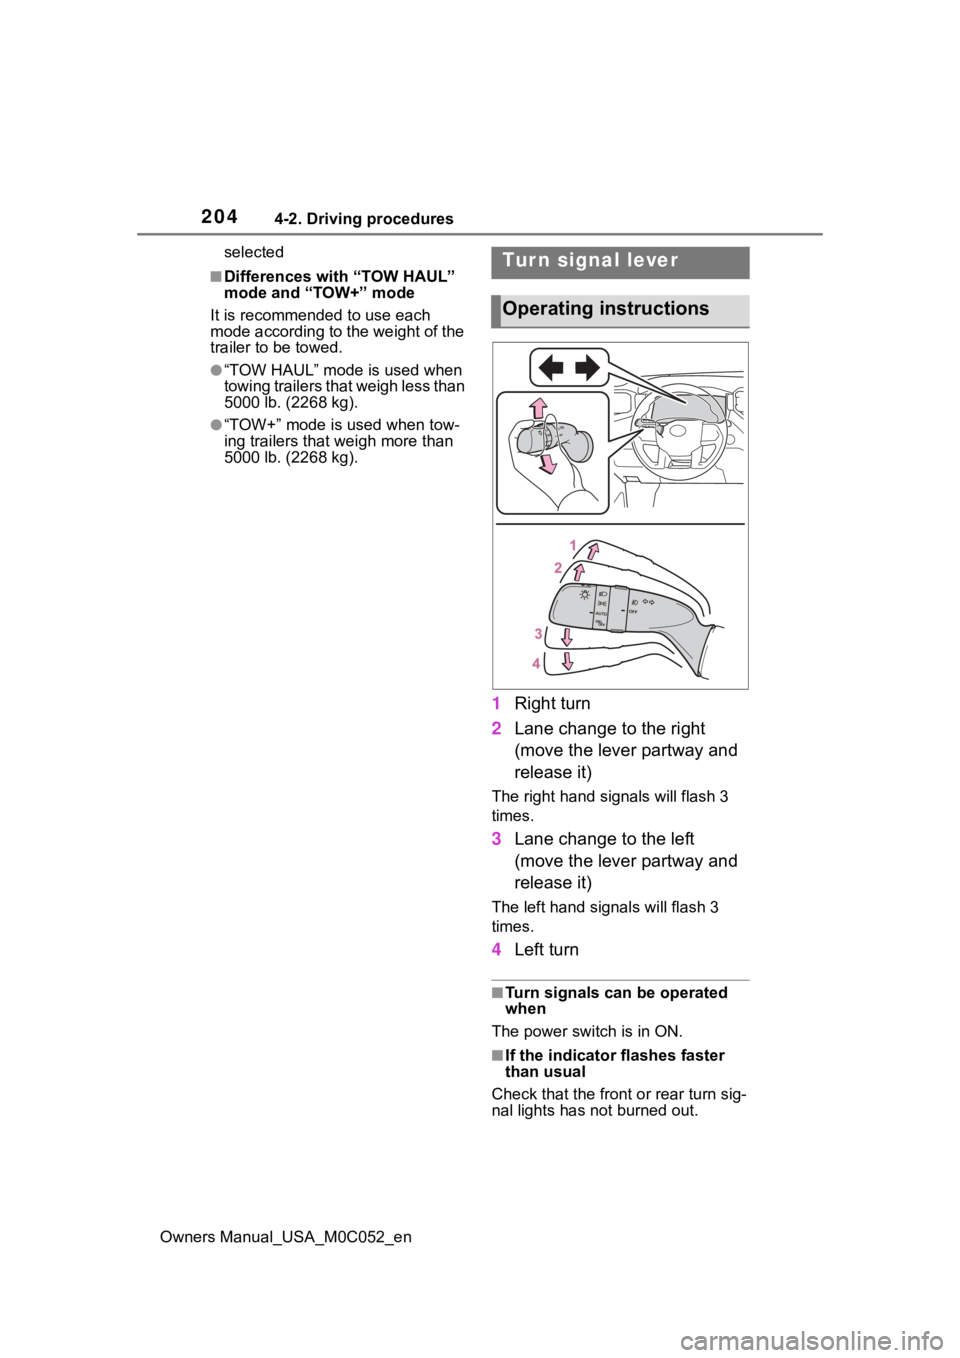
1 Right turn
2 Lane change to the right
(move the lever partway and
release it)
The right hand s ignals will flash 3
times.
3 Lane change to the left
(move the lever partway and
release it)
The left hand signals will flash 3
times.
4Left turn
■Turn signals can be operated
when
The power switch is in ON.
■If the indicator flashes faster
than usual
Check that the front or rear turn sig-
nal lights has not burned out.
Tur n signal lever
Operating instructions
Page 211 of 618

2114-3. Operating the lights and wipers
Owners Manual_USA_M0C052_en
4
Driving
4-3.Operating the lights and wipers
Operating the switch turns
on the lights as follows: U.S.A.
Canada
1 The side marker, park-
ing, tail, license plate, instru-
ment panel lights, and
daytime running lights
( P.211) turn on.
2 The headlights and all
lights listed above (except
daytime running lights) turn
on.
3 The headlights, day- time running lights (
P.211)
and all the lights listed above
turn on and off automatically.
4 (if equipped) Off
■AUTO mode can be used when
The power switch is in ON.
■Daytime running light system
●On some models: The daytime
running lights illu minate using the
same lights as the headlights but
at a lower intensity.
●To make your vehicle more visible
to other drivers during daytime
driving, the daytime running lights
turn on automatically when all of
the following conditions are met.
(The daytime running lights are
not designed for use at night.)
• The hybrid system is started
• The parking brake is released
• The headlight switch is in the
or
* position
*: When the surroundings are bright
●The daytime running lights remain
on after they illuminate, even if the
parking brake is set again.
●For the U.S.A.: Daytime running
lights can be turned off by operat-
ing the switch.
■Headlight control sensor
The sensor may not function prop-
erly if an object is placed on the sen-
sor, or anything that blocks the
sensor is affixed to the windshield.
Doing so interferes with the sensor
detecting the level of ambient light
Headlight switch
The headlights can be oper-
ated manually or automati-
cally.
Operating instructions