2023 TOYOTA TUNDRA HYBRID lights
[x] Cancel search: lightsPage 94 of 618
942-1. Instrument cluster
Owners Manual_USA_M0C052_en
■Pop-up display
In some situations the following
will be temporarily displayed:
Distance until next engine oil
change
Displays the distan ce until the next
engine oil change. This display will
be displayed in the following situa-
tions:
When the power switch is
turned to ON.
When a warning message
indicating that oil mainte-
nance should be performed
soon or is required is dis-
played.
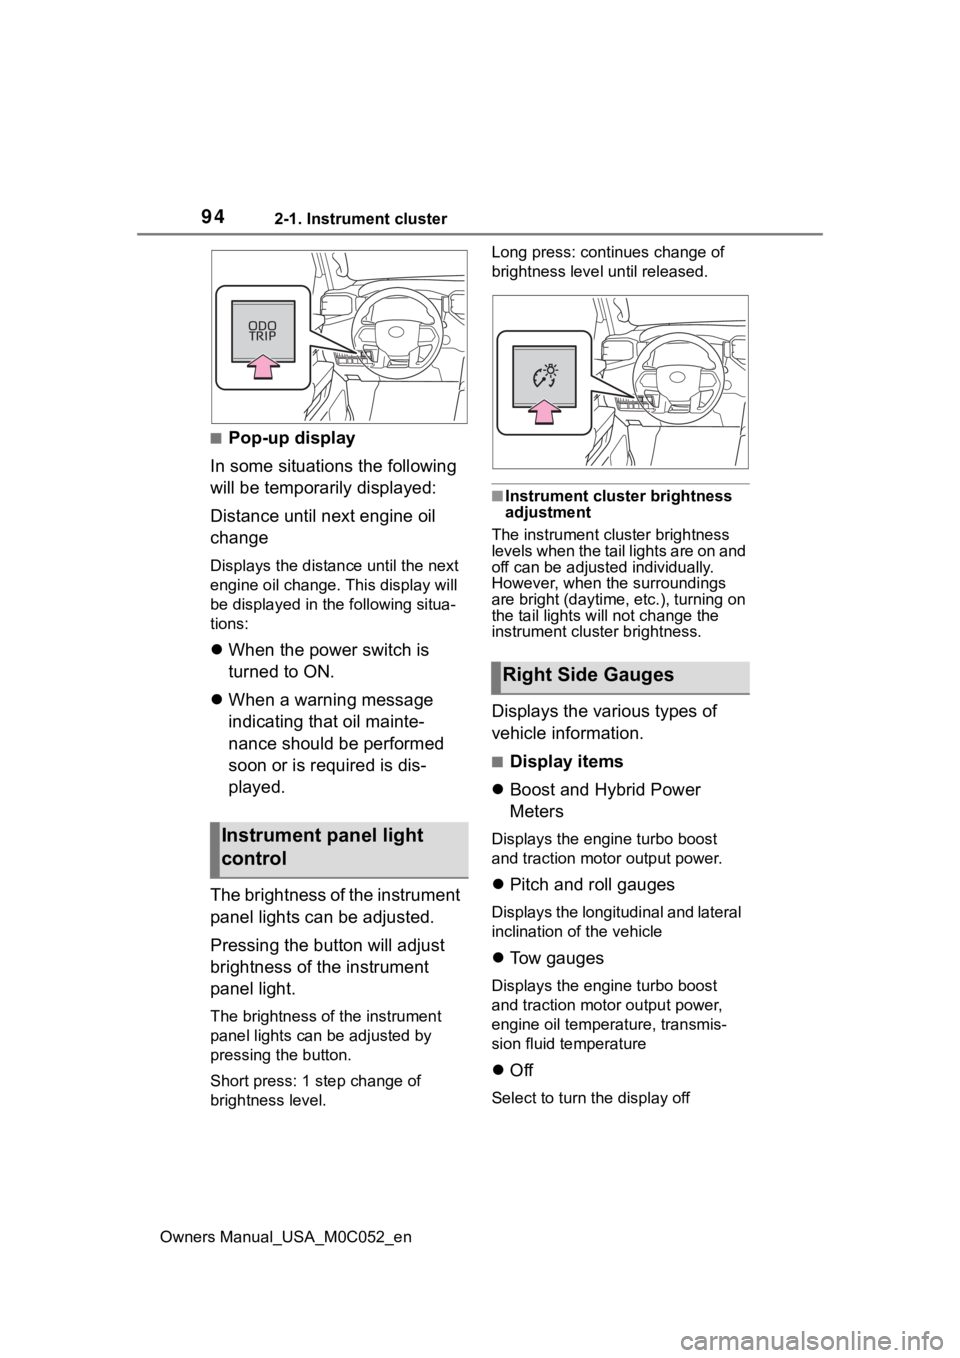
The brightness of the instrument
panel lights can be adjusted.
Pressing the button will adjust
brightness of the instrument
panel light.
The brightness of the instrument
panel lights can be adjusted by
pressing the button.
Short press: 1 s tep change of
brightness level. Long press: continues change of
brightness level until released.
■Instrument cluster brightness
adjustment
The instrument cluster brightness
levels when the tail lights are on and
off can be adjusted individually.
However, when the surroundings
are bright (daytime, etc.), turning on
the tail lights will not change the
instrument cluster brightness.
Displays the various types of
vehicle information.
■Display items
Boost and Hybrid Power
Meters
Displays the engine turbo boost
and traction motor output power.
Pitch and roll gauges
Displays the longitudinal and lateral
inclination of the vehicle
Tow gauges
Displays the engine turbo boost
and traction motor output power,
engine oil temperature, transmis-
sion fluid temperature
Off
Select to turn the display off
Instrument panel light
control
Right Side Gauges
Page 112 of 618
1123-1. Key information
Owners Manual_USA_M0C052_en
■Theft deterrent panic mode
When is pressed for longer
than about one second, an alarm
will sound intermittently and the
vehicle lights will f lash to deter any
person from trying to break into or
damage your vehicle.
To stop the alarm, press any button
on the electronic key.
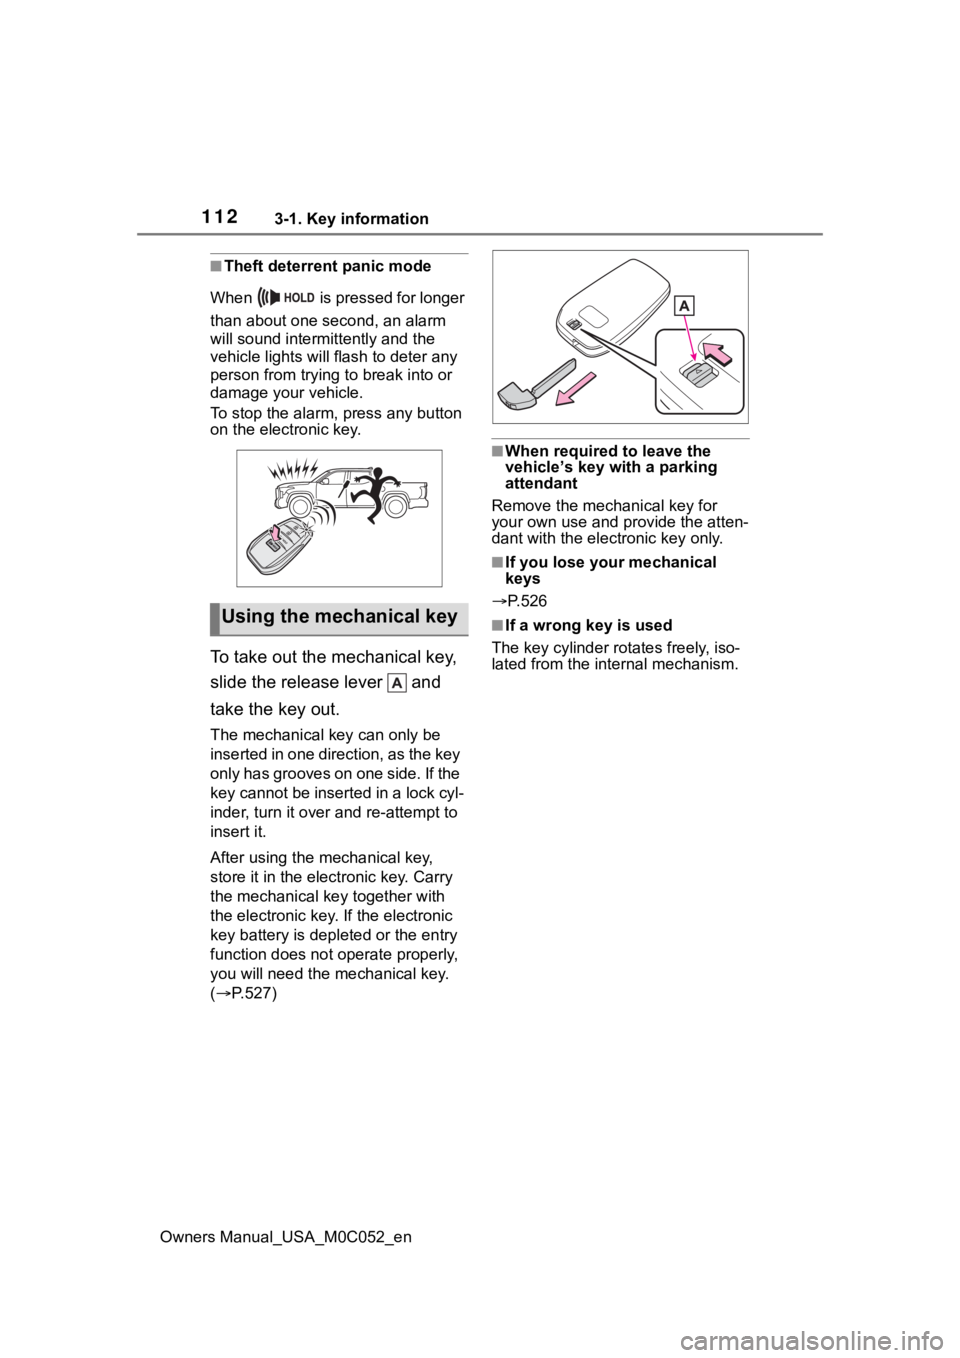
To take out the mechanical key,
slide the release lever and
take the key out.
The mechanical key can only be
inserted in one direction, as the key
only has grooves on one side. If the
key cannot be inserted in a lock cyl-
inder, turn it over and re-attempt to
insert it.
After using the mechanical key,
store it in the electronic key. Carry
the mechanical k ey together with
the electronic key. If the electronic
key battery is dep leted or the entry
function does not operate properly,
you will need the m echanical key.
( P.527)
■When required to leave the
vehicle’s key wi th a parking
attendant
Remove the mechanical key for
your own use and p rovide the atten-
dant with the elec tronic key only.
■If you lose your mechanical
keys
P.526
■If a wrong key is used
The key cylinder rotates freely, iso-
lated from the internal mechanism.Using the mechanical key
Page 145 of 618

1453-4. Adjusting the steering wheel and mirrors
Owners Manual_USA_M0C052_en
3
Before driving
*: If equipped
The height of the rear view mir-
ror can be adjusted to suit your
driving posture.
Adjust the height of the rear
view mirror by moving it up and
down.
Responding to the level of
brightness of the headlights of vehicles behind, the reflected
light is automatically reduced.
Turn the automatic anti-glare
function mode on/off
When the automatic anti-glare func-
tion is in ON mode, the indicator
illuminates.
The function will set to ON mode
each time the power switch is
turned to ON.
Pressing the button turns the func-
tion to OFF mode. (The indicator
also turns off.)
■To prevent sensor error
To ensure that the sensors operate
properly, do not touch or cover
them.
Inside rear view mir-
ror*
The rear view mirror’s posi-
tion can be adjusted to
enable sufficient confirma-
tion of the rear view.
Adjusting the height of
rear view mirror
WARNING
■Caution while driving
Do not adjust the position of the
mirror while driving.
Doing so may lead to mishandling
of the vehicle and cause an acci-
dent, resulting in death or serious
injury.
Anti-glare function
Page 147 of 618
1473-4. Adjusting the steering wheel and mirrors
Owners Manual_USA_M0C052_en
3
Before driving
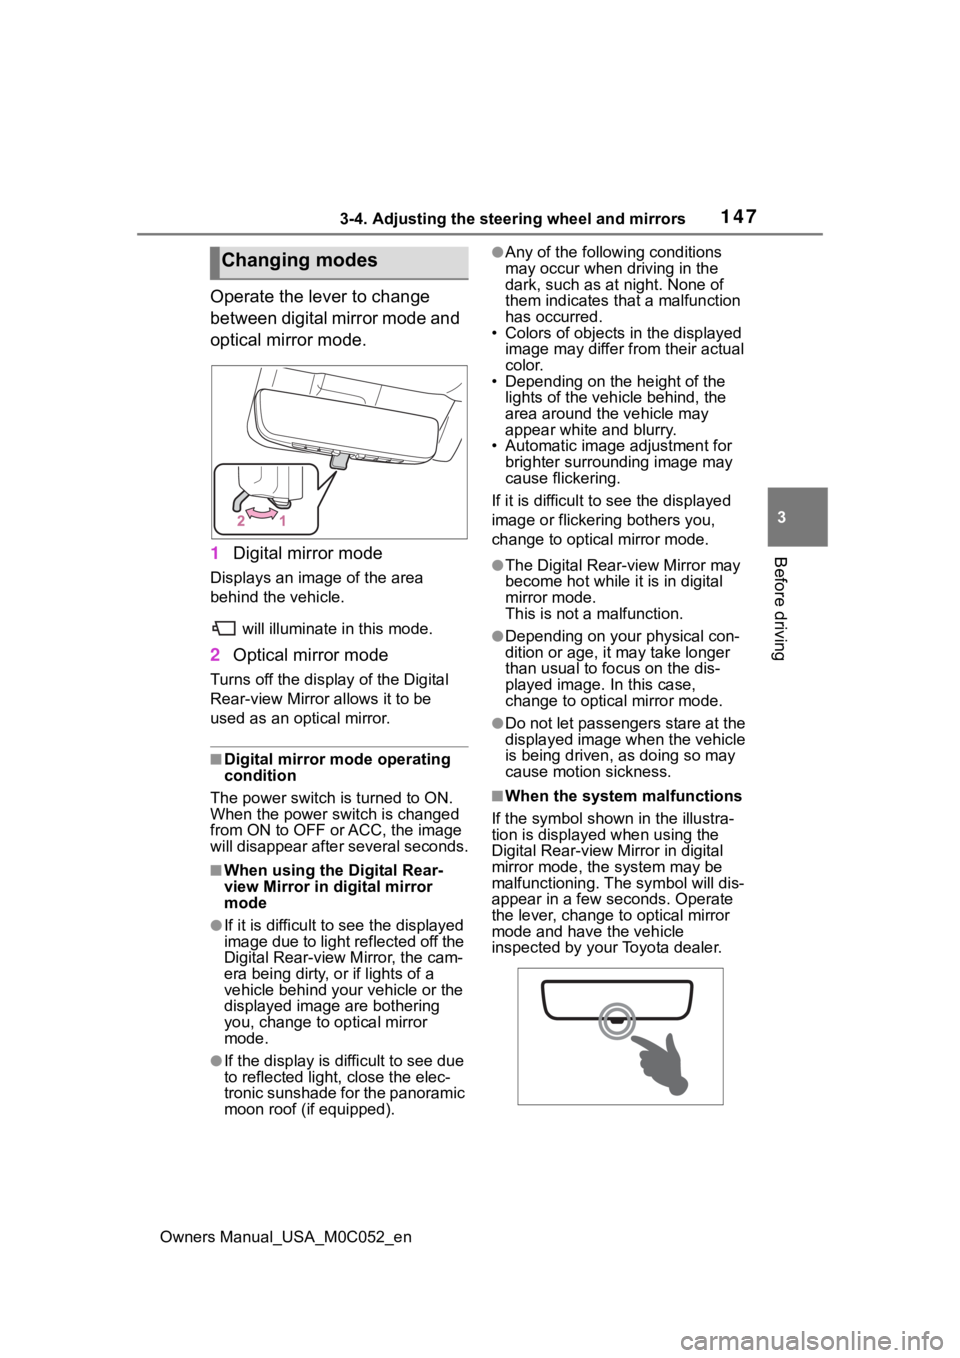
Operate the lever to change
between digital mirror mode and
optical mirror mode.
1 Digital mirror mode
Displays an image of the area
behind the vehicle.
will illuminate in this mode.
2Optical mirror mode
Turns off the display of the Digital
Rear-view Mirror allows it to be
used as an optical mirror.
■Digital mirror mode operating
condition
The power switch is turned to ON.
When the power switch is changed
from ON to OFF or ACC, the image
will disappear afte r several seconds.
■When using the Digital Rear-
view Mirror in digital mirror
mode
●If it is difficult to see the displayed
image due to light reflected off the
Digital Rear-view M irror, the cam-
era being dirty, or if lights of a
vehicle behind your vehicle or the
displayed image are bothering
you, change to optical mirror
mode.
●If the display is difficult to see due
to reflected light, close the elec-
tronic sunshade for the panoramic
moon roof (if equipped).
●Any of the following conditions
may occur when driving in the
dark, such as at night. None of
them indicates that a malfunction
has occurred.
• Colors of objects in the displayed
image may differ from their actual
color.
• Depending on the height of the
lights of the vehicle behind, the
area around the vehicle may
appear white and blurry.
• Automatic image adjustment for brighter surrounding image may
cause flickering.
If it is difficult to see the displayed
image or flickering bothers you,
change to optical mirror mode.
●The Digital Rear-view Mirror may
become hot while it is in digital
mirror mode.
This is not a malfunction.
●Depending on your physical con-
dition or age, it may take longer
than usual to fo cus on the dis-
played image. In this case,
change to optical mirror mode.
●Do not let passengers stare at the
displayed image when the vehicle
is being driven, as doing so may
cause motion sickness.
■When the system malfunctions
If the symbol shown in the illustra-
tion is displayed when using the
Digital Rear-view Mirror in digital
mirror mode, the system may be
malfunctioning. The symbol will dis-
appear in a few seconds. Operate
the lever, change to optical mirror
mode and have the vehicle
inspected by your Toyota dealer.
Changing modes
Page 148 of 618
1483-4. Adjusting the steering wheel and mirrors
Owners Manual_USA_M0C052_en
■Adjusting the mirror height
The height of the rear view mir-
ror can be adjusted to suit your
driving posture.
Change to optical mirror mode,
adjusting the height of the rear
view mirror by moving it up and
down.
■Display settings (digital mir-
ror mode)
Settings of the display in the dig-
ital mirror mode can be
changed.
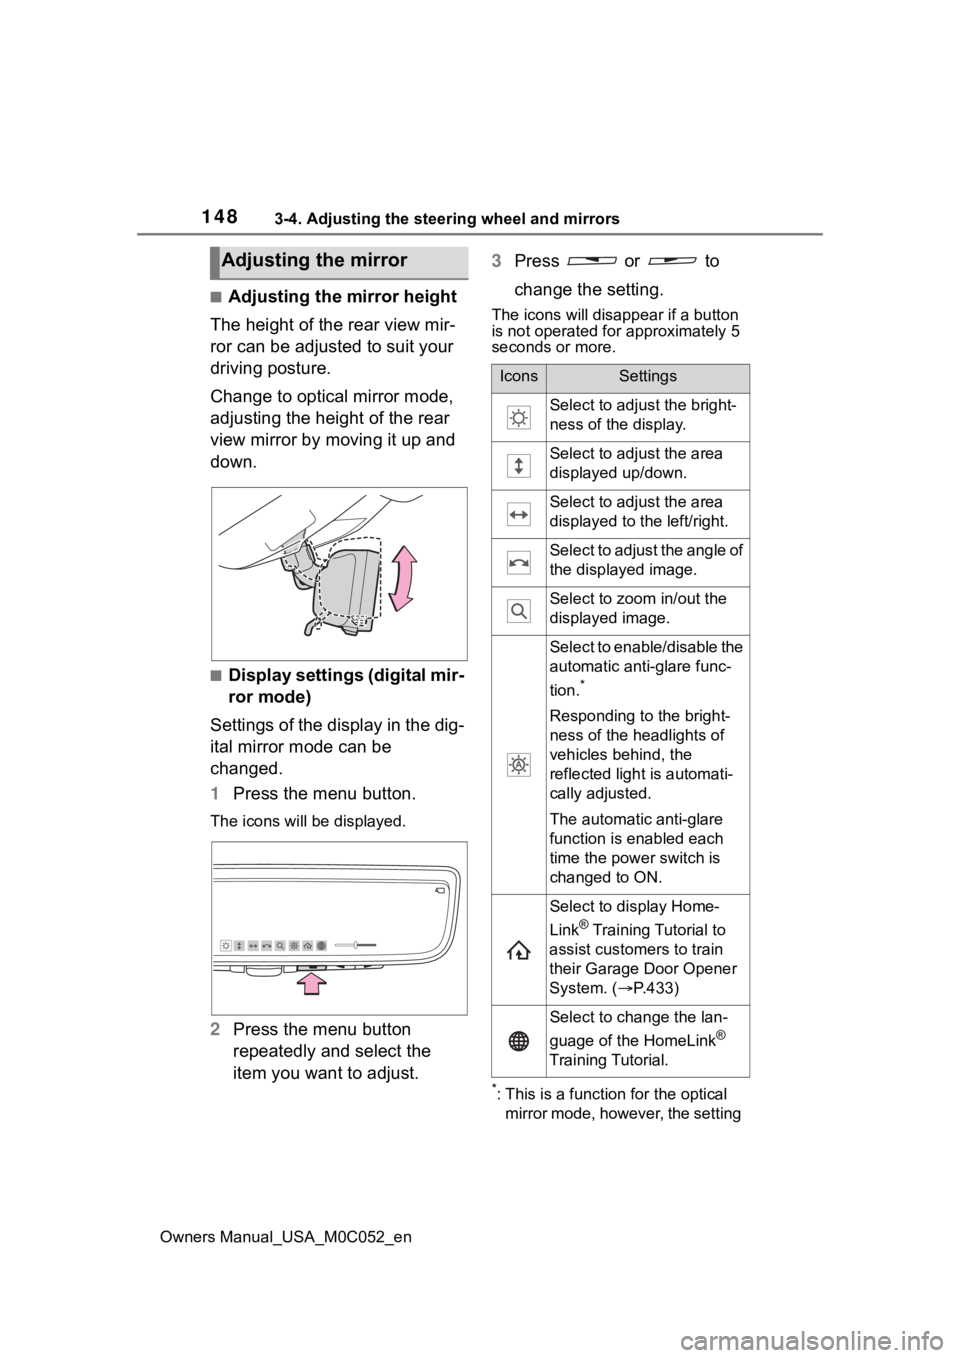
1 Press the menu button.
The icons will be displayed.
2Press the menu button
repeatedly and select the
item you want to adjust. 3
Press or to
change the setting.
The icons will disappear if a button
is not operated fo r approximately 5
seconds or more.
*: This is a functi on for the optical
mirror mode, however, the setting
Adjusting the mirror
IconsSettings
Select to adjust the bright-
ness of the display.
Select to adjust the area
displayed up/down.
Select to adjust the area
displayed to the left/right.
Select to adjust the angle of
the displayed image.
Select to zoom in/out the
displayed image.
Select to enable/disable the
automatic anti-glare func-
tion.
*
Responding to the bright-
ness of the headlights of
vehicles behind, the
reflected light is automati-
cally adjusted.
The automatic anti-glare
function is enabled each
time the power switch is
changed to ON.
Select to display Home-
Link
® Training Tutorial to
assist customers to train
their Garage Door Opener
System. ( P.433)
Select to change the lan-
guage of the HomeLink
®
Training Tutorial.
Page 152 of 618
1523-4. Adjusting the steering wheel and mirrors
Owners Manual_USA_M0C052_en
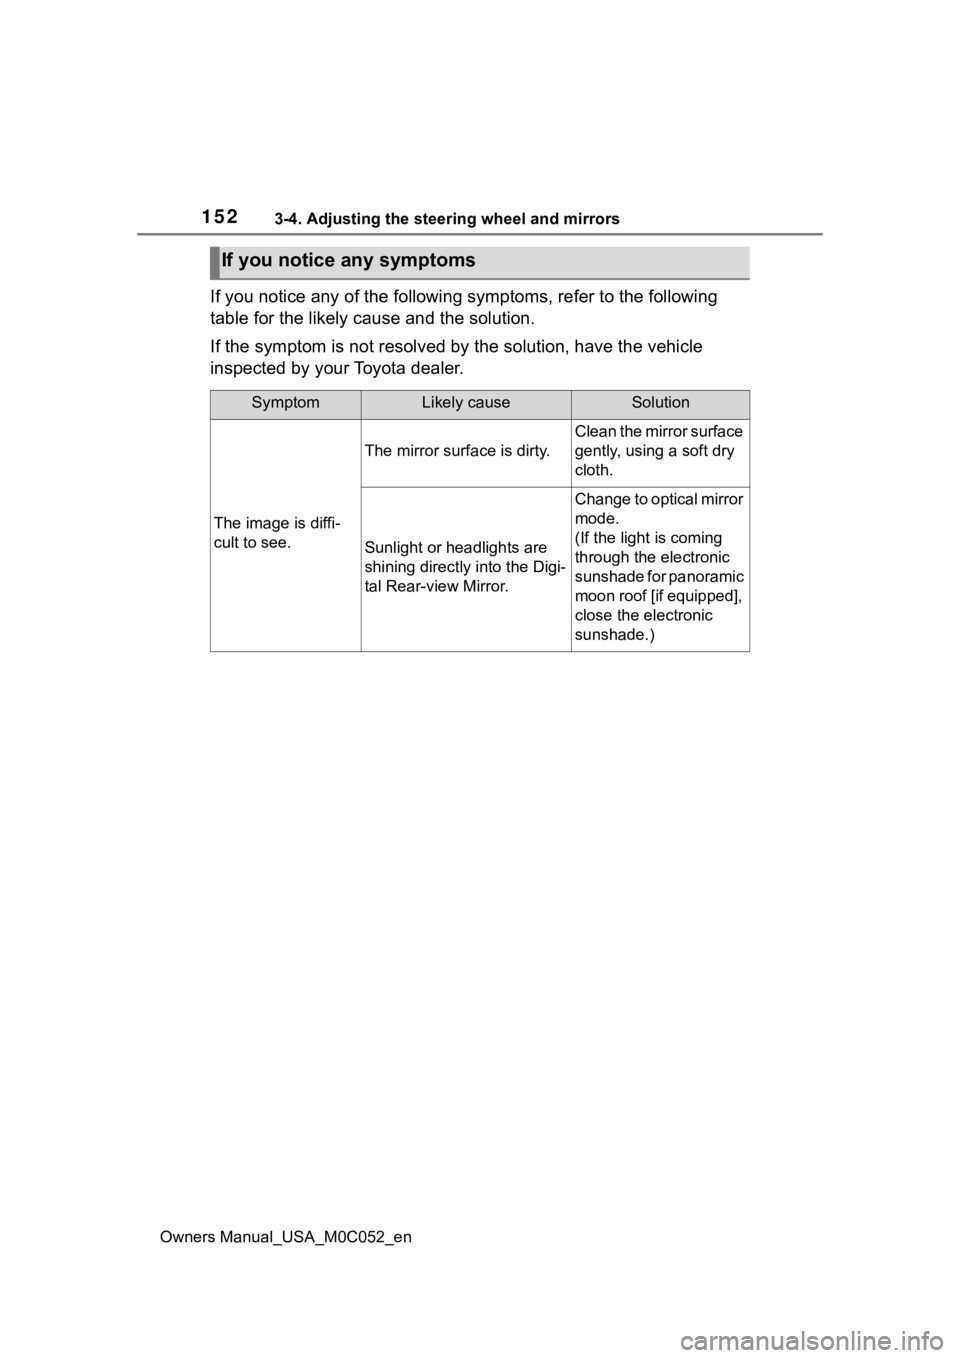
If you notice any of the following symptoms, refer to the following
table for the likely cause and the solution.
If the symptom is not resolved by the solution, have the vehicl e
inspected by your Toyota dealer.
If you notice any symptoms
SymptomLikely causeSolution
The image is diffi-
cult to see.
The mirror surface is dirty.
Clean the mirror surface
gently, using a soft dry
cloth.
Sunlight or headlights are
shining directly into the Digi-
tal Rear-view Mirror.
Change to optical mirror
mode.
(If the light is coming
through the electronic
sunshade for panoramic
moon roof [if equipped],
close the electronic
sunshade.)
Page 153 of 618
1533-4. Adjusting the steering wheel and mirrors
Owners Manual_USA_M0C052_en
3
Before driving
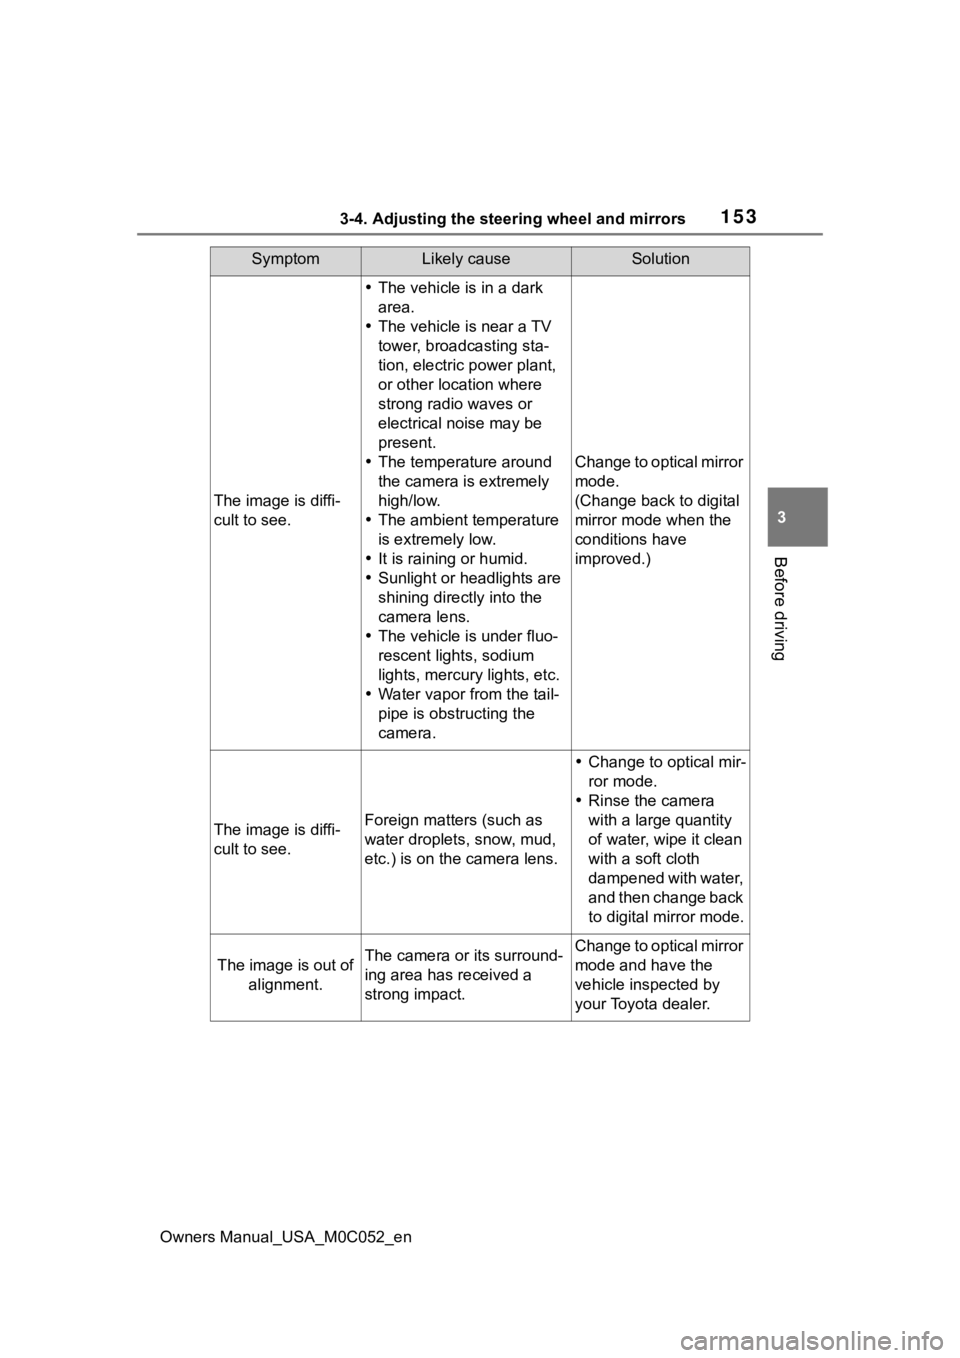
The image is diffi-
cult to see.
The vehicle is in a dark
area.
The vehicle is near a TV
tower, broadcasting sta-
tion, electric power plant,
or other location where
strong radio waves or
electrical noise may be
present.
The temperature around
the camera is extremely
high/low.
The ambient temperature
is extremely low.
It is raining or humid.
Sunlight or headlights are
shining directly into the
camera lens.
The vehicle is under fluo-
rescent lights, sodium
lights, mercury lights, etc.
Water vapor from the tail-
pipe is obstructing the
camera.
Change to optical mirror
mode.
(Change back to digital
mirror mode when the
conditions have
improved.)
The image is diffi-
cult to see.Foreign matters (such as
water droplets, snow, mud,
etc.) is on the camera lens.
Change to optical mir-
ror mode.
Rinse the camera
with a large quantity
of water, wipe it clean
with a soft cloth
dampened with water,
and then change back
to digital mirror mode.
The image is out of
alignment.The camera or its surround-
ing area has received a
strong impact.Change to optical mirror
mode and have the
vehicle inspected by
your Toyota dealer.
SymptomLikely causeSolution
Page 158 of 618
1583-4. Adjusting the steering wheel and mirrors
Owners Manual_USA_M0C052_en
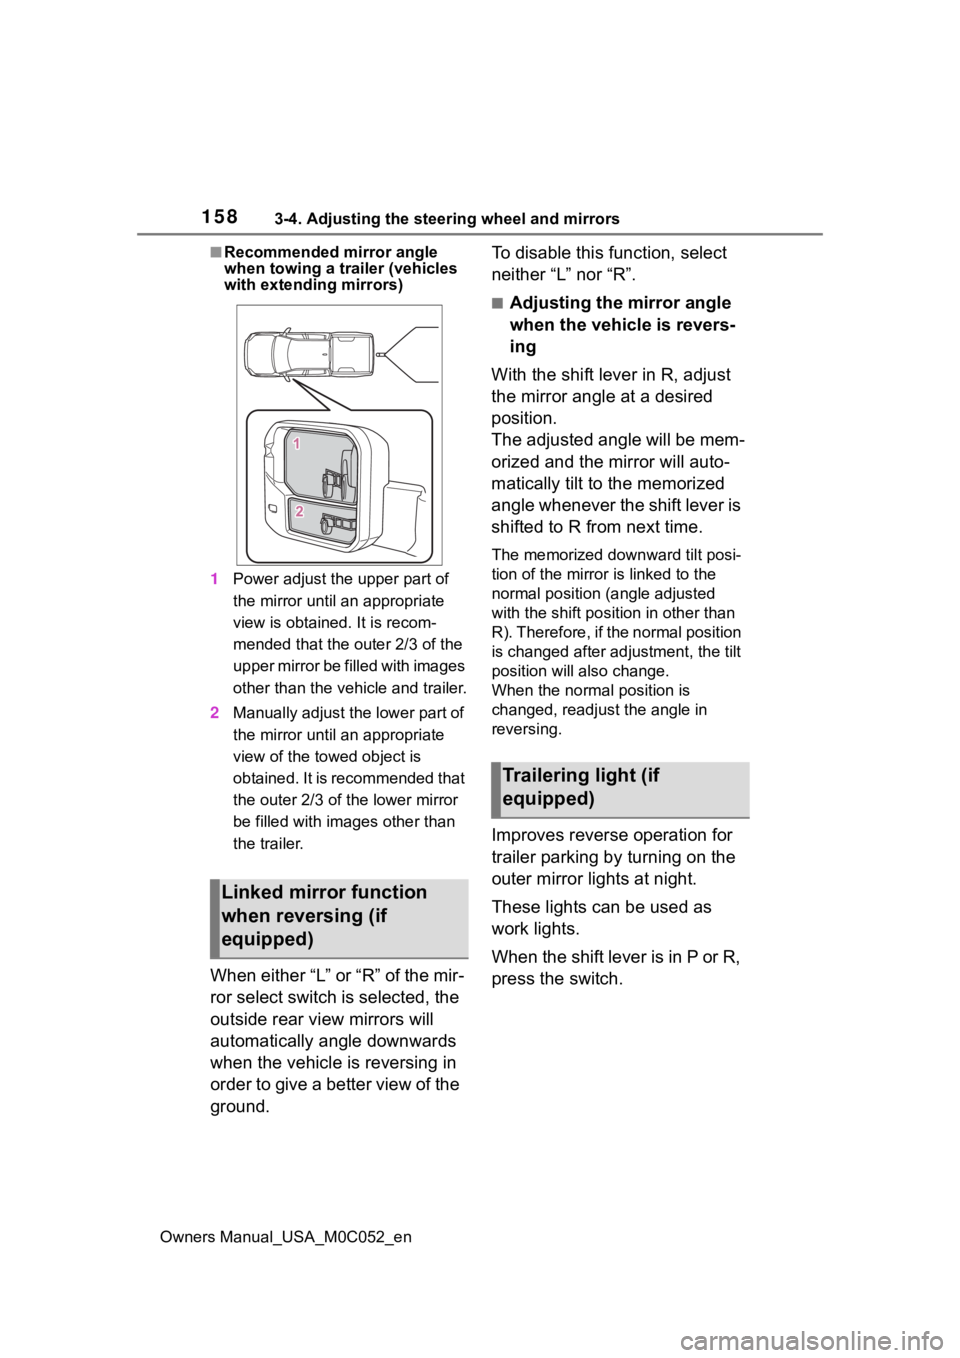
■Recommended mirror angle
when towing a trailer (vehicles
with extending mirrors)
1 Power adjust the upper part of
the mirror until an appropriate
view is obtained. It is recom-
mended that the outer 2/3 of the
upper mirror be f illed with images
other than the vehicle and trailer.
2 Manually adjust the lower part of
the mirror until an appropriate
view of the towed object is
obtained. It is recommended that
the outer 2/3 of the lower mirror
be filled with images other than
the trailer.
When either “L” or “R” of the mir-
ror select switch is selected, the
outside rear view mirrors will
automatically angle downwards
when the vehicle is reversing in
order to give a better view of the
ground. To disable this function, select
neither “L” nor “R”.
■Adjusting the mirror angle
when the vehicle is revers-
ing
With the shift lever in R, adjust
the mirror angle at a desired
position.
The adjusted angle will be mem-
orized and the mirror will auto-
matically tilt to the memorized
angle whenever the shift lever is
shifted to R from next time.
The memorized downward tilt posi-
tion of the mirror is linked to the
normal position (angle adjusted
with the shift posit ion in other than
R). Therefore, if the normal position
is changed after adjustment, the tilt
position will also change.
When the normal position is
changed, readjust the angle in
reversing.
Improves reverse operation for
trailer parking by turning on the
outer mirror lights at night.
These lights can be used as
work lights.
When the shift lever is in P or R,
press the switch.
Linked mirror function
when reversing (if
equipped)
Trailering light (if
equipped)