2023 TOYOTA TUNDRA HYBRID tires
[x] Cancel search: tiresPage 287 of 618
2874-5. Using the driving support systems
Owners Manual_USA_M0C052_en
4
Driving
●When a sensor or the area around
a sensor is extremely hot or cold
●If the suspension has been modi-
fied or tires of a size other than
specified are installed
●If the front of the vehicle is raised
or lowered due to the carried load
■Parking Support Brake
function (static objects)
P.292
■Parking Support Brake
function (rear-crossing
vehicles)
P.295
PKSB (Parking Sup-
port Brake)
The Parking Support Brake
system consists of the fol-
lowing functions that oper-
ate when driving at a low
speed or backing up, such
as when parking. When the
system determines that the
probability of a collision
with a detected object or
pedestrian is high, a warn-
ing operates to urge the
driver to take evasive
action. If the system deter-
mines that the possibility of
a collision with a detected
object or pedestrian is
extremely high, the brakes
are automatically applied to
help avoid the collision or
help reduce the impact of
the collision.
PKSB (Parking Support
Brake) system
Page 288 of 618
2884-5. Using the driving support systems
Owners Manual_USA_M0C052_en
WARNING
■Cautions regarding the use of
the system
Do not overly rely on the system,
as doing so may lead to an acci-
dent.
Always drive while checking the
safety of the surroundings of the
vehicle.
Depending on the vehicle and
road conditions, weather, etc., the
system may not operate.
The detection capa bilities of sen-
sors and radars are limited.
Always drive while checking the
safety of the surroundings of the
vehicle.
●The driver is solely responsible
for safe driving. Always drive
carefully, taking care to observe
your surroundings. The Parking
Support Brake system is
designed to provide support to
lessen the severity of collisions.
However, it may not operate in
some situations.
●The Parking Support Brake sys-
tem is not designed to stop the
vehicle completely. Additionally,
even if the system has stopped
the vehicle, it is necessary to
depress the brake pedal imme-
diately as brake control will be
canceled after approximately 2
seconds.
●It is extremely dangerous to
check the system operations by
intentionally driving the vehicle
into the direction of a wall, etc.
Never attempt such actions.
■When to disable the Parking
Support Brake
In the following situations, disable
the Parking Support Brake as the
system may operate even though
there is no poss ibility of a colli-
sion.
●When inspecting the vehicle
using a chassis roller, chassis
dynamo or free roller
●When loading the vehicle onto a
boat, truck or other transport
vessel
●If the suspension has been
modified or tires of a size other
than specified are installed
●If the front of the vehicle is
raised or lowered due to the
carried load
●When equipment that may
obstruct a sensor is installed,
such as a towing eyelet, bumper
protector (an additional trim
strip, etc.), bicycle carrier, or
snow plow
●When using automatic car
washing devices
●If the vehicle cannot be driven in
a stable manner, such as when
the vehicle has been in an acci-
dent or is malfunctioning
●When the vehicle is driven in a
sporty manner or off-road
●When the tires are not properly
inflated
●When the tires are very worn
●When a tire chains, compact
spare tire or an emergency tire
puncture repair kit is used
Page 294 of 618
2944-5. Using the driving support systems
Owners Manual_USA_M0C052_en
■The Parking Support Brake
function (static object) will
operate when
The function will op erate when the
PKSB OFF indicator is not illumi-
nated or flashing ( P.89, 504) and
all of the followin g conditions are
met:
●Hybrid system output restriction
control
• The Parking Support Brake is enabled.
• The vehicle speed is approxi- mately 9 mph (15 km/h) or less.
• There is a static object in the trav- eling direction of the vehicle and
approximately 6 to 13 ft. (2 to 4 m)
away.
• The Parking Support Brake deter- mines that a stronger-than-nor-
mal brake operation is necessary
to avoid a collision.
●Brake control
• Hybrid system output restriction control is operating.
• The Parking Support Brake deter- mines that an immediate brake
operation is necessary to avoid a
collision.
WARNING
●Do not subject the surrounding
area of the sensor to a strong
impact. If subjected to an
impact, have the vehicle
inspected by your Toyota
dealer. If the fr ont or rear
bumper needs to be
removed/installed or replaced,
contact your Toyota dealer.
●Do not modify, disassemble or
paint the sensors.
●Do not attach a license plate
cover.
●Keep your tires properly
inflated.
■Handling the suspension
Do not modify the suspension, as
changes to the height or inclina-
tion of the vehicle may prevent
the sensors from detecting
objects correctly or cause the sys-
tem to not operate or operate
unnecessarily.
■If the Parking Support Brake
function (static objects) oper-
ates unnecessarily, such as
at a railroad crossing
In the event that the Parking Sup-
port Brake function (static objects)
operates unnecessarily, such as
at a railroad cross ing, brake con-
trol will be cancele d after approxi-
mately 2 seconds, allowing you to
proceed forward and leave the
area, brake control can also be
canceled by depressing the brake
pedal. Depressing the accelera-
tor pedal after brake control is
canceled will allow you to proceed
forward and leave the area.
■Notes when washing the vehi-
cle
Do not apply intensive bursts of
water or steam to the sensor
area.
Doing so may result in the sensor
malfunctioning.
●When using a high pressure
washer to wash the vehicle, do
not spray the sensors directly,
as doing so may cause a sensor
to malfunction.
●When using steam to clean the
vehicle, do not direct steam too
close to the sensors as doing so
may cause a sensor to malfunc-
tion.
Page 298 of 618
2984-5. Using the driving support systems
Owners Manual_USA_M0C052_en
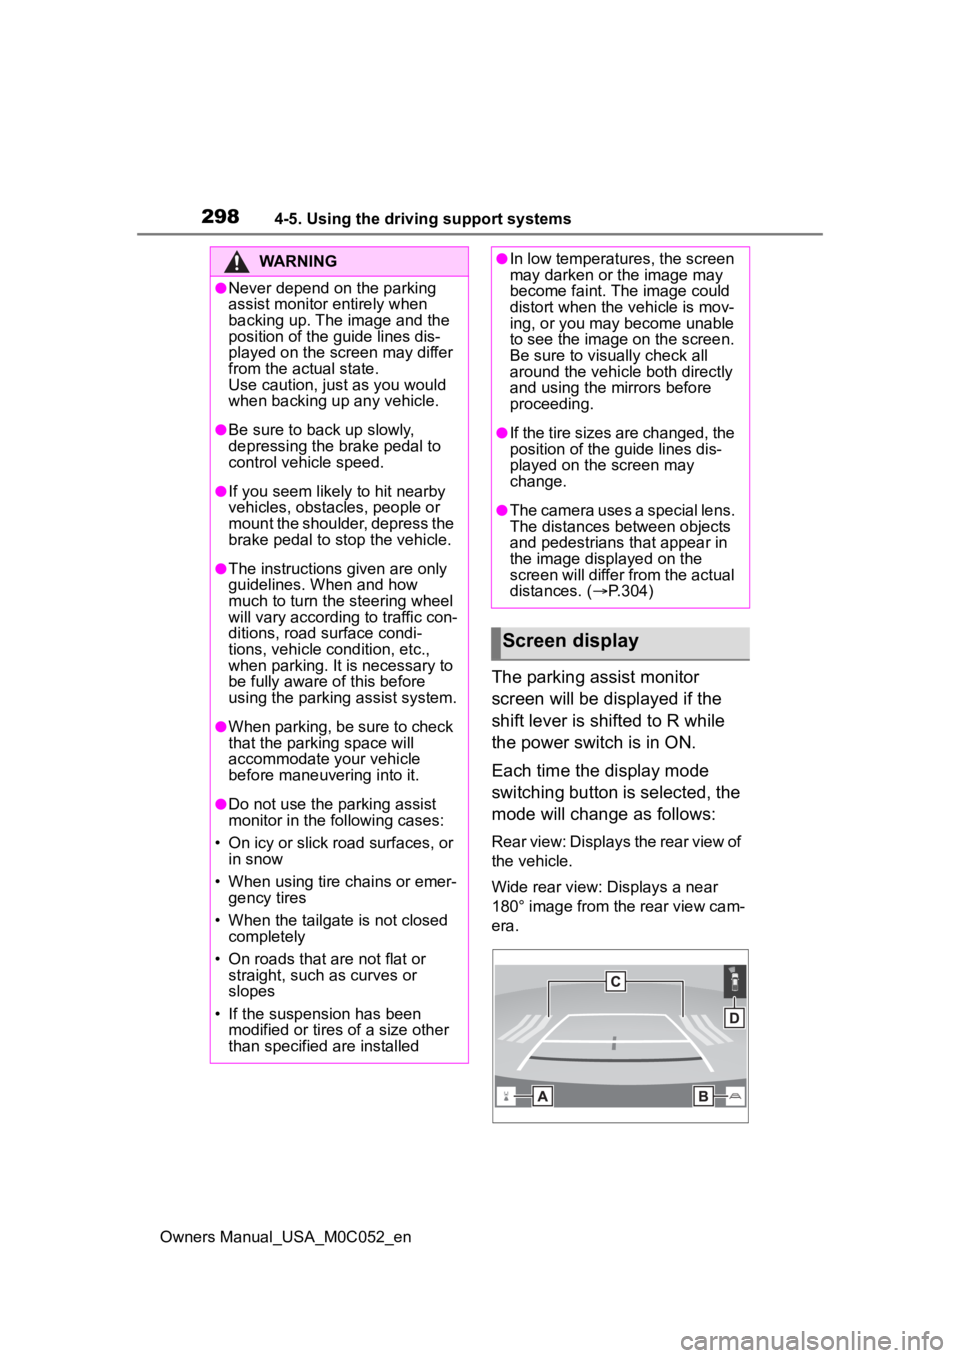
The parking assist monitor
screen will be displayed if the
shift lever is shifted to R while
the power switch is in ON.
Each time the display mode
switching button is selected, the
mode will change as follows:
Rear view: Displays the rear view of
the vehicle.
Wide rear view: Displays a near
180° image from the rear view cam-
era.
WARNING
●Never depend on the parking
assist monitor entirely when
backing up. The image and the
position of the guide lines dis-
played on the screen may differ
from the actual state.
Use caution, just as you would
when backing up any vehicle.
●Be sure to back up slowly,
depressing the brake pedal to
control vehicle speed.
●If you seem likely to hit nearby
vehicles, obstacles, people or
mount the shoulder, depress the
brake pedal to stop the vehicle.
●The instructions given are only
guidelines. When and how
much to turn the steering wheel
will vary according to traffic con-
ditions, road surface condi-
tions, vehicle condition, etc.,
when parking. It is necessary to
be fully aware of this before
using the parking assist system.
●When parking, be sure to check
that the par king space will
accommodate your vehicle
before maneuveri ng into it.
●Do not use the parking assist
monitor in the following cases:
• On icy or slick road surfaces, or in snow
• When using tire chains or emer- gency tires
• When the tailgate is not closed completely
• On roads that are not flat or straight, such as curves or
slopes
• If the suspension has been modified or tires of a size other
than specified are installed
●In low temperatures, the screen
may darken or the image may
become faint. The image could
distort when the vehicle is mov-
ing, or you may become unable
to see the image on the screen.
Be sure to visually check all
around the vehicle both directly
and using the mirrors before
proceeding.
●If the tire sizes are changed, the
position of the guide lines dis-
played on the screen may
change.
●The camera uses a special lens.
The distances between objects
and pedestrians that appear in
the image displayed on the
screen will differ from the actual
distances. ( P.304)
Screen display
Page 310 of 618
3104-5. Using the driving support systems
Owners Manual_USA_M0C052_en
WARNING
●Do not use the panoramic view
monitor system in the following
cases:
• On icy or slick road surfaces, or in snow
• When using tire chains or emer- gency tires
• When the front door or the tail- gate is not closed completely
• On roads that are not flat or straight, such as curves or
slopes
• If the suspension has been modified or tires of a size other
than specified are installed
●In low temperatures, the screen
may darken or the image may
become faint. The image could
distort when the vehicle is mov-
ing, or you may become unable
to see the image on the screen.
Be sure to visually check all
around the vehicle both directly
and using the mirrors before
proceeding.
●If the tire sizes are changed, the
position of the guide lines dis-
played on the screen may
change.
●The camera uses a special lens.
The distances between objects
and pedestrians that appear in
the image displayed on the
screen will differ from the actual
distances. ( P.335)
●When an aftermarket part is
installed in the display area of
the screen.
NOTICE
●In panoramic view/moving
view/see-through view, the sys-
tem combines images taken
from the front, back, left and
right side cameras into a single
image. There are limits to the
range and content that can be
displayed. Familiarize yourself
with the characteristics of the
panoramic view monitor system
before using it.
●Image clarity may decline at the
four corners of t he panoramic
view/moving view/see-through
view. However, this is not a mal-
function, as these are the
regions along the border of
each camera image where the
images are combined.
●Depending on lighting condi-
tions near each of the cameras,
bright and dark patches may
appear on the panoramic
view/moving view/see-through
view.
●The panoramic view/moving
view/see-through view display
does not extend higher than the
installation pos ition and image
capture range o f each camera.
●There are blind spots around
the vehicle. Accordingly, there
are regions not displayed in
panoramic view.
●Three-dimensional objects dis-
played in wide fr ont view, rear
view or side view may not be
displayed in panoramic
view/moving view/see-through
view.
Page 347 of 618
3474-5. Using the driving support systems
Owners Manual_USA_M0C052_en
4
Driving
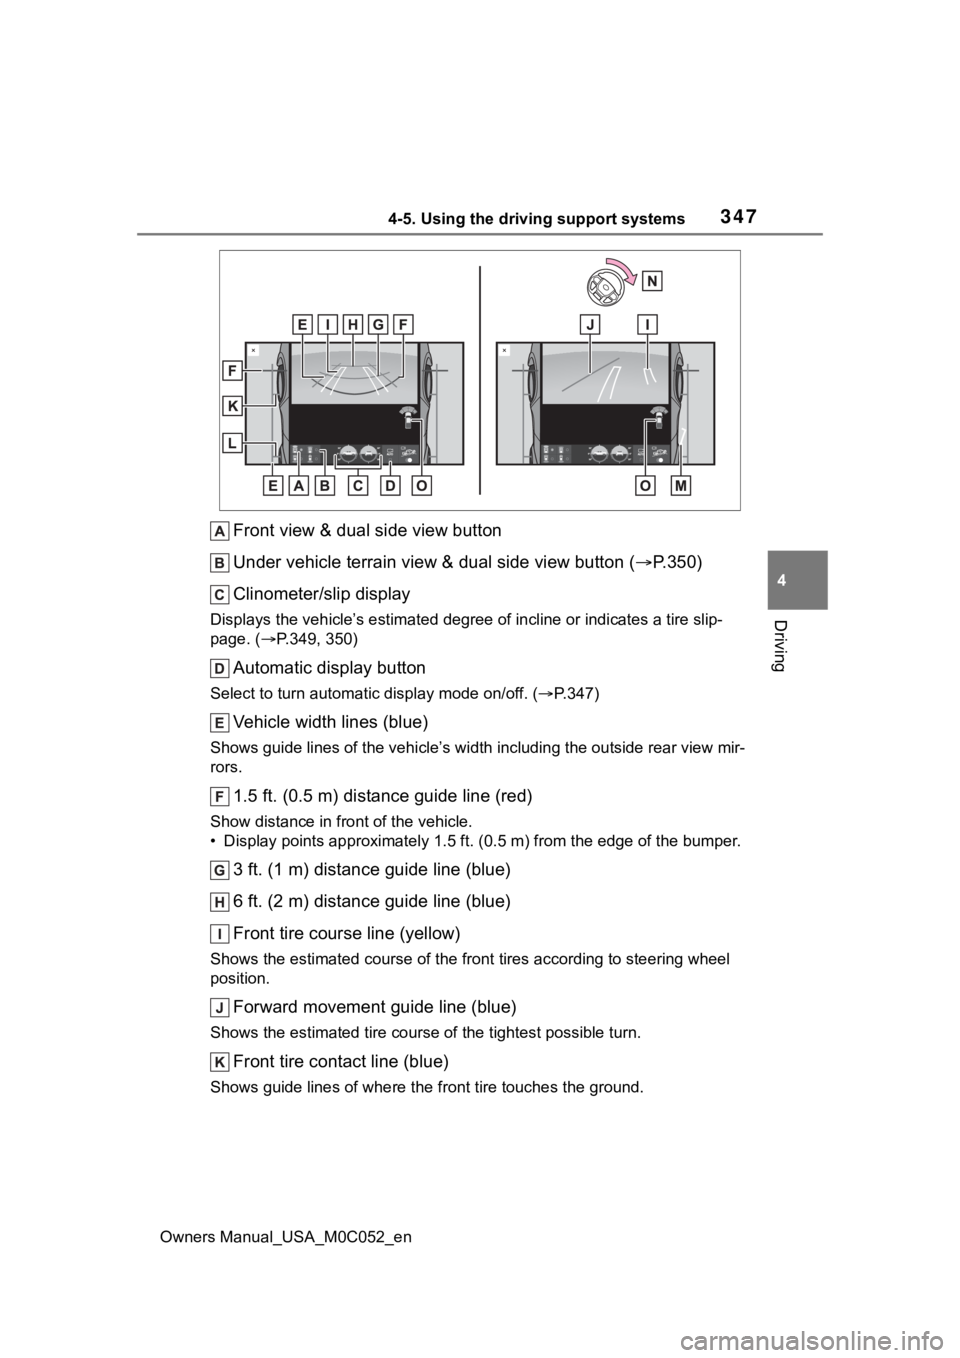
Front view & dual side view button
Under vehicle terrain view & dual side view button ( P.350)
Clinometer/slip display
Displays the vehicle’s estimate d degree of incline or indicates a tire slip-
page. ( P.349, 350)
Automatic display button
Select to turn automatic display mode on/off. (P.347)
Vehicle width lines (blue)
Shows guide lines of the vehicle’ s width including the outside rear view mir-
rors.
1.5 ft. (0.5 m) distance guide line (red)
Show distance in front of the vehicle.
• Display points approximately 1 .5 ft. (0.5 m) from the edge of the bumper.
3 ft. (1 m) distance guide line (blue)
6 ft. (2 m) distance guide line (blue)
Front tire course line (yellow)
Shows the estimated course of the front tires according to steering wheel
position.
Forward movement guide line (blue)
Shows the estimated tire cours e of the tightest possible turn.
Front tire contact line (blue)
Shows guide lines of where the f ront tire touches the ground.
Page 348 of 618
3484-5. Using the driving support systems
Owners Manual_USA_M0C052_en
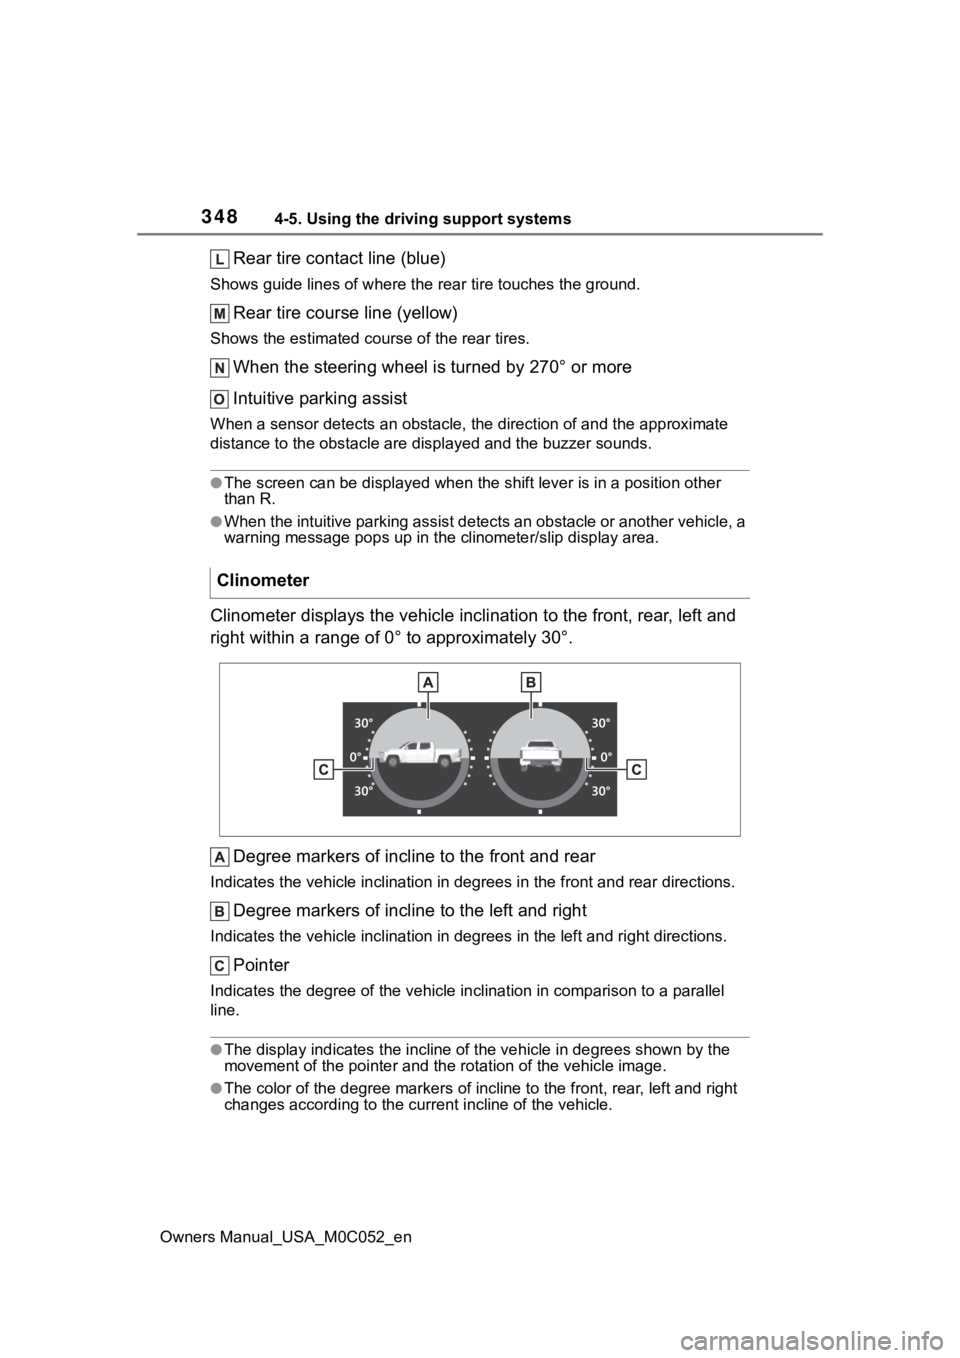
Rear tire contact line (blue)
Shows guide lines of where the rear tire touches the ground.
Rear tire course line (yellow)
Shows the estimated course of the rear tires.
When the steering wheel is turned by 270° or more
Intuitive parking assist
When a sensor detects an obstacle, the direction of and the app roximate
distance to the obsta cle are displayed and the buzzer sounds.
●The screen can be displayed when the shift lever is in a positi on other
than R.
●When the intuitive parking assist detects an obstacle or anothe r vehicle, a
warning message pops up in the clinometer/slip display area.
Clinometer displays the vehicle inclination to the front, rear, left and
right within a range of 0° to approximately 30°.
Degree markers of incline to the front and rear
Indicates the vehicle inclination in degrees in the front and r ear directions.
Degree markers of incline to the left and right
Indicates the vehicle inclination in degrees in the left and ri ght directions.
Pointer
Indicates the degree of the veh icle inclination in comparison to a parallel
line.
●The display indicates the incline of the veh icle in degrees shown by the
movement of the pointer and the rotation o f the vehicle image.
●The color of the degree markers of incline to the front, rear, left and right
changes according to the current incline of the vehicle.
Clinometer
Page 349 of 618
3494-5. Using the driving support systems
Owners Manual_USA_M0C052_en
4
Driving
●After the power switch is in ON, the degree of incline is not d isplayed until
such information is determined.
●The degree of incline showed on the clinometer is only an approximate
indication, and may differ from the degree of incline measured using other
equipment.
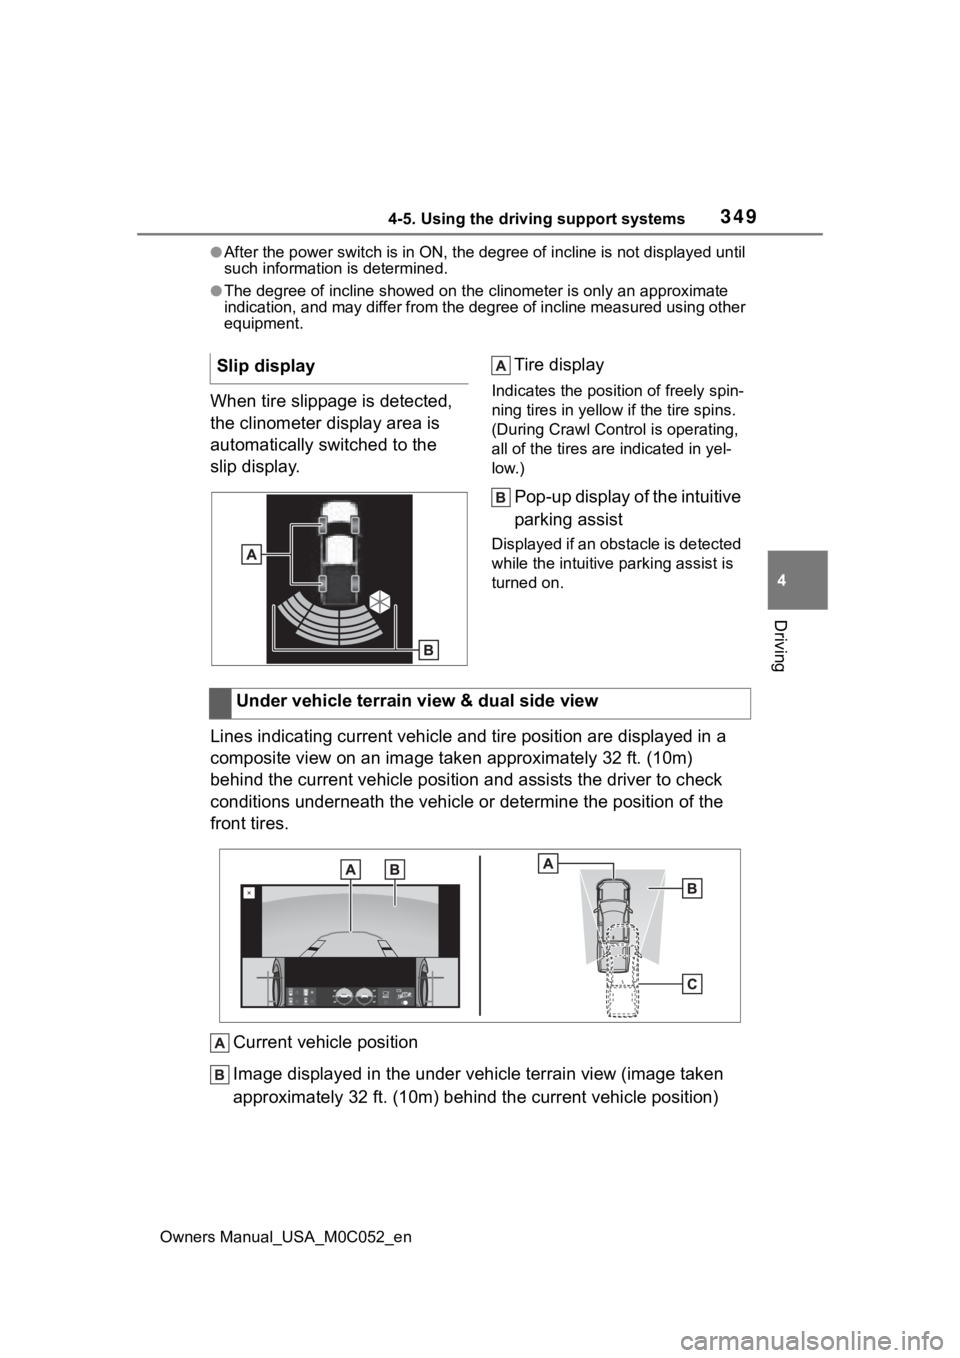
When tire slippage is detected,
the clinometer display area is
automatically switched to the
slip display. Tire displayIndicates the position of freely spin-
ning tires in yellow
if the tire spins.
(During Crawl Cont rol is operating,
all of the tires are indicated in yel-
low.)
Pop-up display of the intuitive
parking assist
Displayed if an obstacle is detected
while the intuitive parking assist is
turned on.
Lines indicating current vehicle and tire position are displayed in a
composite view on an image taken approximately 32 ft. (10m)
behind the current vehicle position and assists the driver to c heck
conditions underneath the vehicle or determine the position of the
front tires.
Current vehicle position
Image displayed in the under vehicle terrain view (image taken
approximately 32 ft. (10m) behind the current vehicle position)
Slip display
Under vehicle terrain view & dual side view