2023 TOYOTA RAV4 PRIME warning
[x] Cancel search: warningPage 552 of 662

5548-2. Steps to take in an emergency
tion display, the vehicle may have
run out of fuel. Stop the vehicle in
a safe place and, if the fuel level is
low, refuel the vehicle.
• “Hybrid system stopped”
• “Engine Stopped”
●If “Maintenance required for
DCDC converter cooling parts
See Owner’s Manual” is shown,
the filter may be clogged, the air
intake vent may be blocked, or
there may be a gap in the duct.
Therefore, perform the following
correction procedure.
• If the air intake vent or filter of the DC/DC converter are dirty, per-
form the procedures on P.515 to
clean them.
• If the warning message is shown when the air intake vent and filter
of the DC/DC converter are not
dirty, have the vehicle inspected
at your Toyota dealer.
●If “12-Volt Battery Charging Sys-
tem Malfunction Stop in a Safe
Place See Owner’s Manual” is
shown
Indicates a malfunction in the vehi-
cle’s charging system. Pull over and
stop the vehicle as soon as it is safe
to do so.
While the message is displayed, the
functions of the air conditioning, etc.
may be partially lim ited in order to
reduce the power consumption of
the 12-volt battery.
■If “Hybrid System Overheated
Output Power Reduced” is
shown
The message may be shown when
driving under severe operating con-
ditions. (For example, when driving
up a long steep hill or driving up a
steep hill in reverse.)
Coping method: P.574
■If “Traction Battery Needs to be
Protected Refrain from the Use
of N Position” is shown
This message may be displayed
when the shift lever is in N.
As the hybrid battery (traction bat-
tery) cannot be charged when the
shift lever is in N, shift the shift lever
to P when the vehicle is stopped.
■If “Traction Battery Needs to be
Protected Shift into P to
Restart” is shown
This message is displayed when the
hybrid battery (traction battery)
charge has becom e extremely low
because the shift lever has been left
in N for a certain amount of time.
When operating the vehicle, shift to
P and restart the hybrid system.
■If “Shift to P Before Exiting
Vehicle” is shown
Message is displayed when the
driver’s door is opened without turn-
ing the power switch to OFF with the
shift lever in any p osition other than
P.
Shift the shift lever to P.
■If “Shift is in N Release Acceler-
ator Before Shifting” is shown
Message is displayed when the
accelerator pedal has been
depressed and the shift lever is in N.
Release the accelerator pedal and
shift the shift lever to D or R.
■If “Press brake when vehicle is
stopped Hybrid system may
overheat” is shown
Message is displayed when the
accelerator pedal is depressed to
maintain the vehicl e position when
stopped on a upward slope, etc.
If this continues, the hybrid system
may overheat.
Release the accelerator pedal and
depress the brake pedal.
Page 554 of 662
5568-2. Steps to take in an emergency
with full-speed range system is sus-
pended temporarily or until the prob-
lem shown in the message is
resolved. (causes a nd coping meth-
ods: P.338)
■If “Radar Cruise Control
Unavailable” is shown
The dynamic radar cruise control
with full-speed range system cannot
be used temporarily. Use the sys-
tem when it bec omes available
again.
■Warning buzzer
P.549
WARNING
■If a warning light comes on or
a warning buzzer sounds
when a warning message is
shown on the multi-informa-
tion display
P.550
NOTICE
■“High Power Consumption
Partial Limit On AC/Heater
Operation” is frequently
shown
There is a possible malfunction
relating to the charging system or
the 12-volt battery may be deteri-
orating. Have the vehicle
inspected by your Toyota dealer.
■If “Maintenance required For
Traction Battery At Your
Dealer” is shown
The hybrid battery (traction bat-
tery) is scheduled to be inspected
or replaced. Have the vehicle
inspected by your Toyota dealer
immediately.
●Continuing to dri ve the vehicle
without having the hybrid bat-
tery (traction battery) inspected
will cause the hybrid system not
to start.
●If the hybrid system does not
start, contact your Toyota
dealer immediately.
Page 555 of 662
5578-2. Steps to take in an emergency
8
When trouble arises
Stop the vehicle in a safe place on a hard, flat surface.
Set the parking brake.
Shift the shift lever to P.
Stop the hybrid system.
Turn on the emergency flashers. ( P.534)
For vehicles with power back door: Turn off the power back door
system. ( P.240)
If you have a flat tire
Your vehicle is equipped with a spare tire. The flat tire can be
replaced with the spare tire.
For details about tires: P.497
WARNING
■If you have a flat tire
Do not continue driv ing with a flat tire.
Driving even a short distance with a flat tire can damage the t ire and the
wheel beyond repair, which could result in an accident.
Before jacking up the vehicle
Page 557 of 662
5598-2. Steps to take in an emergency
8
When trouble arises
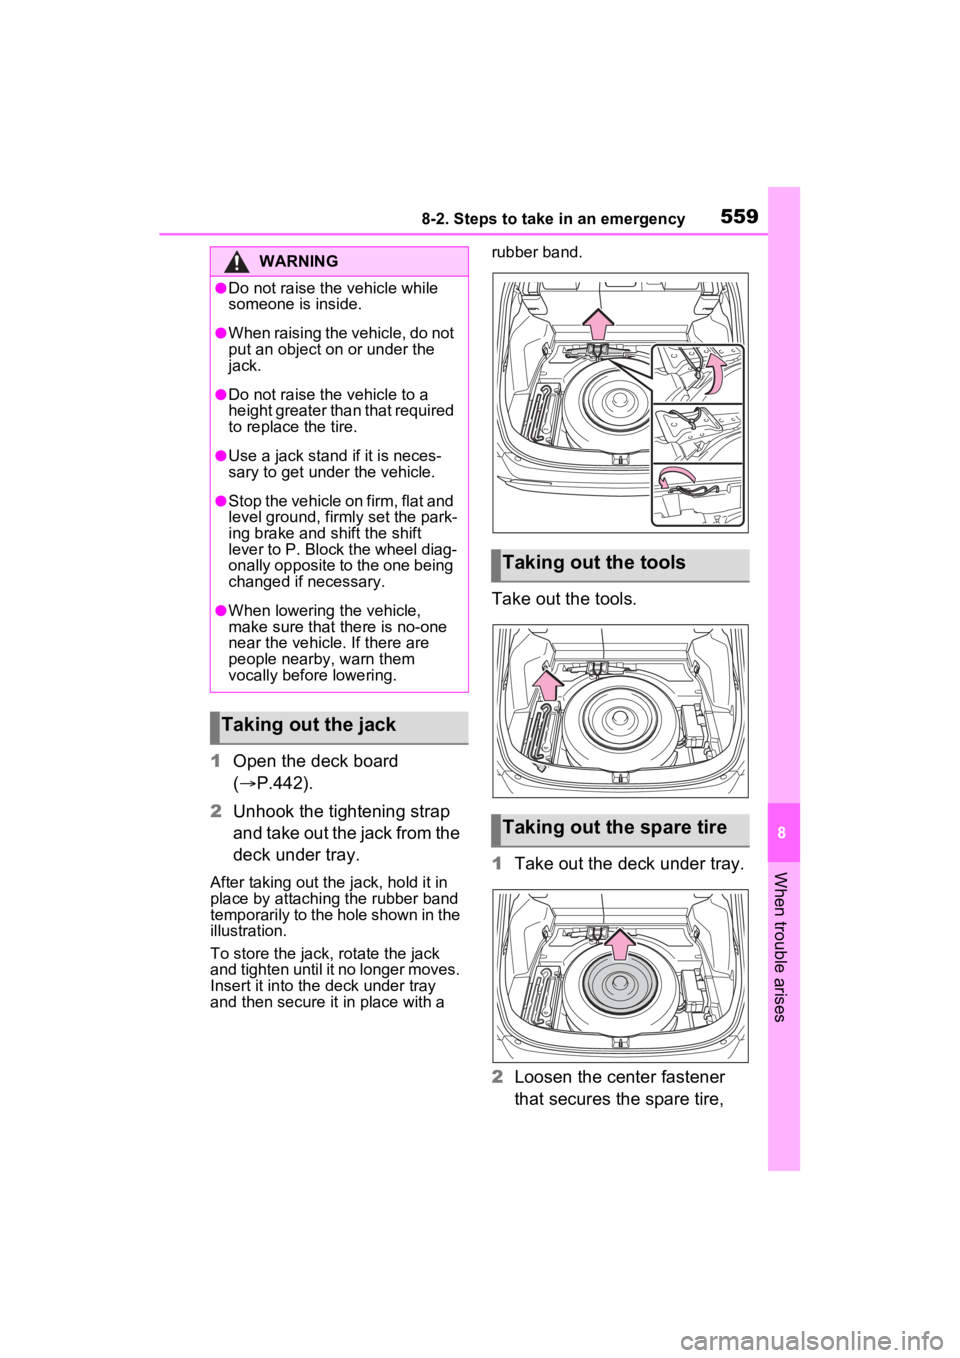
1Open the deck board
( P.442).
2 Unhook the tightening strap
and take out the jack from the
deck under tray.
After taking out the jack, hold it in
place by attaching the rubber band
temporarily to the hole shown in the
illustration.
To store the jack, rotate the jack
and tighten until it no longer moves.
Insert it into the deck under tray
and then secure it in place with a rubber band.
Take out the tools.
1
Take out the deck under tray.
2 Loosen the center fastener
that secures the spare tire,
WARNING
●Do not raise the vehicle while
someone is inside.
●When raising the vehicle, do not
put an object on or under the
jack.
●Do not raise the vehicle to a
height greater than that required
to replace the tire.
●Use a jack stand if it is neces-
sary to get under the vehicle.
●Stop the vehicle on firm, flat and
level ground, firm ly set the park-
ing brake and shift the shift
lever to P. Block the wheel diag-
onally opposite to the one being
changed if necessary.
●When lowering the vehicle,
make sure that there is no-one
near the vehicle. If there are
people nearby, warn them
vocally before lowering.
Taking out the jack
Taking out the tools
Taking out the spare tire
Page 558 of 662
5608-2. Steps to take in an emergency
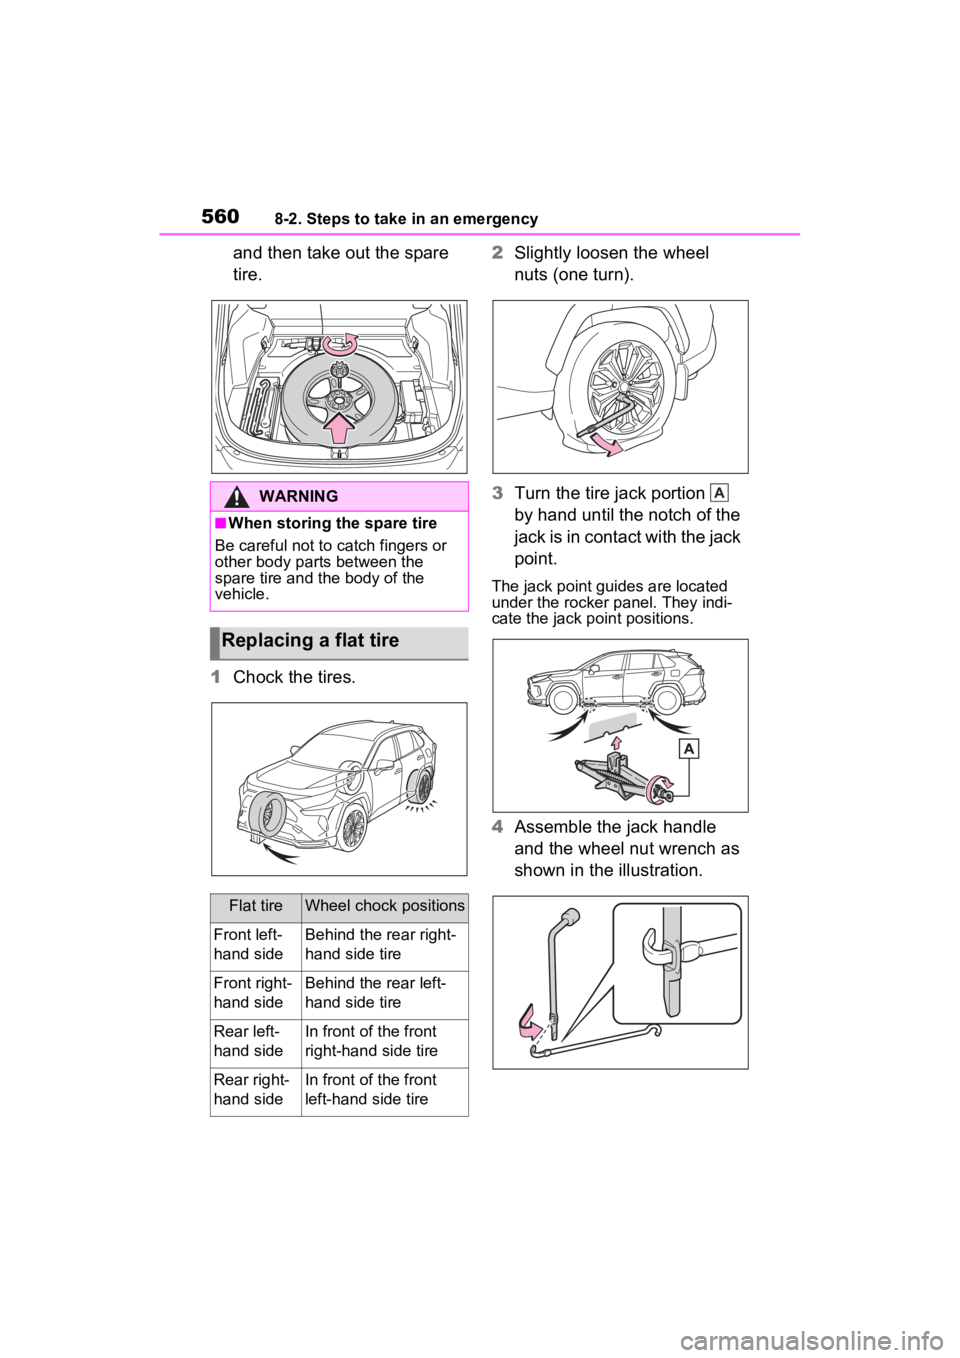
and then take out the spare
tire.
1 Chock the tires. 2
Slightly loosen the wheel
nuts (one turn).
3 Turn the tire jack portion
by hand until the notch of the
jack is in contact with the jack
point.
The jack point guides are located
under the rocker panel. They indi-
cate the jack po int positions.
4Assemble the jack handle
and the wheel nut wrench as
shown in the illustration.
WARNING
■When storing the spare tire
Be careful not to catch fingers or
other body parts between the
spare tire and the body of the
vehicle.
Replacing a flat tire
Flat tireWheel chock positions
Front left-
hand sideBehind the rear right-
hand side tire
Front right-
hand sideBehind the rear left-
hand side tire
Rear left-
hand sideIn front of the front
right-hand side tire
Rear right-
hand sideIn front of the front
left-hand side tire
A
Page 559 of 662
5618-2. Steps to take in an emergency
8
When trouble arises
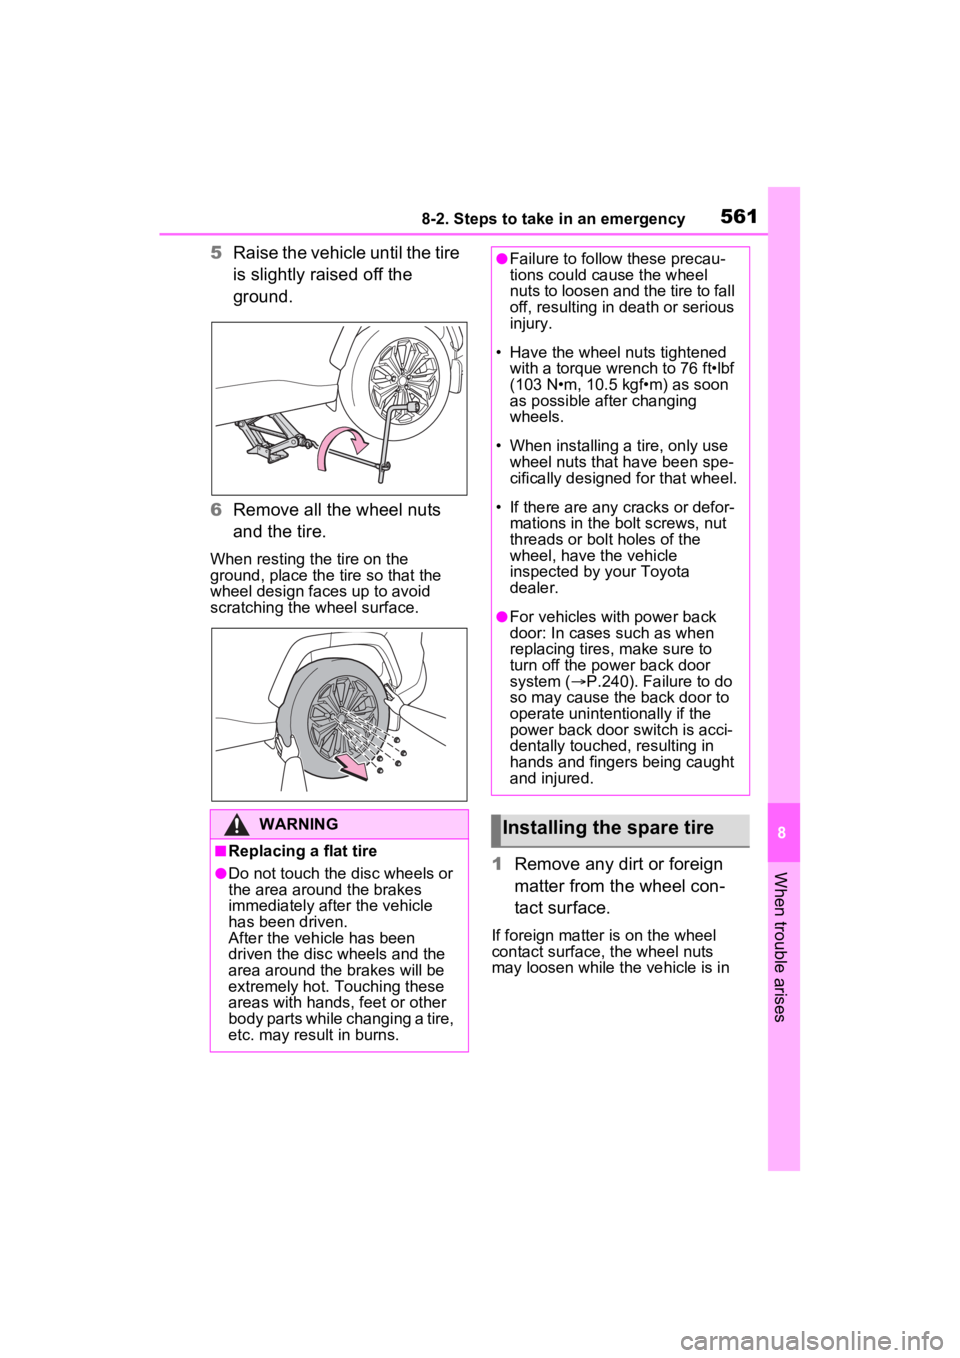
5Raise the vehicle until the tire
is slightly raised off the
ground.
6 Remove all the wheel nuts
and the tire.
When resting the tire on the
ground, place the tire so that the
wheel design faces up to avoid
scratching the wheel surface.
1 Remove any dirt or foreign
matter from the wheel con-
tact surface.
If foreign matter is on the wheel
contact surface, the wheel nuts
may loosen while the vehicle is in
WARNING
■Replacing a flat tire
●Do not touch the disc wheels or
the area around the brakes
immediately after the vehicle
has been driven.
After the vehicle has been
driven the disc wheels and the
area around the brakes will be
extremely hot. Touching these
areas with hands , feet or other
body parts while changing a tire,
etc. may result in burns.
●Failure to follow these precau-
tions could cause the wheel
nuts to loosen and the tire to fall
off, resulting in death or serious
injury.
• Have the wheel nuts tightened
with a torque wrench to 76 ft•lbf
(103 N•m, 10.5 kgf•m) as soon
as possible after changing
wheels.
• When installing a tire, only use wheel nuts that have been spe-
cifically designed for that wheel.
• If there are any cracks or defor- mations in the bolt screws, nut
threads or bolt holes of the
wheel, have the vehicle
inspected by your Toyota
dealer.
●For vehicles with power back
door: In cases such as when
replacing tires, make sure to
turn off the po wer back door
system ( P.240). Failure to do
so may cause the back door to
operate unintentionally if the
power back door switch is acci-
dentally touched , resulting in
hands and fingers being caught
and injured.
Installing the spare tire
Page 560 of 662
5628-2. Steps to take in an emergency
motion, causing the tire to come off.
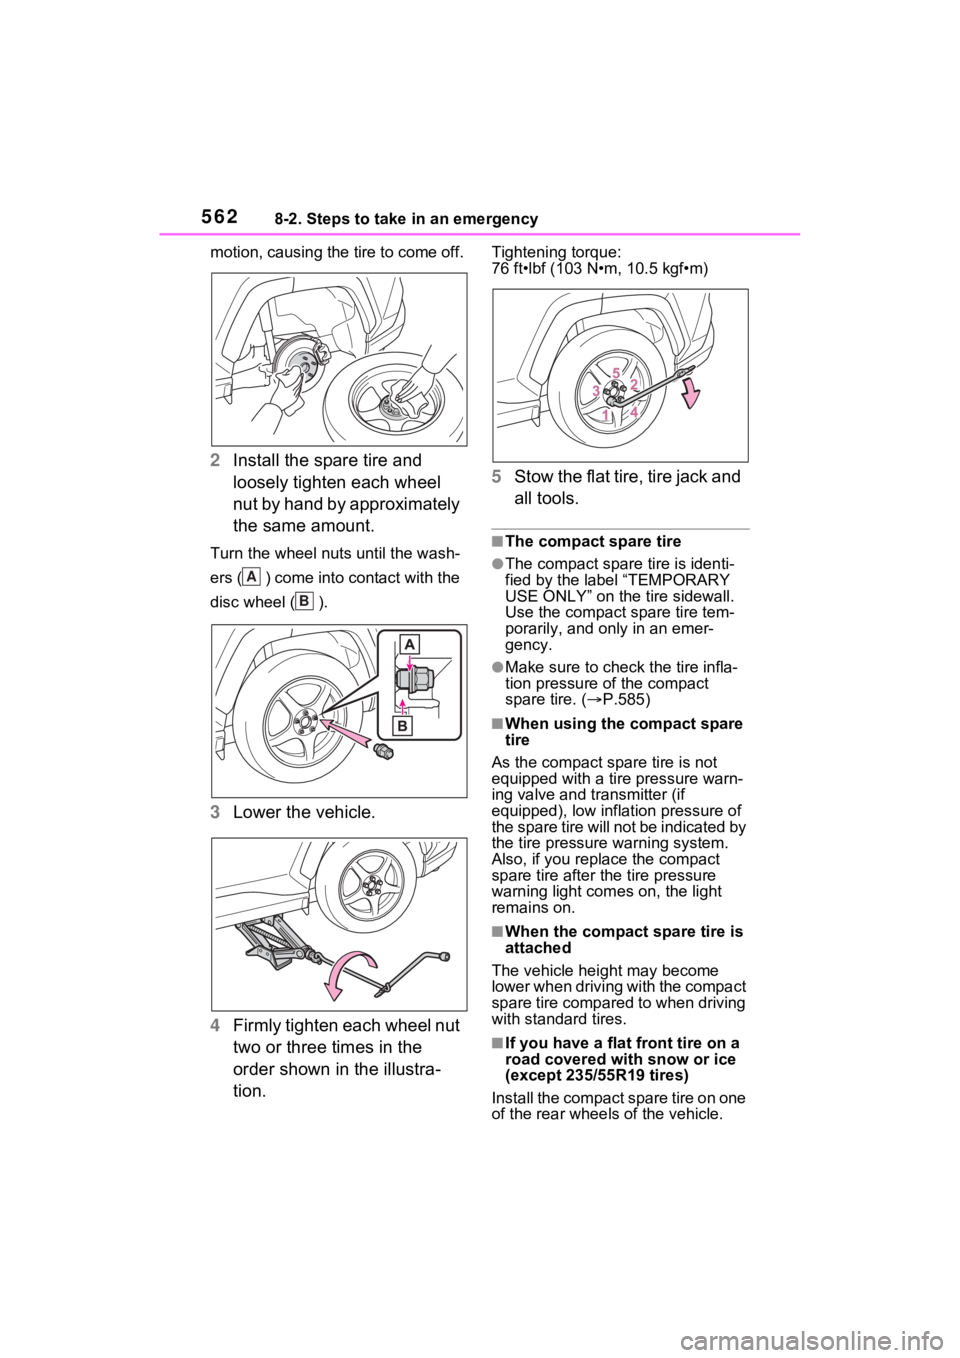
2Install the spare tire and
loosely tighten each wheel
nut by hand by approximately
the same amount.
Turn the wheel nuts until the wash-
ers ( ) come into contact with the
disc wheel ( ).
3Lower the vehicle.
4 Firmly tighten each wheel nut
two or three times in the
order shown in the illustra-
tion.
Tightening torque:
76 ft•lbf (103 N•m, 10.5 kgf•m)
5Stow the flat tire, tire jack and
all tools.
■The compact spare tire
●The compact spare tire is identi-
fied by the label “TEMPORARY
USE ONLY” on the tire sidewall.
Use the compact spare tire tem-
porarily, and only in an emer-
gency.
●Make sure to check the tire infla-
tion pressure of the compact
spare tire. ( P.585)
■When using the compact spare
tire
As the compact spare tire is not
equipped with a tire pressure warn-
ing valve and transmitter (if
equipped), low inflation pressure of
the spare tire will not be indicated by
the tire pressure warning system.
Also, if you replace the compact
spare tire after the tire pressure
warning light com es on, the light
remains on.
■When the compact spare tire is
attached
The vehicle height may become
lower when driving with the compact
spare tire compared to when driving
with standard tires.
■If you have a flat front tire on a
road covered wit h snow or ice
(except 235/55R19 tires)
Install the compact spare tire on one
of the rear wheels of the vehicle.
A
B
Page 561 of 662
5638-2. Steps to take in an emergency
8
When trouble arises
Perform the following steps and fit
tire chains to the front tires:
1Replace a rear tire with the com-
pact spare tire.
2 Replace the flat front tire with the
tire removed from the rear of the
vehicle.
3 Fit tire chains to the front tires.
WARNING
■When using the compact
spare tire
●Remember that the compact
spare tire provided is specifi-
cally designed for use with your
vehicle. Do not use your com-
pact spare tire on another vehi-
cle.
●Do not use more than one com-
pact spare tire simultaneously.
●Replace the compact spare tire
with a standard tire as soon as
possible.
●Avoid sudden acceleration,
abrupt steering, sudden brak-
ing and shifting operations that
cause sudden engine braking.
■When the compact spare tire
is attached
The vehicle speed may not be
correctly detecte d, and the follow-
ing systems may not operate cor-
rectly:
• ABS & Brake assist
• VSC/Trailer Sway Control
• TRAC
• Dynamic radar cruise control
with full-speed range
• PCS (Pre-Collision System)
• EPS
• LTA (Lane Tracing Assist)
• Tire pressure warning system (if equipped)
• AHB (Automatic High Beam)
• BSM
• RCTA
• PKSB (if equipped)
• Intuitive parking assist (if equipped)
• Rear view monitor system (if equipped)
• Panoramic view monitor (if equipped)
• Toyota parking assist monitor (if equipped)
• Navigation system (if equipped)
Also, not only c an the following
system not be utilized fully, but it
may actually negatively affect the
drive-train components:
• E-Four (Electronic On-Demand AWD system)
■Speed limit when using the
compact spare tire
Do not drive at speeds in excess
of 50 mph (80 km /h) when a com-
pact spare tire is installed on the
vehicle.
The compact spare tire is not
designed for driving at high
speeds. Failure to observe this
precaution may lead to an acci-
dent causing death or serious
injury.
■After using the tools and jack
Before driving, ma ke sure all the
tools and jack are securely in
place in their storage location to
reduce the possibility of personal
injury during a collision or sudden
braking.