2023 TOYOTA RAV4 PLUG-IN HYBRID steering
[x] Cancel search: steeringPage 491 of 718

489
7 7-3. Do-it-yourself maintenance
Maintenance and care
The tire pressure warning light comes
on and a buzzer sounds when the tire
inflation pressure becomes low due to
natural air leakage or outside tempera-
ture. (Ways of coping: P.541, 590)
When “Immediately Check tire
when Safe” is displayed (Emer-
gency Warning)
The tire pressure warning light comes
on and a buzzer sounds when the tire
inflation pressure becomes low sud-
denly due to a blowout. (Ways of cop-
ing: P.541, 548, 559)
However, the system may not be able
to detect sudden tire ruptures (bursting,
etc.).
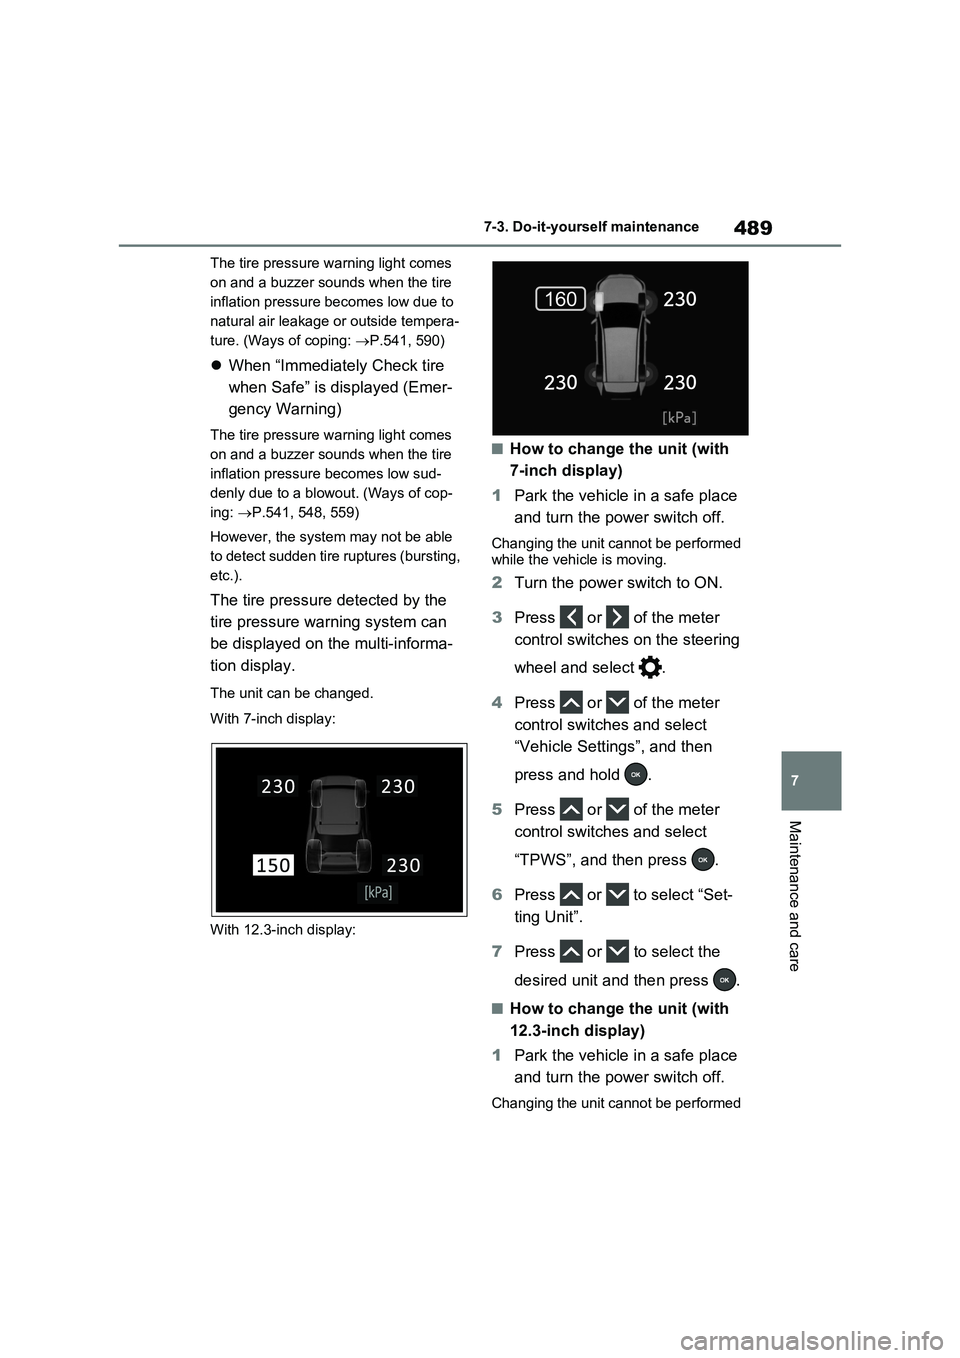
The tire pressure detected by the
tire pressure warning system can
be displayed on the multi-informa-
tion display.
The unit can be changed.
With 7-inch display:
With 12.3-inch display:
■How to change the unit (with
7-inch display)
1Park the vehicle in a safe place
and turn the power switch off.
Changing the unit cannot be performed
while the vehicle is moving.
2Turn the power switch to ON.
3Press or of the meter
control switches on the steering
wheel and select .
4Press or of the meter
control switches and select
“Vehicle Settings”, and then
press and hold .
5Press or of the meter
control switches and select
“TPWS”, and then press .
6Press or to select “Set-
ting Unit”.
7Press or to select the
desired unit and then press .
■How to change the unit (with
12.3-inch display)
1Park the vehicle in a safe place
and turn the power switch off.
Changing the unit cannot be performed
Page 494 of 718

4927-3. Do-it-yourself maintenance
■The tire pressure warning sys-
tem must be initialized in the
following circumstances:
When rotating the tires.
When changing the tire.
After registering the ID codes.
(P.495)
When changing between two
registered wheel sets.
When the tire pressure warning
system is initialized, the current tire
inflation pressure is set as the
benchmark pressure.
■How to initialize the tire pres-
sure warning system (with 7-
inch display)
1Park the vehicle in a safe place
and stop the hybrid system for
20 minutes or more.
Initialization cannot be performed while
the vehicle is moving.
2Adjust the tire inflation pressure
to the specified cold tire inflation
pressure level. (P.590)
Make sure to adjust the tire pressure to
the specified cold tire inflation pressure
level. The tire pressure warning system
will operate based on this pressure
level.
3Start the hybrid system.
4Press or of the meter
control switches on the steering
wheel and select .5Press or of the meter
control switches, select “Vehi-
cle Settings” and then press and
hold .
6Press or of the meter
control switches, select “TPWS”
and then press .
7Press or of the meter
control switches, select the “Set-
ting Pressure”. Then press and
hold .
“Set Pressure Accepted” will be dis-
played on the multi-information display
and the tire pressure warning light will
blink 3 times.
When the message disappears, initial-
ization is complete.
A message is displayed on the multi-
information display. Also, “--” is dis-
played for inflation pressure of each tire
on the multi-information display while
the tire pressure warning system deter-
mines the position.
8Drive straight (with occasional
left and right turns) at approxi-
mately 40 km/h (25mph) or
more for approximately 10 to 30
minutes.
When initialization is complete, the
inflation pressure of each tire will be
displayed on the multi-information dis-
Initializing the tire pressure
warning system
Page 497 of 718

495
7
7-3. Do-it-yourself maintenance
Maintenance and care
Every tire pressure warning valve
and transmitter has a unique ID
code. When replacing a tire pres-
sure warning valve and transmitter,
it is necessary to register the ID
code.
When registering the ID codes, per-
form the following procedure.
■Registering procedure (with 7-
inch display)
1 Park the vehicle in a safe place,
wait for approximately 20 min-
utes, and then start the hybrid
system.
2 Press or of the meter
control switches on the steering
wheel and select .
3 Press or of the meter
control switches and select
“Vehicle Settings”, and then
press and hold .
4 Press or of the meter
control switches and select
“TPWS”, and then press .
5 Press or of the meter
control switches and select
“Identifying Each Wheel & Posi-
tion”. Then press and hold
until the tire pressure warning
light starts slowly blinking 3
times.
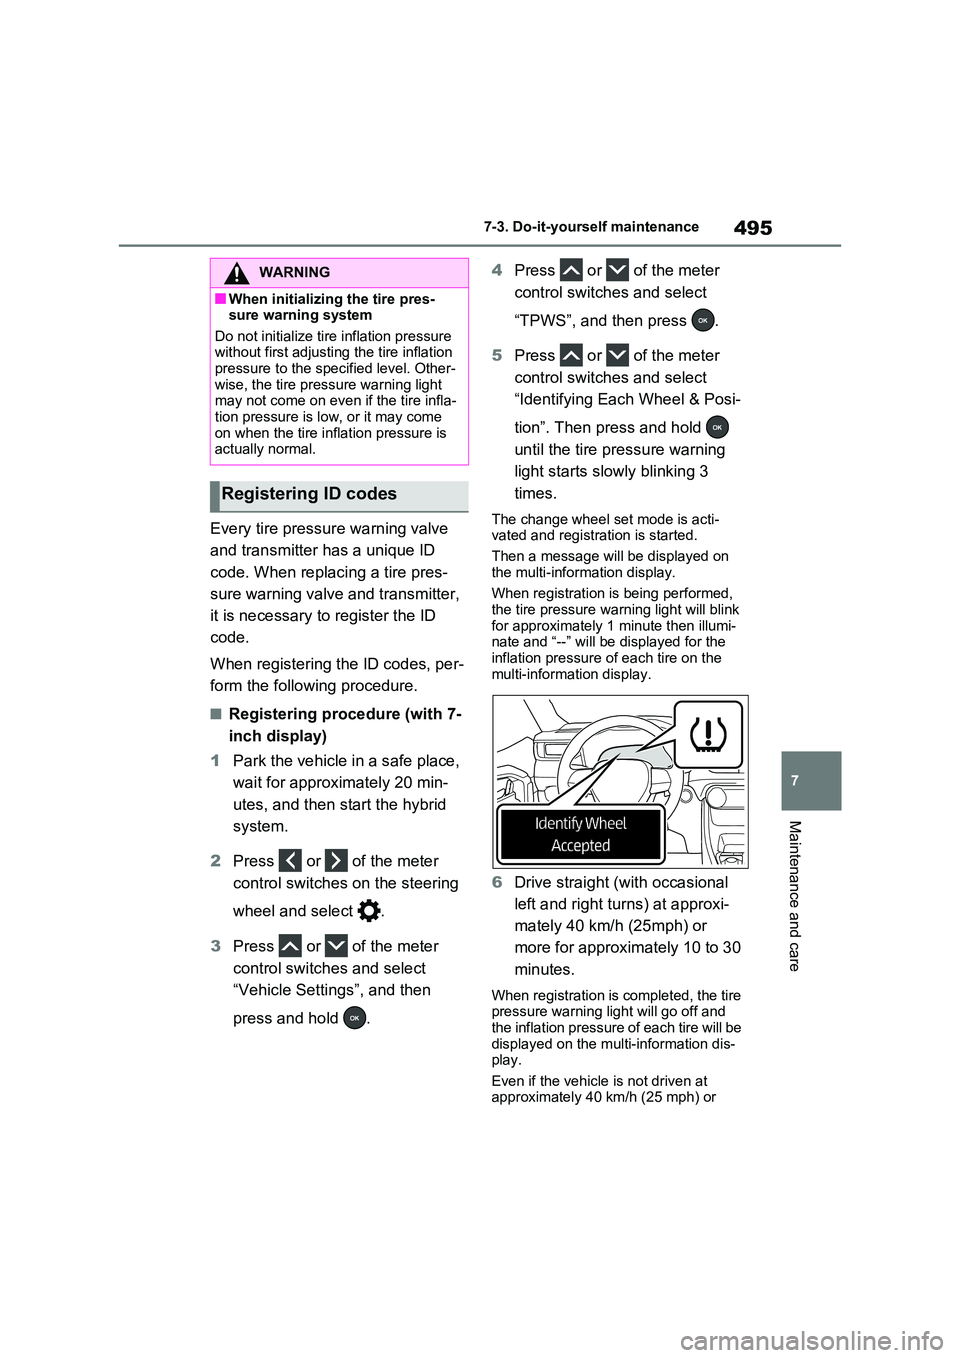
The change wheel set mode is acti- vated and registration is started.
Then a message will be displayed on
the multi-information display.
When registration is being performed, the tire pressure warning light will blink
for approximately 1 minute then illumi- nate and “--” will be displayed for the inflation pressure of each tire on the
multi-information display.
6 Drive straight (with occasional
left and right turns) at approxi-
mately 40 km/h (25mph) or
more for approximately 10 to 30
minutes.
When registration is completed, the tire pressure warning light will go off and
the inflation pressure of each tire will be displayed on the multi-information dis-play.
Even if the vehicle is not driven at approximately 40 km/h (25 mph) or
WARNING
■When initializing the tire pres-sure warning system
Do not initialize tire inflation pressure without first adjusting the tire inflation pressure to the specified level. Other-
wise, the tire pressure warning light may not come on even if the tire infla-tion pressure is low, or it may come
on when the tire inflation pressure is actually normal.
Registering ID codes
Page 529 of 718

527
8
8-1. Essential information
When trouble arises
more, or press it briefly 3 times
or more in succession.
5 Stop the vehicle in a safe place
by the road.
■If emergency stopped
The functions of the air conditioning, etc.
may be partially limited in order to reduce the power consumption of the 12-volt battery.
If the door can be opened, open
the door and exit the vehicle.
If the door can not be opened,
open the window using the
power window switch and ensure
an escape route.
If the window can be opened,
exit the vehicle through the win-
dow.
If the door and window cannot be
opened due to the rising water,
remain calm, wait until the water
level inside the vehicle rises to
the point that the water pressure
inside of the vehicle equals the
water pressure outside of the
vehicle and then open the door
after waiting for the rising water
to enter the vehicle, and exit the
vehicle. When the outside water
level exceeds half the height of
the door, the door cannot be
opened from the inside due to
WARNING
■If the hybrid system has to be turned off while driving
Turning the hybrid system off while driving will not cause a loss of steer-ing or braking control. However,
power assist for the steering wheel may be lost making it difficult to steer smoothly before stopping the vehicle
depending on the remaining charge in the 12-volt battery or usage condi-tions. Decelerate as much as possible
before turning off the hybrid system.
If the vehicle is sub-
merged or water on the
road is rising
This vehicle is not designed to
be able to drive on roads that
are deeply flooded with water.
Do not drive on roads where
the roads may be submerged
or the water may be rising. It is
dangerous to remain in the
vehicle, if it anticipated that the
vehicle will be flooded or set a
drift. Remain calm and follow
the following.
Page 532 of 718

5308-2. Steps to take in an emergency
When using a flat-bed truck to
transport the vehicle, use tire strap-
ping belts. Refer to the owner’s
manual of the flat-bed truck for the
tire strapping method.
In order to suppress vehicle move-
ment during transportation, set the
parking brake and turn the power
switch off.
If a tow truck is not available in an
emergency, your vehicle may be
temporarily towed using cables or
chains secured to the emergency
towing eyelets. This should only be
attempted on hard surfaced roads
for short distances at under 30
km/h (18 mph).
A driver must be in the vehicle to
steer and operate the brakes. The
vehicle’s wheels, drive train, axles,
steering and brakes must be in
good condition.
WARNING
■When towing the vehicle
Be sure to transport the vehicle with
all four wheels raised off the ground. If the vehicle is towed with the tires contacting the ground, the drivetrain
or related parts may be damaged, the vehicle may fly off the truck, or elec-tricity generated by the operation of
the motor may cause a fire to occur depending on the nature of the dam-age or malfunction.
NOTICE
■To prevent damage to the vehicle when towing using a wheel-lift type truck
●Do not tow the vehicle from the rear when the power switch is off. The steering lock mechanism (if
equipped) is not strong enough to hold the front wheels straight.
●When raising the vehicle, ensure adequate ground clearance for tow-ing at the opposite end of the raised
vehicle. Without adequate clear- ance, the vehicle could be dam-aged while being towed.
■Towing with a sling-type truck
Do not tow with a sling-type truck to prevent body damage.
Using a flatbed truck
Emergency towing
Page 533 of 718

531
8
8-2. Steps to take in an emergency
When trouble arises
To have your vehicle towed by
another vehicle, the towing eyelet
must be installed to your vehicle.
Install the towing eyelet using the
following procedure.
1 Take out the wheel nut wrench
and towing eyelet. ( P.549,
560)
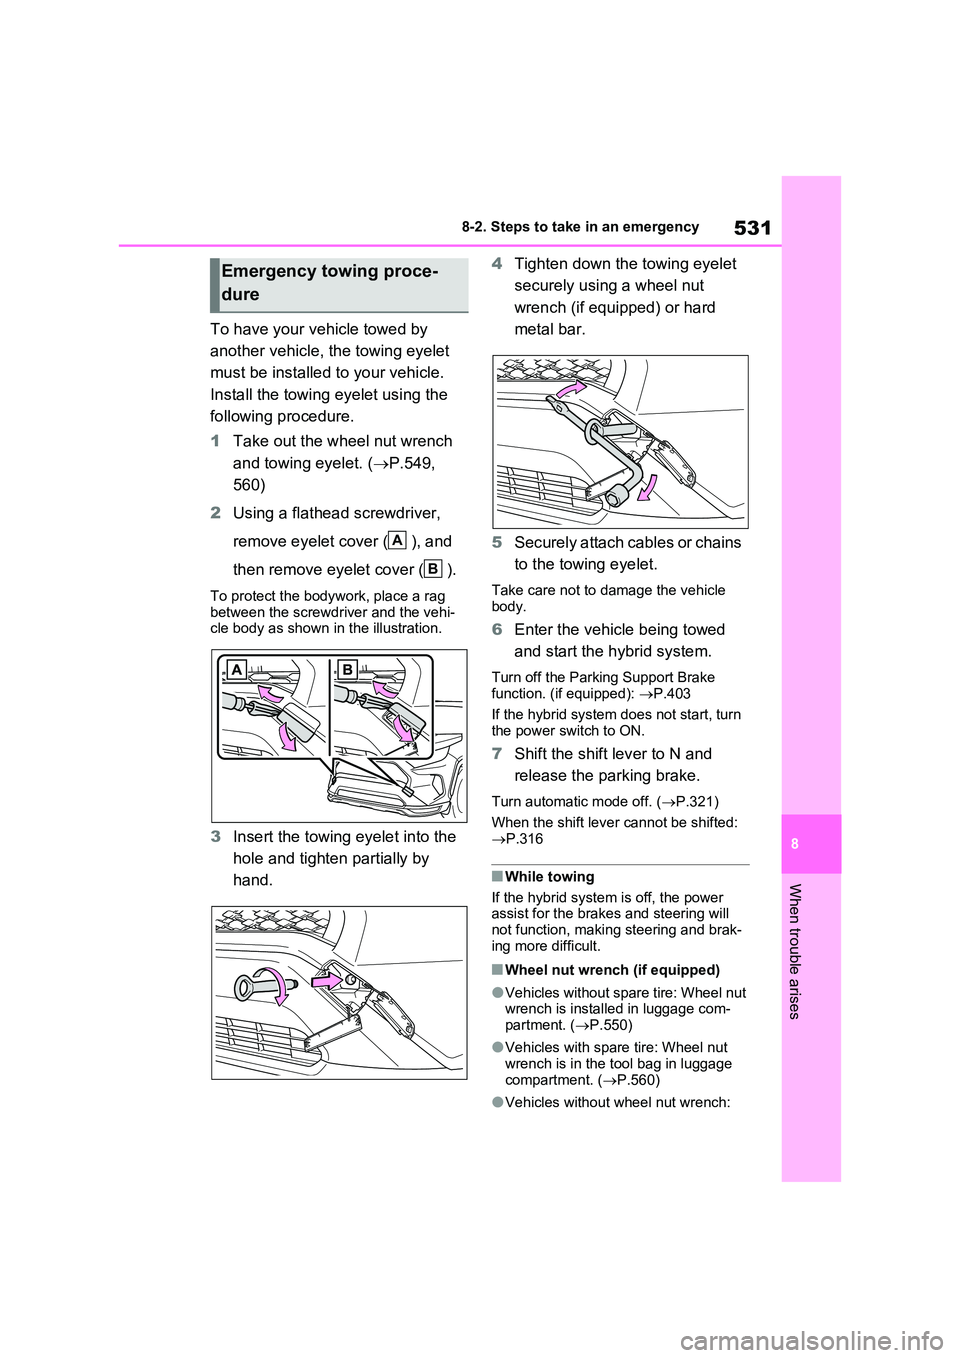
2 Using a flathead screwdriver,
remove eyelet cover ( ), and
then remove eyelet cover ( ).
To protect the bodywork, place a rag between the screwdriver and the vehi-cle body as shown in the illustration.
3 Insert the towing eyelet into the
hole and tighten partially by
hand.
4 Tighten down the towing eyelet
securely using a wheel nut
wrench (if equipped) or hard
metal bar.
5 Securely attach cables or chains
to the towing eyelet.
Take care not to damage the vehicle body.
6 Enter the vehicle being towed
and start the hybrid system.
Turn off the Parking Support Brake function. (if equipped): P.403
If the hybrid system does not start, turn
the power switch to ON.
7 Shift the shift lever to N and
release the parking brake.
Turn automatic mode off. ( P.321)
When the shift lever cannot be shifted: P.316
■While towing
If the hybrid system is off, the power assist for the brakes and steering will
not function, making steering and brak- ing more difficult.
■Wheel nut wrench (if equipped)
●Vehicles without spare tire: Wheel nut wrench is installed in luggage com-
partment. ( P.550)
●Vehicles with spare tire: Wheel nut
wrench is in the tool bag in luggage compartment. ( P.560)
●Vehicles without wheel nut wrench:
Emergency towing proce-
dure
A
B
Page 534 of 718

5328-2. Steps to take in an emergency
Wheel nut wrench can be purchased
at any authorized Toyota retailer or Toyota authorized repairer, or any reli-able repairer.
Fluid leaks under the vehicle
(Water dripping from the air con-
ditioning after use is normal.)
Flat-looking tires or uneven tire
wear
High coolant temperature warn-
ing light flashes or come on
Changes in exhaust sound
Excessive tire squeal when cor-
nering
Strange noises related to the
suspension system
Pinging or other noises related to
the hybrid system
Engine missing, stumbling or
running roughly
Appreciable loss of power
WARNING
Observe the following precautions. Failure to do so may result in death or serious injury.
■While towing
●When towing using cables or
chains, avoid sudden starts, etc. which place excessive stress on the towing eyelets, cables or chains.
The towing eyelets, cables or chains may become damaged, bro-ken debris may hit people, and
cause serious damage.
●Vehicles with steering lock function:
Do not turn the power switch off. There is a possibility that the steer-ing wheel is locked and cannot be
operated.
■Installing towing eyelets to the
vehicle
Make sure that towing eyelets are installed securely. If not securely
installed, towing eyelets may come loose during towing.
NOTICE
■To prevent damage to the vehicle during emergency towing
Do not secure cables or chains to the suspension components.
If you think something is
wrong
If you notice any of the follow-
ing symptoms, your vehicle
probably needs adjustment or
repair. Contact any authorized
Toyota retailer or Toyota
authorized repairer, or any reli-
able repairer as soon as possi-
ble.
Visible symptoms
Audible symptoms
Operational symptoms
Page 538 of 718

5368-2. Steps to take in an emergency
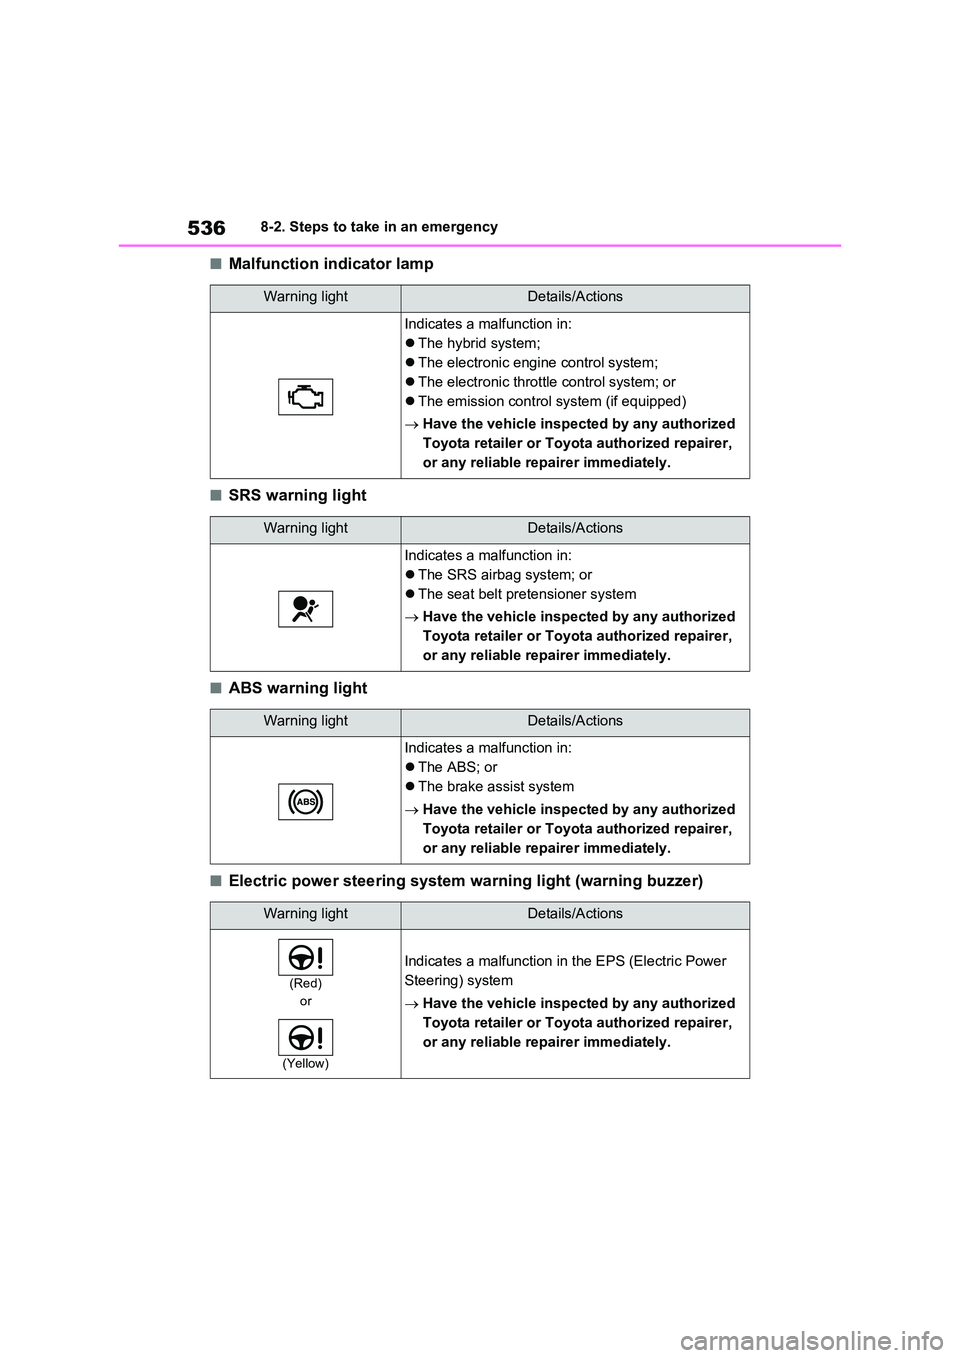
■Malfunction indicator lamp
■SRS warning light
■ABS warning light
■Electric power steering system warning light (warning buzzer)
Warning lightDetails/Actions
Indicates a malfunction in:
The hybrid system;
The electronic engine control system;
The electronic throttle control system; or
The emission control system (if equipped)
Have the vehicle inspected by any authorized
Toyota retailer or Toyota authorized repairer,
or any reliable repairer immediately.
Warning lightDetails/Actions
Indicates a malfunction in:
The SRS airbag system; or
The seat belt pretensioner system
Have the vehicle inspected by any authorized
Toyota retailer or Toyota authorized repairer,
or any reliable repairer immediately.
Warning lightDetails/Actions
Indicates a malfunction in:
The ABS; or
The brake assist system
Have the vehicle inspected by any authorized
Toyota retailer or Toyota authorized repairer,
or any reliable repairer immediately.
Warning lightDetails/Actions
(Red)
or
(Yellow)
Indicates a malfunction in the EPS (Electric Power
Steering) system
Have the vehicle inspected by any authorized
Toyota retailer or Toyota authorized repairer,
or any reliable repairer immediately.