2023 TOYOTA RAV4 HYBRID roof
[x] Cancel search: roofPage 339 of 586
3374-6. Driving tips
4
Driving
Specific design characteris-
tics give it a higher center of
gravity than ordinary passen-
ger cars. This vehicle design
feature causes this type of
vehicle to be more likely to
rollover. And, utility vehicles
have a significantly higher
rollover rate than other types
of vehicles.
An advantage of the higher
ground clearance is a better
view of the road allowing you
to anticipate problems.
It is not designed for corner-
ing at the same speeds as
ordinary passenger cars any
more than low-slung sports
cars are designed to perform
satisfactorily under off-road
conditions. Therefore, sharp
turns at excessive speeds
may cause the vehicle to roll-
over.
When driving your vehicle off-
Utility vehicle precau-
tions
This vehicle belongs to the
utility vehicle class, which
has higher ground clear-
ance and narrower tread in
relation to the height of its
center of gravity to make it
capable of performing in a
wide variety of off-road
applications.
Utility vehicle feature
WARNING
■Utility vehicle precautions
Always observe t he following pre-
cautions to minim ize the risk of
death, serious injury or damage to
your vehicle:
●In a rollover crash, an unbelted
person is significantly more
likely to die than a person wear-
ing a seat belt. Therefore, the
driver and all passengers
should always fasten their seat
belts.
●Avoid sharp turns or abrupt
maneuvers, if at all possible.
Failure to operat e this vehicle
correctly may result in loss of
control or vehicle rollover caus-
ing death or serious injury.
●Loading cargo on the roof lug-
gage carrier (if equipped) will
make the center of the vehicle
gravity higher. Avoid high
speeds, sudden starts, sharp
turns, sudden braking or abrupt
maneuvers, otherwise it may
result in loss of control or vehi-
cle rollover du e to failure to
operate this vehicle correctly.
●Always slow down in gusty
crosswinds. Because of its pro-
file and higher ce nter of gravity,
your vehicle is more sensitive to
side winds than an ordinary
passenger car. Slowing down
will allow you to have better
control.
●Do not drive horizontally across
steep slopes. Driving straight up
or straight down is preferred.
Your vehicle (or any similar off-
road vehicle) can tip over side-
ways much more easily than
forward or backward.
Off-road driving
Page 386 of 586
3846-1. Maintenance and care
6-1.Maintenance and care
Working from top to bottom,
liberally apply water to the
vehicle body, wheel wells and
underside of the vehicle to
remove any dirt and dust.
Wash the vehicle body using
a sponge or soft cloth, such
as a chamois.
For hard-to-remove marks,
use car wash soap and rinse
thoroughly with water.
Wipe away any water.
Wax the vehicle when the
waterproof coating deterio-
rates.
If water does not bead on a clean
surface, apply wax when the vehi-
cle body is cool.
■Automatic car washes
●Before washing the vehicle:
• Fold the mirrors
• Turn off the power back door (if equipped)
Start washing from the front of the
vehicle. Make sure to extend the
mirrors before driving.
●Brushes used in automatic car washes may scratch the vehicle
surface, parts (wheel, etc.) and
harm your vehicle’s paint.
●Rear spoiler may not be washable
in some automatic car washes.
There may also be an increased
risk of damage to vehicle.
■High pressure car washes
As water may enter the cabin, do
not bring the nozzle tip near the
gaps around the doors or perimeter
of the windows, or spray these
areas continuously.
■Note for a smart key system (if
equipped)
If the door handle becomes wet
while the electronic key is within the
effective range, t he door may lock
and unlock repeatedly. In that case,
follow the following correction pro-
cedures to wash the vehicle:
●Place the key in a position 6 ft. (2
m) or more separate from the
vehicle while the vehicle is being
washed. (Take care to ensure that
the key is not stolen.)
●Set the electronic key to battery-
saving mode to disable the smart
key system. ( P.156)
■Wheels and wheel ornaments
●Remove any dirt immediately by
using a neutral detergent.
●Wash detergent off with water
immediately after use.
●To protect the paint from damage,
make sure to obs erve the follow-
ing precautions.
• Do not use acidic, alkaline or abrasive detergent
• Do not use hard brushes
• Do not use detergent on the
wheels when they are hot, such
as after driving or parking in hot
weather
■Brake pads and calipers
Rust may form if the vehicle is
parked with wet brake pads or disc
rotors, causing them to stick. Before
Cleaning a nd protect-
ing the vehicle exte-
rior
Perform the following to
protect the vehicle and
maintain it in prime condi-
tion:
Cleaning instructions
Page 485 of 586

4837-2. Steps to take in an emergency
7
When trouble arises
■When the electronic key does
not work properly
●Make sure that the smart key sys-
tem has not been deactivated in
the customization setting. If it is
off, turn the function on.
(Customizable features: P.523)
●Check if battery-saving mode is
set. If it is set, cancel the function.
( P.157)
●The electronic key function may
have stopped. ( P.157)
Use the mechanical key
( P.134) in order to perform the
following operations.
1 Locks all the doors
2 Unlocks the door
Turning the key rearward unlocks
the driver’s door. Turning the key
once again within 5 seconds
unlocks the other doors.
■Key linked functions
1 Closes the windows and the
moon roof
*1 or panoramic moon
roof
*1 (turn and hold)*2
2 Opens the windows and the
moon roof
*1 or panoramic moon
roof
*1 (turn and hold)*2
*1
: If equipped
*2: These settings must be custom- ized at your Toyota dealer.
If the electronic key
does not op erate prop-
erly (vehicles with
smart key system)
If communication between
the electronic key and vehi-
cle is interrupted ( P.157)
or the electronic key cannot
be used because the battery
is depleted, the smart key
system and wireless remote
control cannot be used. In
such cases, the doors can
be opened and the hybrid
system can be started by
following the procedure
below.
NOTICE
■In case of a smart key system
malfunction, or other key
related problems
Take your vehicle with all the
electronic keys provided with your
vehicle to your Toyota dealer.
Locking and unlocking
the doors
Page 486 of 586
4847-2. Steps to take in an emergency
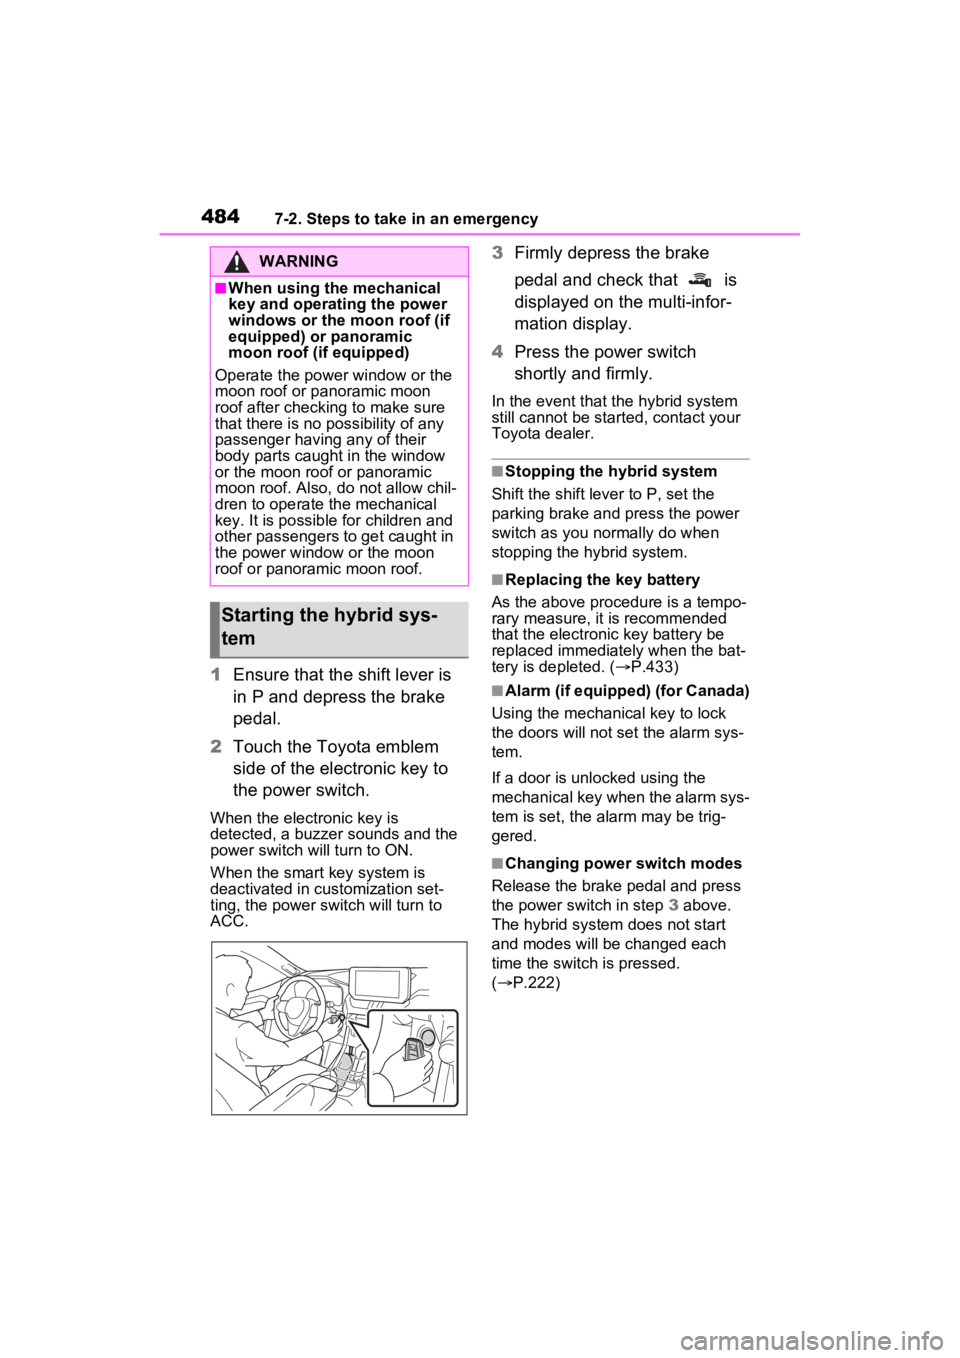
1Ensure that the shift lever is
in P and depress the brake
pedal.
2 Touch the Toyota emblem
side of the electronic key to
the power switch.
When the electronic key is
detected, a buzzer sounds and the
power switch will turn to ON.
When the smart key system is
deactivated in customization set-
ting, the power switch will turn to
ACC.
3Firmly depress the brake
pedal and check that is
displayed on the multi-infor-
mation display.
4 Press the power switch
shortly and firmly.
In the event that t he hybrid system
still cannot be started, contact your
Toyota dealer.
■Stopping the hybrid system
Shift the shift lever to P, set the
parking brake and press the power
switch as you normally do when
stopping the hybrid system.
■Replacing the key battery
As the above proce dure is a tempo-
rary measure, it is recommended
that the electronic key battery be
replaced immediately when the bat-
tery is depleted. ( P.433)
■Alarm (if equipped) (for Canada)
Using the mechanical key to lock
the doors will not set the alarm sys-
tem.
If a door is unl ocked using the
mechanical key when the alarm sys-
tem is set, the alarm may be trig-
gered.
■Changing power switch modes
Release the brake pedal and press
the power switch in step 3 above.
The hybrid system does not start
and modes will be changed each
time the switch is pressed.
( P.222)
WARNING
■When using the mechanical
key and operating the power
windows or the moon roof (if
equipped) or panoramic
moon roof (if equipped)
Operate the power window or the
moon roof or panoramic moon
roof after checking to make sure
that there is no possibility of any
passenger having any of their
body parts caught in the window
or the moon roof or panoramic
moon roof. Also, do not allow chil-
dren to operate the mechanical
key. It is possible for children and
other passengers to get caught in
the power window or the moon
roof or panoramic moon roof.
Starting the hybrid sys-
tem
Page 514 of 586
5128-1. Specifications
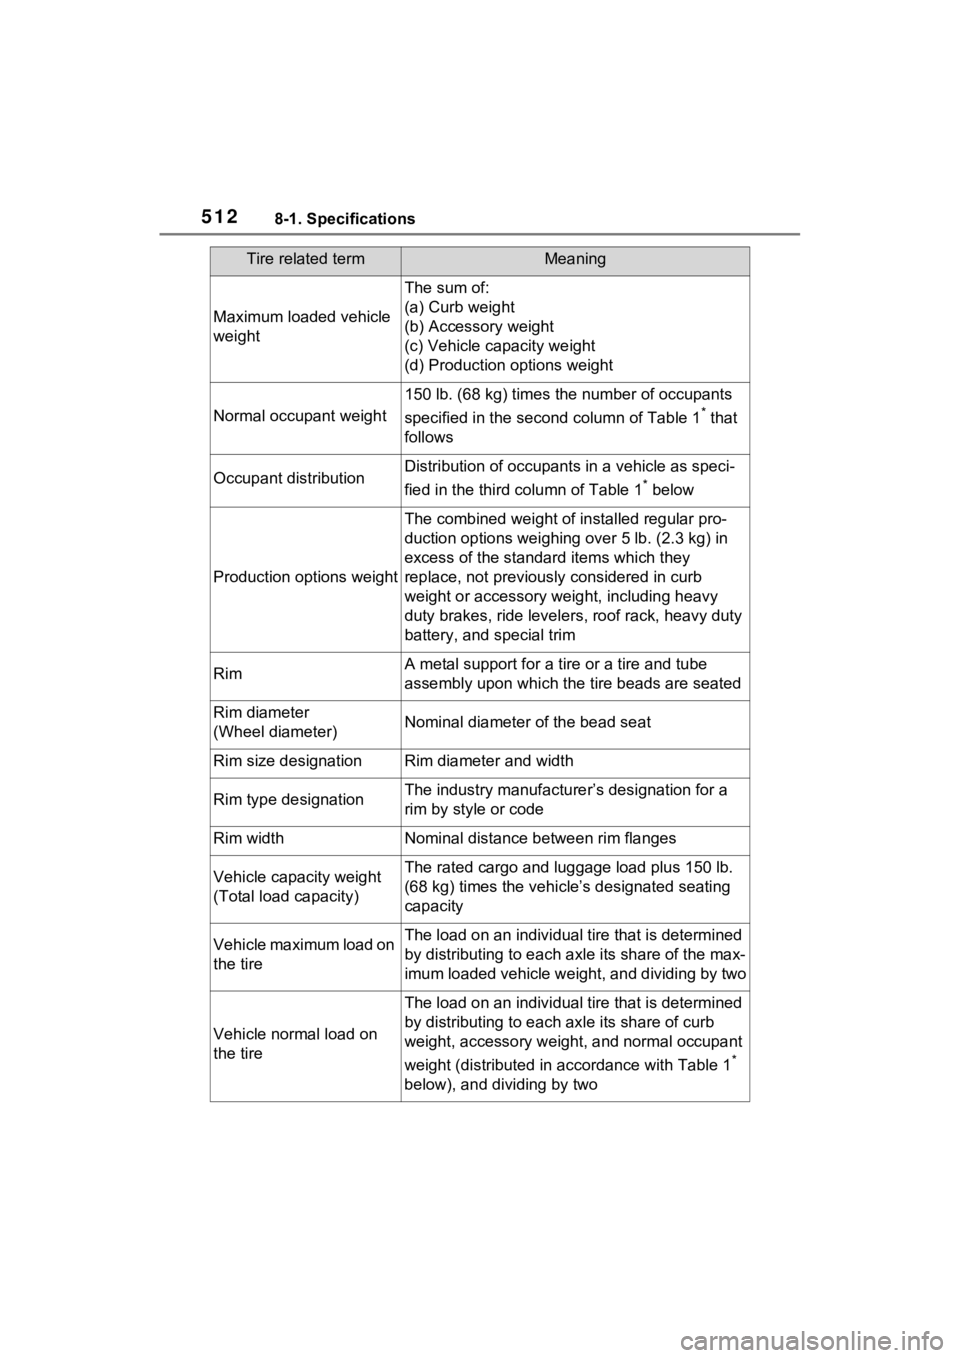
Maximum loaded vehicle
weight
The sum of:
(a) Curb weight
(b) Accessory weight
(c) Vehicle capacity weight
(d) Production options weight
Normal occupant weight
150 lb. (68 kg) times the number of occupants
specified in the second column of Table 1
* that
follows
Occupant distributionDistribution of occupant s in a vehicle as speci-
fied in the third column of Table 1
* below
Production options weight
The combined weight of installed regular pro-
duction options weighing over 5 lb. (2.3 kg) in
excess of the standard items which they
replace, not previously considered in curb
weight or accessory weight, including heavy
duty brakes, ride leveler s, roof rack, heavy duty
battery, and special trim
RimA metal support for a ti re or a tire and tube
assembly upon which the tire beads are seated
Rim diameter
(Wheel diameter)Nominal diameter o f the bead seat
Rim size designationRim diameter and width
Rim type designationThe industry manufacture r’s designation for a
rim by style or code
Rim widthNominal distance between rim flanges
Vehicle capacity weight
(Total load capacity)The rated cargo and luggage load plus 150 lb.
(68 kg) times the vehicl e’s designated seating
capacity
Vehicle maximum load on
the tireThe load on an individual tire that is determined
by distributing to each ax le its share of the max-
imum loaded vehicle weight, and dividing by two
Vehicle normal load on
the tire
The load on an individual tire that is determined
by distributing to each axle its share of curb
weight, accessory weight, and normal occupant
weight (distributed in accordance with Table 1
*
below), and dividing by two
Tire related termMeaning
Page 527 of 586
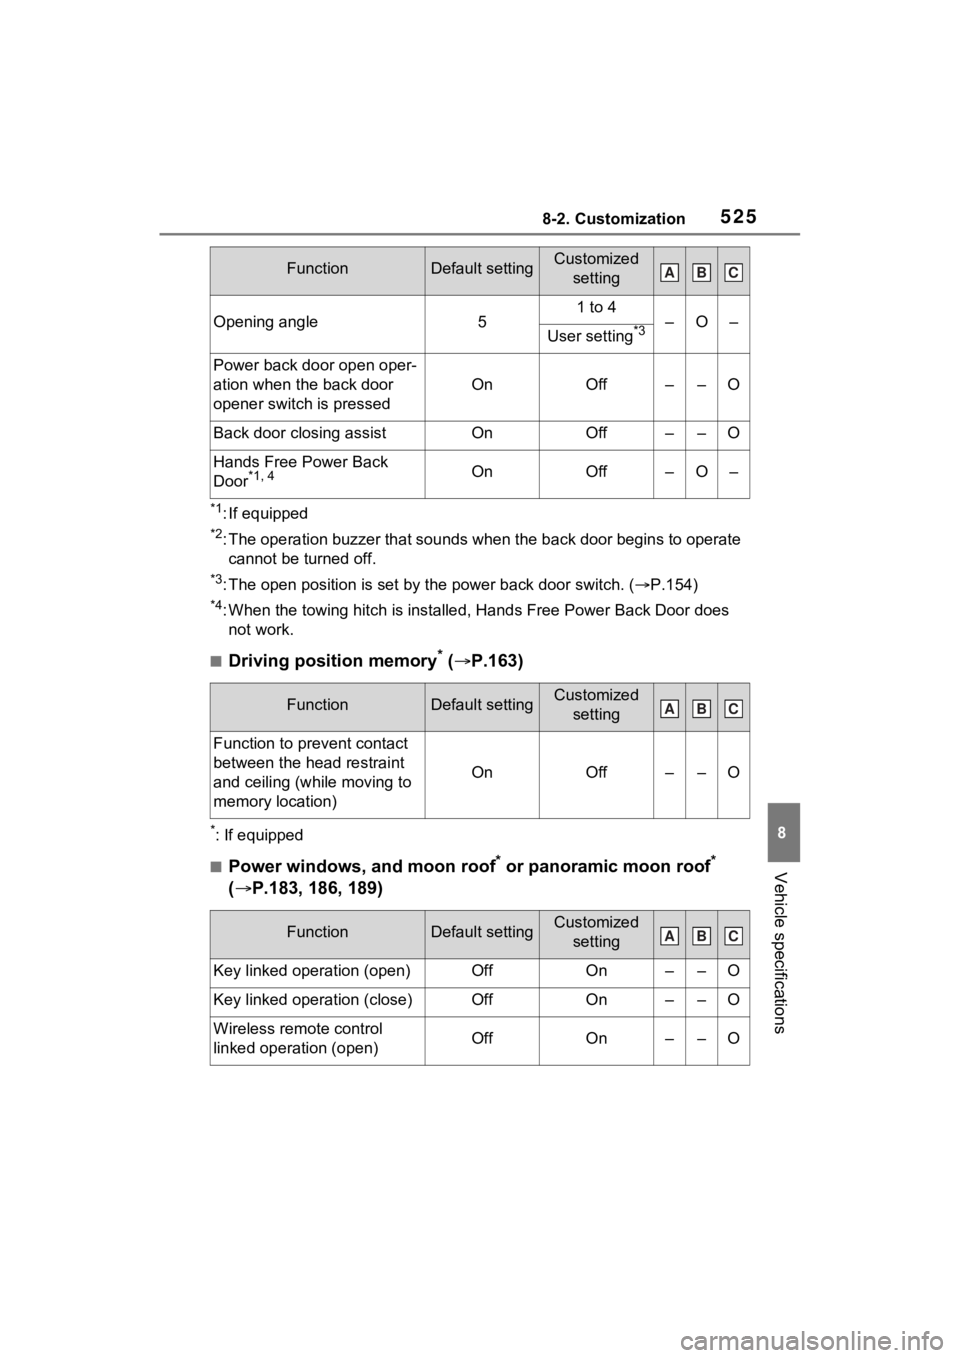
5258-2. Customization
8
Vehicle specifications
*1: If equipped
*2: The operation buzzer that sounds when the back door begins to operate
cannot be turned off.
*3: The open position is set by the power back door switch. ( P.154)
*4: When the towing hitch is installe d, Hands Free Power Back Door does
not work.
■Driving position memory* ( P.163)
*: If equipped
■Power windows, and moon roof* or panoramic moon roof*
( P.183, 186, 189)
Opening angle51 to 4–O–User setting*3
Power back door open oper-
ation when the back door
opener switch is pressed
OnOff––O
Back door closing assistOnOff––O
Hands Free Power Back
Door*1, 4OnOff–O–
FunctionDefault settingCustomized
setting
Function to prevent contact
between the head restraint
and ceiling (while moving to
memory location)
OnOff––O
FunctionDefault settingCustomized setting
Key linked operation (open)OffOn––O
Key linked operation (close)OffOn––O
Wireless remote control
linked operation (open)OffOn––O
FunctionDefault settingCustomized settingABC
ABC
ABC
Page 528 of 586
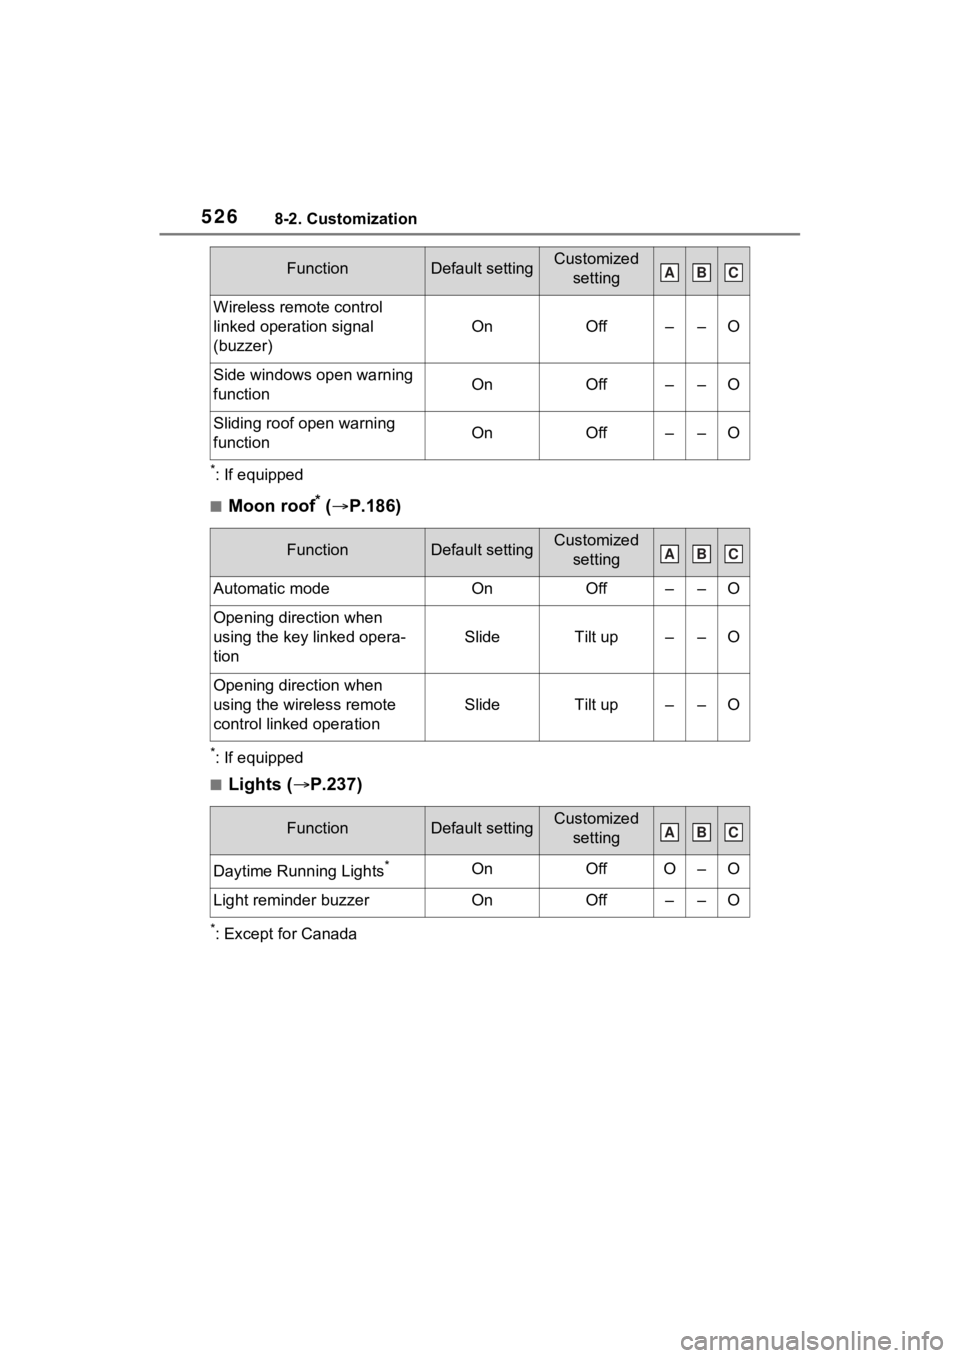
5268-2. Customization
*: If equipped
■Moon roof* ( P.186)
*: If equipped
■Lights ( P.237)
*: Except for Canada
Wireless remote control
linked operation signal
(buzzer)
OnOff––O
Side windows open warning
functionOnOff––O
Sliding roof open warning
functionOnOff––O
FunctionDefault settingCustomized
setting
Automatic modeOnOff––O
Opening direction when
using the key linked opera-
tion
SlideTilt up––O
Opening direction when
using the wireless remote
control linked operation
SlideTilt up––O
FunctionDefault settingCustomized setting
Daytime Running Lights*OnOffO–O
Light reminder buzzerOnOff––O
FunctionDefault settingCustomized settingABC
ABC
ABC
Page 533 of 586
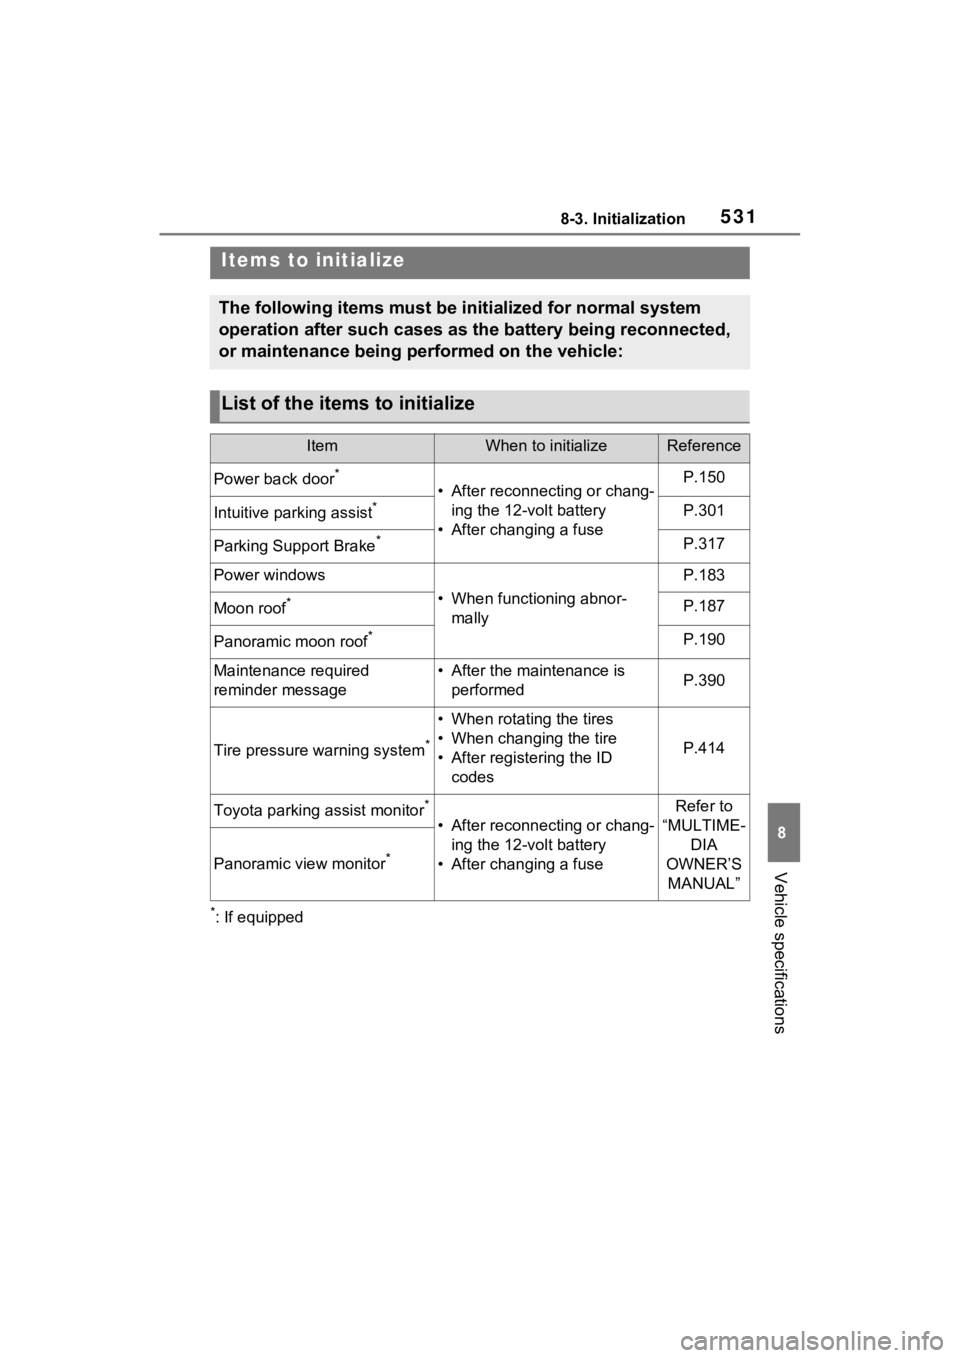
5318-3. Initialization
8
Vehicle specifications
8-3.Initialization
*: If equipped
Items to initialize
The following items must be initialized for normal system
operation after such cases as the battery being reconnected,
or maintenance being performed on the vehicle:
List of the items to initialize
ItemWhen to initializeReference
Power back door*
• After reconnecting or chang-ing the 12-volt battery
• After changing a fuseP.150
Intuitive parking assist*P.301
Parking Support Brake*P.317
Power windows
• When functioning abnor- mally
P.183
Moon roof*P.187
Panoramic moon roof*P.190
Maintenance required
reminder message• After the maintenance is performedP.390
Tire pressure warning system*
• When rotating the tires
• When changing the tire
• After registering the ID codes
P.414
Toyota parking assist monitor*
• After reconnecting or chang-ing the 12-volt battery
• After changing a fuse
Refer to
“MULTIME- DIA
OWNER’S MANUAL”
Panoramic view monitor*