2023 TOYOTA RAV4 HYBRID air condition
[x] Cancel search: air conditionPage 349 of 586

3475-1. Using the air conditioning system and defogger
5
Interior features
This function automatically con-
trols the air conditioning airflow
so that priority is given to the
front seats. When the front pas-
senger seat is not occupied, air-
flow may switch to only the
driver’s seat. Unnecessary air
conditioning is suppressed, con-
tributing to increased fuel effi-
ciency.
Front seat concentrated airflow
mode operates in the following
situations.
No passengers are detected
in the rear seats
The windshield defogger is
not operating
While operating, illumi-
nates.
■Manually turning front seat
concentrated airflow mode
on/off
In front seat concentrated air-
flow mode, directing airflow to
the front seats only and to all
seats can be switched via switch
operation. When the mode has
been switched manually, auto-
matic airflow control stops oper-
ating.
Press on the air condition-
ing operation panel and switch
the airflow.
Indicator illuminated: Airflow
to the front seats only
Indicator off: Airflow to all the
seats
■Operation of automatic airflow
control
●In order to maintain a comfortable
interior, airflow may be directed to
seats without passengers immedi-
ately after the hybrid system is
started and at other times depend-
ing on the outside temperature.
●After the hybrid system is started,
if passengers move around inside
or enter/exit the vehicle, the sys-
tem cannot accura tely detect the
presence of passengers and auto-
matic airflow co ntrol will not oper-
ate.
■Operation of manual airflow
control
Even if the funct ion is manually
switched to directing airflow to only
the front seats, w hen a rear seat is
occupied, it may automatically direct
airflow to all seats.
■To return to automatic airflow
control
1 With the indicator off, turn the
power switch to OFF.
2 After 60 minutes or more elapse,
turn the power switch to ON.
This feature is used to prevent
ice from building up on the wind-
shield and wiper blades.
Press the switch to turn the sys-
tem on/off.
The indicator comes on when the
system is on.
Front seat concentrated
airflow mode (S-FLOW)
Windshield wiper de-icer
(if equipped)
Page 350 of 586
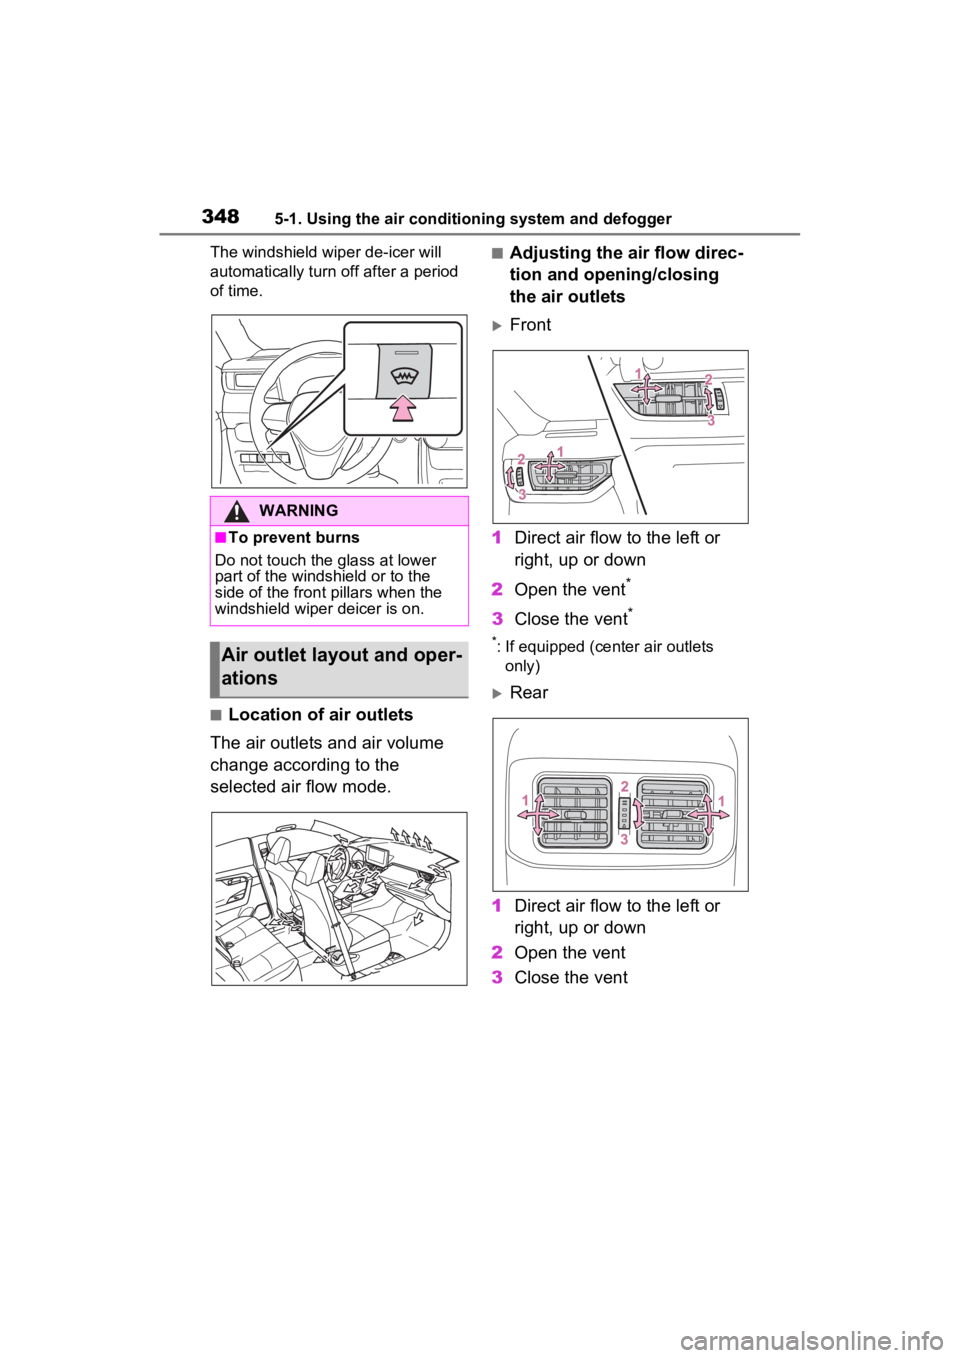
3485-1. Using the air conditioning system and defogger
The windshield wiper de-icer will
automatically turn off after a period
of time.
■Location of air outlets
The air outlets and air volume
change according to the
selected air flow mode.
■Adjusting the air flow direc-
tion and opening/closing
the air outlets
Front
1 Direct air flow to the left or
right, up or down
2 Open the vent
*
3Close the vent*
*: If equipped (cent er air outlets
only)
Rear
1 Direct air flow to the left or
right, up or down
2 Open the vent
3 Close the vent
WARNING
■To prevent burns
Do not touch the glass at lower
part of the windshield or to the
side of the fron t pillars when the
windshield wiper deicer is on.
Air outlet layout and oper-
ations
Page 351 of 586
3495-1. Using the air conditioning system and defogger
5
Interior features
*: If equipped
WARNING
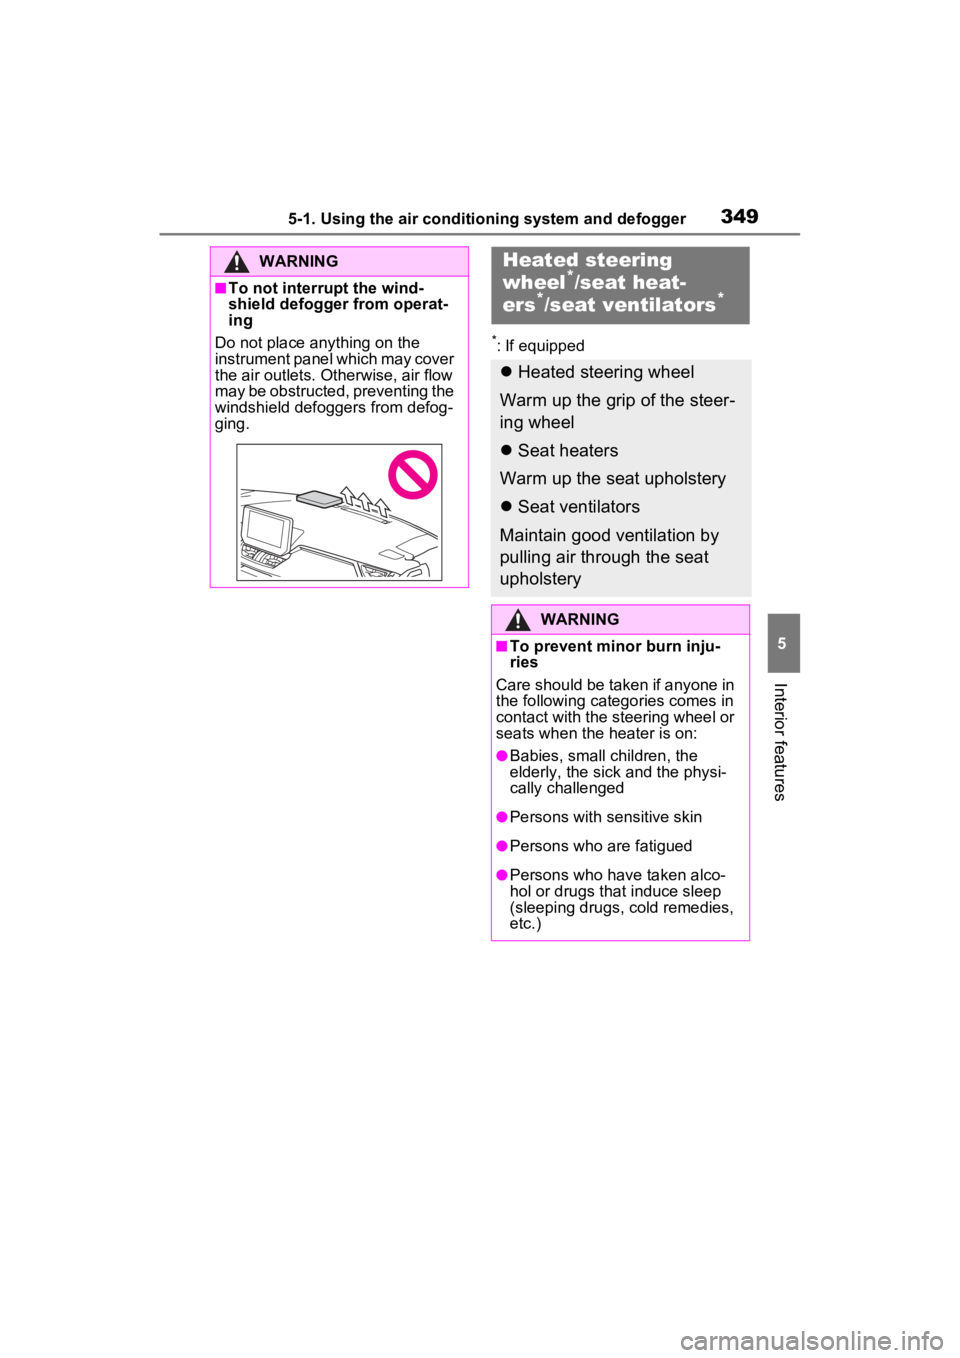
■To not interrupt the wind-
shield defogger from operat-
ing
Do not place anything on the
instrument panel which may cover
the air outlets. Otherwise, air flow
may be obstructed, preventing the
windshield defoggers from defog-
ging.
Heated steering
wheel*/seat heat-
ers*/seat ventilators*
Heated steering wheel
Warm up the grip of the steer-
ing wheel
Seat heaters
Warm up the seat upholstery
Seat ventilators
Maintain good ventilation by
pulling air through the seat
upholstery
WARNING
■To prevent minor burn inju-
ries
Care should be taken if anyone in
the following categories comes in
contact with the steering wheel or
seats when the heater is on:
●Babies, small children, the
elderly, the sick and the physi-
cally challenged
●Persons with sensitive skin
●Persons who are fatigued
●Persons who have taken alco-
hol or drugs that induce sleep
(sleeping drugs, cold remedies,
etc.)
Page 352 of 586
3505-1. Using the air conditioning system and defogger
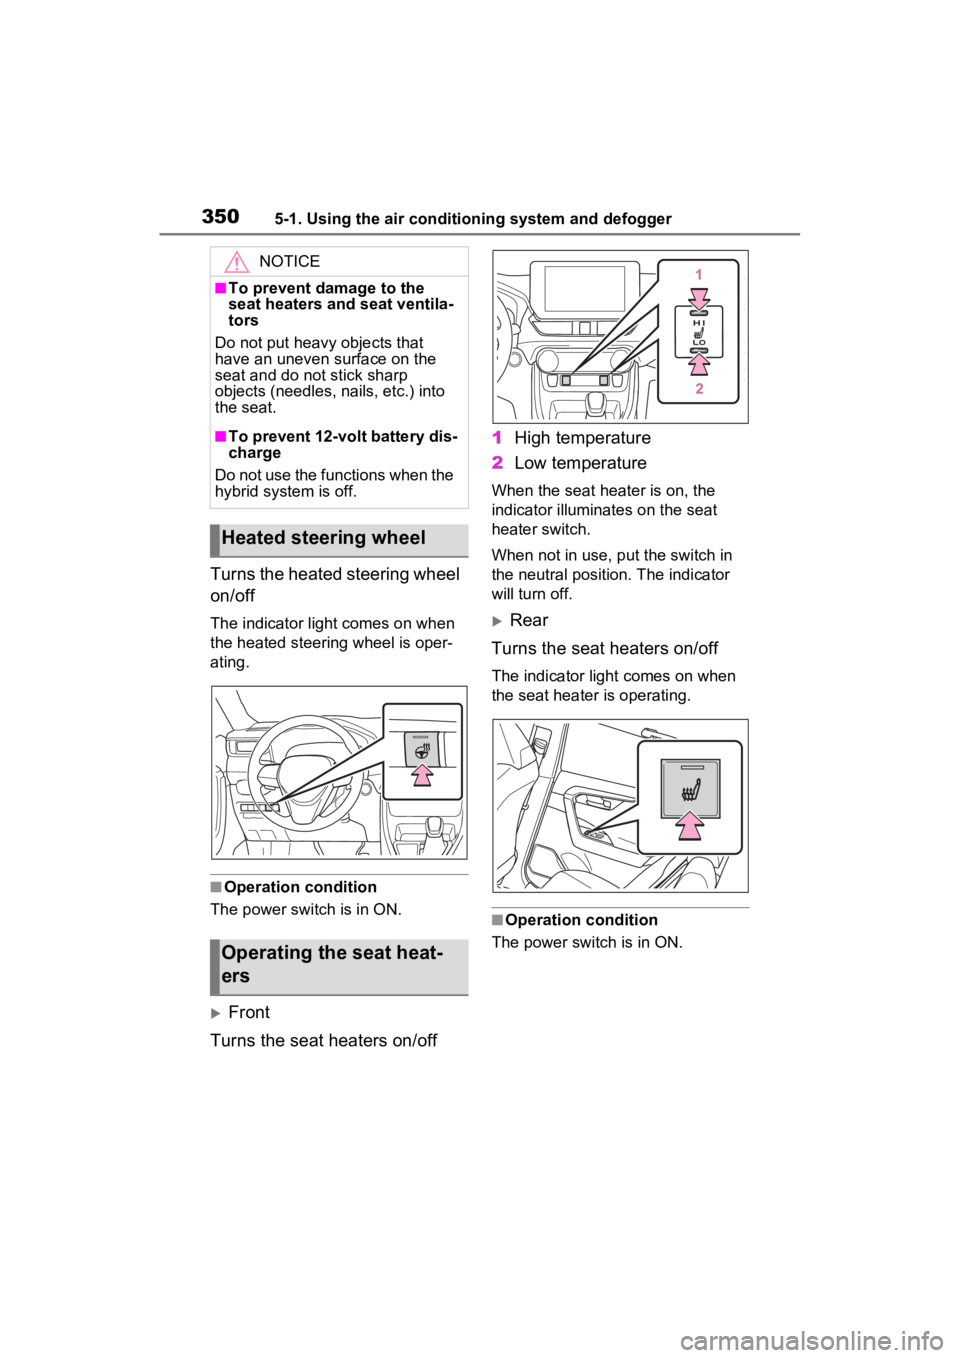
Turns the heated steering wheel
on/off
The indicator light comes on when
the heated steering wheel is oper-
ating.
■Operation condition
The power swit ch is in ON.
Front
Turns the seat heaters on/off 1
High temperature
2 Low temperature
When the seat heater is on, the
indicator illuminates on the seat
heater switch.
When not in use, put the switch in
the neutral position. The indicator
will turn off.
Rear
Turns the seat heaters on/off
The indicator light comes on when
the seat heater is operating.
■Operation condition
The power switch is in ON.
NOTICE
■To prevent damage to the
seat heaters and seat ventila-
tors
Do not put heavy objects that
have an uneven surface on the
seat and do not stick sharp
objects (needles, nails, etc.) into
the seat.
■To prevent 12-volt battery dis-
charge
Do not use the functions when the
hybrid system is off.
Heated steering wheel
Operating the seat heat-
ers
Page 353 of 586
3515-1. Using the air conditioning system and defogger
5
Interior features
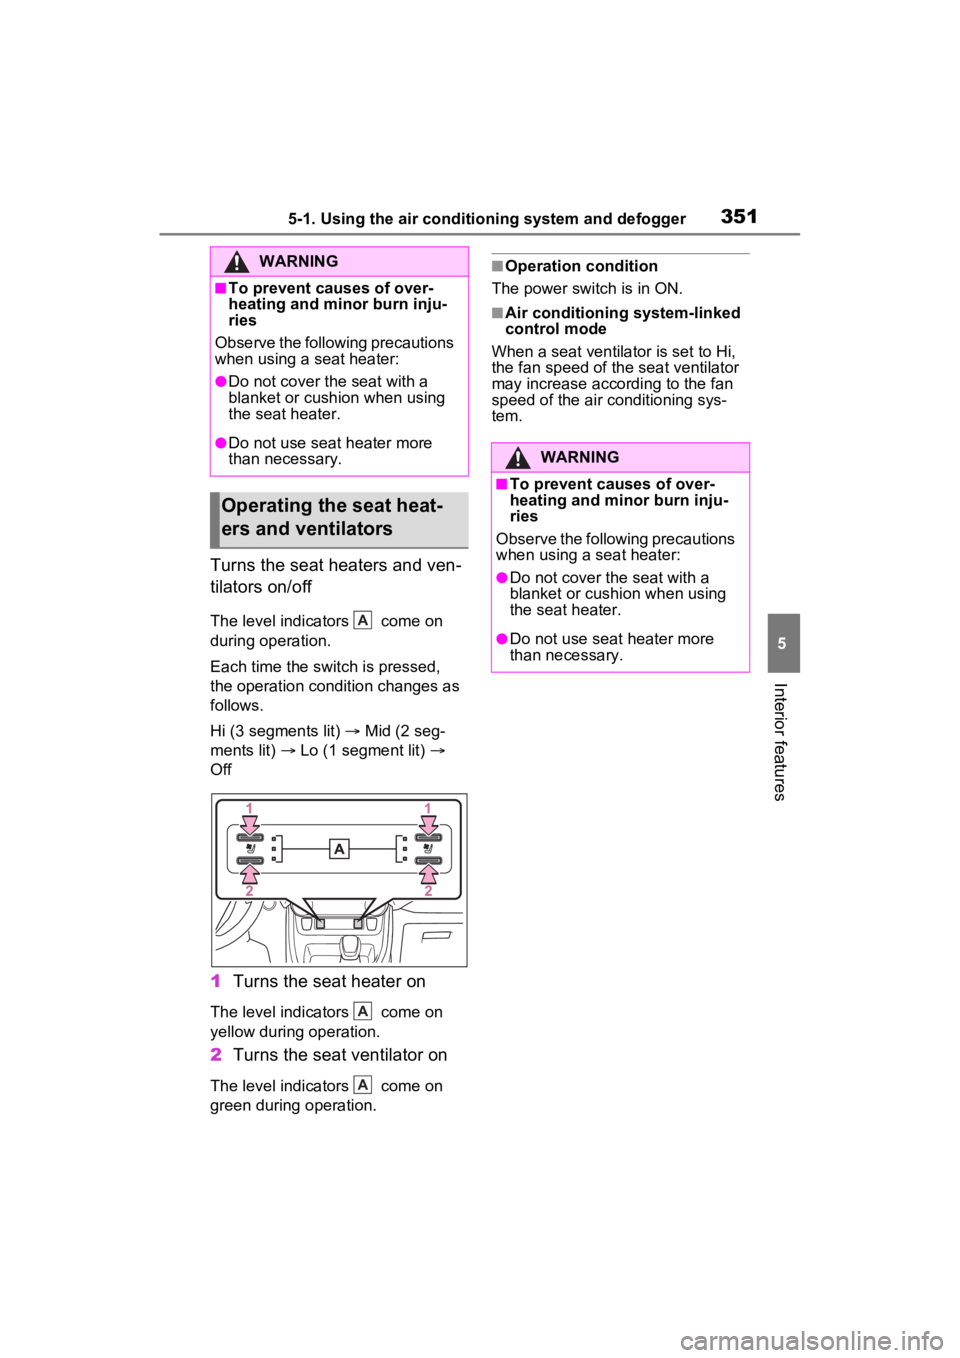
Turns the seat heaters and ven-
tilators on/off
The level indicators come on
during operation.
Each time the switch is pressed,
the operation condition changes as
follows.
Hi (3 segments lit) Mid (2 seg-
ments lit) Lo (1 segment lit)
Off
1 Turns the seat heater on
The level indicators come on
yellow during operation.
2Turns the seat ventilator on
The level indicators come on
green during operation.
■Operation condition
The power switch is in ON.
■Air conditioning system-linked
control mode
When a seat ventilator is set to Hi,
the fan speed of the seat ventilator
may increase according to the fan
speed of the air conditioning sys-
tem.
WARNING
■To prevent causes of over-
heating and minor burn inju-
ries
Observe the following precautions
when using a seat heater:
●Do not cover the seat with a
blanket or cushion when using
the seat heater.
●Do not use seat heater more
than necessary.
Operating the seat heat-
ers and ventilators
A
A
A
WARNING
■To prevent causes of over-
heating and minor burn inju-
ries
Observe the following precautions
when using a seat heater:
●Do not cover the seat with a
blanket or cushion when using
the seat heater.
●Do not use seat heater more
than necessary.
Page 385 of 586

383
6
6
Maintenance and care
Maintenance and care
6-1. Maintenance and careCleaning and protecting the vehicle exterior .......... 384
Cleaning and protecting the vehicle interior ........... 387
6-2. Maintenance Maintenance requirements.................................. 390
General maintenance.. 392
Emission inspection and maintenance (I/M) pro-
grams ........................ 394
6-3. Do-it-yourself mainte- nance
Do-it-yourself service pre- cautions ..................... 396
Hood ........................... 398
Positioning a floor jack 399
Engine compartment ... 401
12-volt battery ............. 407
Tires ............................ 409
Tire inflation pressure . 420
Wheels ......... ...............422
Air conditioning filter .... 424
Cleaning the hybrid battery (traction battery) air intake
vent ........................... 426
Wiper insert replacement .................................. 429
Wireless remote con- trol/electronic key battery
.................................. 433Checking and replacing
fuses .......................... 436
Headlight aim .............. 438
Light bulbs ................... 439
Page 389 of 586
3876-1. Maintenance and care
6
Maintenance and care
Remove dirt and dust using a
vacuum cleaner. Wipe dirty
surfaces with a cloth damp-
ened with lukewarm water.
If dirt cannot be removed,
wipe it off with a soft cloth
dampened with neutral deter-
gent diluted to approximately
1%.
Wring out any excess water
from the cloth and thoroughly
wipe off remaining traces of
detergent and water.
■Shampooing the carpets
There are several commercial foam-
ing-type cleaners available. Use a
sponge or brush to apply the foam.
Rub in overlapping circles. Do not
use water. Wipe dirty surfaces and
let them dry. Exce llent results are
obtained by keeping the carpet as
dry as possible.
■Handling the seat belts
Clean with mild soap and lukewarm
water using a clot h or sponge. Also
check the belts periodically for
excessive wear, fraying or cuts.
NOTICE
●Do not bring the nozzle tip close
to boots (rubber or resin manu-
factured cover), or connectors
or the following parts.
The parts may be damaged if
they come into contact with
high-pressure water.
• Traction related parts
• Steering parts
• Suspension parts
• Brake parts
●Keep the cleaning nozzle at
least 11.9 in. (30 cm) away from
the vehicle body. Otherwise
resin section, such as moldings
and bumpers, may be deformed
and damaged. Also, do not con-
tinuously hold the nozzle in the
same place.
●Do not spray the lower part of
the windshield continuously. If
water enters the air conditioning
system intake located near the
lower part of the windshield, the
air conditioning system may not
operate correctly.
●Do not wash the underside of
the vehicle usin g a high pres-
sure car washer.
Cleaning and protect-
ing the vehicle interior
Perform cleaning in a man-
ner appropriate to each
component and its material.
Protecting the vehicle
interior
Page 412 of 586

4106-3. Do-it-yourself maintenance
etc., molded into the sidewall of
each tire.
Replace the tires if the treadwear
indicators are showing on a tire.
■When to replace your vehicle’s
tires
Tires should be replaced if:
●The treadwear indicators are
showing on a tire.
●You have tire damage such as
cuts, splits, cracks deep enough
to expose the fabric, and bulges
indicating internal damage.
●A tire goes flat repeatedly or can-
not be properly repaired due to
the size or location of a cut or
other damage.
If you are not sure, consult with your
Toyota dealer.
■Tire life
Any tire over 6 years old must be
checked by a qualified technician
even if it has seldom or never been
used or damage i s not obvious.
■Maximum load of tire
Check that the number given by
dividing the maximum load by 1.10
of the replacement tire is greater
than 1/2 of the Gross Axle Weight
Ratings (GAWR) of e ither the front
axle or the rear a xle, whichever is
greater.
For the GAWR, see the Certification
Regulation Label. For the maximum
load of the tire, see the load limit at
maximum cold tire inflation pressure
mentioned on the sidewall of the
tire. ( P.507)
■Tire types
●Summer tires
Summer tires are high-speed perfor-
mance tires best suited to highway
driving under dry conditions. Since
summer tires do not have the same
traction performance as snow tires,
summer tires are inadequate for
driving on snow-covered or icy
roads. For driving on snow-covered
roads or icy roads, the use of snow
tires is recommended. When install-
ing snow tires, be sure to replace all
four tires.
●All season tires
All season tires are designed to pro-
vide better traction in snow and to
be adequate for driving in most win-
ter conditions as well as for use
year-round. All season tires, how-
ever, do not have adequate traction
performance compared with snow
tires in heavy or loose snow. Also,
all season tires fall short in accelera-
tion and handling performance com-
pared with summer tires in highway
driving.
●Snow tires
For driving on snow-covered roads
or icy roads, we recommend using
snow tires. If you need snow tires,
select tires of the same size, con-
struction and load capacity as the
originally installed tires. Since your
vehicle has radial tires as original
equipment, make sure your snow
tires also have radi al construction.
Do not install studded tires without
first checking local regulations for
possible restrictions. Snow tires
should be installed on all wheels.
( P.334)