2023 TOYOTA RAV4 HYBRID tow
[x] Cancel search: towPage 136 of 586
1343-1. Key information
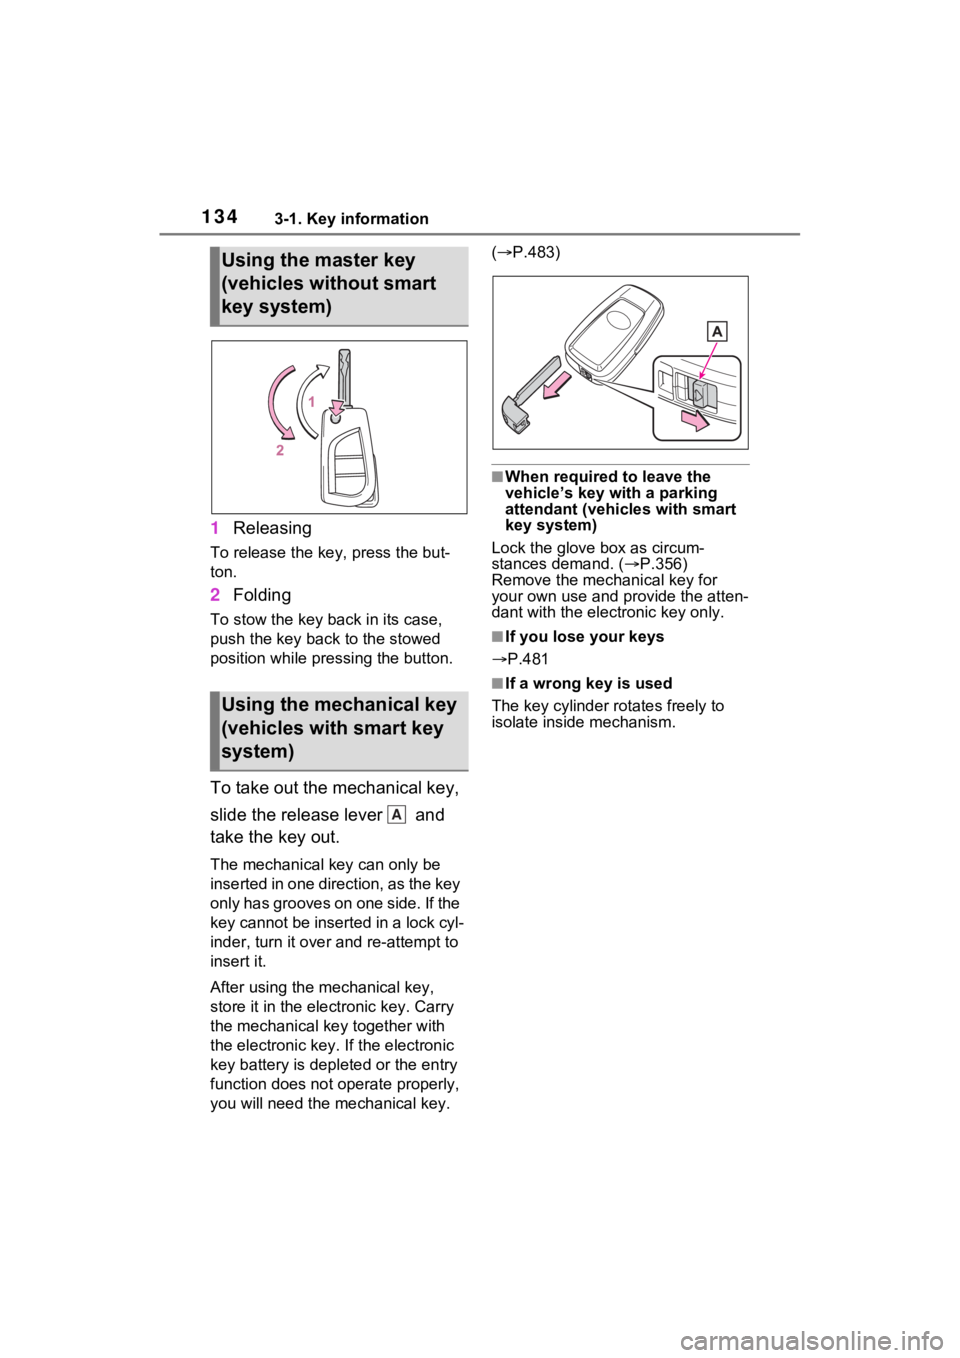
1Releasing
To release the key, press the but-
ton.
2Folding
To stow the key back in its case,
push the key back to the stowed
position while pre ssing the button.
To take out the mechanical key,
slide the release lever and
take the key out.
The mechanical key can only be
inserted in one direction, as the key
only has grooves on one side. If the
key cannot be inserted in a lock cyl-
inder, turn it over and re-attempt to
insert it.
After using the mechanical key,
store it in the electronic key. Carry
the mechanical key together with
the electronic key. If the electronic
key battery is dep leted or the entry
function does not operate properly,
you will need the m echanical key. (
P.483)
■When required to leave the
vehicle’s key wi th a parking
attendant (vehicles with smart
key system)
Lock the glove box as circum-
stances demand. ( P.356)
Remove the mechanical key for
your own use and p rovide the atten-
dant with the elec tronic key only.
■If you lose your keys
P.481
■If a wrong key is used
The key cylinder rotates freely to
isolate inside mechanism.
Using the master key
(vehicles without smart
key system)
Using the mechanical key
(vehicles with smart key
system)
A
Page 151 of 586
1493-2. Opening, closing and locking the doors
3
Before driving
A buzzer sounds and the emer-
gency flashers flash to indicate that
all the doors have been closed and
locked.
●If the electronic key is placed
inside the vehicle after starting a
close operation via the door
reserve lock function, the elec-
tronic key may become locked
inside the vehicle.
●If the power back door does not
fully close due to the operation of
the jam protection function, etc.,
while the back doo r is automati-
cally closing after a door reserve
lock operation is performed, the
door reserve lock function is can-
celed and all the doors will unlock.
●Before leaving the vehicle, make
sure that all the doors are closed
and locked.
■Hands Free Powe r Back Door
operating conditions (vehicles
with Hands Free Power Back
Door)
The Hands Free Power Back Door
will open/close automatically when
the following cond itions are met:
●The Hands Free Power Back Door
operation is enabled ( P.110)
●The power switch is in OFF.
●The electronic key is within the
operational range. ( P.156)
●A foot is put near the lower center
part of the rear bumper and
moved away from the rear
bumper.
The power back door may also be
operated by putting a hand, an
elbow, a knee, etc. near the lower
center part of the rear bumper and
moving it away from the rear
bumper. Make sure to put it close
enough to the center part of the
rear bumper.
■Situations in which the Hands
Free Power Back Door may not
operate properly (vehicles with
Hands Free Power Back Door)
In the following si tuations, the
Hands Free Power Back Door may
not operate properly:
●When a foot remains under the
rear bumper
●If the rear bumper is strongly hit
with a foot or is touched for a while
If the rear bumper has been touched
for a while, wait f or a short time
before attempting to operate the
Hands Free Power Back Door
again.
●When operated while a person is
too close to the rear bumper
●When an external radio wave
source interferes with the commu-
nication between the electronic
key and the vehicle ( P.157)
●When the vehicle is parked near
an electrical noise source which
affects the sensitivity of the Hands
Free Power Back Door, such as a
pay parking spot, gas station,
electrically heated road, or fluo-
rescent light
●When the vehicle is near a TV
tower, electric po wer plant, radio
station, large display, airport or
other facility that generates strong
radio waves or electrical noise
●When a large amount of water is
applied to the rea r bumper, such
as when the vehicle is being
washed or in heavy rain
●When mud, snow, ice, etc. is
attached to the rear bumper
●When the vehicle has been
parked for a while near objects
that may move and contact the
rear bumper, such as plants
●When an accessory i s installed to
the rear bumper
If an accessory has been installed,
turn the Hands F ree Power Back
Page 152 of 586
1503-2. Opening, closing and locking the doors
Door operation setting off.
■Preventing unintentional opera-
tion of the Hands Free Power
Back Door (vehicles with Hands
Free Power Back Door)
When an electronic key is in the
operation range, the Hands Free
Power Back Door may operate unin-
tentionally, so be careful in the fol-
lowing situations.
●When a large amount of water is
applied to the rear bumper, such
as when the vehicle is being
washed or in heavy rain
●When dirt is wiped off the rear
bumper
●When a small animal or small
object, such as a ball, moves
under the rear bumper
●When an object is moved from
under the rear bumper
●If someone is swinging their legs
while sitting on the rear bumper
●If the legs or another part of some-
one’s body contacts the rear
bumper while passi ng by the vehi-
cle
●When the vehicle is parked near
an electrical noise source which
affects the sensitivity of the Hands
Free Power Back Door, such as a
pay parking spot , gas station,
electrically heated road, or fluo-
rescent light
●When the vehicle is near a TV
tower, electric power plant, radio
station, large display, airport or
other facility that generates strong
radio waves or electrical noise
●When the vehicle is parked in a
place where objects such as
plants are near the rear bumper
●If luggage, etc. is s et near the rear
bumper
●If accessories or a vehicle cover is
installed/removed near the rear
bumper
●When the vehicle is being towed To prevent unintentional operation,
turn the Hands F
ree Power Back
Door operation setting off. ( P.110)
■When reconnecting the 12-volt
battery
To enable the power back door to
operate properly, close the back
door manually.
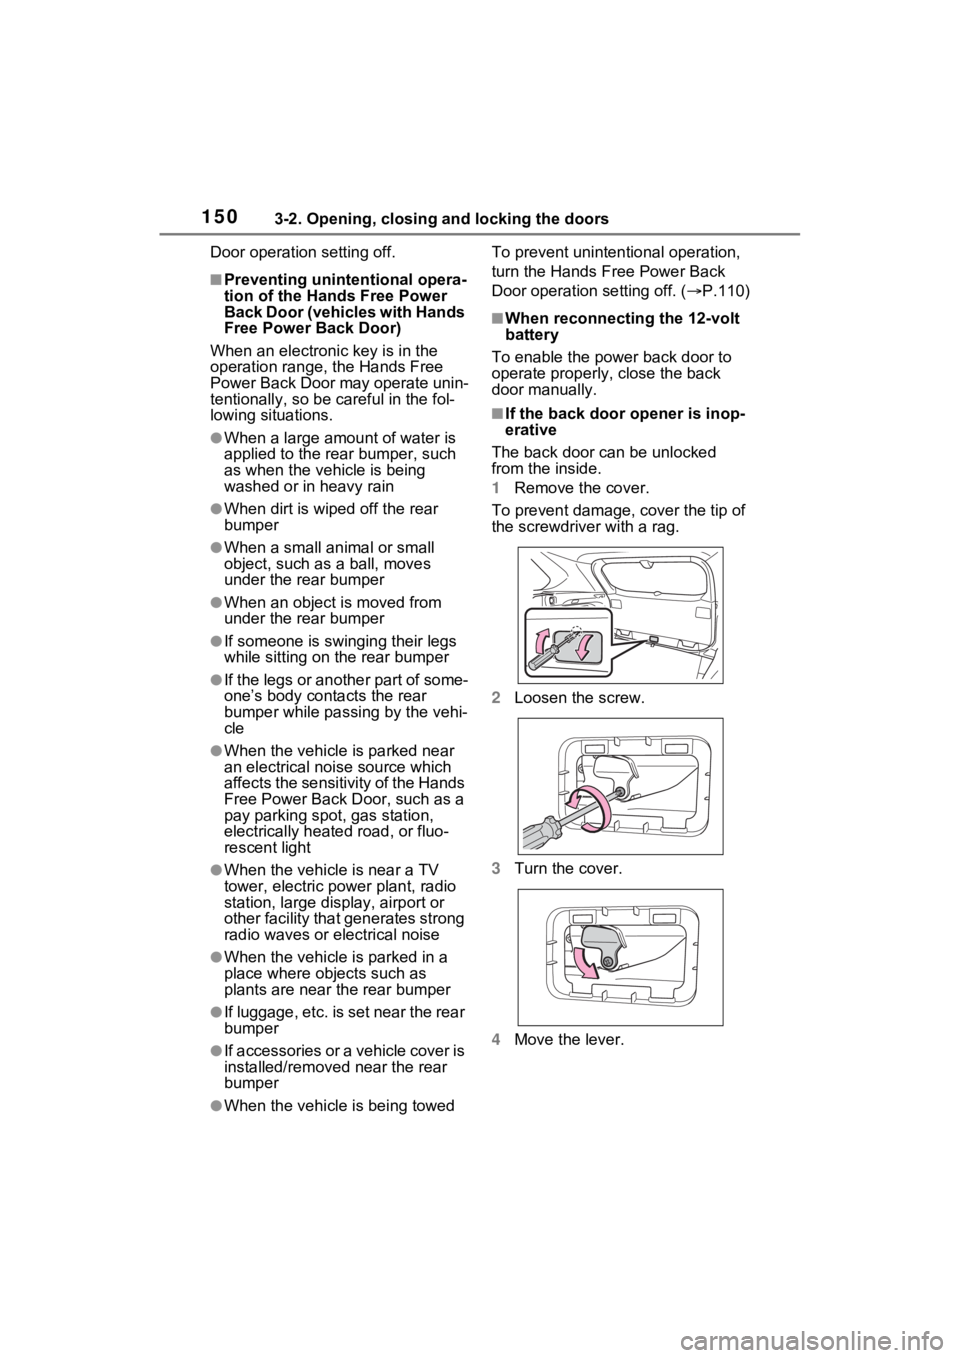
■If the back door opener is inop-
erative
The back door can be unlocked
from the inside.
1 Remove the cover.
To prevent damage, cover the tip of
the screwdriver with a rag.
2 Loosen the screw.
3 Turn the cover.
4 Move the lever.
Page 159 of 586
1573-2. Opening, closing and locking the doors
3
Before driving
mechanical key, to unlock the
doors.
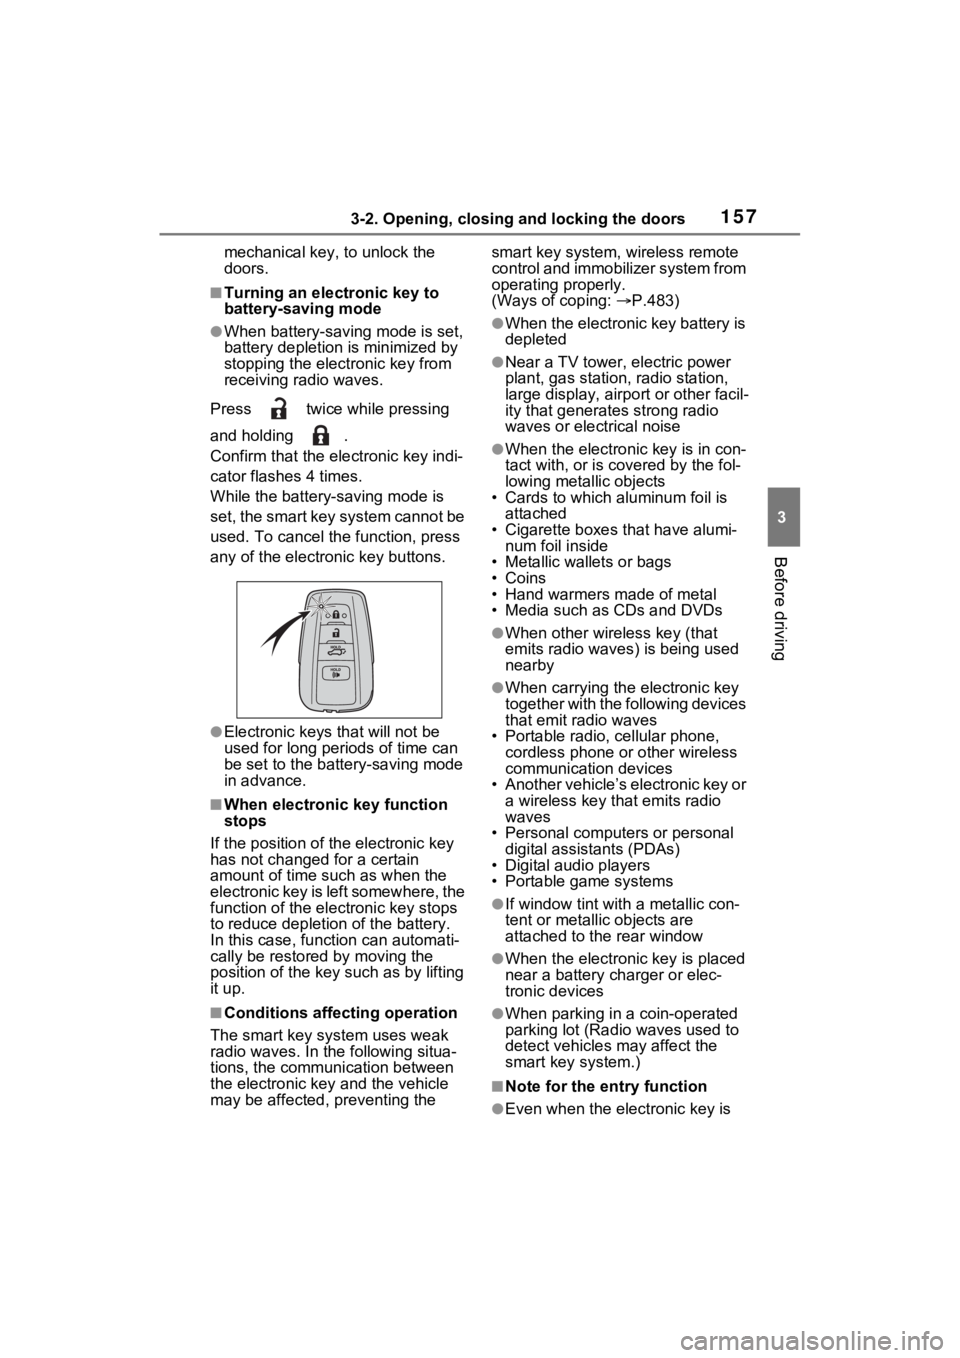
■Turning an electronic key to
battery-saving mode
●When battery-saving mode is set,
battery depletion is minimized by
stopping the electronic key from
receiving radio waves.
Press twice while pressing
and holding .
Confirm that the electronic key indi-
cator flashes 4 times.
While the battery-saving mode is
set, the smart key system cannot be
used. To cancel the function, press
any of the electronic key buttons.
●Electronic keys that will not be
used for long periods of time can
be set to the battery-saving mode
in advance.
■When electronic key function
stops
If the position of the electronic key
has not changed for a certain
amount of time such as when the
electronic key is left somewhere, the
function of the electronic key stops
to reduce depletio n of the battery.
In this case, function can automati-
cally be restored by moving the
position of the key such as by lifting
it up.
■Conditions affecting operation
The smart key system uses weak
radio waves. In the following situa-
tions, the communication between
the electronic key and the vehicle
may be affected, preventing the smart key system, wireless remote
control and immobilizer system from
operating properly.
(Ways of coping:
P.483)
●When the electronic key battery is
depleted
●Near a TV tower, electric power
plant, gas station, radio station,
large display, airpo rt or other facil-
ity that generates strong radio
waves or electrical noise
●When the electronic key is in con-
tact with, or is c overed by the fol-
lowing metallic objects
• Cards to which aluminum foil is
attached
• Cigarette boxes that have alumi- num foil inside
• Metallic wallets or bags
•Coins
• Hand warmers made of metal
• Media such as CDs and DVDs
●When other wireless key (that
emits radio waves) is being used
nearby
●When carrying the electronic key
together with the following devices
that emit radio waves
• Portable radio, cellular phone, cordless phone or other wireless
communication devices
• Another vehicle’s electronic key or a wireless key that emits radio
waves
• Personal computers or personal digital assistants (PDAs)
• Digital audio players
• Portable game systems
●If window tint wit h a metallic con-
tent or metallic objects are
attached to the rear window
●When the electronic key is placed
near a battery charger or elec-
tronic devices
●When parking in a coin-operated
parking lot (Radio waves used to
detect vehicles may affect the
smart key system.)
■Note for the entry function
●Even when the electronic key is
Page 164 of 586
1623-3. Adjusting the seats
■Before folding down the
seatbacks
1 Park the vehicle in a safe
place.
Apply the parking brake ( P.231)
and shift the shift lever to P.
( P.227)
2 Adjust the position of the
front seat and the angle of
the seatback. ( P.160)
Depending on the position of the
front seat, if the seatback is folded
backward, it may interfere with the
operation of the rear seat.
3 Lift up and push down the
head restraints of the rear
outboard seats, and lower
the head restraint of the rear
center seat. ( P.166)
4 Stow the armrest of the rear
seat if it is pulled out.
( P.373)
This step is not necessary when
operating the left side seat only.
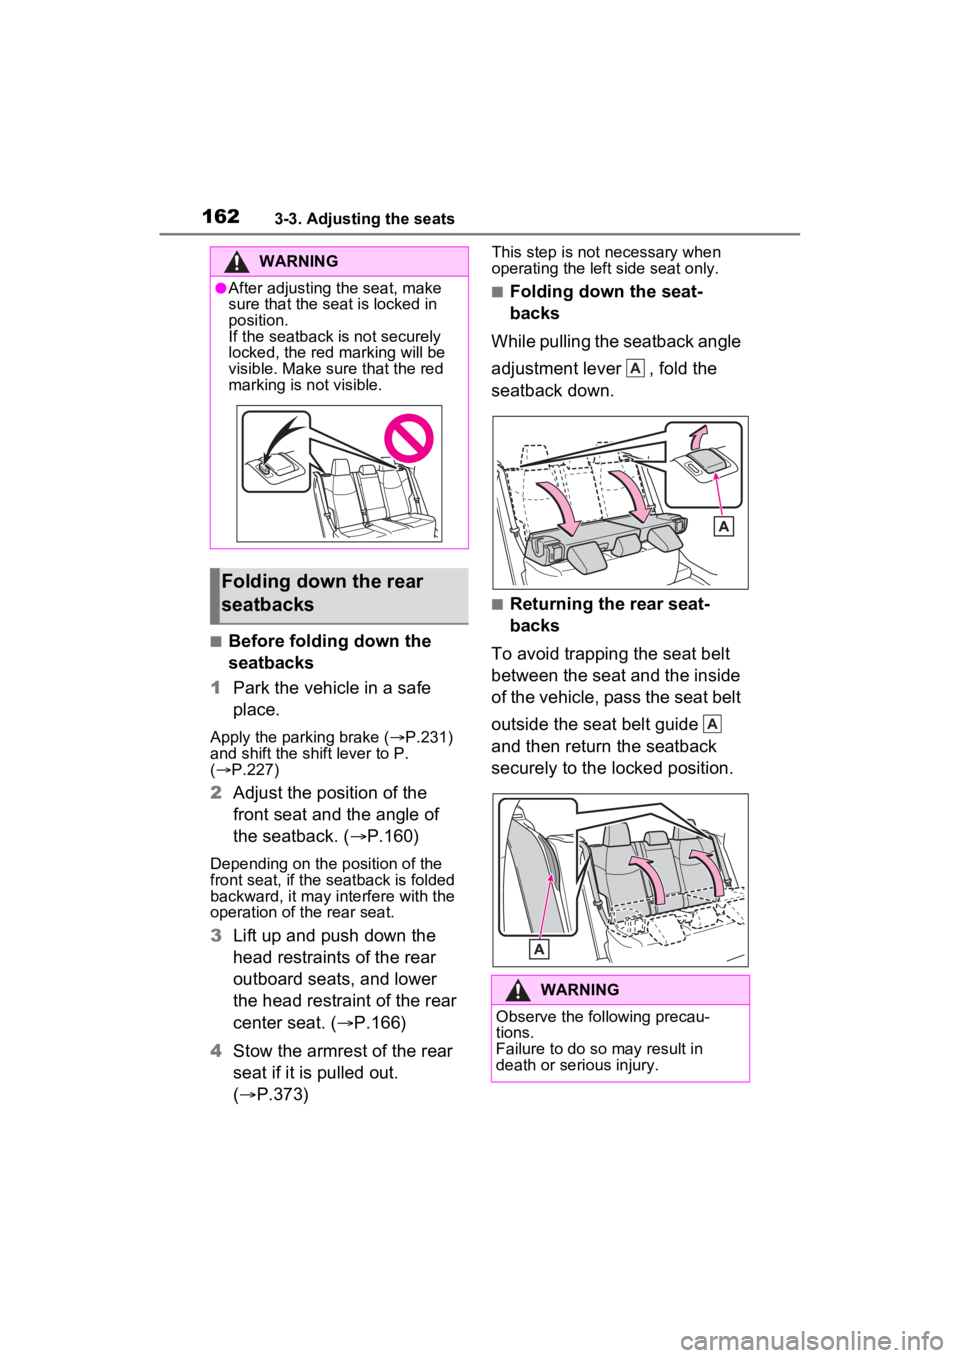
■Folding down the seat-
backs
While pulling the seatback angle
adjustment lever , fold the
seatback down.
■Returning the rear seat-
backs
To avoid trapping the seat belt
between the seat and the inside
of the vehicle, pass the seat belt
outside the seat belt guide
and then return the seatback
securely to the locked position.
WARNING
●After adjusting the seat, make
sure that the seat is locked in
position.
If the seatback is not securely
locked, the red marking will be
visible. Make sure that the red
marking is not visible.
Folding down the rear
seatbacks
WARNING
Observe the following precau-
tions.
Failure to do so may result in
death or serious injury.
A
A
Page 169 of 586
1673-3. Adjusting the seats
3
Before driving
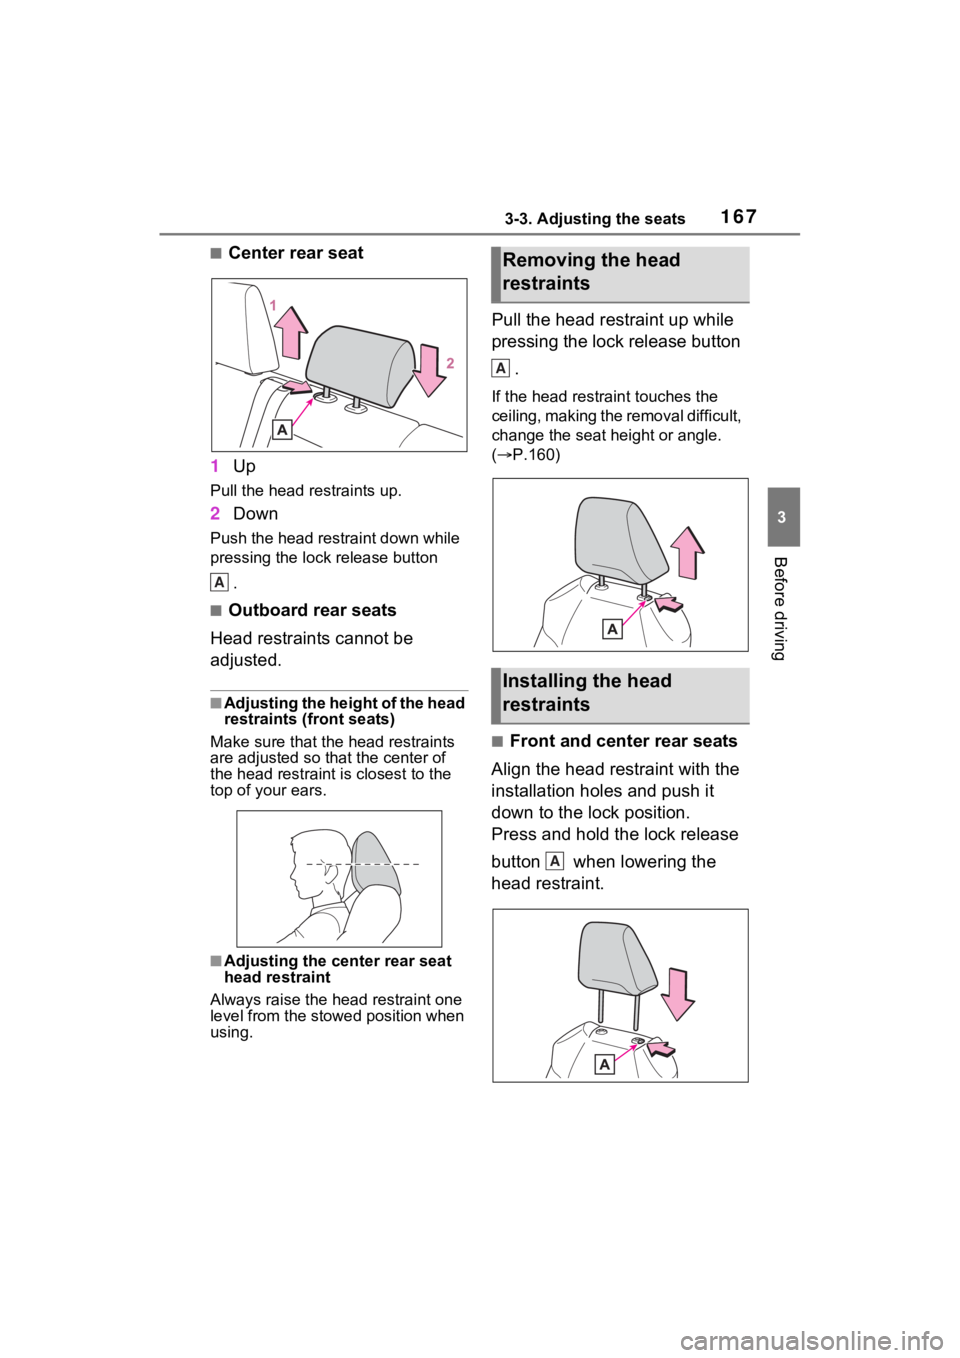
■Center rear seat
1 Up
Pull the head restraints up.
2Down
Push the head restraint down while
pressing the lock release button
.
■Outboard rear seats
Head restraints cannot be
adjusted.
■Adjusting the height of the head
restraints (front seats)
Make sure that the head restraints
are adjusted so that the center of
the head restraint is closest to the
top of your ears.
■Adjusting the center rear seat
head restraint
Always raise the head restraint one
level from the stowed position when
using.
Pull the head restraint up while
pressing the lock release button
.
If the head restrai nt touches the
ceiling, making the removal difficult,
change the seat height or angle.
( P.160)
■Front and center rear seats
Align the head restraint with the
installation holes and push it
down to the lock position.
Press and hold the lock release
button when lowering the
head restraint.
A
Removing the head
restraints
Installing the head
restraints
A
A
Page 180 of 586
1783-4. Adjusting the steering wheel and mirrors
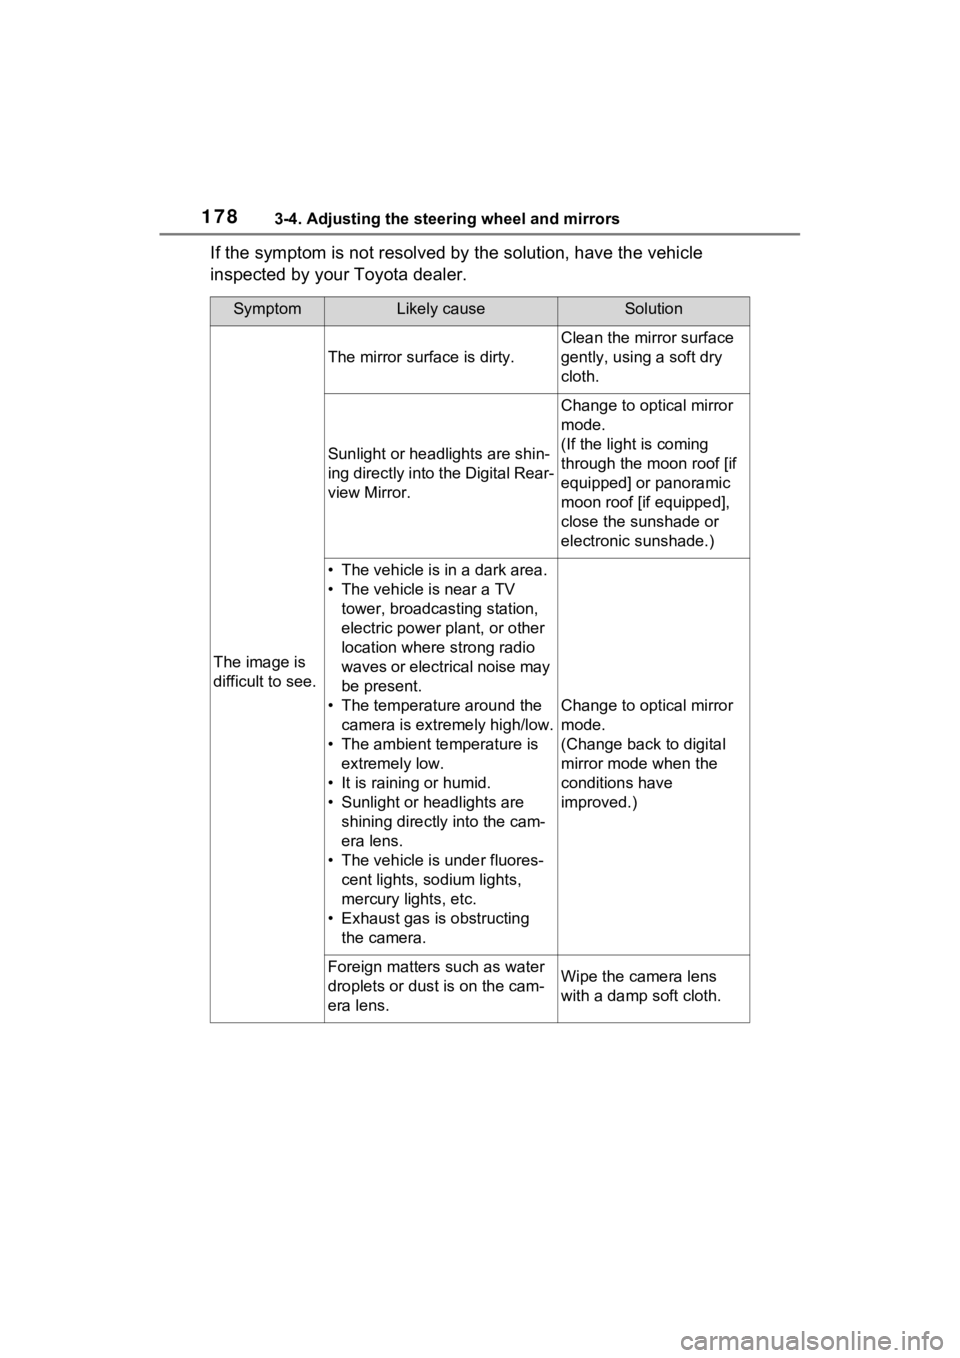
If the symptom is not resolved by the solution, have the vehicle
inspected by your Toyota dealer.
SymptomLikely causeSolution
The image is
difficult to see.
The mirror surface is dirty.
Clean the mirror surface
gently, using a soft dry
cloth.
Sunlight or headlights are shin-
ing directly into the Digital Rear-
view Mirror.
Change to optical mirror
mode.
(If the light is coming
through the moon roof [if
equipped] or panoramic
moon roof [if equipped],
close the sunshade or
electronic sunshade.)
• The vehicle is in a dark area.
• The vehicle is near a TV tower, broadcasting station,
electric power plant, or other
location where strong radio
waves or electrical noise may
be present.
• The temperature around the camera is extremely high/low.
• The ambient te mperature is
extremely low.
• It is raining or humid.
• Sunlight or headlights are shining directly into the cam-
era lens.
• The vehicle is under fluores- cent lights, sodium lights,
mercury lights, etc.
• Exhaust gas is obstructing the camera.
Change to optical mirror
mode.
(Change back to digital
mirror mode when the
conditions have
improved.)
Foreign matters such as water
droplets or dust is on the cam-
era lens.Wipe the camera lens
with a damp soft cloth.
Page 195 of 586
193
4
4
Driving
Driving
4-1. Before drivingDriving the vehicle....... 195
Cargo and luggage ..... 202
Vehicle load limits ....... 205
Trailer towing .............. 206
Dinghy towing ............. 216
4-2. Driving procedures Power (ignition) switch (vehicles without smart
key system) ............... 217
Power (ignition) switch (vehicles with smart key
system)...................... 219
EV drive mode ............ 224
Hybrid transmission .... 226
Turn signal lever ......... 230
Parking brake .............. 231
Brake Hold .................. 235
4-3. Operating the lights and wipers
Headlight switch .......... 237
AHB (Automatic High Beam)........................ 240
Fog light switch ........... 244
Windshield wipers and washer....................... 244
Rear window wiper and washer....................... 247
4-4. Refueling Opening the fuel tank cap.................................. 2494-5. Using the dr
iving support
systems
Toyota Safety Sense 2.5 .................................. 252
PCS (Pre-Collision System) .................................. 257
LTA (Lane Tracing Assist) .................................. 268
RSA (Road Sign Assist) .................................. 279
Dynamic radar cruise con- trol with full-speed range
.................................. 282
BSM (Blind Spot Monitor) .................................. 293
Intuitive parking assist . 298
RCTA (Rear Cross Traffic Alert) function ............ 307
PKSB (Parking Support Brake) ........................ 312
Parking Support Brake func- tion (static objects)
.................................. 318
Parking Support Brake function (rear-crossing
vehicles) .................... 321
Driving mode select switch .................................. 323
Trail Mode (AWD vehicles) .................................. 324
Driving assist systems. 326