2023 TOYOTA PRIUS PLUG-IN HYBRID maintenance schedule
[x] Cancel search: maintenance schedulePage 204 of 818

2023. Instrument cluster
Prius Plug-in Hybrid_OM_OM47F38E_(EE)
■The meters and display illuminate when
The power switch is in ON mode.
■Adjusting the instrument cluster brightness (P. 196)
●The brightness levels that can be selected differ depending on whether the
tail lights are on and surrounding brightness levels, as shown in the table
below.
*: 22 levels of the brightness are displayed on the setting screen. However,
the brightness setting will be the brightest when other than 1st level (the
darkest) is selected. If other than 1st or 22nd level is selected, when the
tail lights are turned on in a dark place, the instrument cluster brightness
setting will be the selected level.
●If the taillights are illuminated in a dark environment, the instrument cluster
light dims. However, when the brightness of the instrument cluster is set to
minimum or maximum (1st or 22nd level of the instrument cluster bright-
ness), even if the taillights are illuminated, the instrument cluster light will
not dim.
■When disconnecting and reconnecting 12-volt battery terminals
The settings of the clock will be reset.
■Calendar setting
●Until the calendar setting is completed, the check screen is displayed every
time the power switch is turned to ON mode.
●After the calendar information is set, it can be changed in the “Meter Custo-
mize” settings. (P. 250)
The tail lights are offThe tail lights are on
In a bright place2 levels*2 levels*
In a dark place22 levels
If calendar recording is interrupted due to
replacement of the 12-volt battery or 12-
volt battery discharge, etc., when the
power switch is turned to ON mode after
maintenance, the calendar setting check
screen is automatically displayed on the
multi-information display.
●If date information is not set, the electric-
ity and fuel consumption record cannot
be stored correctly. Also, the charging
schedule function can not operate prop-
erly. When the calendar setting check
screen is displayed, make sure to com-
plete the calendar setting. (P. 247)
Page 580 of 818

5787-2. Maintenance
Prius Plug-in Hybrid_OM_OM47F38E_(EE)
Maintenance requirements
Scheduled maintenance should be performed at specified intervals
according to the maintenance schedule.
For full details of your maintenance schedule, refer to the “Toyota Service
Booklet” or “Toyota Warranty Booklet”.
What about do-it-yourself maintenance?
Many maintenance items are easy to do yourself if you have a little
mechanical ability and a few basic automotive tools.
Note, however, that some maintenance tasks require special tools and
skills. These are best performed by qualified technicians. Even if you’re an
experienced do-it-yourself mechanic, we recommend that repairs and
maintenance be conducted by any authorized Toyota retailer or Toyota
authorized repairer, or any reliable repairer. Any authorized Toyota retailer
or repairer will keep a record of maintenance, which could be useful should
you ever require Warranty Service. Should you choose to select a qualified
and equipped professional other than an authorized Toyota repairer to ser-
vice or maintain your vehicle, we recommend that you request that a
record of maintenance be kept.
To ensure safe and economical driving, day-to-day care and reg-
ular maintenance are essential. Toyota recommends the follow-
ing maintenance:
Scheduled maintenance
Do-it-yourself maintenance
Page 581 of 818

5797-2. Maintenance
Prius Plug-in Hybrid_OM_OM47F38E_(EE)
7
Maintenance and care
■Where to go for maintenance service?
In order to maintain your vehicle in the best possible condition, Toyota recom-
mends that maintenance service operations as well as other inspections and
repairs be carried out by authorized Toyota retailers or Toyota authorized
repairers, or any reliable repairers. For repairs and services covered by your
warranty, please visit an authorized Toyota retailer or repairer, who will use
genuine Toyota parts in repairing any difficulties you may encounter. There
can also be advantages in utilizing authorized Toyota retailers or repairers for
non-warranty repairs and services, as members of the Toyota network will be
able to expertly assist you with any difficulties you may encounter.
Your Toyota retailer or Toyota authorized repairer, or any reliable repairer will
perform all of the scheduled maintenance on your vehicle reliably and eco-
nomically due to their experience with Toyota vehicles.
■Does your vehicle need repairs?
Be on the alert for changes in performance and sounds, and visual tip-offs
that indicate service is needed. Some important clues are:
●Engine missing, stumbling or pinging
●Appreciable loss of power
●Strange engine noises
●A fluid leak under the vehicle (However, water dripping from the air condi-
tioning system after use is normal.)
●Change in exhaust sound (This may indicate a dangerous carbon monoxide
leak. Drive with the windows open and have the exhaust system checked
immediately.)
●Flat-looking tires, excessive tire squeal when cornering, uneven tire wear
●Vehicle pulls to one side when driven straight on a level road
●Strange noises related to suspension movement
●Loss of brake effectiveness, spongy feeling brake pedal, pedal almost
touches the floor, vehicle pulls to one side when braking
●Engine coolant temperature continually higher than normal (P. 661, 705)
If you notice any of these clues, take your vehicle to any authorized Toyota
retailer or Toyota authorized repairer, or any reliable repairer as soon as pos-
sible. Your vehicle may need adjustment or repair.
Page 629 of 818

6277-3. Do-it-yourself maintenance
Prius Plug-in Hybrid_OM_OM47F38E_(EE)
7
Maintenance and care
Remove the air conditioning fil-
ter from the filter case and
replace it with a new one.
The “ UP” marks shown on the fil-
ter should be pointing up.
When installing, reverse the steps listed.
■ Checking interval
Inspect and replace the air conditioning filter according to the maintenance
schedule. In dusty areas or areas with heavy traffic flow, early replacement
may be required. (For scheduled maintenance information, please refer to the
“Toyota Service Booklet” or “Toyota Warranty Booklet”.)
■ If air flow from the vents decreases dramatically
The filter may be clogged. Check the filter and replace if necessary.
8
WARNING
■ When replacing the air conditioning filter
Observe the following precautions. Failure to do so may result in the air
conditioning system operating during t he procedure, possibly resulting in
injury.
● Check that the charging connector is not connected
The air conditioning may operate due to the “Climate Prep” ( P. 166) or
“Traction Battery Cooler” ( P. 145) setting. (if equipped)
● Do not use the Remote Air Conditioning System
9
Page 676 of 818

6748-2. Steps to take in an emergency
Prius Plug-in Hybrid_OM_OM47F38E_(EE)
■If the shift position cannot be changed or the power switch is turned to
ACCESSORY mode even if trying to turn the power switch off when a
warning message is shown
If the 12-volt battery is discharged or the shift control system is malfunction-
ing, the followings may occur.
● The shift position may not be changed to P.
When parking, stop the vehicle on level ground and apply the parking brake
firmly.
● The hybrid system may not start.
● The power switch may be turned to ACCESSORY mode even if trying to
turn the power switch off.
In this case, the power switch may be turned off after applying the parking
brake.
● The automatic P position selection function (P. 332) may not operate.
Before turning the power switch off, be sure to press the P position switch
and check that the shift position is in P by the shift position indicator or P
position switch indicator.
■ Warning buzzer
P. 665
NOTICE
■If “Maintenance Required for Traction Battery at Your Dealer” is shown
The hybrid battery (traction battery) is scheduled to be inspected or
replaced. Have the vehicle inspected by any authorized Toyota retailer or
Toyota authorized repairer, or any reliable repairer immediately.
● Continuing to drive the vehicle without having the hybrid battery (traction
battery) inspected will cause the hybrid system not to start.
● If the hybrid system does not start, contact any authorized Toyota retailer
or Toyota authorized repairer, or any reliable repairer immediately.
Page 736 of 818

7349-2. Customization
Prius Plug-in Hybrid_OM_OM47F38E_(EE)
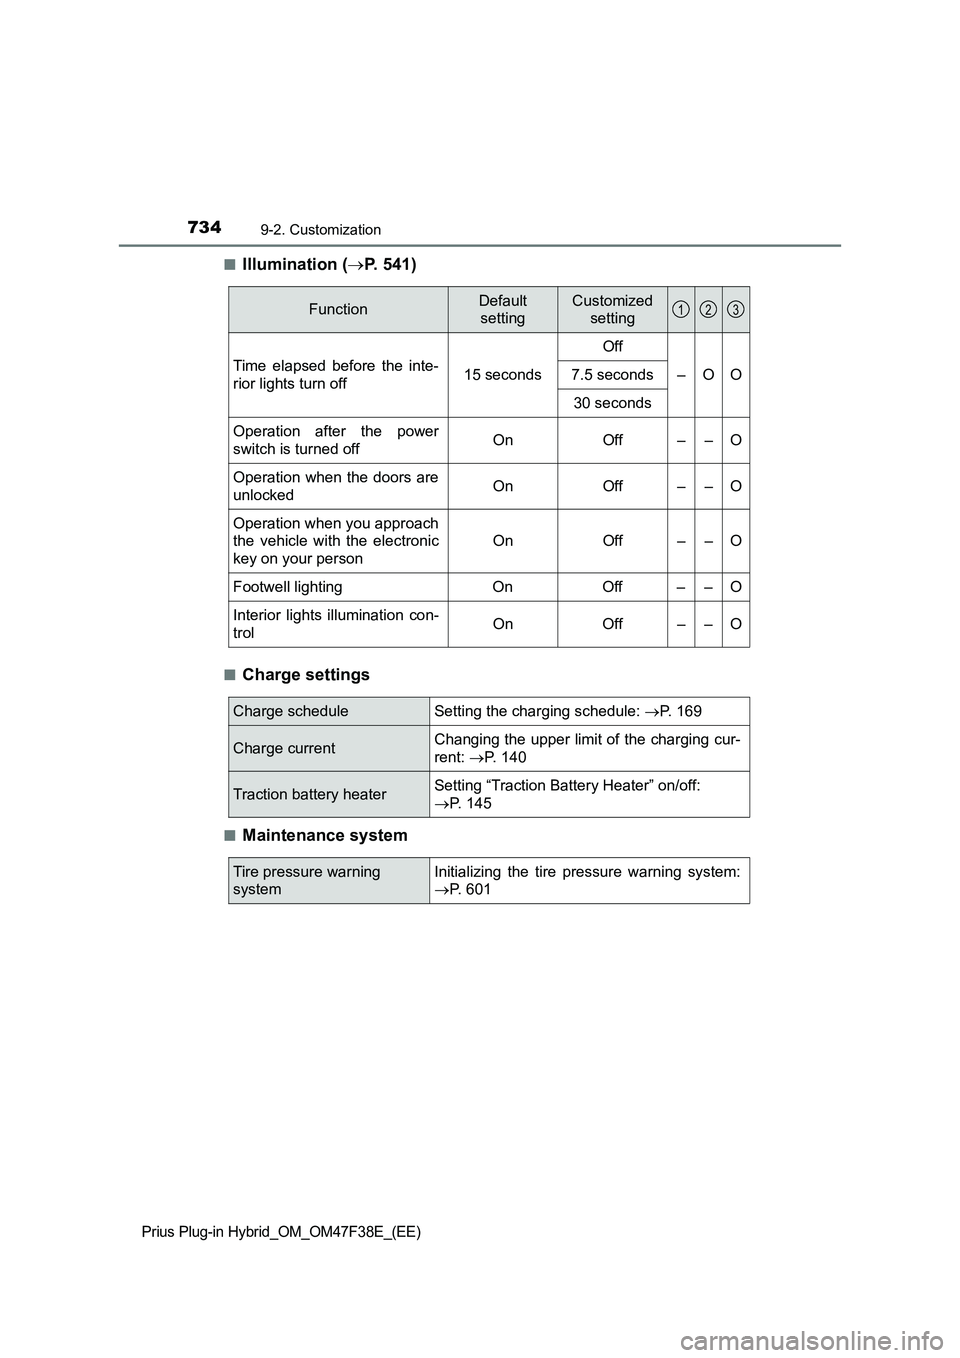
■Illumination (P. 541)
■Charge settings
■Maintenance system
FunctionDefault
settingCustomized
setting
Time elapsed before the inte-
rior lights turn off15 secondsOff
–OO 7.5 seconds
30 seconds
Operation after the power
switch is turned offOnOff––O
Operation when the doors are
unlockedOnOff––O
Operation when you approach
the vehicle with the electronic
key on your person
OnOff––O
Footwell lighting On Off – – O
Interior lights illumination con-
trolOn Off – – O
123
Charge scheduleSetting the charging schedule: P. 169
Charge currentChanging the upper limit of the charging cur-
rent: P. 140
Traction battery heaterSetting “Traction Battery Heater” on/off:
P. 145
Tire pressure warning
systemInitializing the tire pressure warning system:
P. 601
Page 746 of 818

744Alphabetical index
Prius Plug-in Hybrid_OM_OM47F38E_(EE)
Care ................................... 566, 572
Aluminum wheels .................. 567
Exterior.................................. 566
Front camera......................... 358
Interior ................................... 572
Radar sensor ........................ 357
Seat belts .............................. 575
Water-repellent coating ......... 567
Catch protection function ....... 304
Chains ....................................... 517
Charging ................................... 111
Charging cable ...................... 116
Charging equipment.............. 111
Charging indicator ................. 115
Charging messages .............. 187
Charging precautions ............ 162
Charging procedure .............. 155
Charging time may
increase .............................. 144
Charging schedule
function ............................... 166
High voltage components ....... 98
Information related to
charging display.................. 149
Opening and closing the
charging port lid .................. 112
Power sources
precautions ......................... 141
Power sources that can be
used.................................... 139
Safety functions ............ 151, 161
Solar charging system .......... 178
When normal charging
cannot be carried out.......... 182
Charging cable ......................... 116
CCID (Charging Circuit
Interrupting Device) ............ 116
Charging cable types ............ 117If the charging cable cannot
be unlocked ........................ 136
Indicator ................................ 120
Maintenance ......................... 126
Replacing the plug-cord ........ 122
Safety functions .................... 119
Charging port ........................... 111
Opening and closing ............. 112
Smart lid & connector
locking system .................... 130
If the charging port lid does
not open ............................. 133
Child restraint system ............... 54
Child restraint system
installation method ............... 67
Fixed with a seat belt .............. 68
Fixed with an ISOFIX lower
anchorage ............................ 70
Points to remember ................ 54
Riding with children................. 53
Using a top tether
anchorage ............................ 72
Child safety ................................ 53
12-volt battery precautions ... 596
Airbag precautions .................. 41
Back door precautions .......... 280
Charging precautions............ 150
Child restraint system ............. 54
How your child should wear
the seat belt.......................... 36
Installing child restraints ......... 67
Power window lock switch .... 303
Power window precautions ... 306
Rear door child-protectors .... 276
Removed key battery
precautions......................... 634
Riding with children................. 53
Seat belt precautions .............. 69
Seat heater precautions........ 539
C