Page 37 of 770
351-1. For safe use
1
PRIUS_OM_OM47F32E_(EE)
For safety and security
Push the seat belt shoulder
anchor down while pressing the
release button.
Push the seat belt shoulder
anchor up while pressing the
release button.
Move the height adjuster up and
down as needed until you hear a
click.
The pretensioners help the seat
belts to quickly restrain the occu-
pants by retracting the seat belts
when the vehicle is subjected to
certain types of severe frontal or
side collision.
The pretensioners do not activate
in the event of a minor frontal
impact, a minor side impact, a rear
impact or a vehicle rollover.
Adjusting the seat belt shoulder anchor height (front seats)
Release button1
2
Seat belt pretensioners (front seats and outboard rear seats)
Page 61 of 770

591-2. Child safety
1
PRIUS_OM_OM47F32E_(EE)
For safety and security
■Child restraint system compatibility for each seating position
Compatibility of each seating position with child restraint systems
( P. 61) displays the type of child restraint systems that can be
used and possible seating positions for installation using symbols.
Also, the recommended child restraint system that is suitable for
your child can be selected.
Otherwise, check [Recommended child restraint systems informa-
tion] for recommended child restraint systems. ( P. 6 6 )
Check the selected child restraint system together with the follow-
ing [Before confirming the compatibility of each seating position
with child restraint systems].
■Before confirming the compatibility of each seating position
with child restraint systems
Checking the child restraint system standards.
Use a child restraint system that conforms to UN(ECE) R44*1 or
UN(ECE) R129*1, 2.
The following approval mark is displayed on child restraint sys-
tems which are conformed.
Check for an approval mark attached to the child restraint sys-
tem.
Example of the displayed
regulation number
UN(ECE) R44 approval
mark*3
The weight range of the
child who is applicable for
an UN(ECE) R44 approval
mark is indicated.
UN(ECE) R129 approval
mark*3
The height range of the
child who is applicable as
well as available weights
for an UN(ECE) R129
approval mark is indicated.
Child restraint system compatibility for each seating position
1
1
2
Page 64 of 770

621-2. Child safety
PRIUS_OM_OM47F32E_(EE)
*1: Move the front seat fully rearward. If the passenger seat height can be
adjusted, move it to the upper most position.
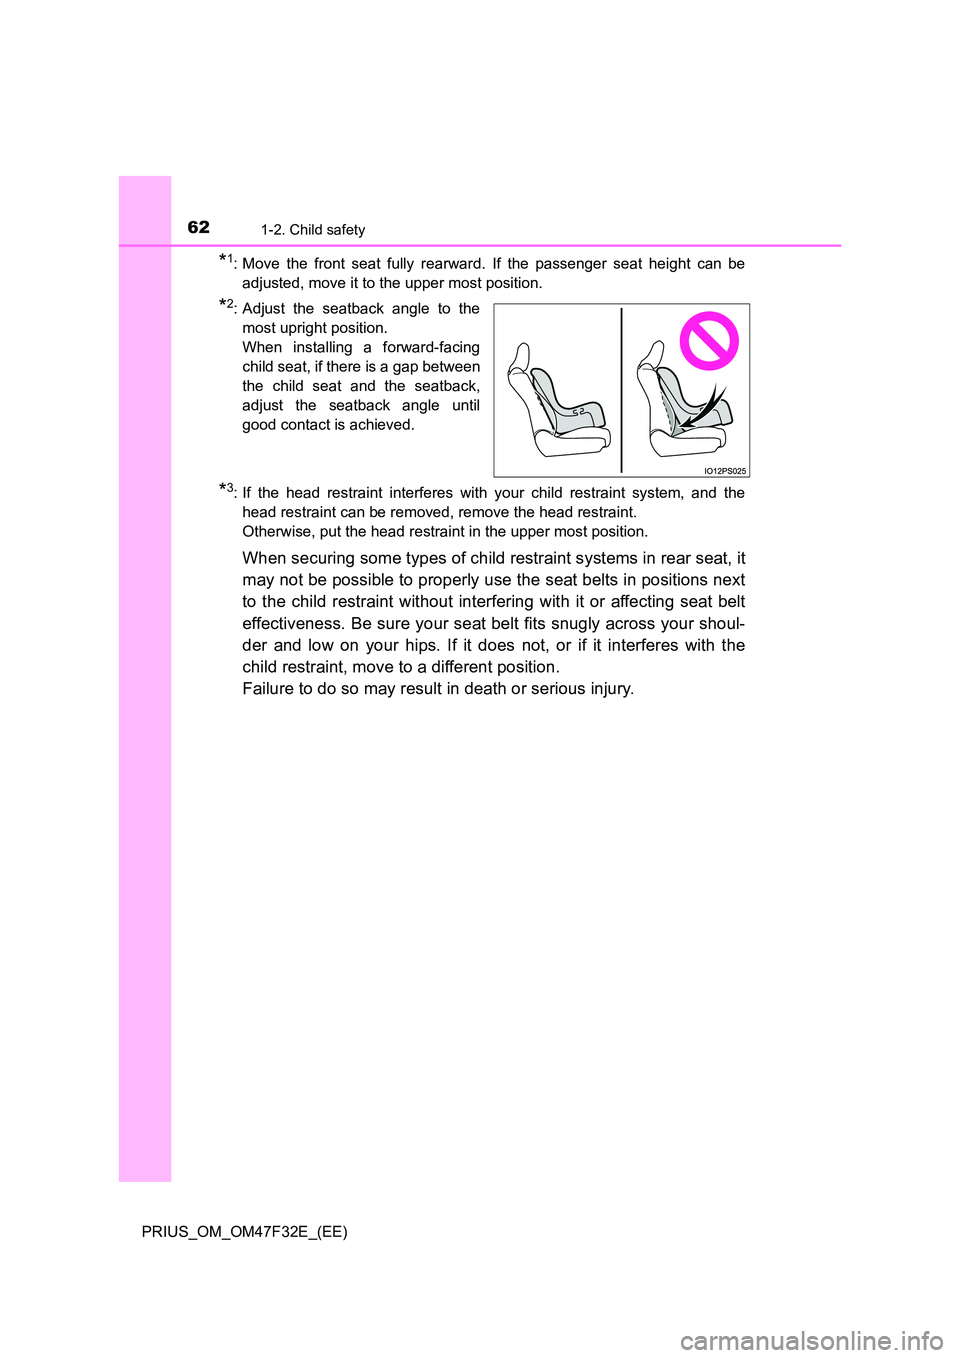
*2: Adjust the seatback angle to the
most upright position.
When installing a forward-facing
child seat, if there is a gap between
the child seat and the seatback,
adjust the seatback angle until
good contact is achieved.
*3: If the head restraint interferes with your child restraint system, and the
head restraint can be removed, remove the head restraint.
Otherwise, put the head restraint in the upper most position.
When securing some types of child restraint systems in rear seat, it
may not be possible to properly use the seat belts in positions next
to the child restraint without interfering with it or affecting seat belt
effectiveness. Be sure your seat belt fits snugly across your shoul-
der and low on your hips. If it does not, or if it interferes with the
child restraint, move to a different position.
Failure to do so may result in death or serious injury.
Page 67 of 770

651-2. Child safety
1
PRIUS_OM_OM47F32E_(EE)
For safety and security
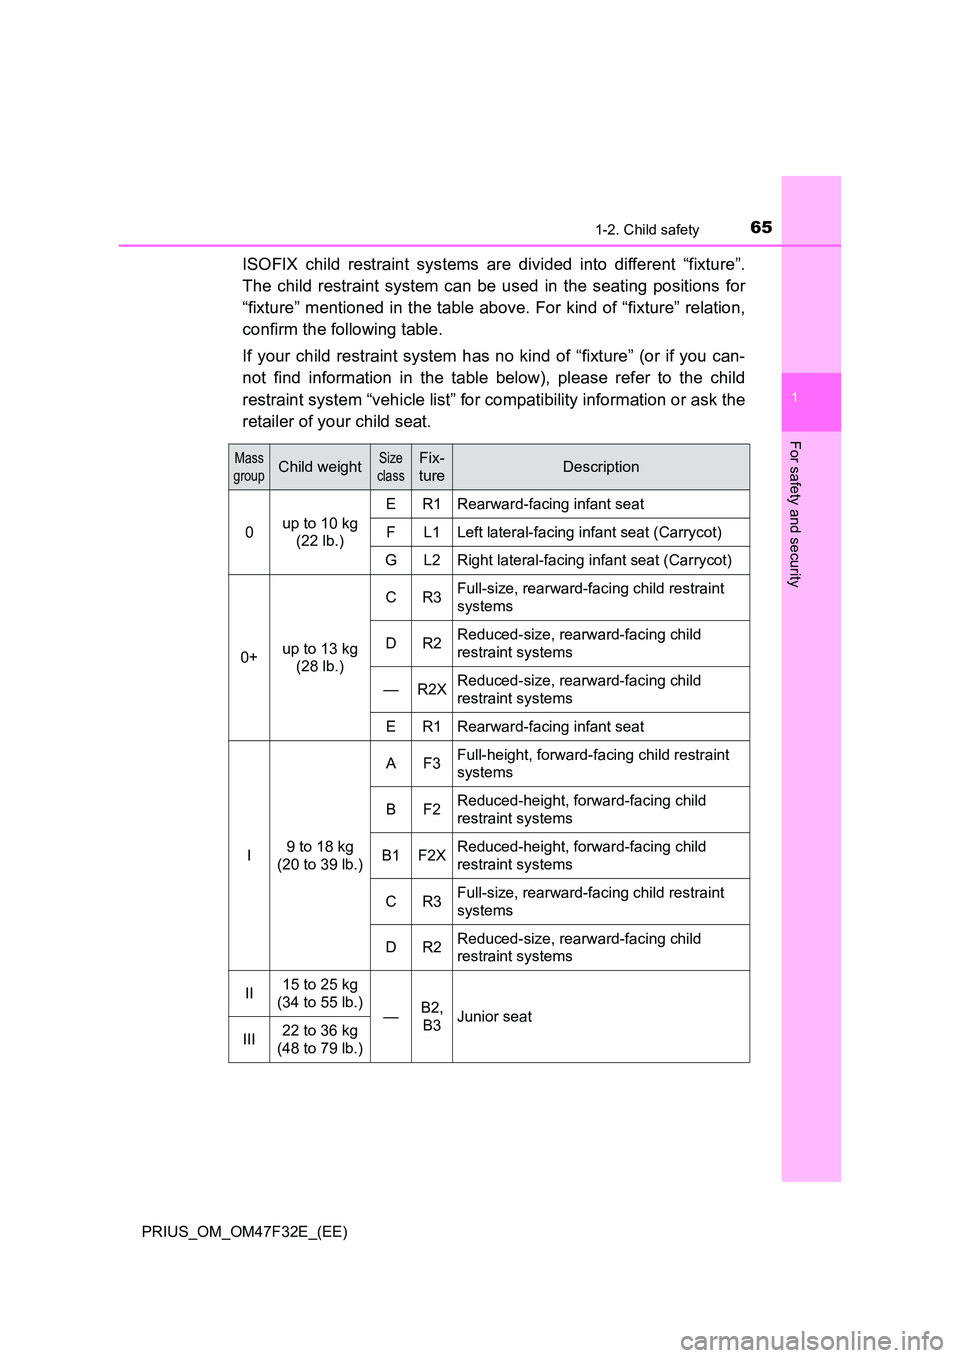
ISOFIX child restraint systems are divided into different “fixture”.
The child restraint system can be used in the seating positions for
“fixture” mentioned in the table above. For kind of “fixture” relation,
confirm the following table.
If your child restraint system has no kind of “fixture” (or if you can-
not find information in the table below), please refer to the child
restraint system “vehicle list” for compatibility information or ask the
retailer of your child seat.
Mass
groupChild weightSize
class
Fix-
tureDescription
0up to 10 kg
(22 lb.)
ER1Rearward-facing infant seat
FL1Left lateral-facing infant seat (Carrycot)
GL2Right lateral-facing infant seat (Carrycot)
0+up to 13 kg
(28 lb.)
CR3Full-size, rearward-facing child restraint
systems
DR2Reduced-size, rearward-facing child
restraint systems
—R2XReduced-size, rearward-facing child
restraint systems
ER1Rearward-facing infant seat
I9 to 18 kg
(20 to 39 lb.)
AF3Full-height, forward-facing child restraint
systems
BF2Reduced-height, forward-facing child
restraint systems
B1F2XReduced-height, forward-facing child
restraint systems
CR3Full-size, rearward-facing child restraint
systems
DR2Reduced-size, rearward-facing child
restraint systems
II15 to 25 kg
(34 to 55 lb.)—B2,
B3Junior seat
III22 to 36 kg
(48 to 79 lb.)
Page 156 of 770

1542. Instrument cluster
PRIUS_OM_OM47F32E_(EE)■
Settings table
ItemSettingsSetting result
*1“On”
Turns the LTA (Lane Tracing Assist) lane
centering function on and off. (P. 307)
“Off”
*1“On”
Turns the LTA (Lane Tracing Assist) steer-
ing assist function on and off. (P. 307)
“Off”
*1“High”Switches the LTA (Lane Tracing Assist)
alert sensitivity. (P. 307)
“Standard”
*1“On”Turns the PCS (Pre-Collision System) on
and off. (P. 300)
“Off”
*1
Early
Switches the PCS (Pre-Collision System)
warning timing. (P. 300)Middle
Late
*1“On”Turns the Toyota parking assist-sensor on
and off. (P. 381)
“Off”
*1“On”Turns the Parking Support Brake function
on and off. (P. 396)
“Off”
*1“On”Turns the Blind Spot Monitor on and off.
(P. 357)
“Off”
*1“On”Turns the LTA (Lane Tracing Assist) vehicle
sway warning on and off. (P. 307)
“Off”
*1
“High”
Switches the LTA (Lane Tracing Assist)
vehicle sway warning sensitivity. (P. 3 0 7 )“Standard”
“Low”
*1HeightChanges the display position and bright-
ness of the head-up display. (P. 162)
Brightness
*1“On”Turns the RSA (Road Sign Assist) on and
off. (P. 323)
“Off”
*1“On” Turns the Dynamic Radar Cruise Control
with Road Sign Assist on and off.
(P. 341)
“Off”
Page 196 of 770
1943-3. Adjusting the seats
PRIUS_OM_OM47F32E_(EE)
Front seats
Seat position adjustment lever
Seatback angle adjustment
lever
Vertical height adjustment lever
(for driver’s side)
Lumbar support adjustment
switch (for driver’s side)
■When adjusting the seat
Take care when adjusting the seat so that the head restraint does not touch
the ceiling.
Adjustment procedure
1
2
3
4
Page 203 of 770
2013-3. Adjusting the seats
3
Operation of each component
PRIUS_OM_OM47F32E_(EE)
■ Installing the head restraints
Front and rear center seats
Rear outboard seats
■ Adjusting the height of the head restraints (front seats)
■ Adjusting the rear seat head restraint
Always raise the head restraint one level from the stowed position when
using.
Align the head restraint with the installa-
tion holes and push it down to the lock
position.
Press and hold the lock release button
when lowering the head restraint.
Pull the seatback lock release lever and
fold down the seatback until it reaches
the position where the head restraints
can be installed.
Align the head restraint with the installa-
tion holes and push it down to the lock
position.
Press and hold the lock release button
when lowering the head restraint.
Make sure that the head restraints are
adjusted so that the center of the head
restraint is closest to the top of your ears.
Lock release button
1
2
Lock release
button
Page 207 of 770
205
3
3-4. Adjusting the steering wheel and mirrors
Operation of each component
PRIUS_OM_OM47F32E_(EE)
Inside rear view mirror
The height of the rear view mirror can be adjusted to suit your driving
posture.
Adjust the height of the rear view
mirror by moving it up and down.
Manual anti-glare inside rear view mirror
Reflected light from the headlights of vehicles behind can be reduced
by operating the lever.
Normal position
Anti-glare position
The rear view mirror’s position can be adjusted to enable suffi-
cient confirmation of the rear view.
Adjusting the height of rear view mirror
Anti-glare function
1
2