2023 TOYOTA HIGHLANDER remote control
[x] Cancel search: remote controlPage 165 of 552

1653-5. Opening, closing the windows and moon roof
3
Before driving
*: If equipped
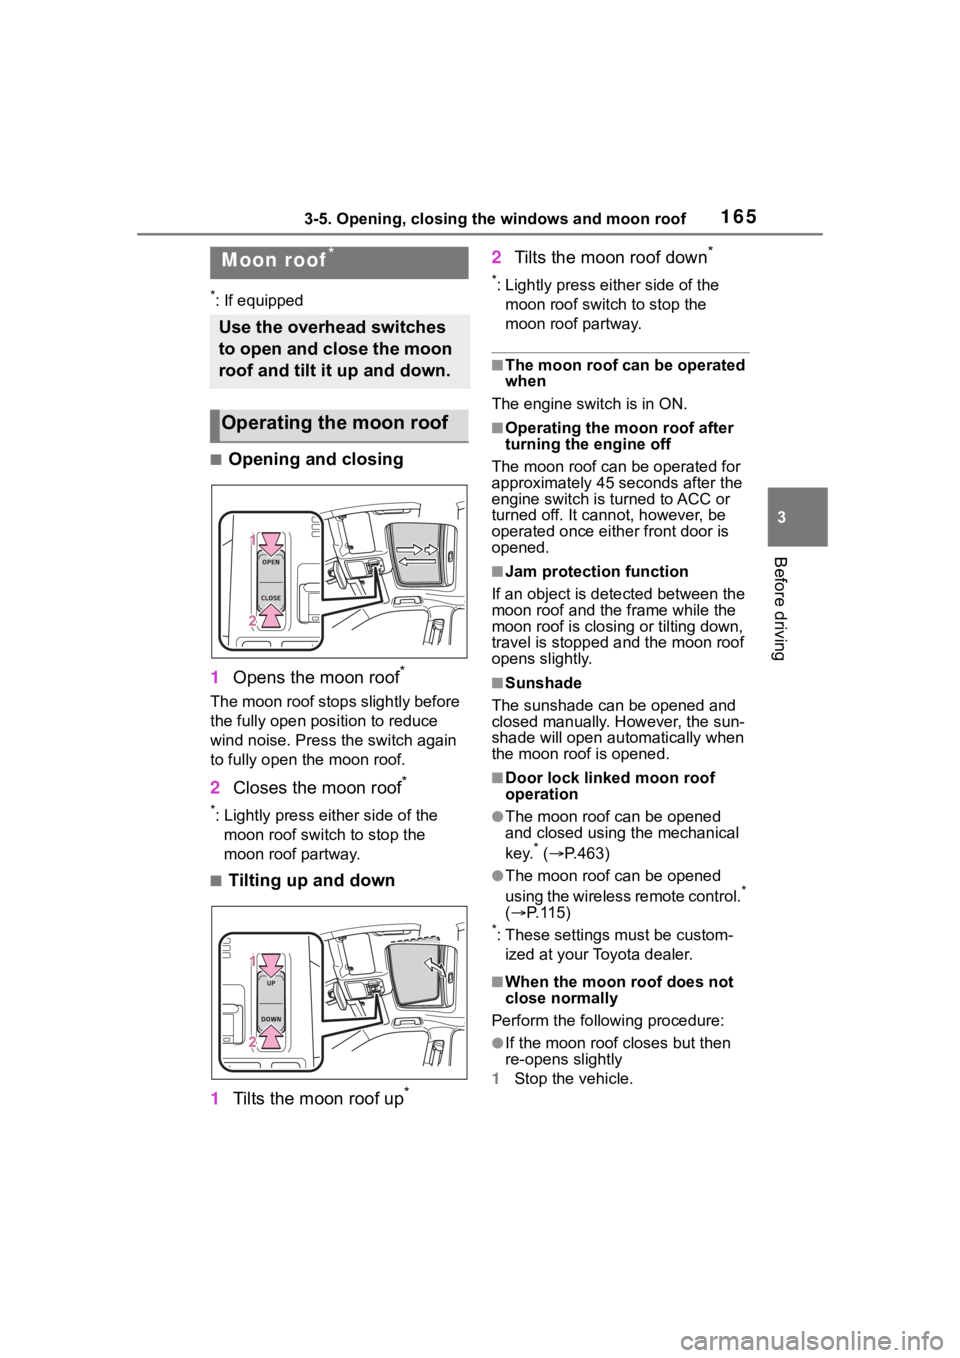
■Opening and closing
1 Opens the moon roof
*
The moon roof stops slightly before
the fully open position to reduce
wind noise. Press the switch again
to fully open the moon roof.
2Closes the moon roof*
*: Lightly press either side of the
moon roof switch to stop the
moon roof partway.
■Tilting up and down
1 Tilts the moon roof up
*
2Tilts the moon roof down*
*: Lightly press e ither side of the
moon roof switch to stop the
moon roof partway.
■The moon roof can be operated
when
The engine switch is in ON.
■Operating the moon roof after
turning the engine off
The moon roof can be operated for
approximately 45 s econds after the
engine switch is turned to ACC or
turned off. It cannot, however, be
operated once eithe r front door is
opened.
■Jam protection function
If an object is dete cted between the
moon roof and the frame while the
moon roof is closing or tilting down,
travel is stopped and the moon roof
opens slightly.
■Sunshade
The sunshade can be opened and
closed manually. However, the sun-
shade will open aut omatically when
the moon roof is opened.
■Door lock linked moon roof
operation
●The moon roof can be opened
and closed using the mechanical
key.
* ( P.463)
●The moon roof can be opened
using the wireless remote control.*
( P. 1 1 5 )
*: These settings must be custom-
ized at your Toyota dealer.
■When the moon roof does not
close normally
Perform the following procedure:
●If the moon roof closes but then
re-opens slightly
1 Stop the vehicle.
Moon roof*
Use the overhead switches
to open and close the moon
roof and tilt it up and down.
Operating the moon roof
Page 167 of 552

1673-5. Opening, closing the windows and moon roof
3
Before driving
WARNING
●Check to make sure that all pas-
sengers do not have any part of
their body in a position where it
could be caught when the moon
roof is being operated.
●When using the wireless remote
control or mechanical key and
operating the moon roof, oper-
ate the moon roof after checking
to make sure that there is no
possibility of any passenger
having any of their body parts
caught in the moon roof. Also,
do not let a child operate moon
roof by the wireless remote con-
trol or mechanical key. It is pos-
sible for children and other
passengers to get caught in the
moon roof.
●When exiting the vehicle, turn
the engine switch off, carry the
key and exit the vehicle along
with the child. There may be
accidental operation, due to
mischief, etc., that may possibly
lead to an accident.
■Jam protection function
●Never use any part of your body
to intentionally a ctivate the jam
protection function.
●The jam protection function may
not work if something gets
caught just before the moon
roof is fully closed. Also, the jam
protection function is not
designed to operate while the
switch is being pressed. Take
care so that your fingers, etc. do
not get caught.
Page 211 of 552

2114-3. Operating the lights and wipers
4
Driving
■Headlight control sensor
The sensor may not function prop-
erly if an object is placed on the sen-
sor, or anything that blocks the
sensor is affixed to the windshield.
Doing so interfere s with the sensor
detecting the level of ambient light
and may cause the automatic head-
light system to malfunction.
■Automatic light off system
●When the headlights are on: The
headlights and tail lights turn off
30 seconds after a door is opened
and closed if the engine switch is
turned to ACC or OFF. (The lights
turn off immediately if on the
key is pressed afte r all the doors
are closed.)
●When only the tail lights are on:
The tail lights tu rn off automati-
cally if the engine switch is turned
to ACC or OFF an d the driver’s
door is opened.
Except for Canada: To turn the lights
on again, turn the engine switch to
ON, or turn the light switch off once
and then back to or .
For Canada: To tu rn the lights on
again, turn the engine switch to ON,
or turn the light s witch to once
and then back to or .
■Automatic headlight leveling
system (if equipped)
The level of the headlights is auto-
matically adjusted according to the
number of passengers and the load-
ing condition of the vehicle to
ensure that the headlights do not interfere with o
ther road users.
■Light reminder buzzer
A buzzer sounds when the engine
switch is turned off or turned to ACC
and the driver’s door is opened
while the lights are turned on.
■Welcome lighting
The parking lights and tail lights
automatically turn on at night when
the doors are un locked using the
entry function or wireless remote
control if the light switch is in the
position.
■Windshield wiper linked head-
light illumination
When driving during daytime with
the headlight switch turned to , if
the windshield wipers are used, the
headlights will turn o n automatically
after several se conds to help
enhance the visibility of your vehi-
cle.
■Battery-saving function
In order to prevent the battery of the
vehicle from discharging, if the
headlights and/or tail lights are on
when the engine switch is turned off
the battery saving function will oper-
ate and automatically turn off all the
lights after approximately 20 min-
utes. When the engine switch is
turned to ON, the battery-saving
function will be disabled.
When any of the following are per-
formed, the battery-saving function
is canceled once and then reacti-
vated. All the lights will turn off auto-
matically 20 minutes after the
battery-saving function has been
reactivated:
●When the headlight switch is oper-
ated
●When a door is opened or closed
■Customization
Some functions can be customized.
( P.494)
Page 356 of 552

3565-4. Using the other interior features
Second seats (8-seat models)
Pull the armrest down for use.
Second seats (7-seat models)
Pull the armrest down for use.
NOTICE
• A metal accessory
• A case or cover made of metal
• A case which ha s magnet in it
on the charging side of the por-
table device
●Electric wave type wireless
remote controls are being used
nearby
●The electronic key is not inside
the vehicle
●2 or more portable devices are
placed on the charging tray at
the same time
If charging is abnormal or the
operation indicator light contin-
ues to flash for any other reason,
the wireless charger may be mal-
functioning. Contact your Toyota
dealer.
■To prevent malfunctions and
data corruptions
●When charging, bringing a
credit, or other magnetic card,
or magnetic storage media
close to the charge area may
clear any stored data due to
magnetic influence. Also, do not
bring a wristwatch or other pre-
cision instrument close to the
charge area since doing so may
cause it to malfunction.
●Do not charge with a non-con-
tact IC card such as a transpor-
tation system IC card inserted
between the charging side of a
portable device and the charge
area. The IC chip may become
extremely hot and damage the
portable device or IC card. Be
especially careful not to charge
a portable device inside a case
or cover with a non-contact IC
card attached.
●Do not leave portable devices
inside the vehicle. The inside of
the vehicle can become hot in
extreme heat, which could
cause a malfunction.
■If the smartphone OS has
been updated
If the smartphone OS has been
updated to a newer version, its
charging specifications may have
changed significantly.
For details, check the information
on the manufacturer’s website.
■To prevent battery discharge
Do not use the wireless charger
for a long period of time with the
engine is stopped.
Armrest
Page 361 of 552

3615-4. Using the other interior features
5
Interior features
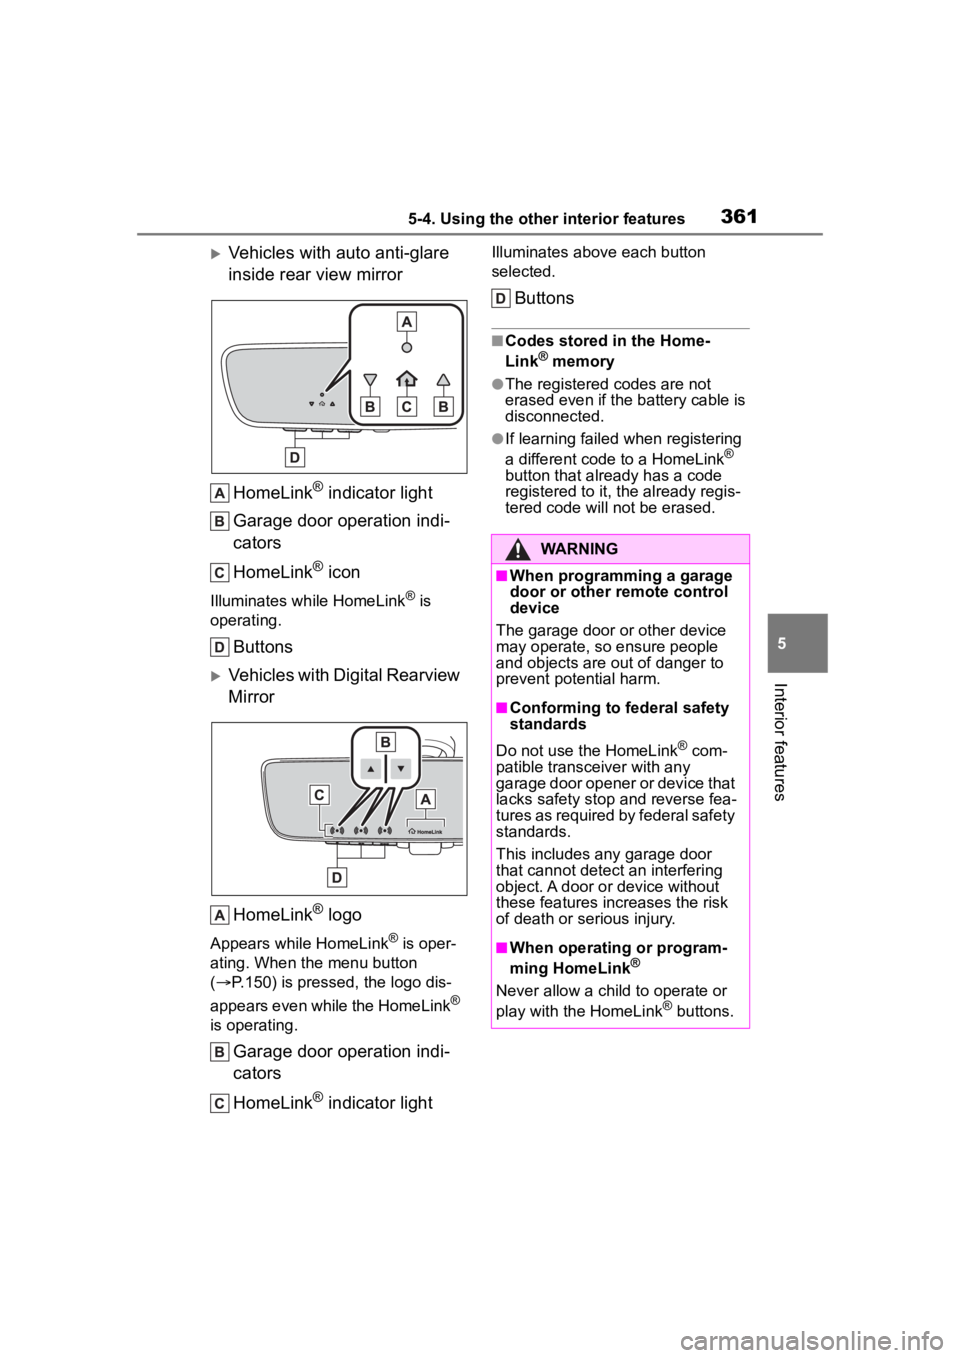
Vehicles with auto anti-glare
inside rear view mirrorHomeLink
® indicator light
Garage door operation indi-
cators
HomeLink
® icon
Illuminates while HomeLink® is
operating.
Buttons
Vehicles with Digital Rearview
Mirror
HomeLink
® logo
Appears while HomeLink® is oper-
ating. When the menu button
( P.150) is pressed, the logo dis-
appears even while the HomeLink
®
is operating.
Garage door operation indi-
cators
HomeLink
® indicator light
Illuminates above each button
selected.
Buttons
■Codes stored in the Home-
Link® memory
●The registered codes are not
erased even if the battery cable is
disconnected.
●If learning failed when registering
a different code to a HomeLink®
button that already has a code
registered to it, the already regis-
tered code will not be erased.
WARNING
■When programming a garage
door or other remote control
device
The garage door or other device
may operate, so ensure people
and objects are out of danger to
prevent potential harm.
■Conforming to federal safety
standards
Do not use the HomeLink
® com-
patible transce iver with any
garage door opener or device that
lacks safety stop and reverse fea-
tures as required by federal safety
standards.
This includes any garage door
that cannot detect an interfering
object. A door or device without
these features increases the risk
of death or serious injury.
■When operating or program-
ming HomeLink®
Never allow a child to operate or
play with the HomeLink® buttons.
Page 362 of 552

3625-4. Using the other interior features
■Before programming Home-
Link
®
During programming, it is pos-
sible that garage doors,
gates, or other devices may
operate. For this reason,
make sure that people and
objects are clear of the
garage door or other devices
to prevent injury or other
potential harm.
It is recommended that a new
battery be placed in the
remote control transmitter for
more accurate programming.
Garage door opener motors
manufactured after 1995 may
be equipped with rolling code
protection. If this is the case,
you may need a stepladder or
other sturdy, safe device to
reach the “Learn” or “Smart”
button on the garage door
opener motor.
■Programming HomeLink®
Steps 1 through 3 must be per-
formed within 60 seconds, oth-
erwise the HomeLink
® indicator
light will stop flashing and pro-
gramming will not be success-
fully completed.
1 Press and release the Home-
Link
® button you want to pro-
gram and check that the HomeLink
® indicator light
flashes (orange).
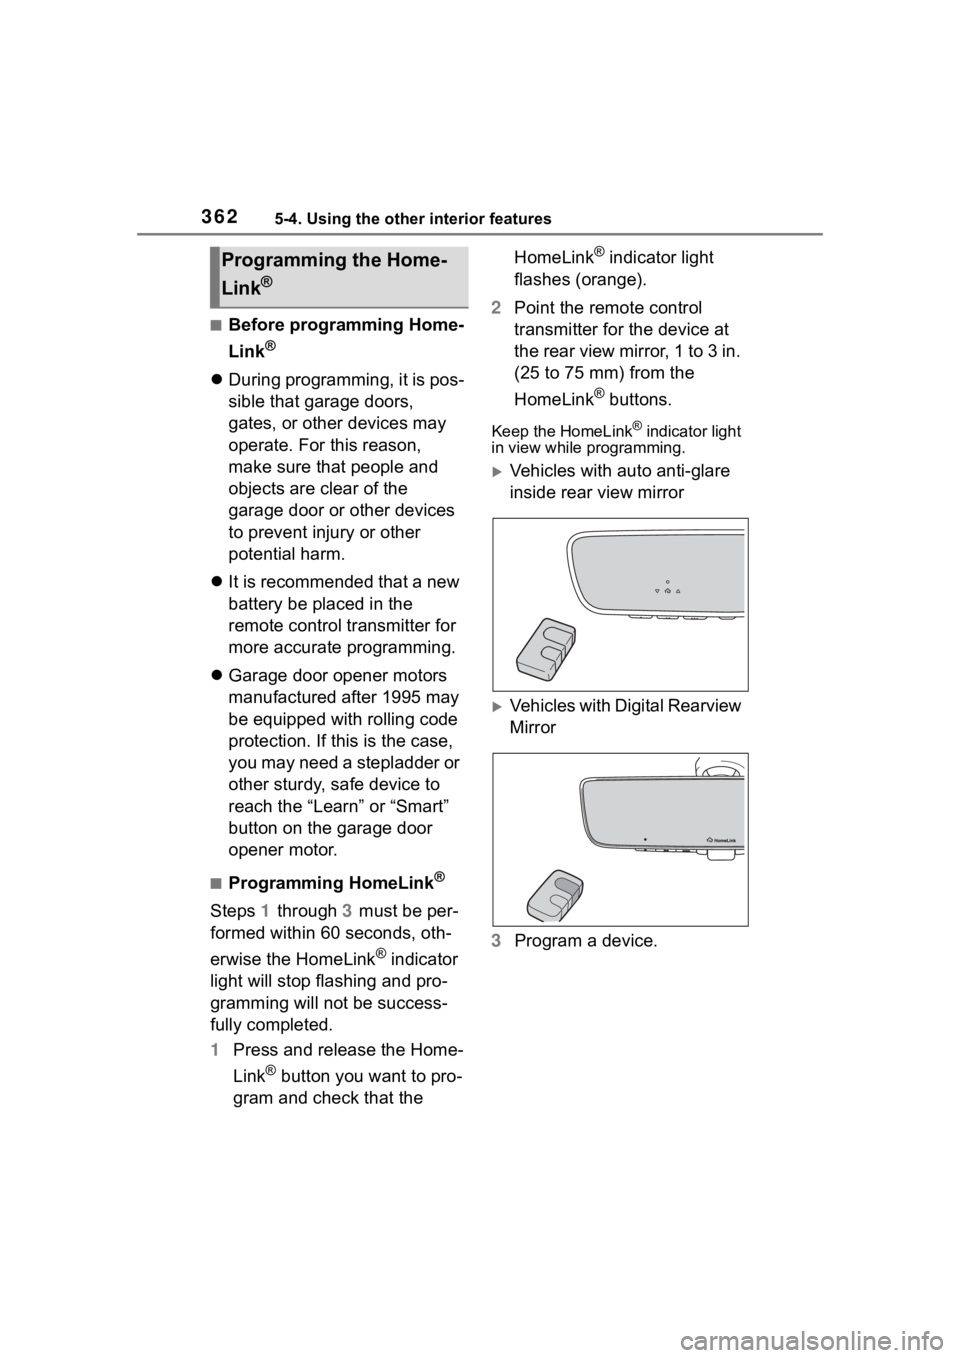
2 Point the remote control
transmitter for the device at
the rear view mirror, 1 to 3 in.
(25 to 75 mm) from the
HomeLink
® buttons.
Keep the HomeLink® indicator light
in view while programming.
Vehicles with auto anti-glare
inside rear view mirror
Vehicles with Digital Rearview
Mirror
3 Program a device.
Programming the Home-
Link
®
Page 363 of 552

3635-4. Using the other interior features
5
Interior features
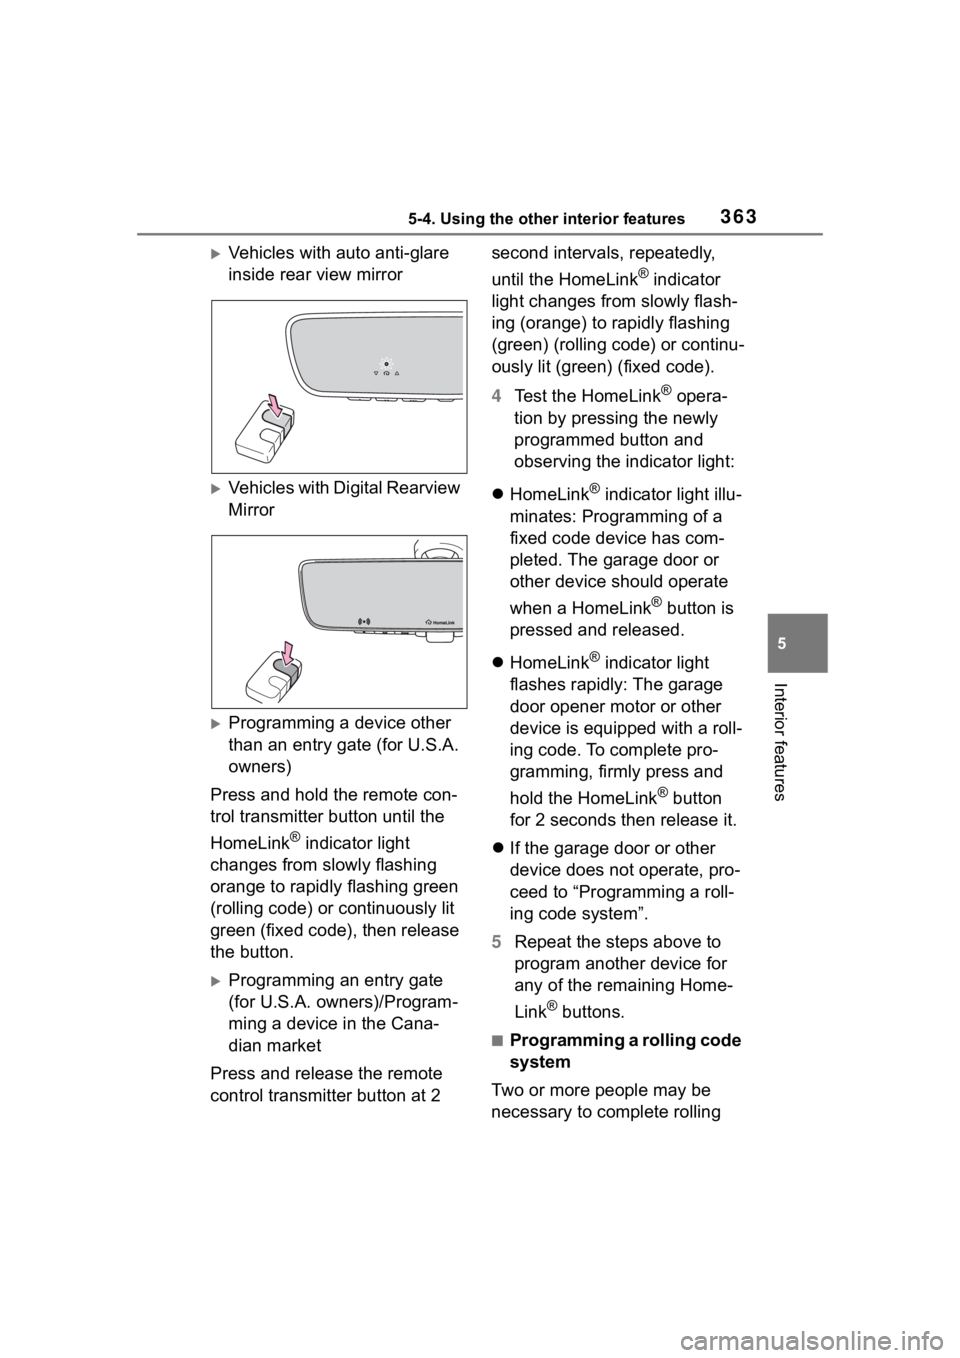
Vehicles with auto anti-glare
inside rear view mirror
Vehicles with Digital Rearview
Mirror
Programming a device other
than an entry gate (for U.S.A.
owners)
Press and hold the remote con-
trol transmitter button until the
HomeLink
® indicator light
changes from slowly flashing
orange to rapidly flashing green
(rolling code) or continuously lit
green (fixed code), then release
the button.
Programming an entry gate
(for U.S.A. owners)/Program-
ming a device in the Cana-
dian market
Press and release the remote
control transmitter button at 2 second intervals, repeatedly,
until the HomeLink
® indicator
light changes from slowly flash-
ing (orange) to rapidly flashing
(green) (rolling code) or continu-
ously lit (green) (fixed code).
4 Test the HomeLink
® opera-
tion by pressing the newly
programmed button and
observing the indicator light:
HomeLink
® indicator light illu-
minates: Programming of a
fixed code device has com-
pleted. The garage door or
other device should operate
when a HomeLink
® button is
pressed and released.
HomeLink
® indicator light
flashes rapidly: The garage
door opener motor or other
device is equipped with a roll-
ing code. To complete pro-
gramming, firmly press and
hold the HomeLink
® button
for 2 seconds then release it.
If the garage door or other
device does not operate, pro-
ceed to “Programming a roll-
ing code system”.
5 Repeat the steps above to
program another device for
any of the remaining Home-
Link
® buttons.
■Programming a rolling code
system
Two or more people may be
necessary to complete rolling
Page 391 of 552

3916-3. Do-it-yourself maintenance
6
Maintenance and care
Check the battery as follows.
■Battery exterior
Make sure that the battery termi-
nals are not corroded and that
there are no loose connections,
cracks, or loose clamps.
Terminals
Hold-down clamp
■Before recharging
When recharging, the battery pro-
duces hydrogen gas which is flam-
mable and explosive. Therefore,
observe the followi ng precautions
before recharging:
●If recharging with the battery
installed on the vehicle, be sure to
disconnect the ground cable.
●Make sure the power switch on
the charger is off when connecting
and disconnecting the charger
cables to the battery.
■After recharging/reconnecting
the battery
The engine may not start. Follow the
procedure below to initialize the sys-
tem.
1 Shift the shift lever to P.
2 Open and close any of the doors.
3 Restart the engine.
●Unlocking the doors using the
smart key system may not be pos-
sible immediately after reconnect-
ing the battery. If this happens,
use the wireless remote control or
the mechanical key to lock/unlock
the doors.
●Start the engine with the engine
switch in ACC. T he engine may
not start with th e engine switch
turned off. However, the engine
will operate normally from the sec-
ond attempt.
●The engine switch mode is
recorded by the vehicle. If the bat-
tery is disconnected and recon-
nected, the vehicle will return the
engine switch mode to the status it
was in before the battery was dis-
connected. Make sure to turn off
the engine before disconnecting
the battery. Take extra care when
connecting the battery if the
engine switch mode prior to the
battery being disconnected is
unknown.
If the system will not start even after
multiple attempts, contact your Toy-
WARNING
■When filling the reservoir
Take care as brake fluid can harm
your hands and eyes and damage
painted surfaces.
If fluid gets on your hands or in
your eyes, flush t he affected area
with clean water immediately.
If you still experien ce discomfort,
see a doctor.
NOTICE
■If the fluid level is low or high
It is normal for the brake fluid level
to go down slightly as the brake
pads wear out or when the fluid
level in the accumulator is high.
If the reservoir needs frequent
refilling, there may be a serious
problem.
Battery