2023 TOYOTA HIGHLANDER window
[x] Cancel search: windowPage 111 of 552

111
3
3
Before driving
Before driving
.3-1. Key informationKeys ............................ 112
3-2. Opening, closing and locking the doors
Side doors ................... 115
Back door .................... 119
Smart key system ....... 131
3-3. Adjusting the seats Front seats .................. 136
Rear seats................... 137
Driving position memory .................................. 142
Head restraints............ 145
3-4. Adjusting the steering wheel and mirrors
Steering wheel ............ 148
Inside rear view mirror .................................. 149
Digital Rearview Mirror .................................. 150
Outside rear view mirrors .................................. 160
3-5. Opening, closing the win- dows and moon roof
Power windows ........... 162
Moon roof .................... 165
Panoramic moon roof.. 168
Page 113 of 552

1133-1. Key information
3
Before driving
If this message is displayed but you
have not had a new electronic key
registered, ask your Toyota dealer to
check if an unknow n electronic key
(other than those in your posses-
sion) has been registered.
The electronic keys are
equipped with the following
wireless remote control:
Locks the doors ( P.115)
Unlocks the doors ( P.115)
Opens the windows
*1 and
moon roof
*1, 2 ( P.115)
Opens and closes the power
back door
*2 ( P.122)
Sounds the alarm
*1: These settings must be custom- ized at your Toyota dealer.
NOTICE
■To prevent key damage
●Do not drop the keys, subject
them to strong shocks or bend
them.
●Do not expose the keys to high
temperatures for long periods of
time.
●Do not get the keys wet or wash
them in an ultrasonic washer,
etc.
●Do not attach metallic or mag-
netic materials to the keys or
place the keys close to such
materials.
●Do not disassemble the keys.
●Do not attach a sticker or any-
thing else to the surface of the
electronic key.
●Do not place th e keys near
objects that produce magnetic
fields, such as TVs, audio sys-
tems and induction cookers.
●Do not place th e keys near
medical electrical equipment
such as low-frequency therapy
equipment or microwave ther-
apy equipment, and do not
receive medical attention with
the keys on your person.
■Carrying the electronic key
on your person
Carry the electronic key 3.9 in.
(10 cm) or more away from elec-
tric appliances that are turned on.
Radio waves emitte d from electric
appliances within 3.9 in. (10 cm)
of the electronic key may interfere
with the key, causing the key to
not function properly.
■In case of a smart key system
malfunction or other
key-related problems
P. 4 6 3
■When an electronic key is lost
P. 4 6 1
Wireless remote control
Page 116 of 552

1163-2. Opening, closing and locking the doors
continuously, release the buttons,
wait for at least 5 seconds, and
repeat step 2.)
For vehicles with an alarm: To pre-
vent unintended triggering of the
alarm, unlock the doors using the
wireless remote control and open
and close a door once after the set-
tings have been changed. (If a door
is not opened within 60 seconds
after is press ed, the doors will
be locked again an d the alarm will
automatically be set.)
In case that the alarm is triggered,
immediately stop the alarm. ( P. 7 0 )
■Impact detection door lock
release system
In the event that t he vehicle is sub-
ject to a strong impact, all the doors
are unlocked. Depending on the
force of the impact or the type of
accident, however, the system may
not operate.
■Operation signals
A buzzer sounds and the emer-
gency flashers flash to indicate that
the doors have been
locked/unlocked. (Locked: Once;
Unlocked: Twice)
A buzzer sounds to indicate that the
windows and the moon roof
* or pan-
oramic moon roof* are operating.
*: If equipped
■Security feature
If a door is not opened within
approximately 60 s econds after the
vehicle is unlocked, the security fea-
ture automatically locks the vehicle
again.
■When the door cannot be
locked by the lock sensor on
the surface of the front door
handle
If the door will not lock even when
the topside sensor area is touched,
try touching both the topside and
underside sensor areas at the same
time.
When gloves are being worn,
remove the gloves.
■Door lock buzzer
If an attempt to lock the doors using
the smart key system is made when
a door is not fully closed, a buzzer
will sound continuo usly for 5 sec-
onds. Fully close the door to stop
the buzzer, and lock the doors
again.
■Setting the alarm (if equipped)
Locking the doors will set the alarm
system. ( P. 7 0 )
Multi-informa-
tion display/BeepUnlocking func- tion
Exterior: Beeps 3 times
Interior: Pings once
Holding the
driver’s door
handle unlocks
only the driver’s
door.
Holding the front
passenger’s
door handle
unlocks all the
doors.
Exterior: Beeps twice
Interior: Pings once
Holding either
front door handle
unlocks all the
doors.
Page 133 of 552

1333-2. Opening, closing and locking the doors
3
Before driving
wireless remote control or the
mechanical key, to unlock the
doors.
■Turning an electronic key to
battery-saving mode
When battery-savi ng mode is set,
battery depletion is minimized by
stopping the electronic key from
receiving radio waves.
Press twice while pressing and
holding . Confirm that the elec-
tronic key indicator flashes 4 times.
While the battery-saving mode is
set, the smart key system cannot be
used. To cancel the function, press
any of the electronic key buttons.
■Conditions affecting operation
The smart key system uses weak
radio waves. In the following situa-
tions, the communication between
the electronic key and the vehicle
may be affected, preventing the
smart key system, wireless remote
control and engine immobilizer sys-
tem from operating properly. (Ways
of coping: P.463)
●When the electronic key battery is
depleted
●Near a TV tower, electric power
plant, gas station , radio station,
large display, airpo rt or other facil-
ity that generates strong radio
waves or electrical noise
●When the electronic key is in con-
tact with, or is covered by the fol-
lowing metallic objects
• Cards to which al uminum foil is
attached
• Cigarette boxes that have alumi- num foil inside • Metallic wallets or bags
•Coins
• Hand warmers made of metal
• Media such as CDs and DVDs
●When other wirel
ess keys (that
emit radio waves) are being used
nearby
●When carrying the electronic key
together with the following devices
that emit radio waves
• Portable radio, cellular phone, cordless phone or other wireless
communication devices
• Another electronic key or a wire- less key that emits radio waves
• Personal computers or personal
digital assistants (PDAs)
• Digital audio players
• Portable game systems
●If window tint wit h a metallic con-
tent or metallic objects are
attached to the rear window
●When the electronic key is placed
near a battery charger or elec-
tronic devices
●When the vehicle is parked in a
pay parking spot where radio
waves are emitted
■Note for the entry function
●Even when the electronic key is
within the effective range (detec-
tion areas), the system may not
operate properly in the following
cases:
• The electronic key is too close to the window or outside door han-
dle, near the ground, or in a high
place when the doors are locked
or unlocked.
• The electronic key is on the instru-
ment panel, luggage compart-
ment, floor, or in the door pockets
or glove box when the engine is
started or engine switch modes
are changed.
●Do not leave the electronic key on
top of the instrument panel or near
the door pockets when exiting the
vehicle. Depending on the radio
wave reception conditions, it may
be detected by the antenna out-
Page 134 of 552

1343-2. Opening, closing and locking the doors
side the cabin and the door will
become lockable from the outside,
possibly trapping the electronic
key inside the vehicle.
●As long as the electronic key is
within the effective range, the
doors may be locked or unlocked
by anyone. However, only the
doors detecting the electronic key
can be used to unlock the vehicle.
●Even if the electronic key is not
inside the vehicle, it may be possi-
ble to start the engine if the elec-
tronic key is near the window.
●The doors may unlock or lock if a
large amount of water splashes on
the door handle, such as in the
rain or in a car wash when the
electronic key is w ithin the effec-
tive range. (The doors will auto-
matically be locked after
approximately 60 seconds if the
doors are not opened and closed.)
●If the wireless remote control is
used to lock the doors when the
electronic key is near the vehicle,
there is a possib ility that the door
may not be unlocke d by the entry
function. (Use the wireless remote
control to unloc k the doors.)
●Touching the door lock or unlock
sensor while wearing gloves may
prevent lock or unlock operation.
●When the lock op eration is per-
formed using the lock sensor, rec-
ognition signals will be shown up
to two consecutive times. After
this, no recogniti on signals will be
given.
●If the door handle becomes wet
while the electronic key is within
the effective ran ge, the door may
lock and unlock repeatedly. In that
case, follow the fo llowing correc-
tion procedures to wash the vehi-
cle:
• Place the electronic key in a loca- tion 6 ft. (2 m) or more away from
the vehicle. (Take care to ensure
that the key is not stolen.)
• Set the electronic key to bat- tery-saving mode to disable the
smart key system. (
P.133)
●If the electronic key is inside the
vehicle and a door handle
becomes wet during a car wash, a
message may be shown on the
multi-information display and a
buzzer will sound outside the vehi-
cle. To turn off the alarm, lock all
the doors.
●The lock sensor may not work
properly if it comes into contact
with ice, snow, m ud, etc. Clean
the lock sensor and attempt to
operate it again, or use the lock
sensor on the lower part of the
door handle.
●A sudden handle operation or a
handle operation immediately
after entering the effective range
may prevent the doors from being
unlocked. Touch the door unlock
sensor and check that the doors
are unlocked befo re pulling the
door handle again.
●If there is another electronic key in
the detection area, it may take
slightly longer to unlock the doors
after the door handle is gripped.
■When the vehicle is not driven
for extended periods
●To prevent theft of the vehicle, do
not leave the electronic key within
6 ft. (2 m) of the vehicle.
●The smart key system can be
deactivated in advance. ( P.494)
●Setting the electronic key to bat-
tery-saving mode helps to reduce
key battery depletion. ( P.133)
■To operate the system properly
Make sure to carry the electronic
key when operating the system. Do
not get the electronic key too close
to the vehicle when operating the
system from the out side of the vehi-
cle.
Depending on the position and hold-
ing condition of the electronic key,
the key may not be detected cor-
Page 155 of 552

1553-4. Adjusting the steering wheel and mirrors
3
Before driving
■Cleaning the mirror surface
If the mirror surface is dirty, the
image on the display may be dif-
ficult to see.
Clean the mirror surface gently
using a soft dry cloth.
■Cleaning the camera
If the camera lens is dirty or cov-
ered with foreign matter, such as
water droplets, snow, mud, etc.,
the displayed image may not be
clear. In this case, rinse the
camera lens with a large quan-
tity of water and then wipe it
clean with a soft cloth damp-
ened with water.
Dirt on the camera lens can be
cleaned by operating the dedi-
cated camera cleaning washer.
( P.219)
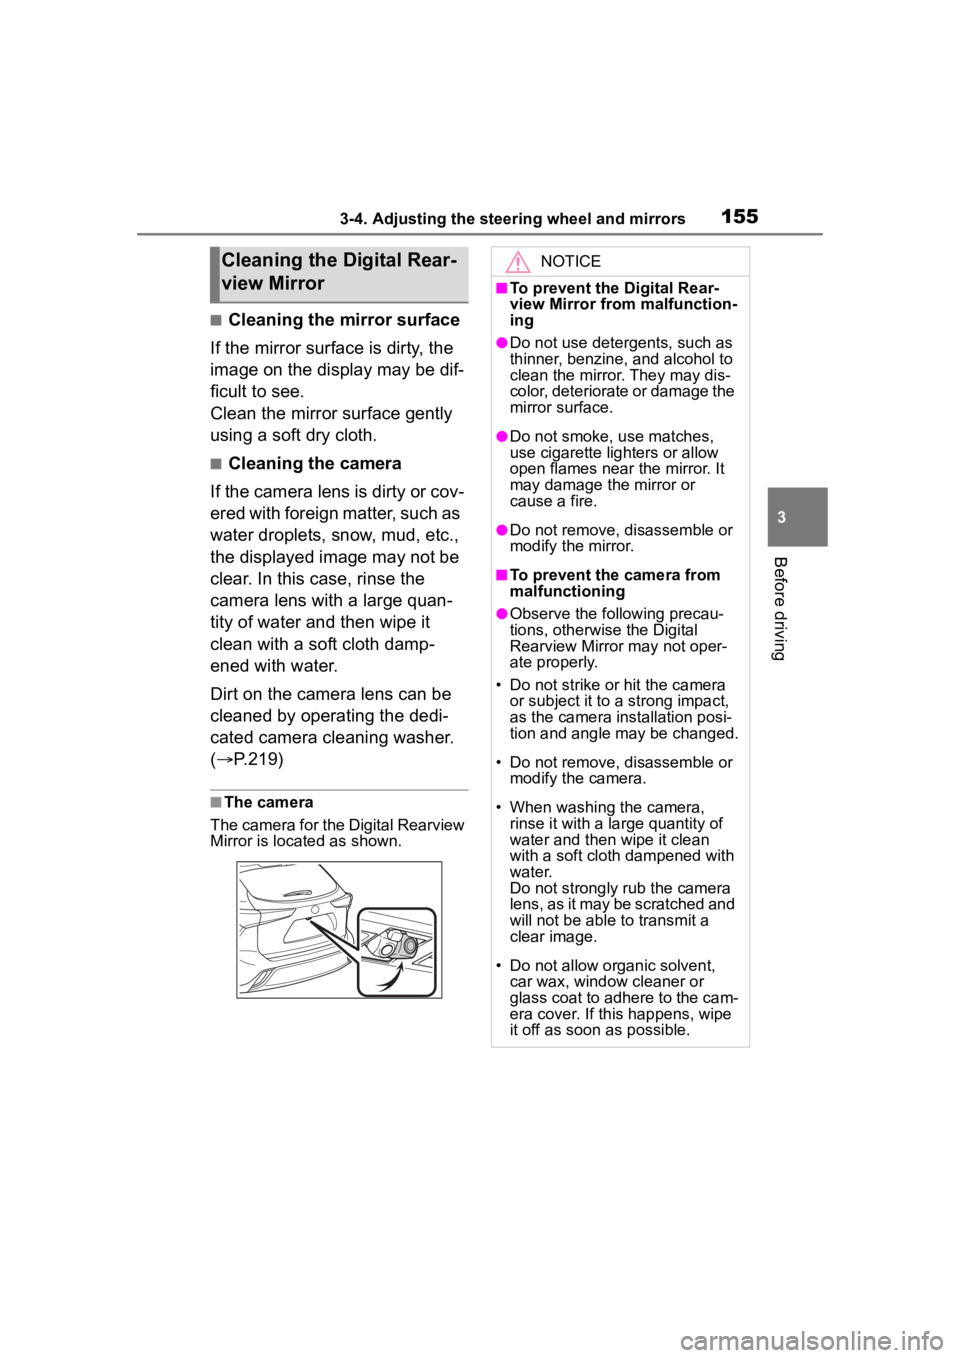
■The camera
The camera for the Digital Rearview
Mirror is located as shown.
Cleaning the D igital Rear-
view MirrorNOTICE
■To prevent the Digital Rear-
view Mirror from malfunction-
ing
●Do not use detergents, such as
thinner, benzine, and alcohol to
clean the mirror. They may dis-
color, deteriorate or damage the
mirror surface.
●Do not smoke, use matches,
use cigarette lighters or allow
open flames near the mirror. It
may damage the mirror or
cause a fire.
●Do not remove, d isassemble or
modify the mirror.
■To prevent the camera from
malfunctioning
●Observe the fo llowing precau-
tions, otherwise the Digital
Rearview Mirror may not oper-
ate properly.
• Do not strike or hit the camera or subject it to a strong impact,
as the camera installation posi-
tion and angle may be changed.
• Do not remove, disassemble or modify the camera.
• When washing the camera, rinse it with a la rge quantity of
water and then wipe it clean
with a soft cloth dampened with
water.
Do not strongly rub the camera
lens, as it may be scratched and
will not be able to transmit a
clear image.
• Do not allow organic solvent, car wax, window cleaner or
glass coat to adhere to the cam-
era cover. If this happens, wipe
it off as soon as possible.
Page 160 of 552

1603-4. Adjusting the steering wheel and mirrors
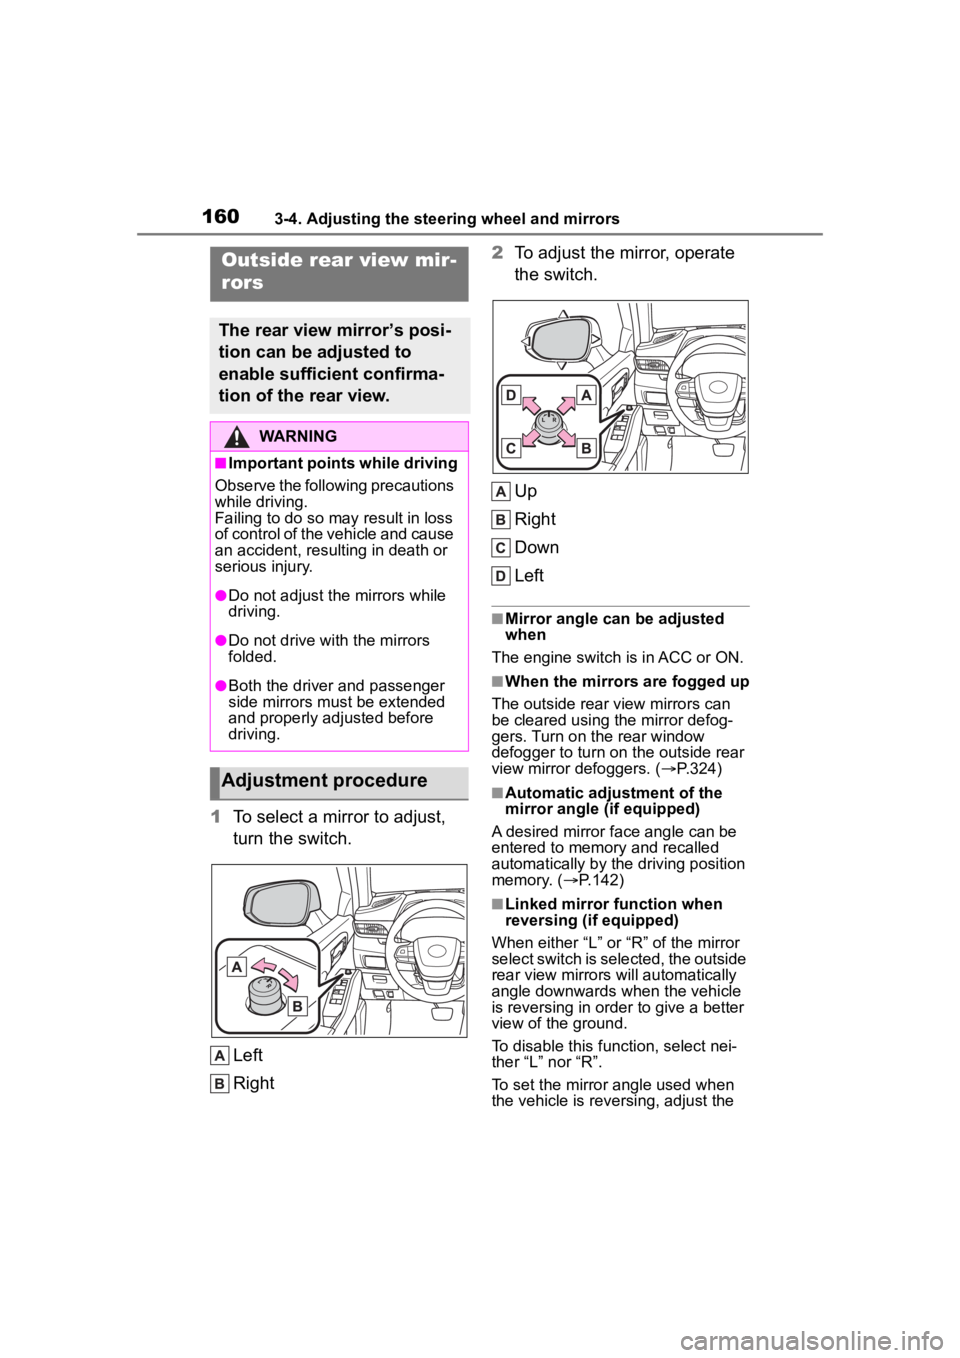
1To select a mirror to adjust,
turn the switch.
Left
Right 2
To adjust the mirror, operate
the switch.
Up
Right
Down
Left
■Mirror angle can be adjusted
when
The engine switch i s in ACC or ON.
■When the mirrors are fogged up
The outside rear view mirrors can
be cleared using the mirror defog-
gers. Turn on the rear window
defogger to turn on the outside rear
view mirror defoggers. ( P.324)
■Automatic adjustment of the
mirror angle (if equipped)
A desired mirror face angle can be
entered to memory and recalled
automatically by the driving position
memory. ( P.142)
■Linked mirror function when
reversing (if equipped)
When either “L” or “R” of the mirror
select switch is selected, the outside
rear view mirrors will automatically
angle downwards when the vehicle
is reversing in order to give a better
view of the ground.
To disable this function, select nei-
ther “L” nor “R”.
To set the mirror angle used when
the vehicle is reversing, adjust the
Outside rear view mir-
rors
The rear view mirror’s posi-
tion can be adjusted to
enable sufficient confirma-
tion of the rear view.
WARNING
■Important points while driving
Observe the following precautions
while driving.
Failing to do so may result in loss
of control of the vehicle and cause
an accident, resul ting in death or
serious injury.
●Do not adjust the mirrors while
driving.
●Do not drive with the mirrors
folded.
●Both the driver and passenger
side mirrors must be extended
and properly adjusted before
driving.
Adjustment procedure
Page 162 of 552

1623-5. Opening, closing the windows and moon roof
3-5.Opening, closing the windows and moon roof
The power windows can be
opened and closed using the
switches.
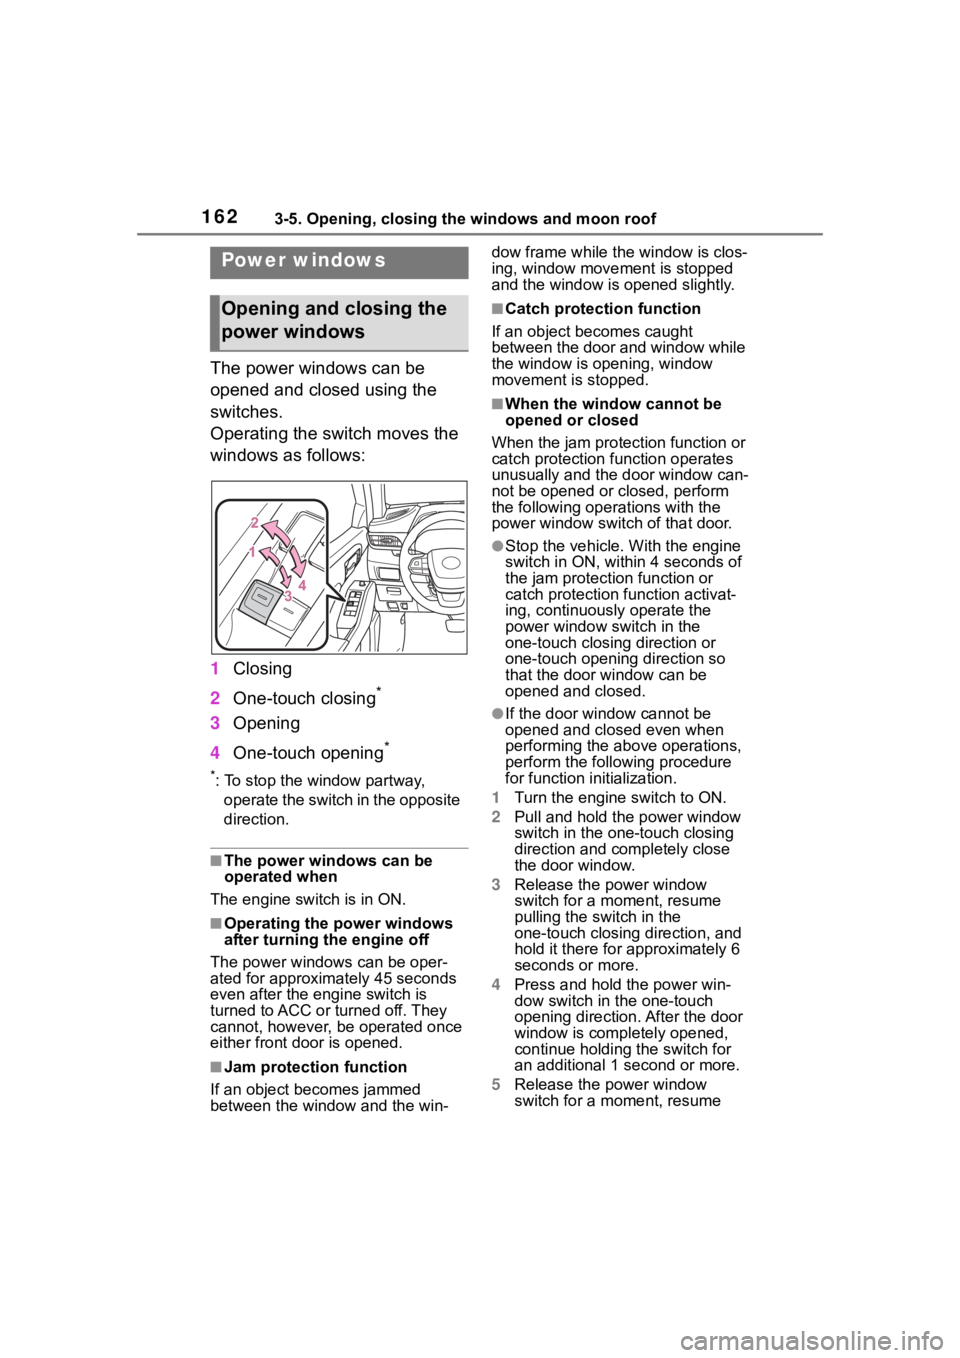
Operating the switch moves the
windows as follows:
1Closing
2 One-touch closing
*
3Opening
4 One-touch opening
*
*: To stop the window partway,
operate the switch in the opposite
direction.
■The power windows can be
operated when
The engine switch is in ON.
■Operating the power windows
after turning the engine off
The power windows can be oper-
ated for approximately 45 seconds
even after the engine switch is
turned to ACC or turned off. They
cannot, however, be operated once
either front door is opened.
■Jam protection function
If an object becomes jammed
between the window and the win- dow frame while the
window is clos-
ing, window move ment is stopped
and the window is opened slightly.
■Catch protection function
If an object becomes caught
between the door and window while
the window is opening, window
movement is stopped.
■When the window cannot be
opened or closed
When the jam protection function or
catch protection function operates
unusually and the door window can-
not be opened or closed, perform
the following operations with the
power window swit ch of that door.
●Stop the vehicle. With the engine
switch in ON, within 4 seconds of
the jam protection function or
catch protection function activat-
ing, continuously operate the
power window switch in the
one-touch closing direction or
one-touch opening direction so
that the door window can be
opened and closed.
●If the door window cannot be
opened and closed even when
performing the above operations,
perform the follo wing procedure
for function initialization.
1 Turn the engine switch to ON.
2 Pull and hold the power window
switch in the on e-touch closing
direction and completely close
the door window.
3 Release the power window
switch for a m oment, resume
pulling the switch in the
one-touch closing direction, and
hold it there for approximately 6
seconds or more.
4 Press and hold the power win-
dow switch in the one-touch
opening direction. After the door
window is completely opened,
continue holding the switch for
an additional 1 second or more.
5 Release the power window
switch for a m oment, resume
Power windows
Opening and closing the
power windows