2023 TOYOTA HIGHLANDER torque
[x] Cancel search: torquePage 308 of 552

3084-5. Using the driving support systems
wheel
■Dynamic Torque Control
AWD system (AWD models)
Automatically controls the drive
system such as to front-wheel
drive or AWD (all wheel drive)
according to various running
conditions including normal driv-
ing, during cornering, on a
uphill, when starting off, during
acceleration, on a slippery roads
due to snow or rain, thus con-
tributing to stable operability and
driving stability.
■Dynamic Torque Vectoring
AWD system (AWD models)
Automatically controls the drive
system such as to front-wheel
drive or AWD (all wheel drive)
according to various running
conditions including normal driv-
ing, during cornering, on a
uphill, when starting off, during
acceleration, on a slippery roads
due to snow or rain, thus con-
tributing to stable operability and
driving stability.
Also, drive torque distribution is
precisely controlled during cor-
nering, contributing to improve-
ments in operability and stability.
■The Secondary Collision
Brake
When the SRS airbag sensor
detects a collision and the sys-
tem operates, the brakes and
brake lights are automatically
controlled to reduce the vehicle speed and help reduce the pos-
sibility of further damage due to
a secondary collision.
■When the TRAC/VSC/Trailer
Sway Control systems are oper-
ating
The slip indicator light will flash
while the TRAC/VSC/Trailer Sway
Control systems are operating.
■Disabling the TRAC system
If the vehicle gets stuck in mud, dirt
or snow, the TRAC system may
reduce power from the engine to the
wheels. Pressing the switch to
turn the system off may make it eas-
ier for you to rock the vehicle in
order to free it.
To turn the TRAC system off, quickly
press and release the switch.
The “Traction Cont rol Turned OFF”
will be shown on the multi-informa-
tion display.
Press the switch again to turn
the system back on.
Page 312 of 552

3124-5. Using the driving support systems
WARNING
■When the TRAC/VSC/Trailer
Sway Control is activated
The slip indicator light flashes.
Always drive carefully. Reckless
driving may cause an accident.
Exercise particular care when the
indicator light flashes.
■When the TRAC/VSC/Trailer
Sway Control systems are
turned off
●Be especially careful and drive
at a speed appropriate to the
road conditions. As these are
the systems to help ensure
vehicle stability and driving
force, do not turn the
TRAC/VSC/Trailer Sway Con-
trol systems off unless neces-
sary.
●Trailer Sway Control is part of
the VSC system and will not
operate if VSC is turned off or
experiences a malfunction.
■Dynamic Torque Vectoring
AWD system
The cornering performance of the
AWD system has been improved.
However, do not overly rely on the
system and drive with caution.
■Replacing tires
Make sure that all tires are of the
specified size, brand, tread pat-
tern and total load capacity. In
addition, make sure that the tires
are inflated to the recommended
tire inflation pressure level.
The ABS, TRAC, Trailer Sway
Control and VSC systems will not
function correctly if different tires
are installed on the vehicle.
Contact your Toyota dealer for fur-
ther information when replacing
tires or wheels.
■Handling of tires and the sus-
pension
Using tires with any kind of prob-
lem or modifying the suspension
will affect the driving assist sys-
tems, and may cause a system to
malfunction.
■Trailer Sway Control precau-
tion
The Trailer Sway Control system
is not able to red uce trailer sway
in all situations. Depending on
many factors such as the condi-
tions of the vehicle, trailer, road
surface and driving environment,
the Trailer Sway Control system
may not be effective. Refer to
your trailer owner’s manual for
information on how to tow your
trailer properly.
■If trailer sway occurs
Observe the following precau-
tions.
Failing to do so may cause death
or serious injury.
●Firmly grip the steering wheel.
Steer straight ahead. Do not try
to control trailer sway by turning
the steering wheel.
●Begin releasing the accelerator
pedal immediately but very
gradually to reduce speed.
Do not increase speed. Do not
apply vehicle brakes.
If you make no extreme correction
with the steering or brakes, your
vehicle and traile r should stabi-
lize. ( P.186)
Page 448 of 552
4487-2. Steps to take in an emergency
When replacing tires on a vehi-
cle with wheel lock nuts, use the
following procedures to remove
and install the wheel lock nuts.
The wheel lock key is stored in
the tray inside the luggage com- partment. Always return the
wheel lock key to its original
position after use, so that it does
not get lost. (
P.447)
■Removal
For ease of removal, the wheel
lock nut should always be the
first one loosened.
1 Place the wheel lock key on
top of the wheel lock nut,
turning until the wheel lock
key and wheel lock nut pat-
terns engage.
2 Place the wheel nut wrench
on the wheel lock key, and
while applying pressure on
the wheel lock key, loosen
the wheel lock nut.
■Installation
For ease of installation, the
wheel lock nut should always be
the last one tightened.
1 By hand, install a wheel lock
nut on each wheel.
2 Place the wheel lock key on
top of the wheel lock nut,
turning until the wheel lock
key and wheel lock nut pat-
terns engage.
3 Place the wheel nut wrench
on the wheel lock key, and
while applying pressure on
the wheel lock key, tighten
the wheel lock nut to the rec-
ommended torque.
WARNING
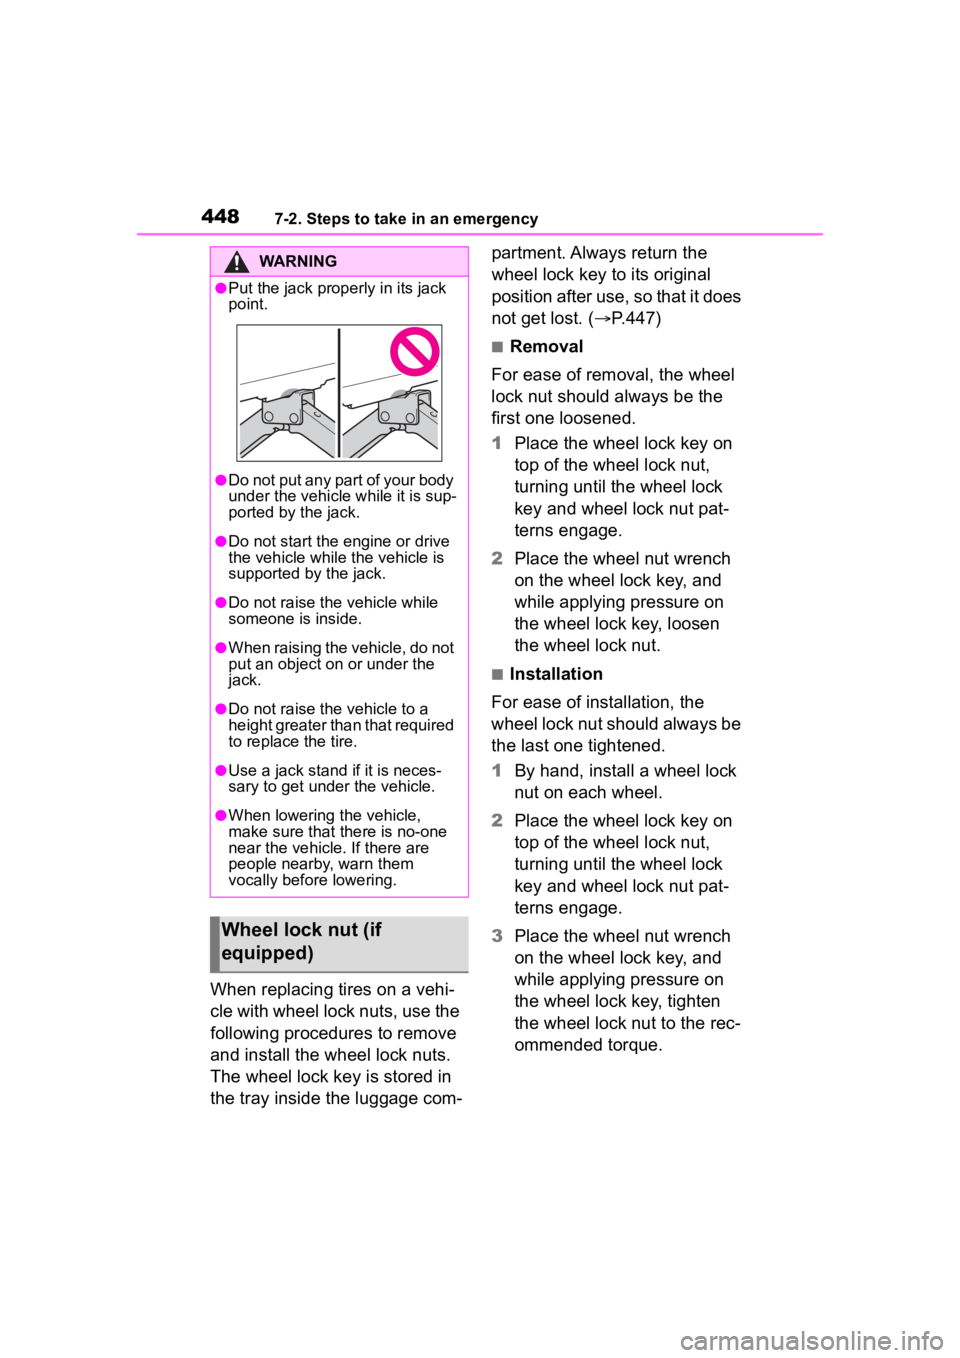
●Put the jack prope rly in its jack
point.
●Do not put any part of your body
under the vehicle while it is sup-
ported by the jack.
●Do not start the engine or drive
the vehicle while the vehicle is
supported by the jack.
●Do not raise the vehicle while
someone is inside.
●When raising the vehicle, do not
put an object on or under the
jack.
●Do not raise the vehicle to a
height greater than that required
to replace the tire.
●Use a jack stand if it is neces-
sary to get under the vehicle.
●When lowering the vehicle,
make sure that there is no-one
near the vehicle. If there are
people nearby, warn them
vocally before lowering.
Wheel lock nut (if
equipped)
Page 454 of 552
4547-2. Steps to take in an emergency
ered, the wire cable may be sev-
ered. Have the vehicle inspected by
your Toyota dealer.
1Remove any dirt or foreign
matter from the wheel con-
tact surface.
If foreign matter is on the wheel
contact surface, the wheel nuts
may loosen while the vehicle is in
WARNING
■Replacing a flat tire
●Do not touch the disc wheels or
the area around the brakes
immediately after the vehicle
has been driven.
After the vehicle has been
driven the disc wheels and the
area around the brakes will be
extremely hot. Touching these
areas with hands , feet or other
body parts while changing a tire,
etc. may result in burns.
●Failure to follow these precau-
tions could cause the wheel
nuts to loosen and the tire to fall
off, resulting in death or serious
injury.
• Never use oil or grease on the wheel bolts or wheel nuts.
Oil and grease may cause the
wheel nuts to be excessively
tightened, leading to bolt or disc
wheel damage. In addition, the
oil or grease can cause the
wheel nuts to loosen and the
wheel may fall off, causing an
accident and resulting in death
or serious injury. Remove any
oil or grease from the wheel
bolts or wheel nuts.
• Have the wheel nuts tightened with a torque wrench to 76 ft•lbf
(103 N•m, 10.5 kgf•m) as soon
as possible after changing
wheels.
• When installing a tire, only use wheel nuts that have been spe-
cifically designed for that wheel.
• If there are any cracks or defor- mations in the bolt screws, nut
threads or bolt holes of the
wheel, have the vehicle
inspected by your Toyota
dealer.
• Do not attach a heavily dam- aged wheel ornament, as it may
fly off the wheel while the vehi-
cle is moving.
●Observe the fo llowing precau-
tions.
Failure to do so may result in
serious injury:
• Do not try to remove the wheel ornament by hand. Take due
care in handling the ornament to
avoid unexpected personal
injury.
• Lower the spare tire completely to the ground before removing it
from under the vehicle.
■Replacing a flat tire for vehi-
cles with power back door
In cases such as when replacing
tires, make sure to turn off the
power back door main switch
( P.494). Failure to do so may
cause the back d oor to operate
unintentionally if the power back
door switch is accidentally
touched, resulti ng in hands and
fingers being caught and injured.
Installing the spare tire
Page 455 of 552
4557-2. Steps to take in an emergency
7
When trouble arises
motion, causing the tire to come off.
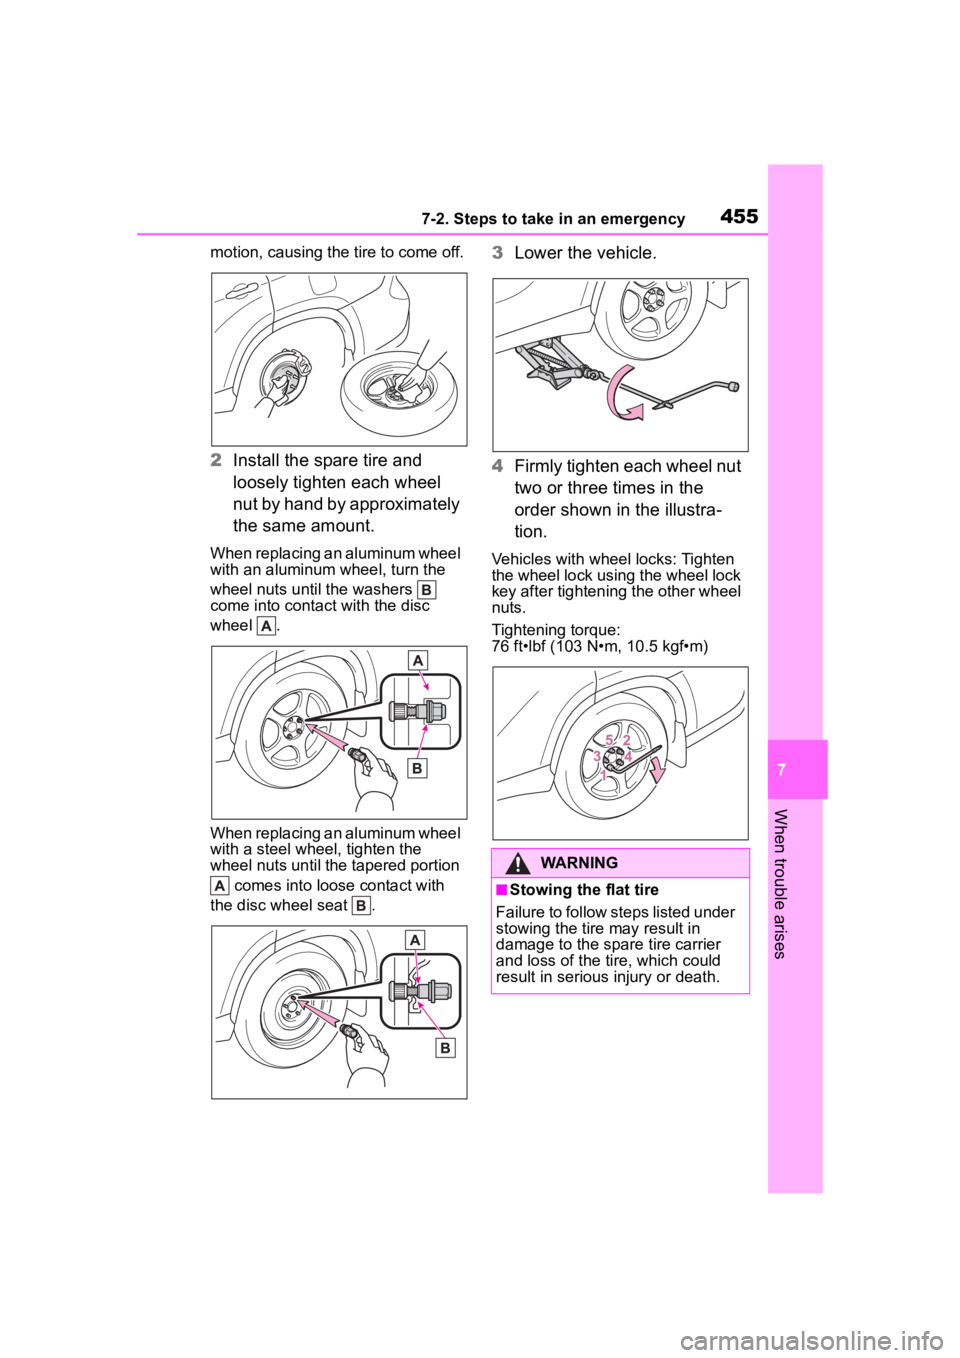
2Install the spare tire and
loosely tighten each wheel
nut by hand by approximately
the same amount.
When replacing an aluminum wheel
with an aluminum wheel, turn the
wheel nuts until the washers
come into contact with the disc
wheel .
When replacing an aluminum wheel
with a steel wheel, tighten the
wheel nuts until the tapered portion
comes into loose contact with
the disc wheel seat .
3 Lower the vehicle.
4 Firmly tighten each wheel nut
two or three times in the
order shown in the illustra-
tion.
Vehicles with wheel locks: Tighten
the wheel lock using the wheel lock
key after tightening the other wheel
nuts.
Tightening torque:
76 ft•lbf (103 N•m, 10.5 kgf•m)
WARNING
■Stowing the flat tire
Failure to follow steps listed under
stowing the tire may result in
damage to the spare tire carrier
and loss of the tire, which could
result in serious injury or death.
Page 480 of 552
4808-1. Specifications
Ty p e B
Ty p e C
Wheel size18 8 J, 18 4T (spare)
Wheel nut torque76 ft•lbf (103 N•m, 10.5 kgf•m)
Tire size235/55R20 102V, T165/90D18 107M (spare)
Tire inflation pressure
(Recommended cold tire
inflation pressure)
Front
36 psi (250 kPa, 2.5 kgf/cm
2 or bar)
Rear
36 psi (250 kPa, 2.5 kgf/cm
2 or bar)
Spare
60 psi (420 kPa, 4.2 kgf/cm
2 or bar)
Driving at high speeds (above 100 mph [160
km/h]) (in countries wher e such speeds are per-
mitted by law)
Add 4 psi (30 kPa, 0.3 kgf/cm
2 or bar) to the front
and rear tires. Never exceed the maximum cold
tire inflation pressure in dicated on the tire side-
wall.
Wheel size20 8 J, 18 4T (spare)
Wheel nut torque76 ft•lbf (103 N•m, 10.5 kgf•m)
Tire size235/65R18 106V
Tire inflation pressure
(Recommended cold tire
inflation pressure)
Front
36 psi (250 kPa, 2.5 kgf/cm
2 or bar)
Rear
36 psi (250 kPa, 2.5 kgf/cm
2 or bar)
Spare
36 psi (250 kPa, 2.5 kgf/cm
2 or bar)
Driving at high speeds (above 100 mph [160
km/h]) (in countries wher e such speeds are per-
mitted by law)
Add 4 psi (30 kPa, 0.3 kgf/cm
2 or bar) to the front
and rear tires. Never exceed the maximum cold
tire inflation pressure in dicated on the tire side-
wall.
Page 481 of 552
4818-1. Specifications
8
Vehicle specifications
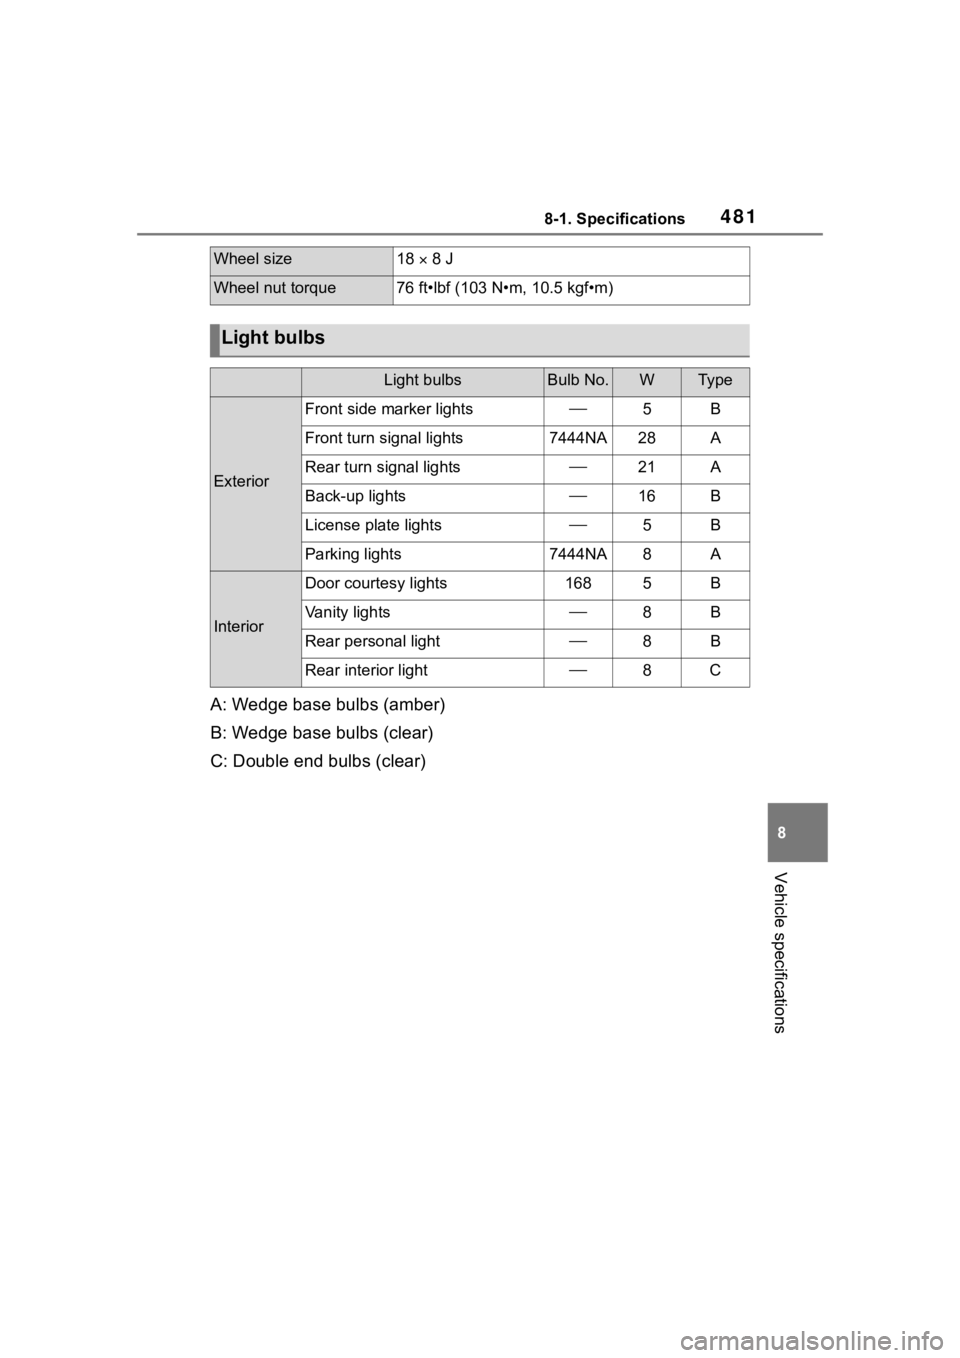
A: Wedge base bulbs (amber)
B: Wedge base bulbs (clear)
C: Double end bulbs (clear)
Wheel size18 8 J
Wheel nut torque76 ft•lbf (103 N•m, 10.5 kgf•m)
Light bulbs
Light bulbsBulb No.WTy p e
Exterior
Front side marker lights5B
Front turn signal lights7444NA28A
Rear turn signal lights21A
Back-up lights16B
License plate lights5B
Parking lights7444NA8A
Interior
Door courtesy lights1685B
Vanity lights8B
Rear personal light8B
Rear interior light8C
Page 527 of 552

527Alphabetical Index
Cruise controlDynamic radar cruise control with full-speed range .......... 249
Cup holders ............................ 341
Current fuel consumption . 88, 99
Curtain shield airbags ............. 34
Customizable features ........... 494
D
Daytime running light system210 Replacing light bulbs ............ 415
Defogger Outside rear view mirrors ..... 324
Rear window ........................ 324
Windshield............................ 324
Differential Rear differential oil ............... 478
Digital Rearview Mirror .......... 150
Dimension ............................... 474
Dinghy towing ........................ 196
Display Dynamic radar cruise control with full-speed range .......... 249
Head-up display ................... 103
Intuitive parking assist .......... 275
LTA (Lane Tracing Assist) ..... 245
Multi-information display .. 87, 96
RCTA .................................... 283
Warning message ................ 442
Distance until next engine oil change..................................... 80
Do-it-yourself maintenance ... 377
Door courtesy lights .............. 337
Door lock Back door ............................. 119
Side doors ............................ 115
Smart key system................. 131
Wireless remote control ....... 113
Doors Automatic door locking and unlocking system................ 118
Back door ............................. 119 Door glasses ........................162
Door lock .............................. 119
Open door warning buzzer . 116,
11 8
Outside rear view mirrors .....160
Rear door child-protectors .... 118
Downhill assist control system ...............................................305
Drive distance ...........................91
Drive information ......................91
Driver’s seat position memory Driving position memory .......142
Memory recall function .........144
Driving Break-in tips .........................175
Correct driving posture ...........25
Driving mode select switch ...300
Procedures ...........................174
Winter drive tips....................314
Driving information display .....88
Driving mode select switch ...300
Driving position memory .......142 Memory recall function .........144
Driving range ................88, 89, 99
Driving support system informa- tion display................90, 98, 100
Dynamic radar cruise control with full-speed range............249Warning message.................259
Dynamic Torque Control AWD system ...................................308
Dynamic Torque Vectoring AWD system ...................................308
E
Eco drive mode .......................300
Eco Driving Indicator .......89, 106
Eco Driving Indicator Light......89
EDR (Event data recorder) .........7
Elapsed time .............................91