2023 TOYOTA COROLLA brakes
[x] Cancel search: brakesPage 254 of 468
2544-6. Driving tips
Perform the following according
to the driving conditions:
Do not try to forcibly open a
window or move a wiper that
is frozen. Pour warm water
over the frozen area to melt
the ice. Wipe away the water
immediately to prevent it from
freezing.
To ensure proper operation of
the climate control system
fan, remove any snow that
has accumulated on the air
inlet vents in front of the wind-
shield.
Check for and remove any
excess ice or snow that may
have accumulated on the
exterior lights, outside rear
view mirrors, windows, vehi-
cle’s roof, chassis, around the
tires or on the brakes.
Remove any snow or mud
from the bottom of your shoes
before getting in the vehicle.
Accelerate the vehicle slowly,
keep a safe distance between
you and the vehicle ahead, and
drive at a reduced speed suit-
able to road conditions.
Turn automatic mode of the parking brake off. Otherwise,
the parking brake may freeze
and not be able to be
released automatically.
Also, avoid using the following as
the parking brake may operate
automatically, even if automatic
mode is off.
• Brake hold system
Park the vehicle and shift the
shift lever to P without setting
the parking brake. The park-
ing brake may freeze up, pre-
venting it from being released.
If the vehicle is parked without
setting the parking brake,
make sure to block the
wheels.
Failure to do so may be dan-
gerous because it may cause
the vehicle to move unexpect-
edly, possibly leading to an
accident.
When the parking brake is in
automatic mode, release the
parking brake after shifting
the shift lever to P. ( P.169)
If the vehicle is parked without
setting the parking brake,
confirm that the shift lever
cannot be moved out of P.
If the vehicle is left parked
with the brakes damp in cold
temperatures, there is a pos-
sibility of the brakes freezing.
Use the correct tire chain size
Before driving the vehicle
When driving the vehicle
When parking the vehicleSelecting tire chains
Page 288 of 468
2886-1. Maintenance and care
6-1.Maintenance and care
Working from top to bottom,
liberally apply water to the
vehicle body, wheel wells and
underside of the vehicle to
remove any dirt and dust.
Wash the vehicle body using
a sponge or soft cloth, such
as a chamois.
For hard-to-remove marks,
use car wash soap and rinse
thoroughly with water.
Wipe away any water.
Wax the vehicle when the
waterproof coating deterio-
rates.
If water does not bead on a clean
surface, apply wax when the vehi-
cle body is cool.
■Automatic car washes
●Fold the mirrors before washing
the vehicle. Start washing from the
front of the vehicle. Make sure to
extend the mirrors before driving.
●Brushes used in automatic car
washes may scratch the vehicle
surface, parts (wheel, etc.) and
harm your vehicle’s paint.
●Vehicles with a rear spoiler: In cer-
tain automatic car washes, the rear spoiler may interfere with
machine operation. This may pre-
vent the vehicle from being
cleaned properly or result in dam-
age to the r
ear spoiler.
■High pressure car washes
As water may enter the cabin, do
not bring the nozzle tip near the
gaps around the doors or perimeter
of the windows, or spray these
areas continuously.
■When using a car wash (vehi-
cles with a smart key system)
If the door handle becomes wet
while the electronic key is within the
effective range, the door may lock
and unlock repeatedly. In that case,
follow the following correction pro-
cedures to wash the vehicle:
●Place the key in a position 6 ft. (2
m) or more separate from the
vehicle while the vehicle is being
washed. (Take care to ensure that
the key is not stolen.)
●Set the electronic key to bat-
tery-saving mode to disable the
smart key system. ( P.121)
■Wheels and wheel ornaments
●Remove any dirt immediately by
using a neutral detergent.
●Wash detergent off with water
immediately after use.
●To protect the paint from damage,
make sure to obs erve the follow-
ing precautions.
• Do not use acidic, alkaline or abrasive detergent
• Do not use hard brushes
• Do not use detergent on the
wheels when they are hot, such
as after driving or parking in hot
weather
■Brake pads and calipers
Rust may form if the vehicle is
parked with wet brake pads or disc
rotors, causing them to stick. Before
parking the vehicle after it is
washed, drive slo wly and apply the
brakes several times to dry the
Cleaning and protect-
ing the vehicle exte-
rior
Perform cleaning in a man-
ner appropriate to each
component and its material.
Cleaning instructions
Page 297 of 468

2976-2. Maintenance
6
Maintenance and care
Brakes
• The vehicle should not pull to
one side when
the brakes are
applied.
• The brakes should work
effectively.
• The brake pedal should not feel
spongy.
• The brake pedal should not get
too close to the
floor when the
brakes are
applied.
Head
restraints
Do the head
restraints move
smoothly and lock
securely?
Indica-
tors/buzzersDo the indicators
and buzzers func-
tion properly?
LightsDo all the lights
come on?
Parking brake
• Does the park-ing brake oper-
ate normally?
• When parked on a slope and the
parking brake is
on, is the vehicle
securely
stopped?
ItemsCheck points
Seat belts
• Do the seat belts operate
smoothly?
• The seat belts should not be
damaged.
Seats
Do the seat con-
trols operate prop-
erly?
Steering wheel
• Does the steer-ing wheel rotate
smoothly?
• Does the steer- ing wheel have
the correct
amount of free
play?
• There should not be any strange
sounds coming
from the steer-
ing wheel.
Vehicle exterior
ItemsCheck points
Doors/trunkDo the doors/trunk
operate smoothly?
Engine hood
Does the engine
hood lock system
work properly?
Fluid leaks
There should not
be any signs of
fluid leakage after
the vehicle has
been parked.
ItemsCheck points
Page 349 of 468
3497-1. Essential information
7
When trouble arises
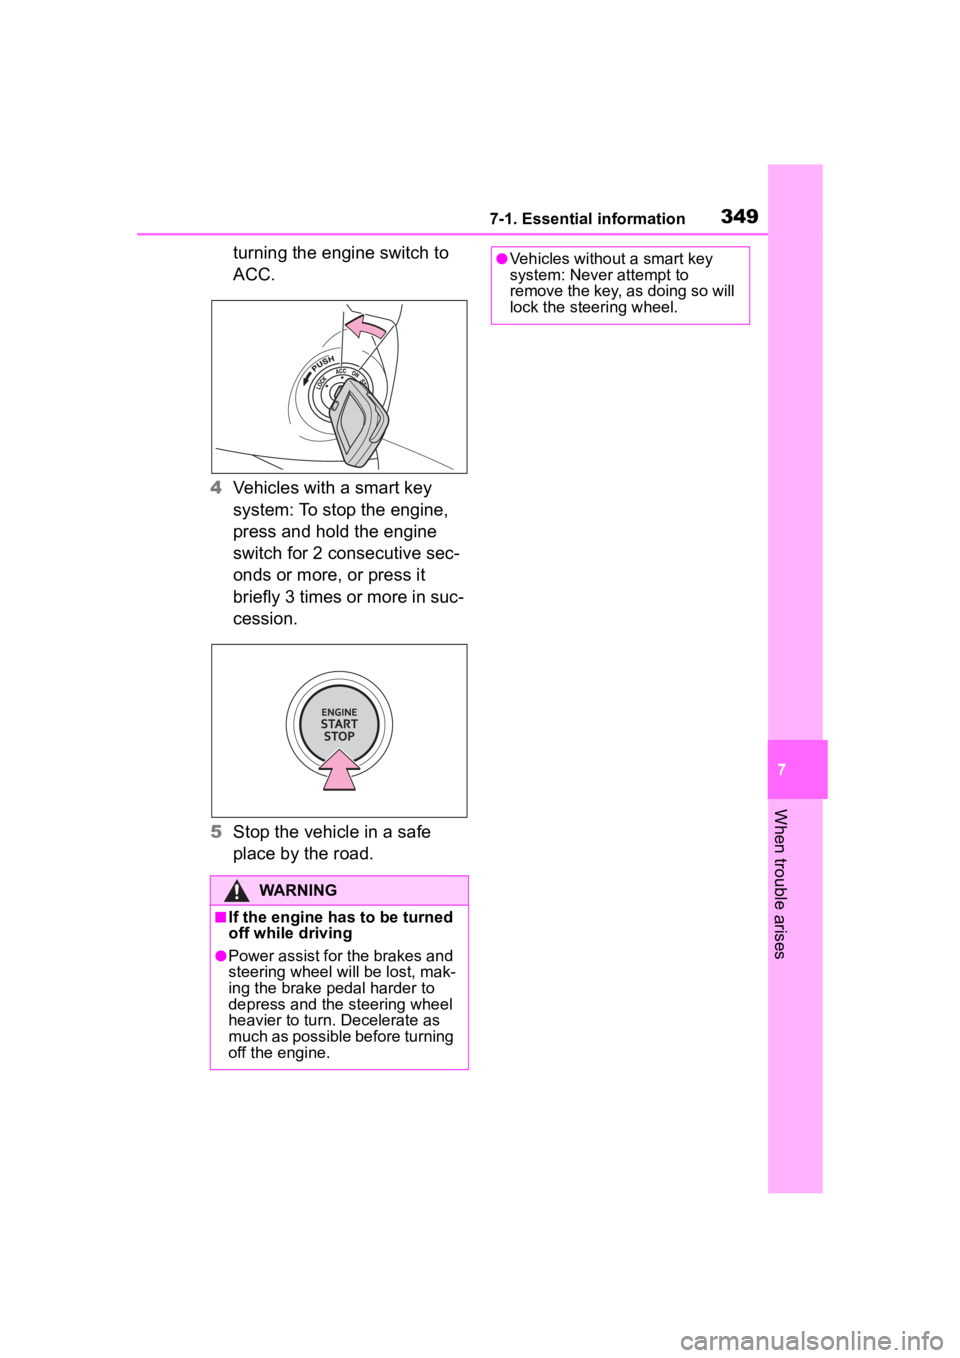
turning the engine switch to
ACC.
4 Vehicles with a smart key
system: To stop the engine,
press and hold the engine
switch for 2 consecutive sec-
onds or more, or press it
briefly 3 times or more in suc-
cession.
5 Stop the vehicle in a safe
place by the road.
WARNING
■If the engine has to be turned
off while driving
●Power assist for the brakes and
steering wheel will be lost, mak-
ing the brake pedal harder to
depress and the steering wheel
heavier to turn. Decelerate as
much as possible before turning
off the engine.
●Vehicles without a smart key
system: Never attempt to
remove the key, as doing so will
lock the steering wheel.
Page 353 of 468
3537-2. Steps to take in an emergency
7
When trouble arises
If a tow truck is not available in
an emergency, your vehicle may
be temporarily towed using
cables or chains secured to the
emergency towing eyelets. This
should only be attempted on
hard surfaced roads for at most
50 miles (80 km) at under 18
mph (30 km/h).
A driver must be in the vehicle to
steer and operate the brakes.
The vehicle’s wheels, drive train,
axles, steering and brakes must
be in good condition.
For vehicles with a continuously
variable transmission, only the
front towing eyelets may be
used.
To have your vehicle towed by
another vehicle, the towing eye-
let must be installed to your
vehicle. Install the towing eyelet
using the following procedure.
1Take out the wheel nut
wrench and towing eyelet.
( 371)
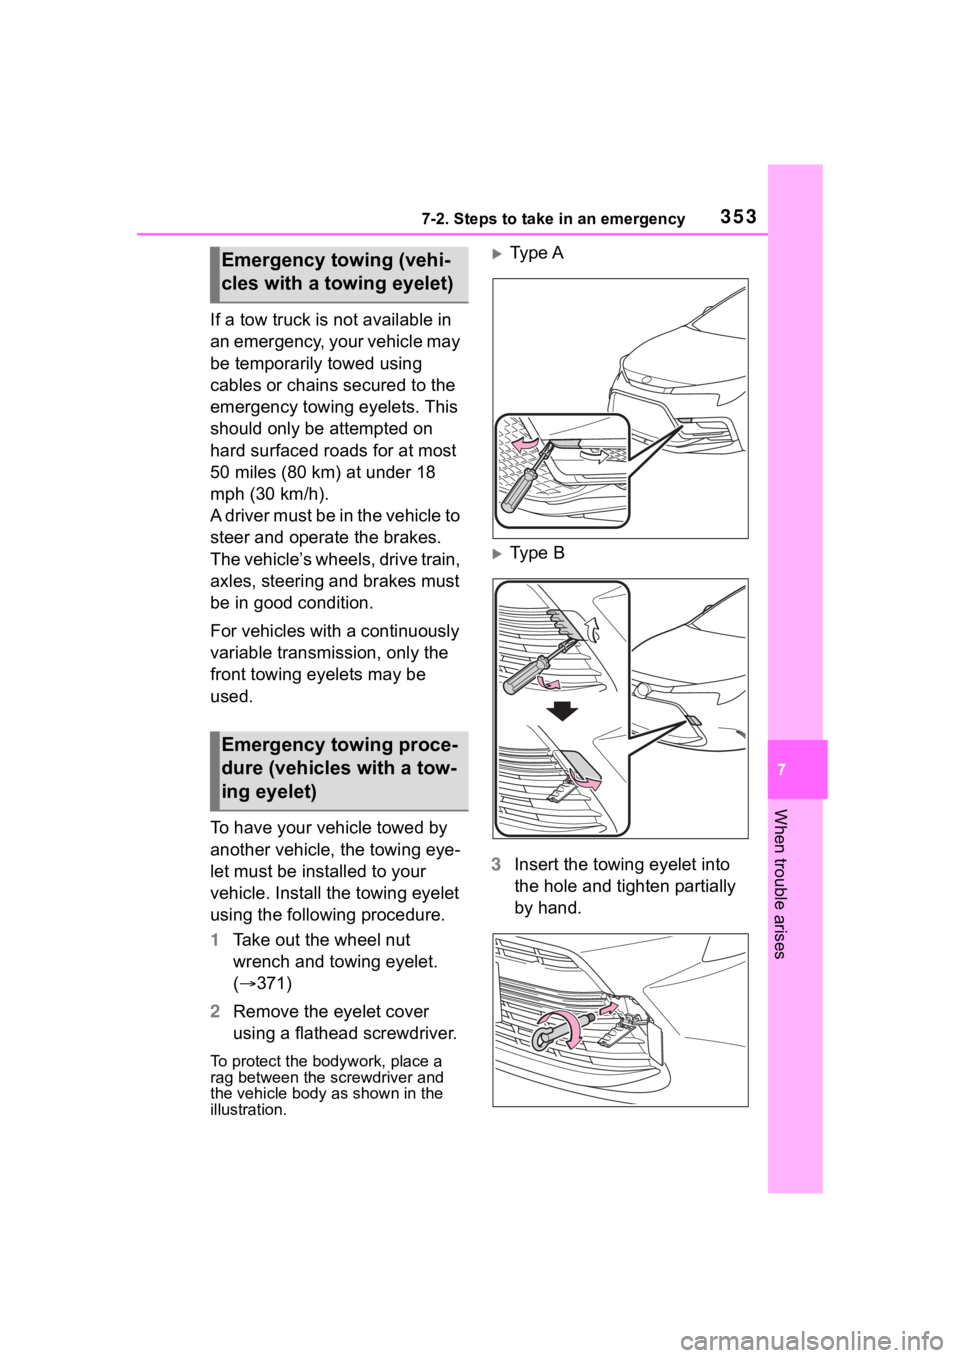
2 Remove the eyelet cover
using a flathead screwdriver.
To protect the bod ywork, place a
rag between the screwdriver and
the vehicle body as shown in the
illustration.
Type A
Type B
3 Insert the towing eyelet into
the hole and tighten partially
by hand.
Emergency towing (vehi-
cles with a towing eyelet)
Emergency towing proce-
dure (vehicles with a tow-
ing eyelet)
Page 354 of 468
3547-2. Steps to take in an emergency
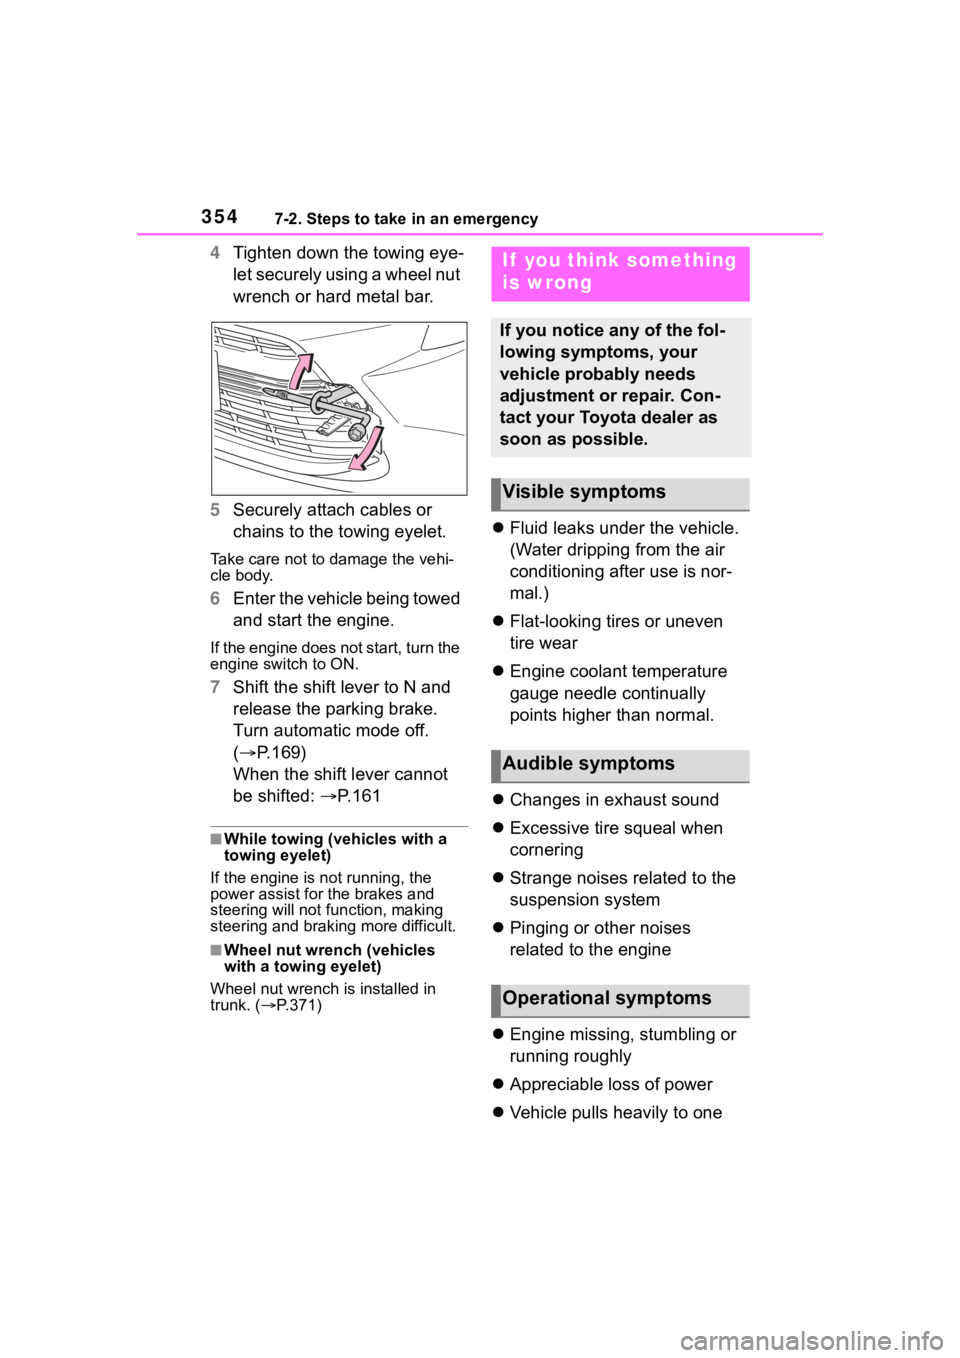
4Tighten down the towing eye-
let securely using a wheel nut
wrench or hard metal bar.
5 Securely attach cables or
chains to the towing eyelet.
Take care not to damage the vehi-
cle body.
6Enter the vehicle being towed
and start the engine.
If the engine does not start, turn the
engine switch to ON.
7Shift the shift lever to N and
release the parking brake.
Turn automatic mode off.
( P.169)
When the shift lever cannot
be shifted: P. 1 6 1
■While towing (vehicles with a
towing eyelet)
If the engine is not running, the
power assist for the brakes and
steering will not function, making
steering and braking more difficult.
■Wheel nut wrench (vehicles
with a towing eyelet)
Wheel nut wrench is installed in
trunk. ( P.371)
Fluid leaks under the vehicle.
(Water dripping from the air
conditioning after use is nor-
mal.)
Flat-looking tires or uneven
tire wear
Engine coolant temperature
gauge needle continually
points higher than normal.
Changes in exhaust sound
Excessive tire squeal when
cornering
Strange noises related to the
suspension system
Pinging or other noises
related to the engine
Engine missing, stumbling or
running roughly
Appreciable loss of power
Vehicle pulls heavily to one
If you think something
is wrong
If you notice any of the fol-
lowing symptoms, your
vehicle probably needs
adjustment or repair. Con-
tact your Toyota dealer as
soon as possible.
Visible symptoms
Audible symptoms
Operational symptoms
Page 363 of 468

3637-2. Steps to take in an emergency
7
When trouble arises
■Parking brake indicator
■Brake hold operated indicator
■Warning buzzer
In some cases, the buzzer may not
be heard due to being in a noisy
location or audio sound.
■Front passenger detection sen-
sor, seat belt reminder and
warning buzzer
●If luggage is placed on the front
passenger seat, the front passen-
ger detection sensor may cause
the warning light to flash and the
warning buzzer to sound even if a
passenger is not sitting in the
seat.
●If a cushion is placed on the seat,
the sensor may n ot detect a pas-
senger, and the warning light may
not operate properly.
■Operation of rear passengers’
seat belt re minder lights
●The rear passengers’ seat belt
reminder lights will illuminate for
approximately 60 seconds after
either rear door has been opened
and closed.
●If any rear seat belt is fastened
and then unfastened, the corre-
sponding light for that seat will illu-
minate continuously . If either rear
door is opened and closed while a
rear passengers’ seat belt light is
illuminated, it will tu rn off approxi-
mately 60 seconds after the door
is closed.
■SRS warning light
This warning light system monitors
the airbag sensor assembly, front
impact sensors, side impact sensors
(front door), side impact sensors
(front), driver’s seat position sensor,
driver’s seat belt buckle switch, front
passenger seat belt buckle switch,
“AIR BAG ON” indicator light, “AIR
BAG OFF” indicator light, seat belt
pretensioners, airbags, intercon-
necting wiring and power sources.
( P. 3 2 )
■Electric power steering system
warning light (warning buzzer)
When the battery charge becomes
insufficient or the voltage temporar-
ily drops, the electric power steering
Warning lightDetails/Actions
(Flashes)
(U.S.A.)
or
(Flashes)
(Canada)
It is possible that the parking brake is not fully engaged or
released
Operate the parking brake switch once again.
This light comes on the parking brake is not released. If the
light turns off after the parking brakes is fully released, the
system is operating normally.
Warning lightDetails/Actions
(Flashes)
Indicates a malfunction in the brake hold system
Have the vehicle inspected by your Toyota dealer
immediately.
Page 365 of 468
3657-2. Steps to take in an emergency
7
When trouble arises
WARNING
●Stop your vehicle in a safe place
as soon as possible. Adjust the
tire inflation pressure immedi-
ately.
●If the tire pressure warning light
comes on even after tire infla-
tion pressure adjustment, it is
probable that you have a flat
tire. Check the tires. If a tire is
flat, change it with the spare tire
and have the flat tire repaired by
the nearest Toy ota dealer.
●Avoid abrupt maneuvering and
braking.
If the vehicle tires deteriorate,
you could lose control of the
steering wheel or the brakes.
■If a blowout or sudden air
leakage should occur (vehi-
cles with a tire pressure warn-
ing system)
The tire pressure warning system
may not activate immediately.
■Maintenance of the tires
Each tire, including the spare (if
provided), should be checked
monthly when cold and inflated to
the inflation pressure recom-
mended by the vehicle manufac-
turer on the vehicle placard or tire
inflation pressure label (tire and
load information label). (If your
vehicle has tires of a different size
than the size indicated on the
vehicle placard or tire inflation
pressure label [tire and load infor-
mation label], you should deter-
mine the proper tire inflation
pressure for those tires.)
As an added safety feature, your
vehicle has been equipped with a
tire pressure monitoring system
(TPMS-tire pressure warning sys-
tem) that illuminates a low tire
pressure telltale (tire pressure
warning light) w hen one or more
of your tires is significantly
under-inflated. Accordingly, when
the low tire pressure telltale (tire
pressure warning light) illumi-
nates, you should stop and check
your tires as soon as possible,
and inflate them to the proper
pressure. Driving on a signifi-
cantly under-inflated tire causes
the tire to overhea t and can lead
to tire failure. Under-inflation also
reduces fuel efficiency and tire
tread life, and may affect the vehi-
cle’s handling and stopping ability.
Please note that the TPMS (tire
pressure warning system) is not a
substitute for proper tire mainte-
nance, and it is the driver’s
responsibility to m aintain correct
tire pressure, even if under-infla-
tion has not reached the level to
trigger illumination of the TPMS
low tire pressure te lltale (tire pres-
sure warning light).
Your vehicle has also been
equipped with a TPMS (tire pres-
sure warning system) malfunc-
tion indicator to indicate when the
system is not operating properly.
The TPMS (tire pressure warning
system) malfunction indicator is
combined with the low tire pres-
sure telltale (tire pressure warning
light). When the system detects a
malfunction, the te lltale will flash
for approximately one minute and
then remain continuously illumi-
nated. This sequence will con-
tinue upon subsequent vehicle
start-ups as long as the malfunc-
tion exists. When the malfunction
indicator is illuminated, the sys-
tem may not be ab le to detect or
signal low tire pressure as
intended.