2023 TOYOTA COROLLA HYBRID air conditioning
[x] Cancel search: air conditioningPage 285 of 496
2855-1. Using the air conditioning system and defogger
5
Interior features
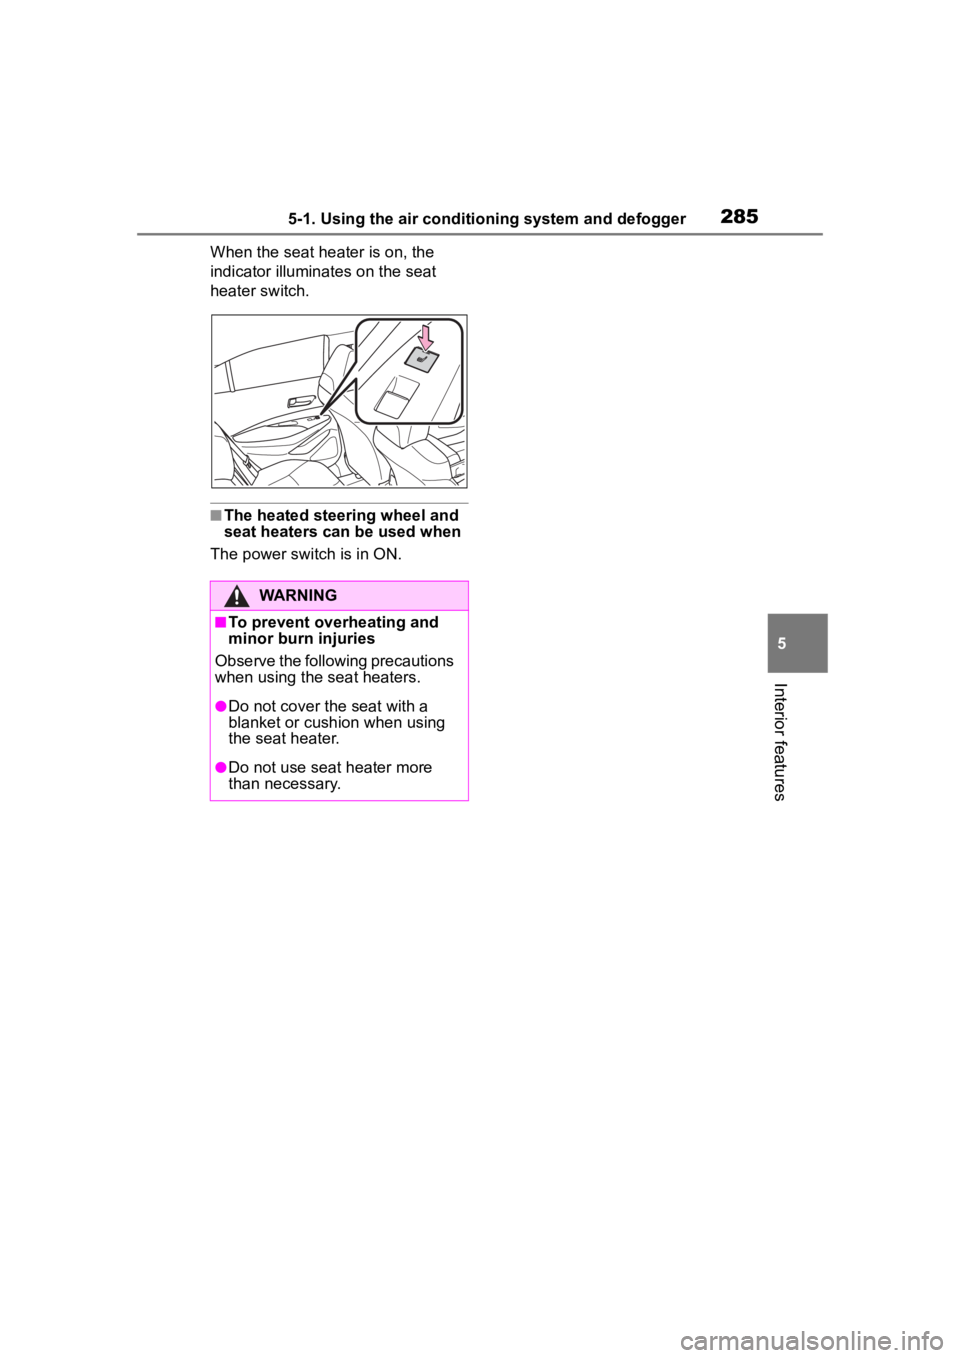
When the seat heater is on, the
indicator illumina tes on the seat
heater switch.
■The heated steering wheel and
seat heaters can be used when
The power swit ch is in ON.
WARNING
■To prevent overheating and
minor burn injuries
Observe the following precautions
when using the seat heaters.
●Do not cover the seat with a
blanket or cushion when using
the seat heater.
●Do not use seat heater more
than necessary.
Page 301 of 496
301
6
6
Maintenance and care
Maintenance and care
.6-1. Maintenance and careCleaning and protecting the vehicle exterior .......... 302
Cleaning and protecting the vehicle interior ........... 305
6-2. Maintenance Maintenance requirements.................................. 308
General maintenance.. 310
Emission inspection and maintenance (I/M) pro-
grams ........................ 312
6-3. Do-it-yourself mainte- nance
Do-it-yourself service pre- cautions ..................... 314
Hood ........................... 316
Positioning a floor jack .................................. 317
Engine compartment ... 318
Tires ............................ 325
Tire inflation pressure.. 342
Wheels ......... ...............344
Air conditioning filter .... 346
Cleaning the hybrid battery (traction battery) air intake
vents.......................... 347
Wireless remote con- trol/electronic key battery.................................. 350
Checking and replacing fuses.......................... 354Light bulbs ...................
356
Page 304 of 496
3046-1. Maintenance and care
NOTICE
■To prevent damage to the
windshield wiper arms
When lifting the wiper arms away
from the windshield, pull the driver
side wiper arm upward first, and
repeat for the passenger side.
When returning the wipers to their
original position, do so from the
passenger side first.
■When using a high pressure
car wash
●When washing the vehicle, do
not spray the came ra or its sur-
rounding area directly with a
high pressure washer. Shock
applied from high pressure
water may cause the device to
not operate normally.
●Do not spray water directly on
the radar which is equipped
behind the emblem. Otherwise
it may cause the device to be
damaged.
●Do not bring the nozzle tip close
to boots (rubber or resin manu-
factured cover), connectors or
the following parts. The parts
may be damaged if they come
into contact with high-pressure
water.
• Traction related parts
• Steering parts
• Suspension parts
• Brake parts
●Keep the cleaning nozzle at
least 11.9 in. (30 cm) away from
the vehicle body. Otherwise
resin section, such as moldings
and bumpers, may be deformed
and damaged. Also, do not con-
tinuously hold the nozzle in the
same place.
●Do not spray the lower part of
the windshield continuously. If
water enters the air conditioning
system intake located near the
lower part of the windshield, the
air conditioning system may not
operate correctly.
●Do not wash the underside of
the vehicle using a high pres-
sure car washer.
Page 346 of 496

3466-3. Do-it-yourself maintenance
1Turn the power switch off.
2 Open the glove box. Slide off
the damper.
3 Push in the glove box on the
vehicle’s outer side to discon-
nect the claws. Then pull out
the glove box and disconnect
the lower claws.
4 Unlock the filter cover ( ),
pull the filter cover out of the claws ( ), and remove the
filter cover.
5 Remove the filter case.
6 Remove the air conditioning
filter from the filter case and
replace it with a new one.
The “ UP” marks shown on the
filter and the filter case should be
pointing up.
■Checking interval
Replace the air conditioning filter
according to the maintenance
schedule. In dusty areas or areas
with heavy traffic fl ow, early replace-
Air conditioning filter
The air conditioning filter
must be changed regularly
to maintain air conditioning
efficiency.
Removing the air condi-
tioning filter
Page 347 of 496

3476-3. Do-it-yourself maintenance
6
Maintenance and care
ment may be required. (For sched-
uled maintenance information,
please refer to the “Scheduled
Maintenance Guide” or “Owner’s
Manual Supplement”.)
■If air flow from the vents
decreases dramatically
The filter may be clogged. Check
the filter and replace if necessary.
■Scheduled maintenance of the
air intake vent is necessary
when
In some situations such as when the
vehicle is used frequently or in
heavy traffic or dusty areas, the air
intake vent may need to be cleaned
more regularly. For d etails, refer to
“Scheduled Maintenance Guide” or
“Owner’s Manual Supplement”.
■Cleaning the air intake vent
Improper handling of the air intake
vent cover and filter may result in
damage to them. If you have any
concerns about cleaning the filter,
contact your Toyota dealer.
NOTICE
■When using the air condition-
ing system
Make sure that a filter is always
installed.
Using the air conditioning system
without a filter may cause damage
to the system.
■To prevent damage to the fil-
ter cover
When moving the filter cover in
the direction of arrow to release
the fitting, pay attention not to
apply excessive force to the
claws. Otherwise, the claws may
be damaged.
Cleaning the hybrid
batter y (traction bat-
ter y) air intake vents
To prevent the fuel economy
from being affected, visually
inspect the hybrid battery
(traction battery) air intake
vents periodically for clogs.
If it is dusty or clogged or if
“Maintenance Required for
Traction Battery Cooling
Parts See Owner’s Manual”
is displayed on the
multi-information display,
clean the air intake vent
using the following proce-
dures:
Page 370 of 496

3707-2. Steps to take in an emergency
4Tighten down the towing eye-
let securely using a wheel nut
wrench (if equipped) or hard
metal bar.
5 Securely attach cables or
chains to the towing eyelet.
Take care not to damage the vehi-
cle body.
6Enter the vehicle being towed
and start the hybrid system.
If the hybrid system does not start,
turn the power switch to ON.
7Shift the shift lever to N and
release the parking brake.
Turn automatic mode off.
( P.184)
When the shift lever cannot
be shifted: P. 1 8 1
■While towing
If the hybrid system is off, the power
assist for the brakes and steering
will not function, making steering
and braking more difficult.
■Wheel nut wrench
Vehicle without wheel nut wrench:
Wheel nut wrench can be pur-
chased at your Toyota dealer.
Vehicle with wheel nut wrench:
Wheel nut wrench is installed in
trunk. ( P.399)
Fluid leaks under the vehicle.
(Water dripping from the air
conditioning after use is nor-
mal.)
Flat-looking tires or uneven
tire wear
Engine coolant temperature
gauge needle continually
points higher than normal.
Changes in exhaust sound
Excessive tire squeal when
cornering
Strange noises related to the
suspension system
Pinging or other noises
related to the hybrid system
Engine missing, stumbling or
running roughly
Appreciable loss of power
Vehicle pulls heavily to one
If you think something
is wrong
If you notice any of the fol-
lowing symptoms, your
vehicle probably needs
adjustment or repair. Con-
tact your Toyota dealer as
soon as possible.
Visible symptoms
Audible symptoms
Operational symptoms
Page 384 of 496
3847-2. Steps to take in an emergency
●RCTA (Rear Cross Traffic
Alert) (if equipped)
●SEA (Safe Exit Assist) (if
equipped)
Have the vehicle inspected by your
Toyota dealer immediately.
■If “System Stopped See
Owner’s Manual” is displayed
Indicates one of the following sys-
tems is disabled.
●PCS (Pre-Collision system)
●LDA (Lane Departure Alert)
●LTA (Lane Tracing Assist)
●AHB (Automatic High Beam)
●Dynamic radar cruise control
●RSA (Road Sign Assist) (if
equipped)
●BSM (Blind Spot Monitor) (if
equipped)
●RCTA (Rear Cross Traffic
Alert) (if equipped)
●SEA (Safe Exit Assist) (if
equipped)
Follow the followi ng correction
methods.
• Check the voltage of the battery
• Check the sensors that the Toyota
Safety Sense 3.0 u ses for foreign
matter covering them. Remove
them if any. ( P.202)
Indicates the sensors may not be
operating properly. ( P.205)
When problems are solved and the
sensors are operatio nal, this indica-
tion may disappear by itself.
■If “System Stopped Front Cam-
era Low Visibility See Owner’s
Manual” is displayed
Indicates one of the following sys-
tems is disabled.
●PCS (Pre-Collision system)
●LDA (Lane Departure Alert)
●LTA (Lane Tracing Assist)
●AHB (Automatic High Beam)
●Dynamic radar cruise control
●RSA (Road Sign Assist) (if
equipped)
Follow the following correction
methods.
• Using the windshield wipers, remove the dirt or foreign matter
from the windshield.
• Using the air conditioning system, defog the windshield.
• Close the hood, remove any stick- ers, etc. to clear the obstruction in
front of the front camera.
■If “System Stopped Front Cam-
era Out of Temperature Range
Wait until Normal Temperature”
is displayed
Indicates one of the following sys-
tems is disabled.
●PCS (Pre-Collision system)
●LDA (Lane Departure Alert)
●LTA (Lane Tracing Assist)
●AHB (Automatic High Beam)
●Dynamic radar cruise control
●RSA (Road Sign Assist) (if
equipped)
Follow the following correction
methods.
• If the front camer a is hot, such as
after the vehicle is parked in the
sun, use the air conditioning sys-
tem to decrease the temperature
around the front camera
• If a sunshade was used when the vehicle was parked, depending on
its type, the sunlight reflected from
the surface of the sunshade may
cause the temperature of the front
camera to become excessively
high
• If the front camera is cold, such after the vehicle is parked in an
extremely cold environment, use
Page 385 of 496

3857-2. Steps to take in an emergency
7
When trouble arises
the air conditioning system to
increase the temperature around
the front camera
■If “System Stopped Front Radar
Sensor Blocked Clean Radar
Sensor” is displayed
Indicates one of the following sys-
tems is disabled.
●PCS (Pre-Collision system)
●LDA (Lane Departure Alert)
●LTA (Lane Tracing Assist)
●AHB (Automatic High Beam)
●Dynamic radar cruise control
Follow the followi ng correction
methods.
• Check if there is any foreign mat- ter attached to the radar sensor or
radar sensor cover and clean
them if necessary ( P.203)
• This message may be displayed when driving in an open area with
few nearby vehicles or structures,
such as a desert, grasslands, sub-
urbs, etc.
The message may be cleared by
driving the vehicle in an area with
structures, vehicles, etc., nearby.
■If “System Stopped Front Radar
Sensor Out of Temperature
Range Wait until Normal Tem-
perature” is displayed
Indicates one of the following sys-
tems is disabled.
●PCS (Pre-Collision system)
●LDA (Lane Departure Alert)
●LTA (Lane Tracing Assist)
●AHB (Automatic High Beam)
●Dynamic radar cruise control
Follow the followi ng correction
methods.
The temperature of the radar sensor
is outside of the operating range.
Wait for the temperature to become
appropriate.
■If “System Stopped Front Radar
In Self Calibration See Owner’s
Manual” is displayed
Indicates one of the following sys-
tems is disabled.
●PCS (Pre-Collision system)
●LDA (Lane Departure Alert)
●LTA (Lane Tracing Assist)
●AHB (Automatic High Beam)
●Dynamic radar cruise control
Follow the following correction
methods.
• Check if there is any foreign mat- ter attached to the radar sensor or
radar sensor cover and clean
them if necessary ( P.203)
• The radar sensor may be mis- aligned and will be adjusted auto-
matically while d riving. Continue
driving for a while.
■If “Cruise Control Unavailable
See Owner’s Manual” is dis-
played
Indicates one of the following sys-
tems is disabled.
●Dynamic radar cruise control
●Cruise control
A message is displayed when the
driving assist s witch is pushed
repeatedly.
Press the driving assist switch
quickly and firmly.
■If “Maintenance Required
Soon” is displayed
Indicates that all maintenance
according to the driven distance on
the maintenance schedule
* should
be performed soon.
Comes on approximately 4500
miles (7200 km) after the message
has been reset. If necessary, per-
form maintenance. Please reset the
message after the maintenance is
performed. ( P.309)
*: Refer to the separate “Scheduled
Maintenance” or “Owner’s Man-