Page 337 of 500

3376-2. Maintenance
6
Maintenance and care
Brakes
• The vehicle should not pull to
one side when
the brakes are
applied.
• The brakes should work
effectively.
• The brake pedal should not feel
spongy.
• The brake pedal should not get
too close to the
floor when the
brakes are
applied.
Head
restraints
Do the head
restraints move
smoothly and lock
securely?
Indica-
tors/buzzersDo the indicators
and buzzers func-
tion properly?
LightsDo all the lights
come on?
Parking brake
• Does the park-ing brake oper-
ate normally?
• When parked on a slope and the
parking brake is
on, is the vehicle
securely
stopped?
ItemsCheck points
Seat belts
• Do the seat belts operate
smoothly?
• The seat belts should not be
damaged.
Seats
Do the seat con-
trols operate prop-
erly?
Steering wheel
• Does the steer-ing wheel rotate
smoothly?
• Does the steer- ing wheel have
the correct
amount of free
play?
• There should not be any strange
sounds coming
from the steer-
ing wheel.
Vehicle exterior
ItemsCheck points
DoorsDo the doors oper-
ate smoothly?
Engine hood
Does the engine
hood lock system
work properly?
Fluid leaks
There should not
be any signs of
fluid leakage after
the vehicle has
been parked.
ItemsCheck points
Page 342 of 500
3426-3. Do-it-yourself maintenance
1Pull the hood lock release
lever.
The hood will pop up slightly.
2Pull the auxiliary catch lever
to the left and lift the hood. 3
Hold the hood open by insert-
ing the support rod into the
slot.
Hood
Opening the hood
WARNING
■Pre-driving check
Check that the hood is fully closed
and locked.
If the hood is not locked properly,
it may open while the vehicle is in
motion and cause an accident,
which may result i n death or seri-
ous injury.
■After installing the support
rod into the slot
Make sure the rod supports the
hood securely preventing it from
falling down onto your head or
body.
NOTICE
■When closing the hood
Be sure to return the support rod
to its clip before closing the hood.
Closing the hood with the support
rod not clipped could cause the
hood to bend.
Page 369 of 500

3696-3. Do-it-yourself maintenance
6
Maintenance and care
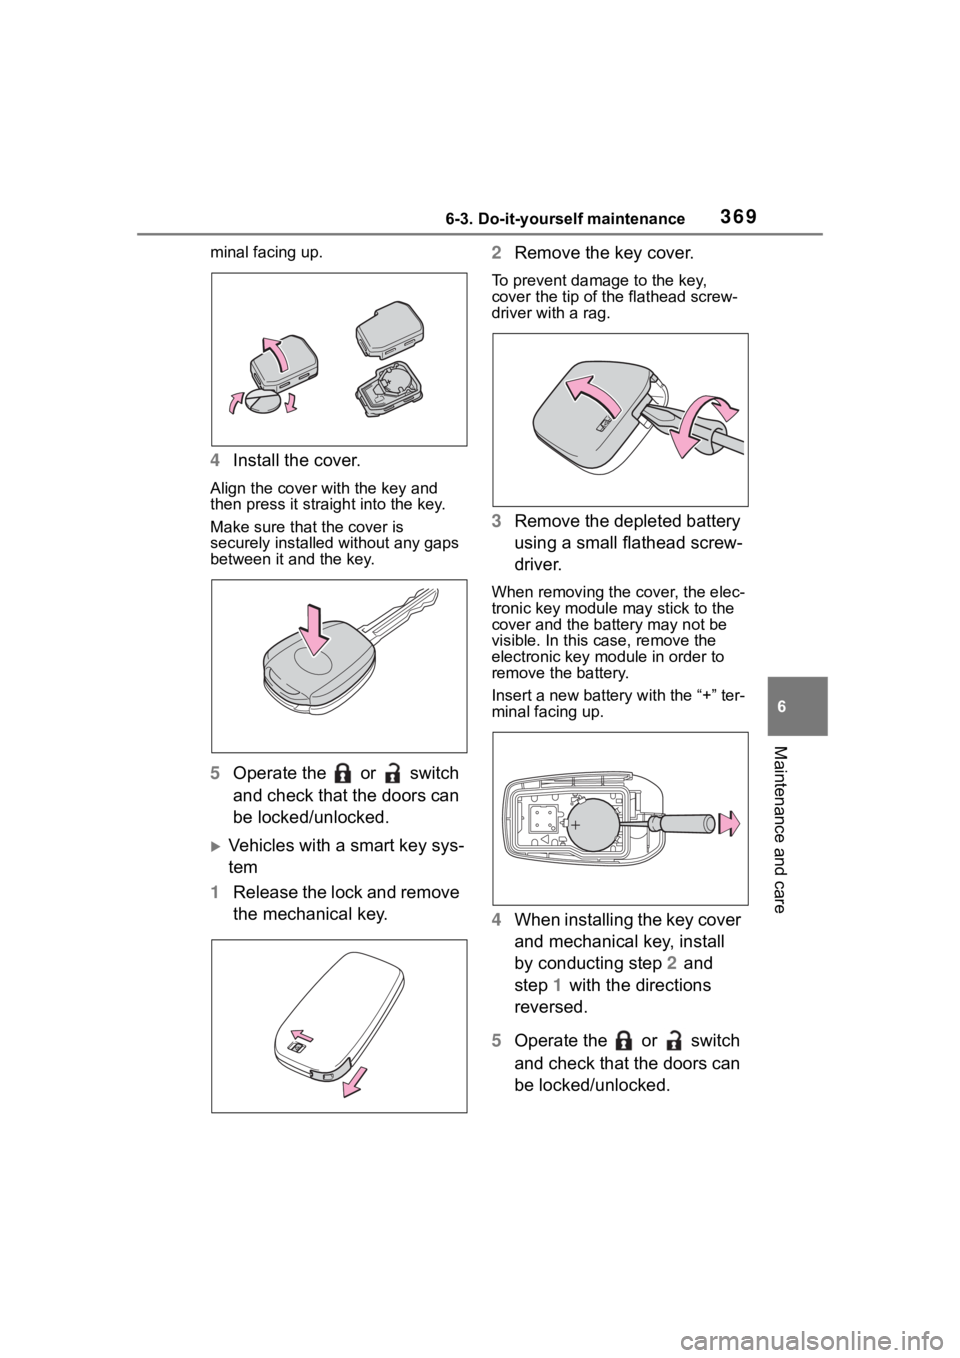
minal facing up.
4Install the cover.
Align the cover with the key and
then press it straight into the key.
Make sure that the cover is
securely installed without any gaps
between it and the key.
5Operate the or switch
and check that the doors can
be locked/unlocked.
Vehicles with a smart key sys-
tem
1 Release the lock and remove
the mechanical key. 2
Remove the key cover.
To prevent damage to the key,
cover the tip of the flathead screw-
driver with a rag.
3Remove the depleted battery
using a small flathead screw-
driver.
When removing the cover, the elec-
tronic key module may stick to the
cover and the batt ery may not be
visible. In this case, remove the
electronic key module in order to
remove the battery.
Insert a new battery with the “+” ter-
minal facing up.
4 When installing the key cover
and mechanical key, install
by conducting step 2 and
step 1 with the directions
reversed.
5 Operate the or switch
and check that the doors can
be locked/unlocked.
Page 372 of 500

3726-3. Do-it-yourself maintenance
Normal fuse
Blown fuse
Type C
Normal fuse
Blown fuse
Type DNormal fuse
Blown fuse
■After a fuse is replaced
●When installing the lid, make sure
that the tab is installed securely.
●If the lights do n ot turn on even
after the fuse has been replaced,
a bulb may need replacement.
( P.374)
●If the replaced fuse blows again,
have the vehicle inspected by
your Toyota dealer.
■If there is an overload in a cir-
cuit
The fuses are designed to blow, pro- tecting the wiring harness from
damage.
WARNING
■To prevent system break-
downs and vehicle fire
Observe the following precau-
tions.
Failure to do so may cause dam-
age to the vehicle, and possibly a
fire or injury.
●Never use a fuse of a higher
amperage rating than that indi-
cated, or use any other object in
place of a fuse.
●Always use a genuine Toyota
fuse or equivalent.
Never replace a fuse with a
wire, even as a temporary fix.
●Do not modify the fuses or fuse
boxes.
NOTICE
■Before replacing fuses
Have the cause of electrical over-
load determined and repaired by
your Toyota dealer as soon as
possible.
Page 379 of 500

3796-3. Do-it-yourself maintenance
6
Maintenance and care
right or left hooks.
2 Push the lens into place.
After installation, confirm that the
lens is properly installed by gently
pulling it.
WARNING
■To prevent injury
Before performing any light bulb
replacement procedure, be sure
to turn the e ngine switch off. Fail-
ure to do so may result in burns
from hot compone nts or a part of
your body may get caught on an
operating component, possibly
causing serious injury.
■Replacing light bulbs
●Turn off the lights. Do not
attempt to replace the bulb
immediately after turning off the
lights. The bulbs become very
hot and may cause burns.
●Do not touch the glass portion
of the light bulb with bare
hands. When it is unavoidable
to hold the glass portion, use
and hold with a clean dry cloth
to avoid getting moisture and
oils on the bulb. Also, if the bulb
is scratched or dropped, it may
blow out or crack.
●Fully install light bulbs and any
parts used to secure them. Fail-
ure to do so may result in heat
damage, fire, or water entering
the light unit. This may damage
the lights or cause condensa-
tion to build up on the lens.
■To prevent damage or fire
●Make sure bulbs are fully
seated and locked.
●Check the wattage of the bulb
before installing to prevent heat
damage.
Page 383 of 500
3837-1. Essential information
7
When trouble arises
turning the engine switch to
ACC.
4 Vehicles with a smart key
system: To stop the engine,
press and hold the engine
switch for 2 consecutive sec-
onds or more, or press it
briefly 3 times or more in suc-
cession.
5 Stop the vehicle in a safe
place by the road.
WARNING
■If the engine has to be turned
off while driving
●Power assist for the brakes and
steering wheel will be lost, mak-
ing the brake pedal harder to
depress and the steering wheel
heavier to turn. Decelerate as
much as possible before turning
off the engine.
●Vehicles without a smart key
system: Never attempt to
remove the key.
Page 387 of 500

3877-2. Steps to take in an emergency
7
When trouble arises
When using a flat-bed truck to
transport the vehicle, use tire
strapping belts. Refer to the
owner's manual of the flat-bed
truck for the tire strapping
method.
In order to suppress vehicle
movement during transporta-
tion, set the parking brake and
turn the engine switch off.
If a tow truck is not available in
an emergency, your vehicle may
be temporarily towed using
cables or chains secured to the
emergency towing eyelet. This
should only be attempted on
hard surfaced roads for at most
50 miles (80 km) at under 18
mph (30 km/h).
A driver must be in the vehicle to
steer and operate the brakes.
The vehicle’s wheels, drive train,
axles, steering and brakes must
be in good condition.
To have your vehicle towed by
another vehicle, the towing eye-
let must be installed to your
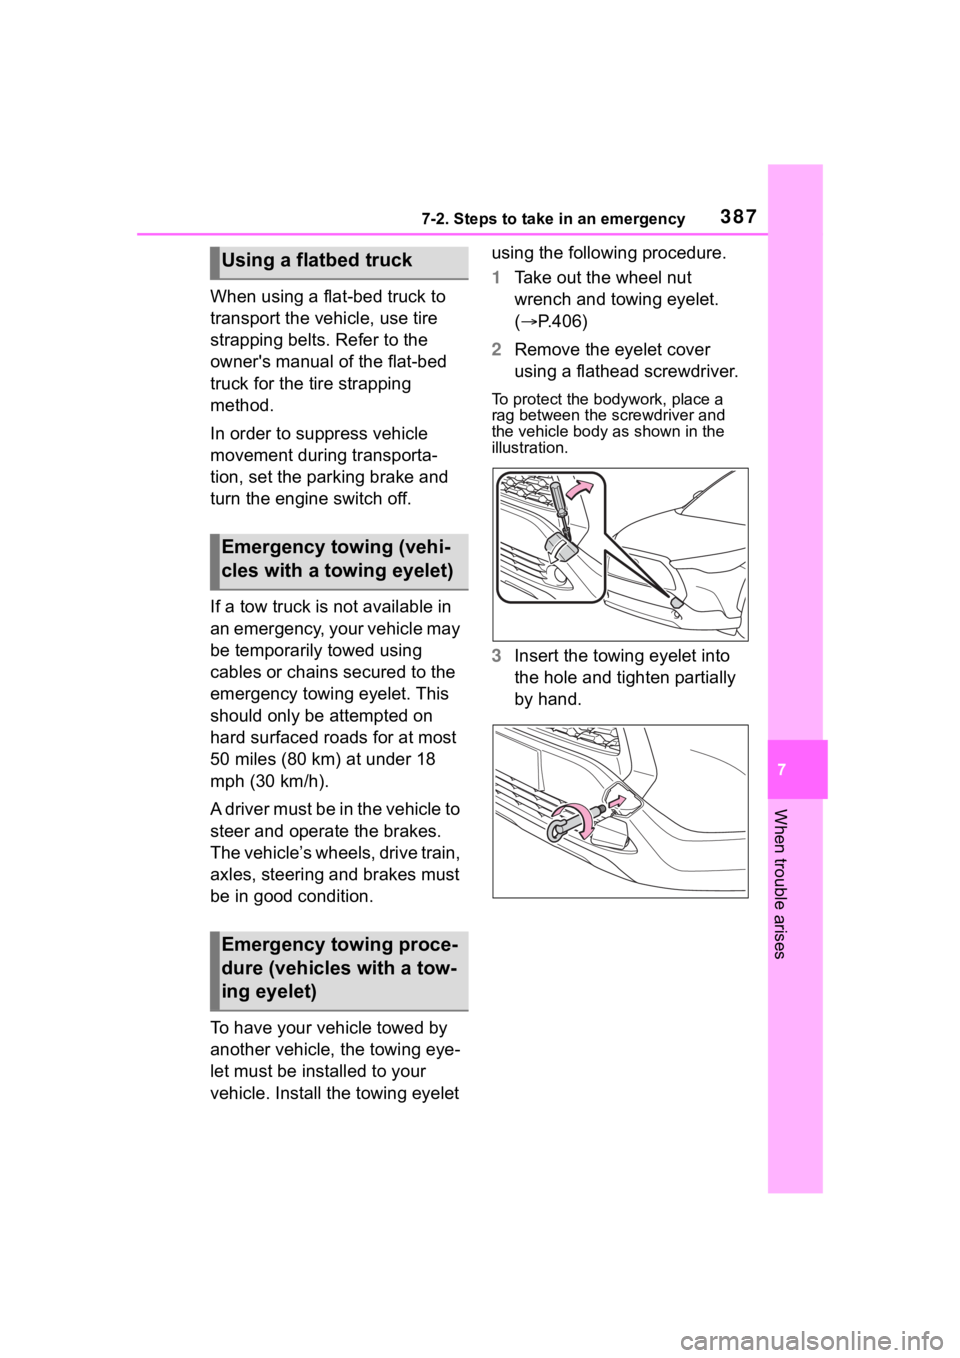
vehicle. Install the towing eyelet using the following procedure.
1
Take out the wheel nut
wrench and towing eyelet.
( P.406)
2 Remove the eyelet cover
using a flathead screwdriver.
To protect the b odywork, place a
rag between the screwdriver and
the vehicle body as shown in the
illustration.
3 Insert the towing eyelet into
the hole and tighten partially
by hand.
Using a flatbed truck
Emergency towing (vehi-
cles with a towing eyelet)
Emergency towing proce-
dure (vehicles with a tow-
ing eyelet)
Page 388 of 500

3887-2. Steps to take in an emergency
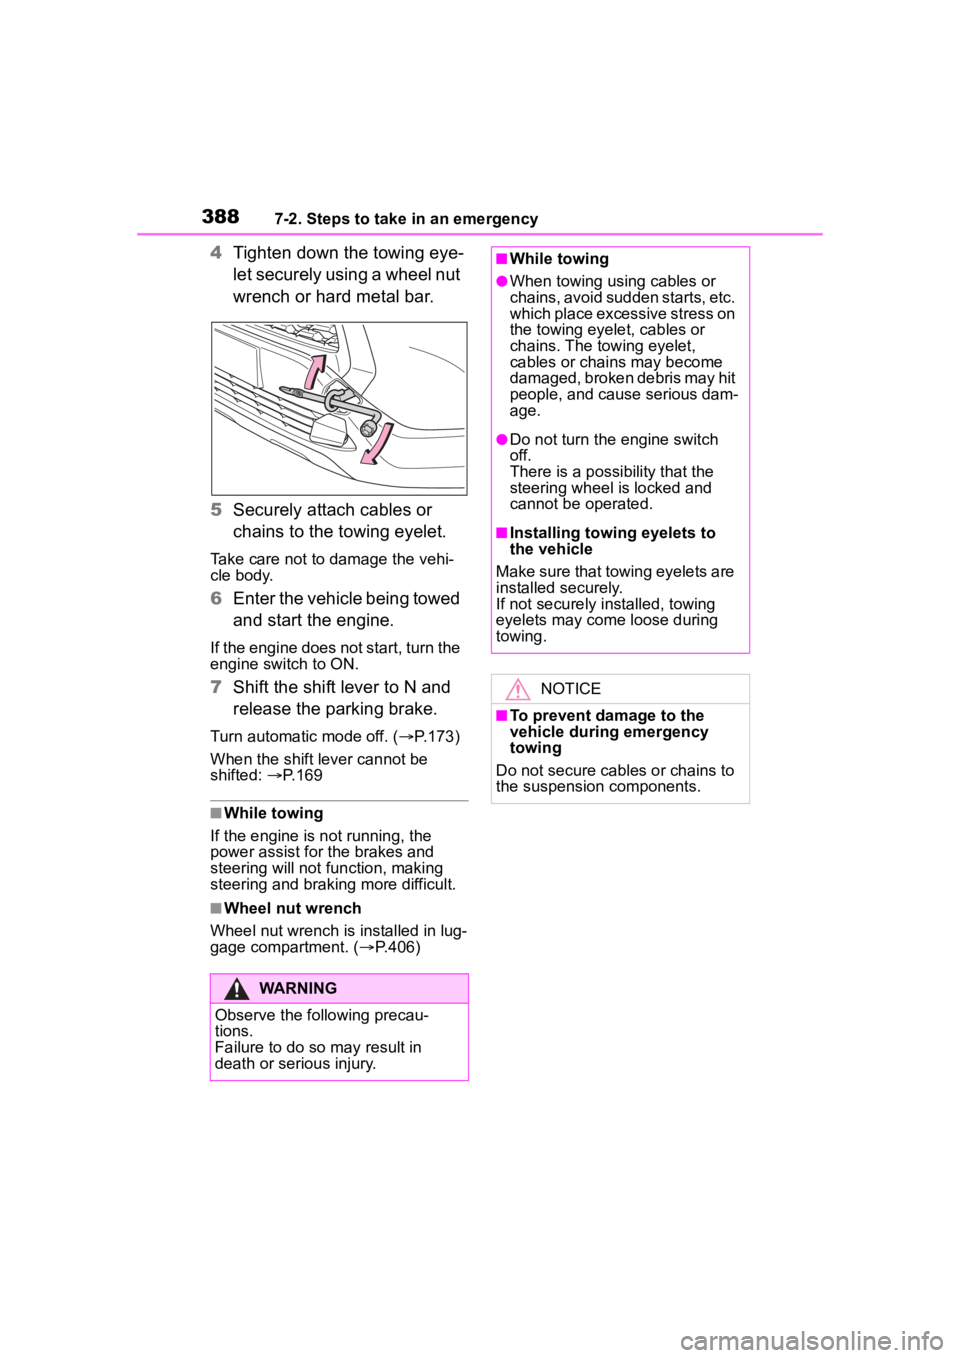
4Tighten down the towing eye-
let securely using a wheel nut
wrench or hard metal bar.
5 Securely attach cables or
chains to the towing eyelet.
Take care not to damage the vehi-
cle body.
6Enter the vehicle being towed
and start the engine.
If the engine does not start, turn the
engine switch to ON.
7Shift the shift lever to N and
release the parking brake.
Turn automatic mode off. ( P.173)
When the shift lever cannot be
shifted: P. 1 6 9
■While towing
If the engine is not running, the
power assist for the brakes and
steering will not function, making
steering and braking more difficult.
■Wheel nut wrench
Wheel nut wrench is installed in lug-
gage compartment. ( P.406)
WARNING
Observe the following precau-
tions.
Failure to do so m ay result in
death or serious injury.
■While towing
●When towing using cables or
chains, avoid sudden starts, etc.
which place excessive stress on
the towing eyelet, cables or
chains. The towing eyelet,
cables or chains may become
damaged, broken debris may hit
people, and cause serious dam-
age.
●Do not turn the engine switch
off.
There is a possibility that the
steering wheel is locked and
cannot be operated.
■Installing towing eyelets to
the vehicle
Make sure that towing eyelets are
installed securely.
If not securely installed, towing
eyelets may come loose during
towing.
NOTICE
■To prevent damage to the
vehicle during emergency
towing
Do not secure cables or chains to
the suspension components.