2023 TOYOTA 86 weight
[x] Cancel search: weightPage 172 of 449
1724-5. EyeSight
WARNING
• The lights including headlights and fog lights have been modi-
fied.
• Vehicle operation has become unstable due to an accident or
malfunction.
• The brake system warning light is illuminated in red.
*2
• A heavy cargo is inside the vehicle.
• The maximum number of occu- pants is exceeded.
• The meter is not operating prop- erly; such as when the lights do
not illuminate, the beeps do not
sound, the display is different
from when it is normal, etc.
*3
●The system will not operate cor-
rectly in the following condi-
tions. Do not use Adaptive
Cruise Control or Conventional
Cruise Control.
• The wheels are out of balance (e.g., the balance weight is
removed or misaligned).
*1
• The wheels are out of align-
ment.*1
• A trailer or another vehicle, etc. is being towed.
*1: The wheels and tires have
functions that are critically
important. Be sure to use the
correct ones. (
P.386)
*2: If the brake system warning
light (red) does not turn off,
immediately pull the vehicle
over in a safe place and con-
tact a Toyota dealer to have the
system inspected.
*3: For details about the meter, refer to P.88.
NOTICE
●The characteristics of the stereo
camera are simila r to those of
human eyes. For this reason,
conditions that make it difficult
for the driver to see in the for-
ward direction have the same
effect on the stereo camera.
They also make it difficult for the
system to detect vehicles,
obstacles, and traffic lanes.
●Detection by the EyeSight sys-
tem is limited to objects that are
within the range of the stereo
camera’s field of view. Also,
after an object enters the range
of the camera’s field of view, it
may take some time for the sys-
tem to detect it as a controllable
target and to warn the driver.
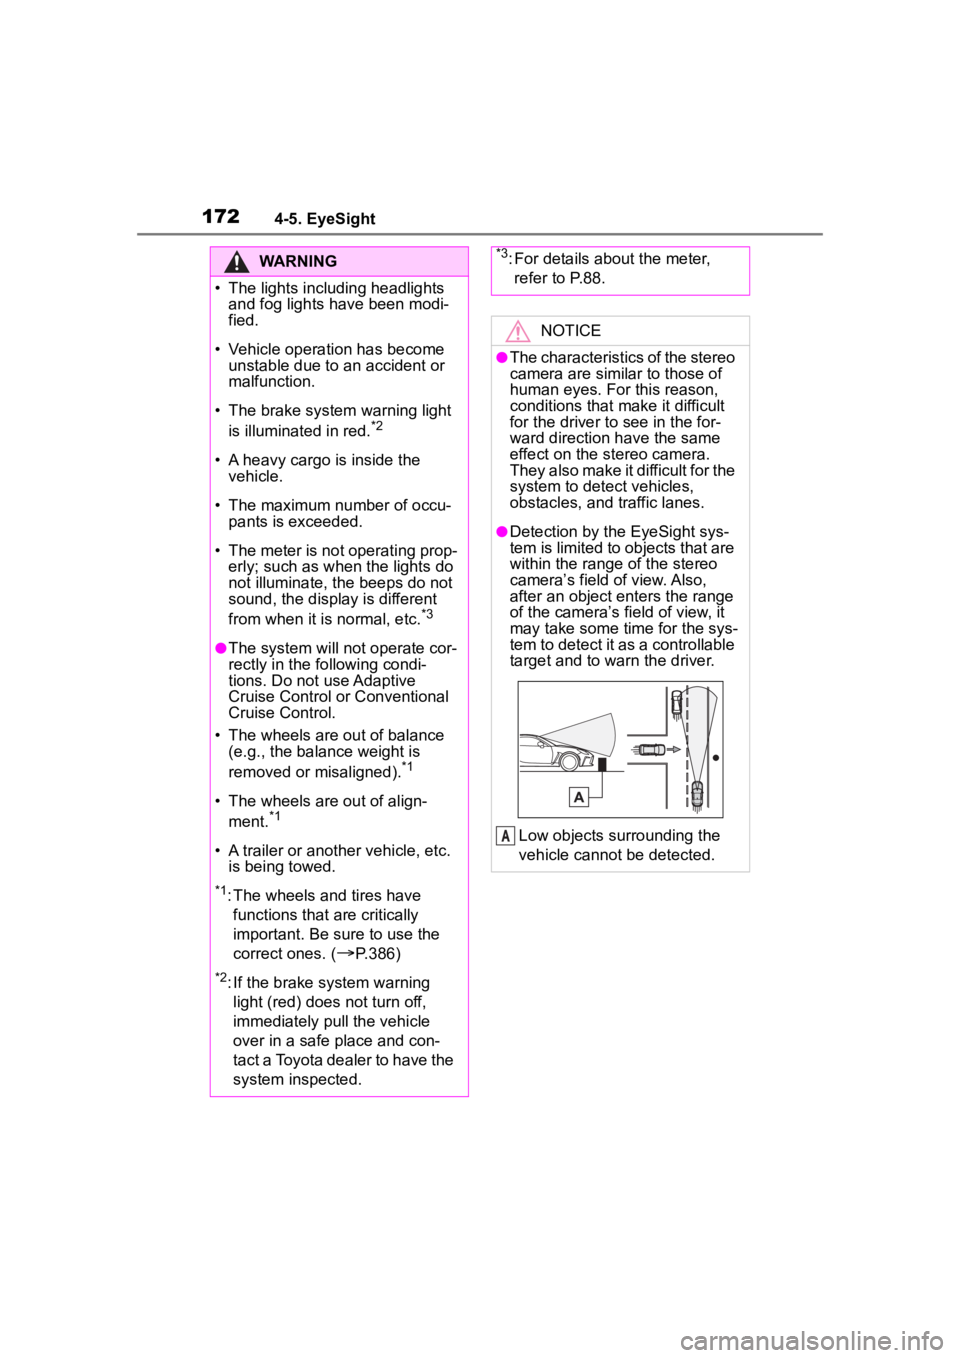
Low objects surrounding the
vehicle cannot be detected.
A
Page 303 of 449
3036-3. Do-it-yourself maintenance
6
Maintenance and care
■Front
WARNING
■Pre-driving check
Check that the hood is fully closed
and locked.
If the hood is not locked properly,
it may open while the vehicle is in
motion and cause an accident,
which may result in death or seri-
ous injury.
NOTICE
■When opening the hood
●Do not lift up or operate the wip-
ers. Doing so may cause the
hood and wipers to contact,
scratching the hood.
●Use caution when opening the
hood in windy weather as it may
close suddenly in strong wind.
●Do not attach any accessories
other than genuine Toyota prod-
ucts to the hood. Such addi-
tional weight on the hood may
cause it to be too heavy to be
supported by the supporting rod
when opened.
■When closing the hood
Do not apply excessive weight or
force when closing the hood as
doing so may result in damage.
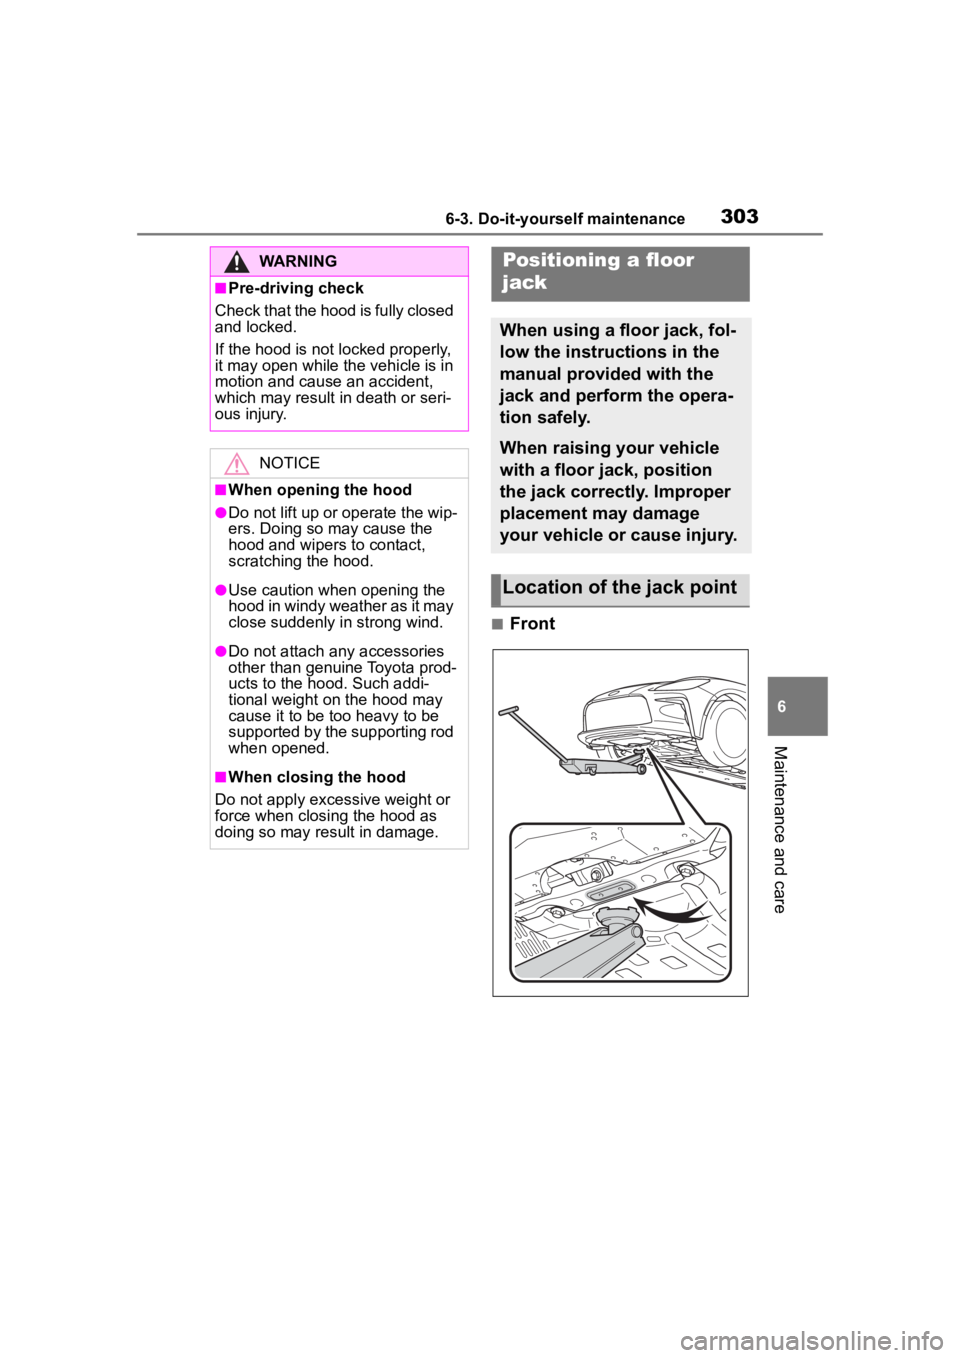
Positioning a floor
jack
When using a floor jack, fol-
low the instructions in the
manual provided with the
jack and perform the opera-
tion safely.
When raising your vehicle
with a floor jack, position
the jack correctly. Improper
placement may damage
your vehicle or cause injury.
Location of the jack point
Page 313 of 449
3136-3. Do-it-yourself maintenance
6
Maintenance and care
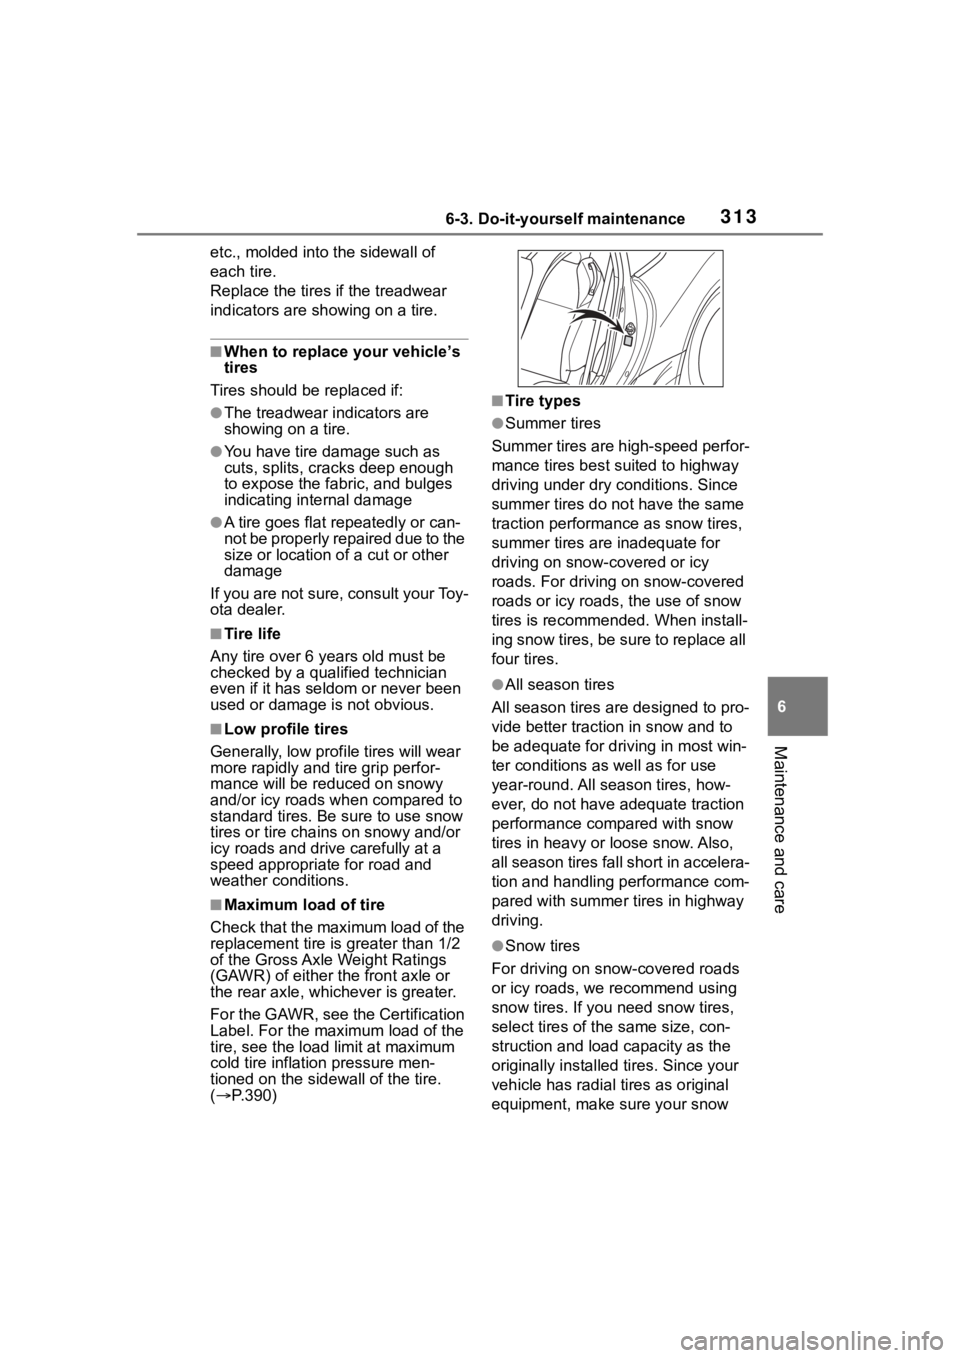
etc., molded into the sidewall of
each tire.
Replace the tires if the treadwear
indicators are showing on a tire.
■When to replace your vehicle’s
tires
Tires should be replaced if:
●The treadwear indicators are
showing on a tire.
●You have tire damage such as
cuts, splits, cracks deep enough
to expose the fabric, and bulges
indicating internal damage
●A tire goes flat r epeatedly or can-
not be properly repaired due to the
size or location of a cut or other
damage
If you are not sure, consult your Toy-
ota dealer.
■Tire life
Any tire over 6 years old must be
checked by a qualified technician
even if it has seldom or never been
used or damage i s not obvious.
■Low profile tires
Generally, low prof ile tires will wear
more rapidly and t ire grip perfor-
mance will be reduced on snowy
and/or icy roads when compared to
standard tires. Be sure to use snow
tires or tire chains on snowy and/or
icy roads and drive carefully at a
speed appropriate for road and
weather conditions.
■Maximum load of tire
Check that the maximum load of the
replacement tire is greater than 1/2
of the Gross Axle Weight Ratings
(GAWR) of either the front axle or
the rear axle, whichever is greater.
For the GAWR, see the Certification
Label. For the maximum load of the
tire, see the load limit at maximum
cold tire inflation pressure men-
tioned on the sidewall of the tire.
( P.390)
■Tire types
●Summer tires
Summer tires are high-speed perfor-
mance tires best suited to highway
driving under dry conditions. Since
summer tires do not have the same
traction performance as snow tires,
summer tires are inadequate for
driving on snow-covered or icy
roads. For driving on snow-covered
roads or icy roads, the use of snow
tires is recommended. When install-
ing snow tires, be sure to replace all
four tires.
●All season tires
All season tires are designed to pro-
vide better traction in snow and to
be adequate for driving in most win-
ter conditions as well as for use
year-round. All se ason tires, how-
ever, do not have adequate traction
performance compared with snow
tires in heavy or loose snow. Also,
all season tires fall short in accelera-
tion and handling performance com-
pared with summer tires in highway
driving.
●Snow tires
For driving on snow-covered roads
or icy roads, we recommend using
snow tires. If you need snow tires,
select tires of the same size, con-
struction and load capacity as the
originally installed tires. Since your
vehicle has radial tires as original
equipment, make sure your snow
Page 324 of 449
3246-3. Do-it-yourself maintenance
Tire pressure gauge
1 Remove the tire valve cap.
2 Press the tip of the tire pres-
sure gauge onto the tire
valve.
3 Read the pressure using the
gauge gradations.
4 If the tire inflation pressure is
not at the recommended
level, adjust the pressure.
If you add too much air, press
the center of the valve to
deflate.
5 After completing the tire infla-
tion pressure measurement
and adjustment, apply soapy
water to the valve and check
for leakage.
6 Put the tire valve cap back
on.
■Tire inflation pressure check
interval
You should check tire inflation pres-
sure every two weeks, or at least
once a month.
■Effects of incorrect tire inflation
pressure
Driving with incorrect tire inflation
pressure may result in the following:
●Reduced fuel economy
●Reduced driving comfort and poor
handling
●Reduced tire life due to wear
●Reduced safety
●Damage to the drivetrain
If a tire needs frequent inflating,
have it checked by your Toyota
dealer.
■Instructions for checking tire
inflation pressure
When checking tire inflation pres-
sure, observe the following:
●Check only when the tires are
cold.
If your vehicle has been parked for
at least 3 hours or has not been
driven for more than 1 mile or 1.5
km, you will get an accurate cold
tire inflation pressure reading.
●Always use a tire pressure gauge.
It is difficult to j udge if a tire is
properly inflated based only on its
appearance.
●It is normal for the tire inflation
pressure to be higher after driving
as heat is generated in the tire. Do
not reduce tire inflation pressure
after driving.
●Never exceed the vehicle capacity
weight.
Passengers and luggage weight
should be placed so that the vehi-
cle is balanced.
WARNING
■Proper inflation is critical to
save tire performance
Keep your tires properly inflated.
If the tires are not properly
inflated, the following conditions
may occur which could lead to an
accident resulting in death or seri-
ous injury:
●Excessive wear
●Uneven wear
●Poor handling
●Possibility of blowouts resulting
from overheated tires
●Air leaking from between tire
and wheel
●Wheel deformation and/or tire
damage
Page 326 of 449
3266-3. Do-it-yourself maintenance
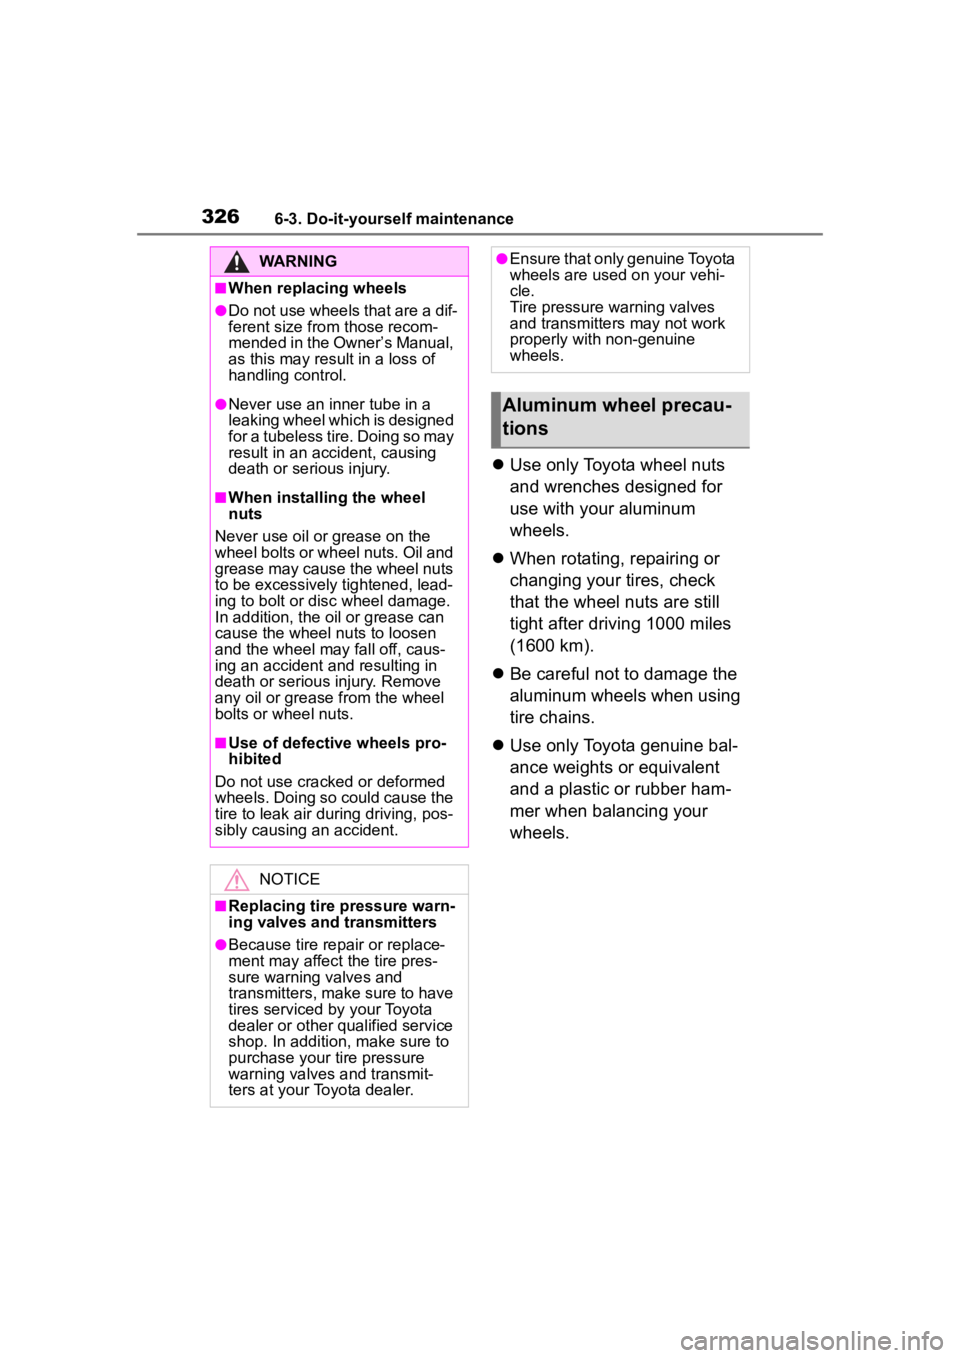
Use only Toyota wheel nuts
and wrenches designed for
use with your aluminum
wheels.
When rotating, repairing or
changing your tires, check
that the wheel nuts are still
tight after driving 1000 miles
(1600 km).
Be careful not to damage the
aluminum wheels when using
tire chains.
Use only Toyota genuine bal-
ance weights or equivalent
and a plastic or rubber ham-
mer when balancing your
wheels.
WARNING
■When replacing wheels
●Do not use wheels that are a dif-
ferent size from those recom-
mended in the Owner’s Manual,
as this may result in a loss of
handling control.
●Never use an inner tube in a
leaking wheel which is designed
for a tubeless tire. Doing so may
result in an accident, causing
death or serious injury.
■When installing the wheel
nuts
Never use oil or grease on the
wheel bolts or wheel nuts. Oil and
grease may cause the wheel nuts
to be excessively tightened, lead-
ing to bolt or disc wheel damage.
In addition, the oil or grease can
cause the wheel nuts to loosen
and the wheel may fall off, caus-
ing an accident and resulting in
death or serious injury. Remove
any oil or grease from the wheel
bolts or wheel nuts.
■Use of defective wheels pro-
hibited
Do not use cracked or deformed
wheels. Doing so could cause the
tire to leak air during driving, pos-
sibly causing an accident.
NOTICE
■Replacing tire pressure warn-
ing valves and transmitters
●Because tire repair or replace-
ment may affect the tire pres-
sure warning valves and
transmitters, make sure to have
tires serviced by your Toyota
dealer or other qualified service
shop. In addition, make sure to
purchase your tire pressure
warning valves and transmit-
ters at your Toyota dealer.
●Ensure that only genuine Toyota
wheels are used on your vehi-
cle.
Tire pressure warning valves
and transmitters may not work
properly with non-genuine
wheels.
Aluminum wheel precau-
tions
Page 380 of 449

3808-1. Specifications
8-1.Specifications
*: Unladen vehicle
■Vehicle identification num-
ber
The vehicle identification num-
ber (VIN) is the legal identifier
for your vehicle. This is the pri-
mary identification number for
your Toyota. It is used in regis-
tering the ownership of your
vehicle.
This number is stamped under
the right-hand front seat. This number is located on the
top left of the body panel.
Maintenance data (fuel, oil level, etc.)
Dimensions and weight
Overall length167.9 in. (4265 mm)
Overall width69.9 in. (1775 mm)
Overall height*51.6 in. (1310 mm)
Wheelbase101.4 in. (2575 mm)
TreadFront59.8 in. (1520 mm)
Rear61.0 in. (1550 mm)
Vehicle capacity weight (Occupants + lug-
gage)Details are described on the
tire and loading information
label. (
P.323)
Seating capacity
Seating capacity4 (Front 2, Rear 2)
Vehicle identification
Page 394 of 449
3948-1. Specifications
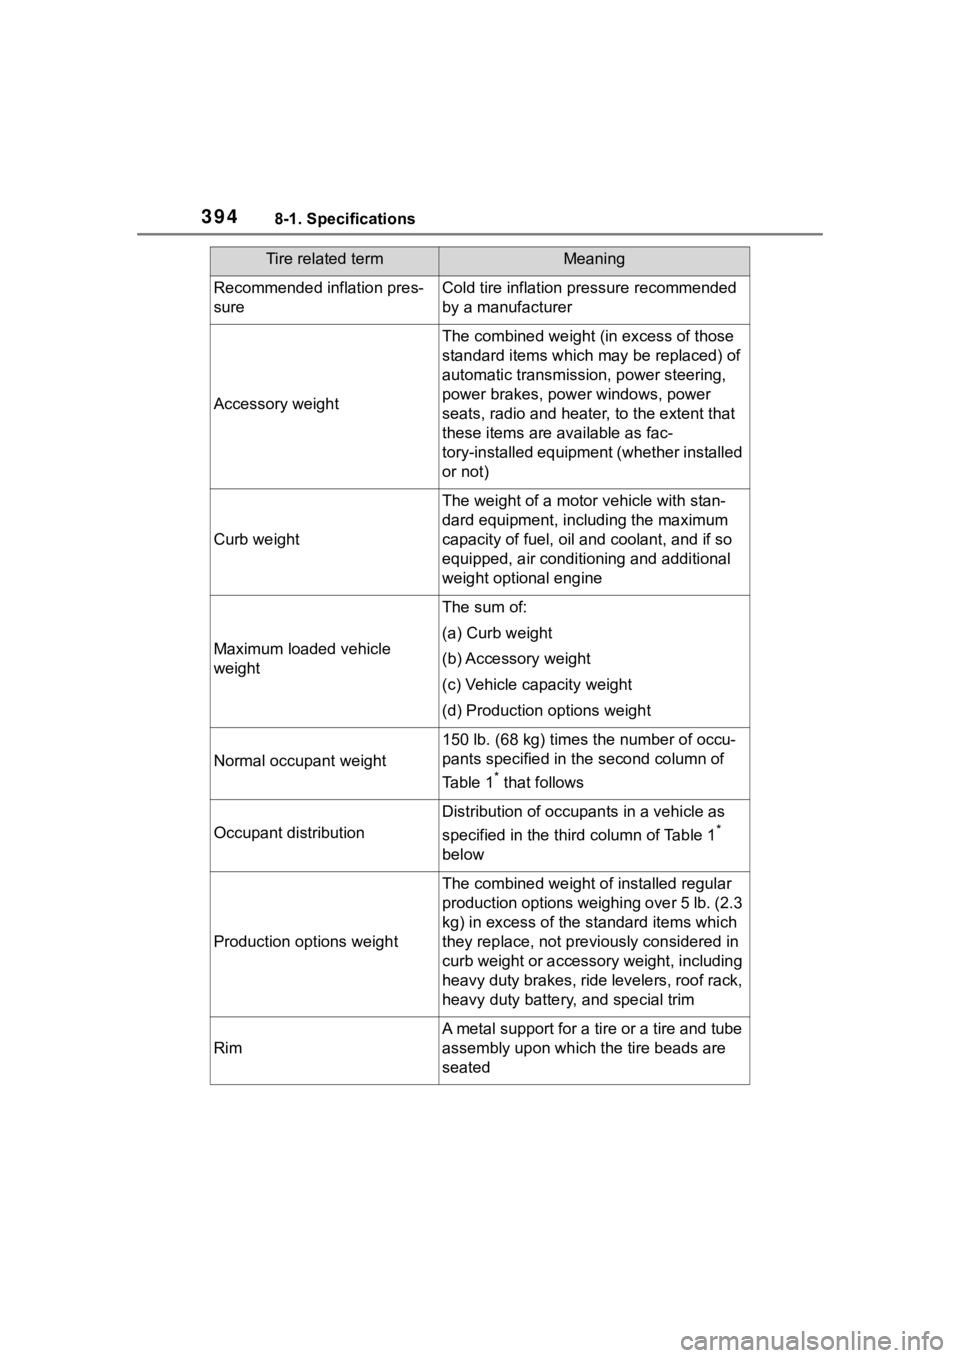
Recommended inflation pres-
sureCold tire inflation pressure recommended
by a manufacturer
Accessory weight
The combined weight (in excess of those
standard items which may be replaced) of
automatic transmission, power steering,
power brakes, power windows, power
seats, radio and heater, to the extent that
these items are available as fac-
tory-installed equipment (whether installed
or not)
Curb weight
The weight of a motor vehicle with stan-
dard equipment, including the maximum
capacity of fuel, oil and coolant, and if so
equipped, air conditioning and additional
weight optional engine
Maximum loaded vehicle
weight
The sum of:
(a) Curb weight
(b) Accessory weight
(c) Vehicle capacity weight
(d) Production options weight
Normal occupant weight
150 lb. (68 kg) times the number of occu-
pants specified in the second column of
Table 1
* that follows
Occupant distribution
Distribution of occupan ts in a vehicle as
specified in the thi rd column of Table 1
*
below
Production options weight
The combined weight o f installed regular
production options weighing over 5 lb. (2.3
kg) in excess of the s tandard items which
they replace, not previously considered in
curb weight or accessory weight, including
heavy duty brakes, ride levelers, roof rack,
heavy duty battery, and special trim
Rim
A metal support for a tire or a tire and tube
assembly upon which the tire beads are
seated
Tire related termMeaning
Page 395 of 449
3958-1. Specifications
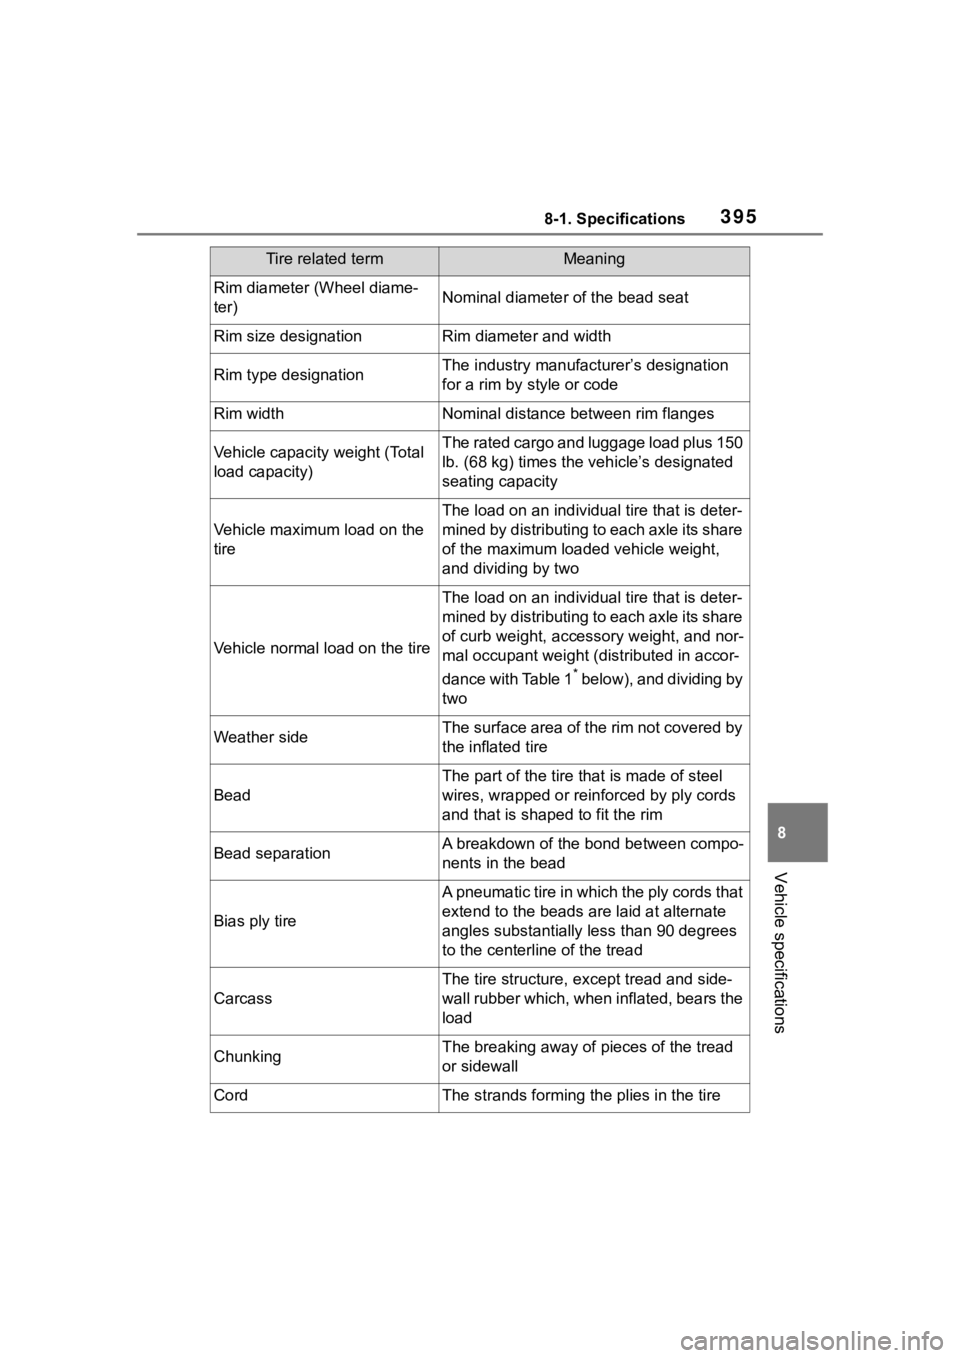
8
Vehicle specifications
Rim diameter (Wheel diame-
ter)Nominal diameter of the bead seat
Rim size designationRim diameter and width
Rim type designationThe industry manufacturer’s designation
for a rim by style or code
Rim widthNominal distance between rim flanges
Vehicle capacity weight (Total
load capacity)The rated cargo and luggage load plus 150
lb. (68 kg) times the vehicle’s designated
seating capacity
Vehicle maximum load on the
tire
The load on an individual tire that is deter-
mined by distributing to each axle its share
of the maximum loaded vehicle weight,
and dividing by two
Vehicle normal load on the tire
The load on an individual tire that is deter-
mined by distributing to each axle its share
of curb weight, accessory weight, and nor-
mal occupant weight (distributed in accor-
dance with Table 1
* below), and dividing by
two
Weather sideThe surface area of the rim not covered by
the inflated tire
Bead
The part of the tire that is made of steel
wires, wrapped or rein forced by ply cords
and that is shaped to fit the rim
Bead separationA breakdown of the bond between compo-
nents in the bead
Bias ply tire
A pneumatic tire in which the ply cords that
extend to the beads are laid at alternate
angles substantially l ess than 90 degrees
to the centerlin e of the tread
Carcass
The tire structure, ex cept tread and side-
wall rubber which, when inflated, bears the
load
ChunkingThe breaking away of pieces of the tread
or sidewall
CordThe strands forming the plies in the tire
Tire related termMeaning