Page 302 of 449
3026-3. Do-it-yourself maintenance
1Pull the hood lock release
lever.
The hood will pop up slightly.
2Push the auxiliary catch lever
to the left and lift the hood.
3 Hold the hood open by insert-
ing the support rod into the
slot.
NOTICE
■If you remove th e air cleaner
filter
Driving with the air cleaner filter
removed may cause excessive
engine wear due to dirt in the air.
Hood
Opening the hood
Page 303 of 449
3036-3. Do-it-yourself maintenance
6
Maintenance and care
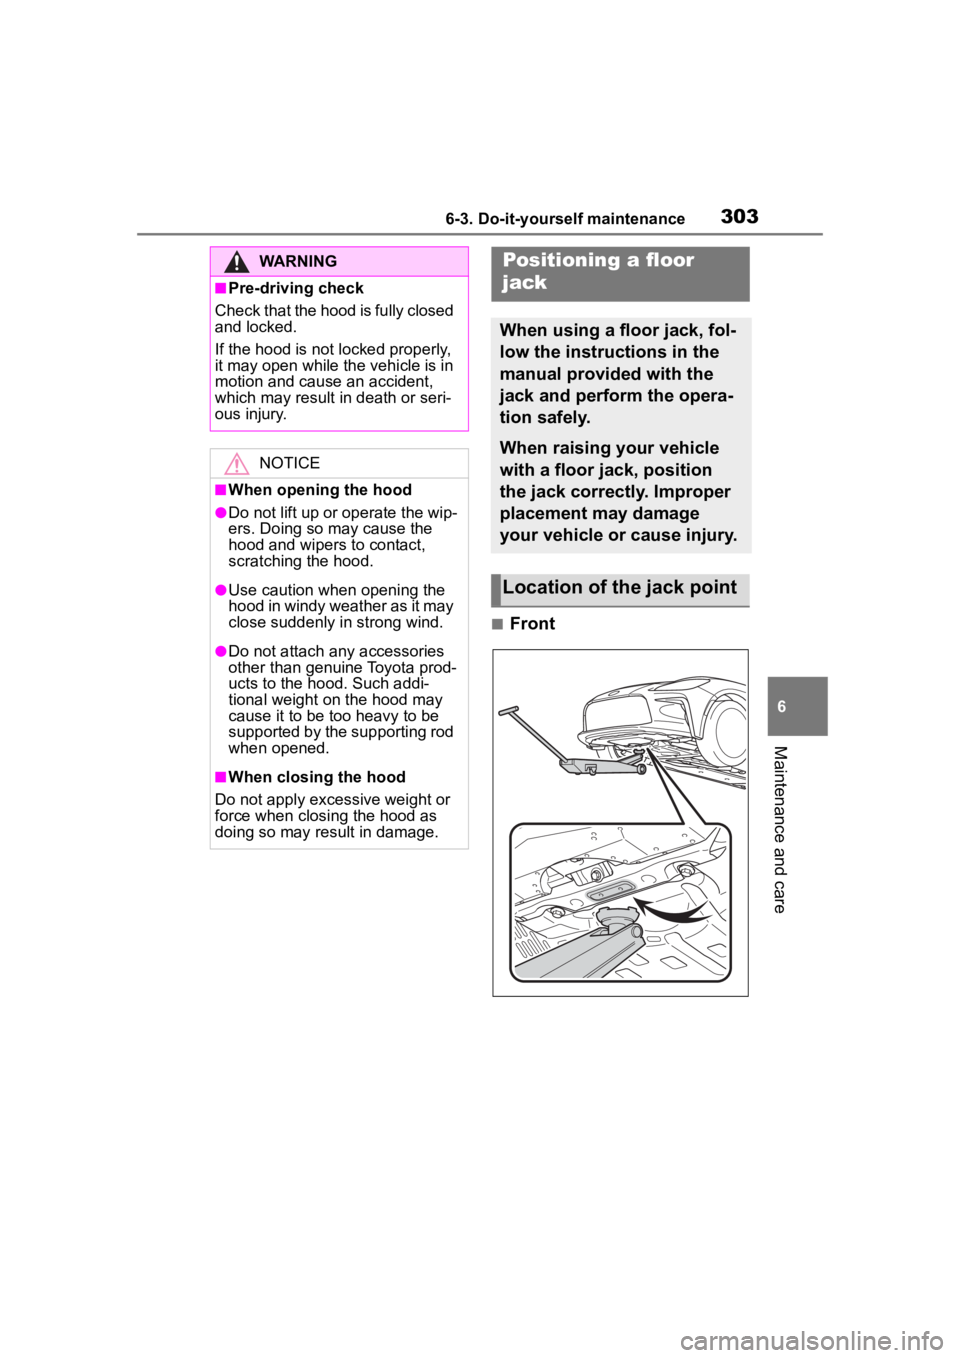
■Front
WARNING
■Pre-driving check
Check that the hood is fully closed
and locked.
If the hood is not locked properly,
it may open while the vehicle is in
motion and cause an accident,
which may result in death or seri-
ous injury.
NOTICE
■When opening the hood
●Do not lift up or operate the wip-
ers. Doing so may cause the
hood and wipers to contact,
scratching the hood.
●Use caution when opening the
hood in windy weather as it may
close suddenly in strong wind.
●Do not attach any accessories
other than genuine Toyota prod-
ucts to the hood. Such addi-
tional weight on the hood may
cause it to be too heavy to be
supported by the supporting rod
when opened.
■When closing the hood
Do not apply excessive weight or
force when closing the hood as
doing so may result in damage.
Positioning a floor
jack
When using a floor jack, fol-
low the instructions in the
manual provided with the
jack and perform the opera-
tion safely.
When raising your vehicle
with a floor jack, position
the jack correctly. Improper
placement may damage
your vehicle or cause injury.
Location of the jack point
Page 306 of 449
3066-3. Do-it-yourself maintenance
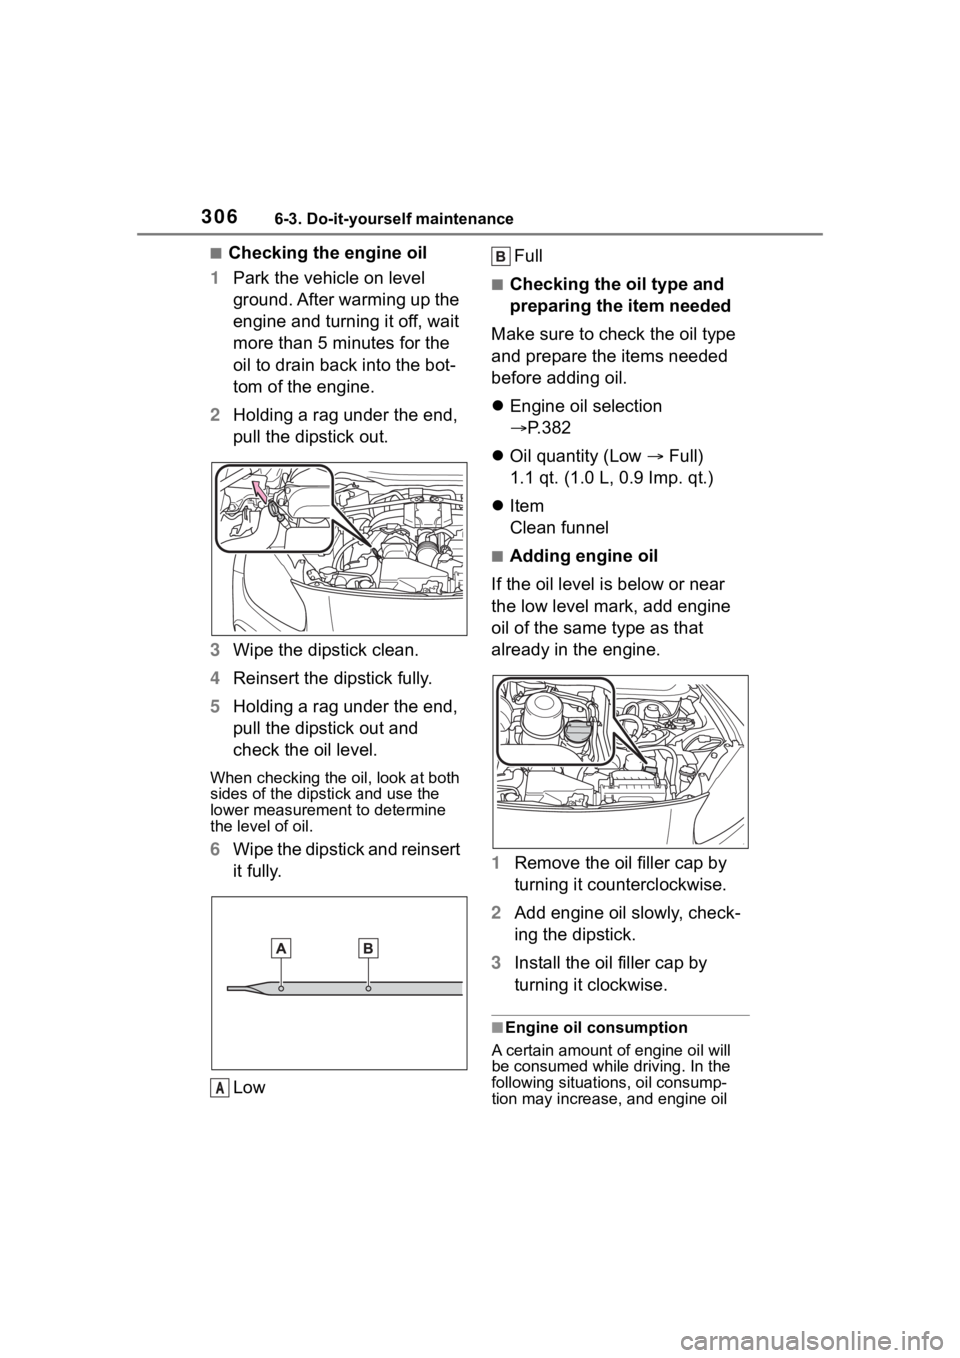
■Checking the engine oil
1 Park the vehicle on level
ground. After warming up the
engine and turning it off, wait
more than 5 minutes for the
oil to drain back into the bot-
tom of the engine.
2 Holding a rag under the end,
pull the dipstick out.
3 Wipe the dipstick clean.
4 Reinsert the dipstick fully.
5 Holding a rag under the end,
pull the dipstick out and
check the oil level.
When checking the oil, look at both
sides of the dipstick and use the
lower measurement to determine
the level of oil.
6Wipe the dipstick and reinsert
it fully.
Low Full
■Checking the oil type and
preparing the item needed
Make sure to check the oil type
and prepare the items needed
before adding oil.
Engine oil selection
P.382
Oil quantity (Low Full)
1.1 qt. (1.0 L, 0.9 Imp. qt.)
Item
Clean funnel
■Adding engine oil
If the oil level is below or near
the low level mark, add engine
oil of the same type as that
already in the engine.
1 Remove the oil filler cap by
turning it counterclockwise.
2 Add engine oil slowly, check-
ing the dipstick.
3 Install the oil filler cap by
turning it clockwise.
■Engine oil consumption
A certain amount of engine oil will
be consumed while driving. In the
following situatio ns, oil consump-
tion may increase, and engine oil
A
Page 310 of 449
3106-3. Do-it-yourself maintenance
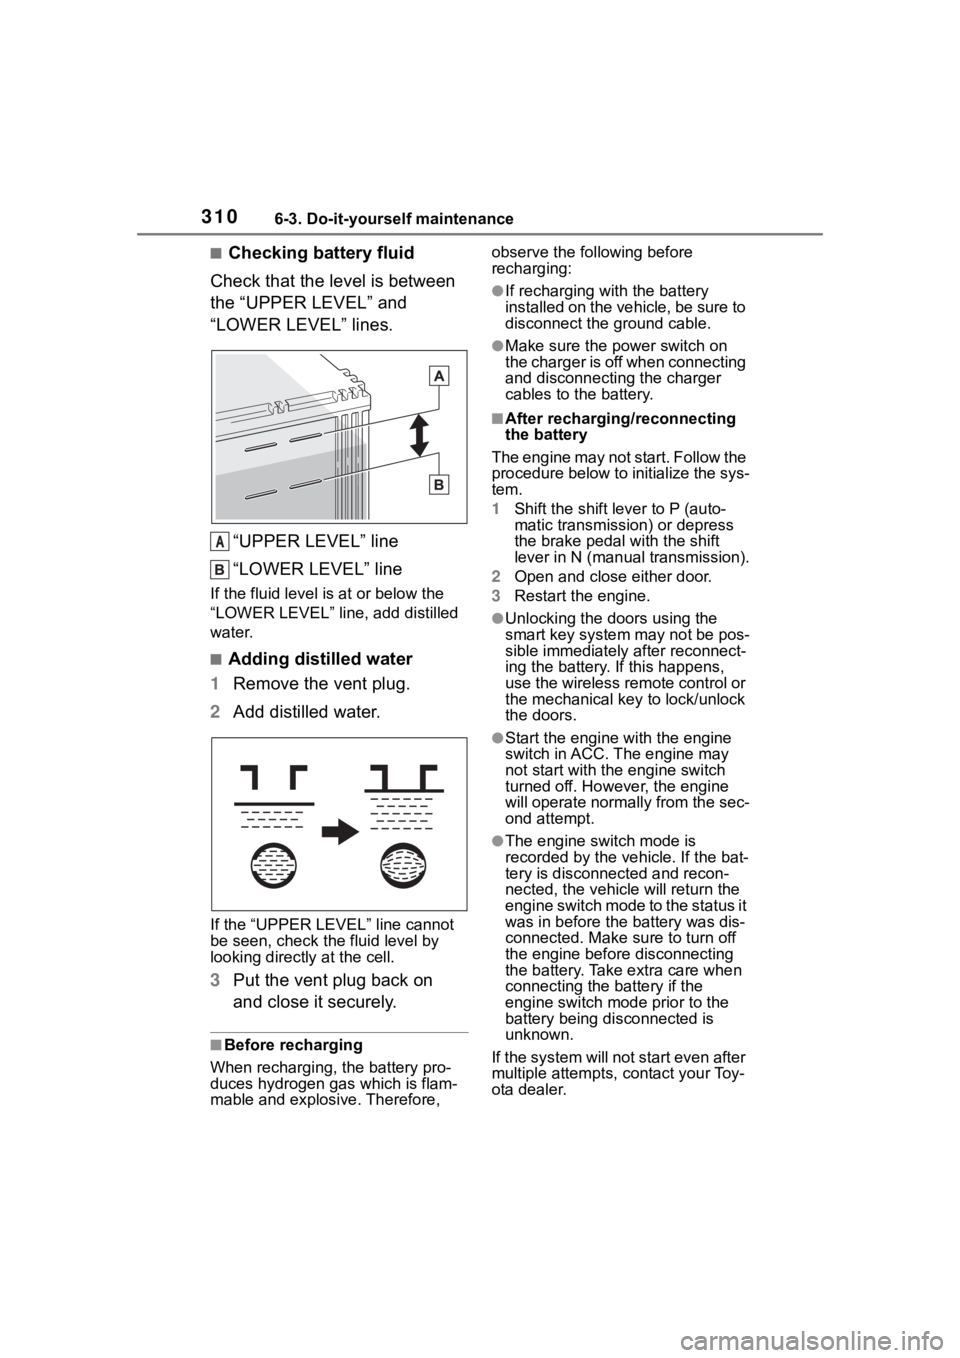
■Checking battery fluid
Check that the level is between
the “UPPER LEVEL” and
“LOWER LEVEL” lines.
“UPPER LEVEL” line
“LOWER LEVEL” line
If the fluid level is at or below the
“LOWER LEVEL” line, add distilled
water.
■Adding distilled water
1 Remove the vent plug.
2 Add distilled water.
If the “UPPER LEVEL ” line cannot
be seen, check the fluid level by
looking directly at the cell.
3 Put the vent plug back on
and close it securely.
■Before recharging
When recharging, t he battery pro-
duces hydrogen ga s which is flam-
mable and explosive. Therefore, observe the following before
recharging:
●If recharging with the battery
installed on the vehicle, be sure to
disconnect the ground cable.
●Make sure the power switch on
the charger is off when connecting
and disconnecting the charger
cables to the battery.
■After recharging/reconnecting
the battery
The engine may not start. Follow the
procedure below to initialize the sys-
tem.
1 Shift the shift lever to P (auto-
matic transmission) or depress
the brake pedal with the shift
lever in N (manual transmission).
2 Open and close either door.
3 Restart the engine.
●Unlocking the doors using the
smart key system may not be pos-
sible immediately after reconnect-
ing the battery. If this happens,
use the wireless remote control or
the mechanical key to lock/unlock
the doors.
●Start the engine with the engine
switch in ACC. T he engine may
not start with th e engine switch
turned off. However, the engine
will operate normally from the sec-
ond attempt.
●The engine switch mode is
recorded by the vehicle. If the bat-
tery is disconnected and recon-
nected, the vehi cle will return the
engine switch mode to the status it
was in before the battery was dis-
connected. Make sure to turn off
the engine before disconnecting
the battery. Take extra care when
connecting the battery if the
engine switch mode prior to the
battery being disconnected is
unknown.
If the system will not start even after
multiple attempts, contact your Toy-
ota dealer.
A
Page 334 of 449
3346-3. Do-it-yourself maintenance
Rear turn signal lights
High mounted stoplight
License plate lights
Door courtesy lights (if
equipped)
■LED light bulbs
The lights other than the back-up
light each consist of a number of
LEDs. If any of the LEDs burn out,
take your vehicle to your Toyota
dealer to have the light replaced.
■Condensation build-up on the
inside of the lens
Temporary condensation build-up
on the inside of the headlight lens
does not indicate a malfunction.
Contact your Toyota dealer for more
information in the following situa-
tions:
●Large drops of water have built up
on the inside of the lens.
●Water has built up inside the
headlight.
■When replacing light bulbs
P. 3 3 1
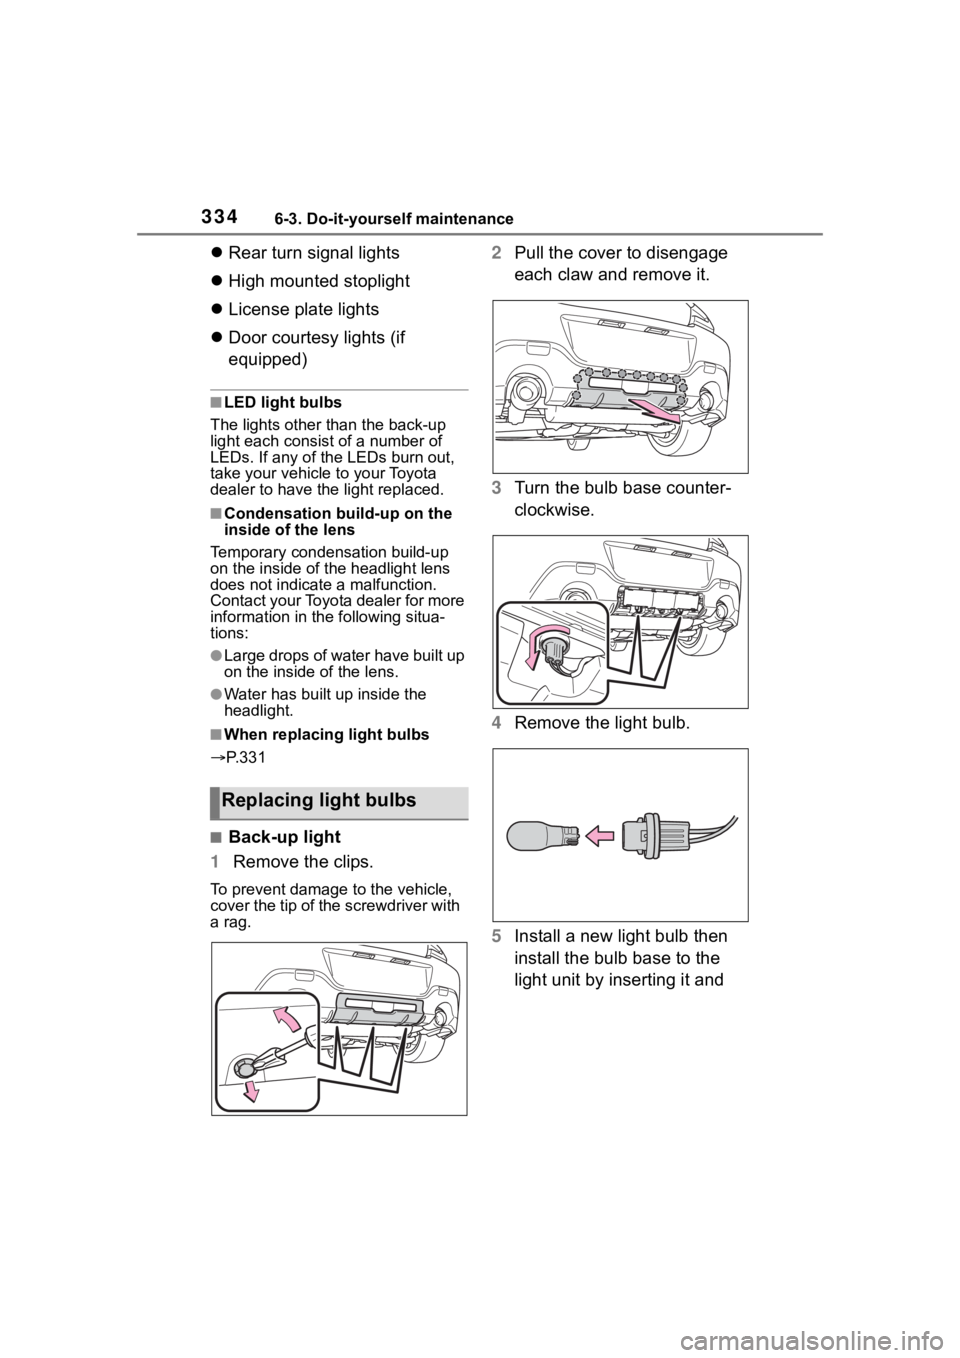
■Back-up light
1 Remove the clips.
To prevent damage to the vehicle,
cover the tip of the screwdriver with
a rag.
2Pull the cover to disengage
each claw and remove it.
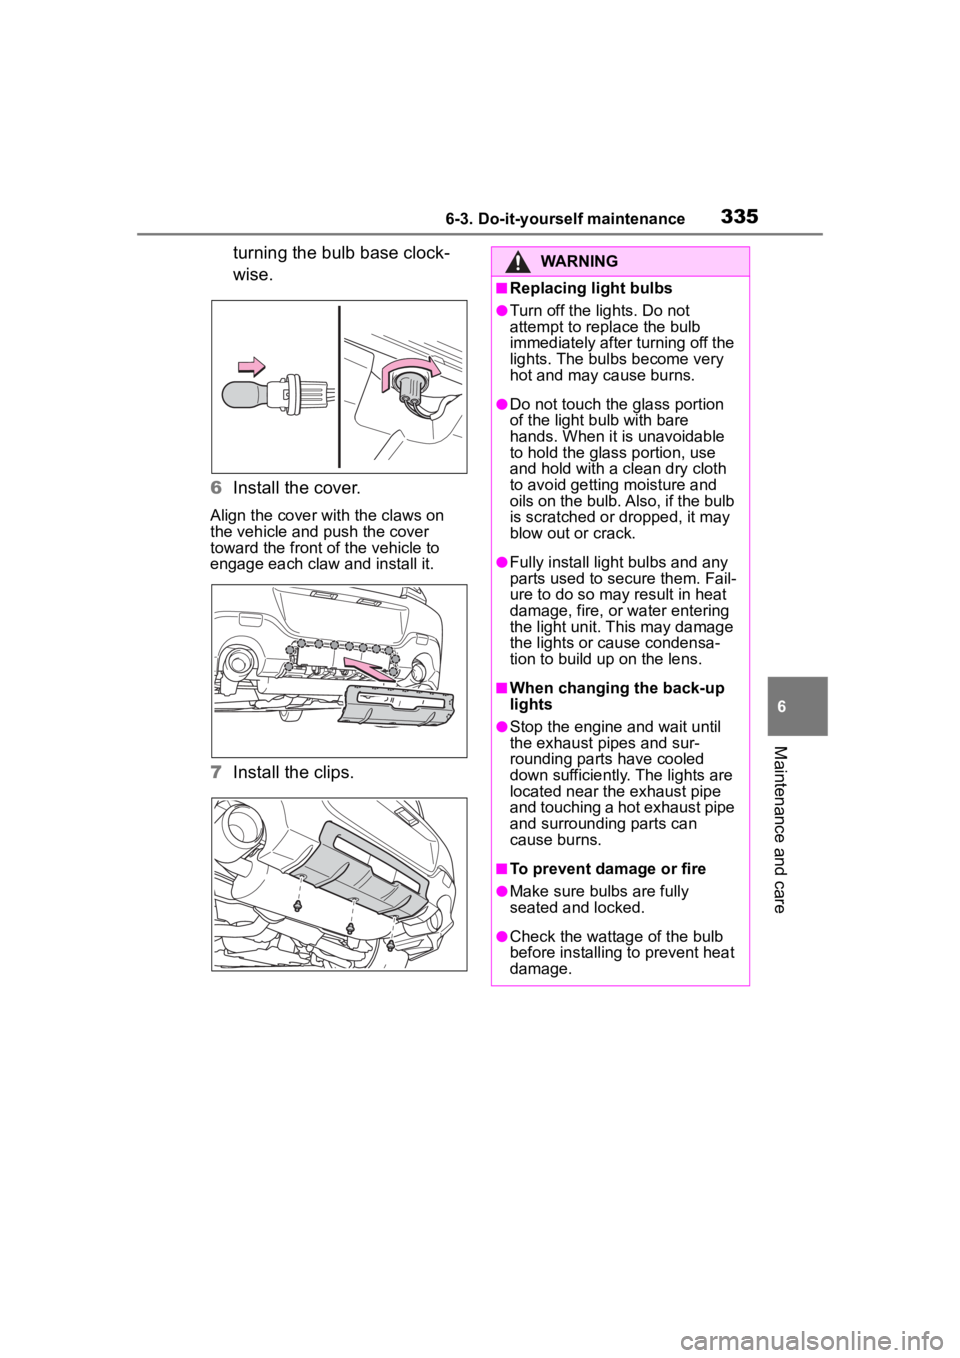
3 Turn the bulb base counter-
clockwise.
4 Remove the light bulb.
5 Install a new light bulb then
install the bulb base to the
light unit by inserting it and
Replacing light bulbs
Page 335 of 449
3356-3. Do-it-yourself maintenance
6
Maintenance and care
turning the bulb base clock-
wise.
6 Install the cover.
Align the cover with the claws on
the vehicle and push the cover
toward the front of the vehicle to
engage each claw and install it.
7Install the clips.
WARNING
■Replacing light bulbs
●Turn off the lights. Do not
attempt to replace the bulb
immediately after turning off the
lights. The bulbs become very
hot and may cause burns.
●Do not touch the glass portion
of the light bulb with bare
hands. When it is unavoidable
to hold the glass portion, use
and hold with a clean dry cloth
to avoid getting moisture and
oils on the bulb. Also, if the bulb
is scratched or dropped, it may
blow out or crack.
●Fully install light bulbs and any
parts used to secure them. Fail-
ure to do so may result in heat
damage, fire, or water entering
the light unit. This may damage
the lights or cause condensa-
tion to build up on the lens.
■When changing the back-up
lights
●Stop the engine and wait until
the exhaust pi pes and sur-
rounding parts have cooled
down sufficiently. The lights are
located near the exhaust pipe
and touching a hot exhaust pipe
and surrounding parts can
cause burns.
■To prevent damage or fire
●Make sure bulbs are fully
seated and locked.
●Check the wattage of the bulb
before installing to prevent heat
damage.
Page 341 of 449
3417-2. Steps to take in an emergency
7
When trouble arises
7-2.Steps to take in an emergency
If your vehicle needs
to be towed
If towing is necessary, we
recommend having your
vehicle towed by your Toy-
ota dealer or commercial
towing service, using a
wheel-lift type truck or flat-
bed truck.
Use a safety chain system
for all towing, and abide by
all state/provincial and local
laws.
If towing your vehicle with a
wheel-lift type truck from
the front, the vehicle's rear
wheels and axles must be in
good conditions. ( P.342)
If they are damaged, use a
towing dolly or flatbed
truck.
WARNING
Observe the following precau-
tions.
Failure to do so m ay result in
death or serious injury.
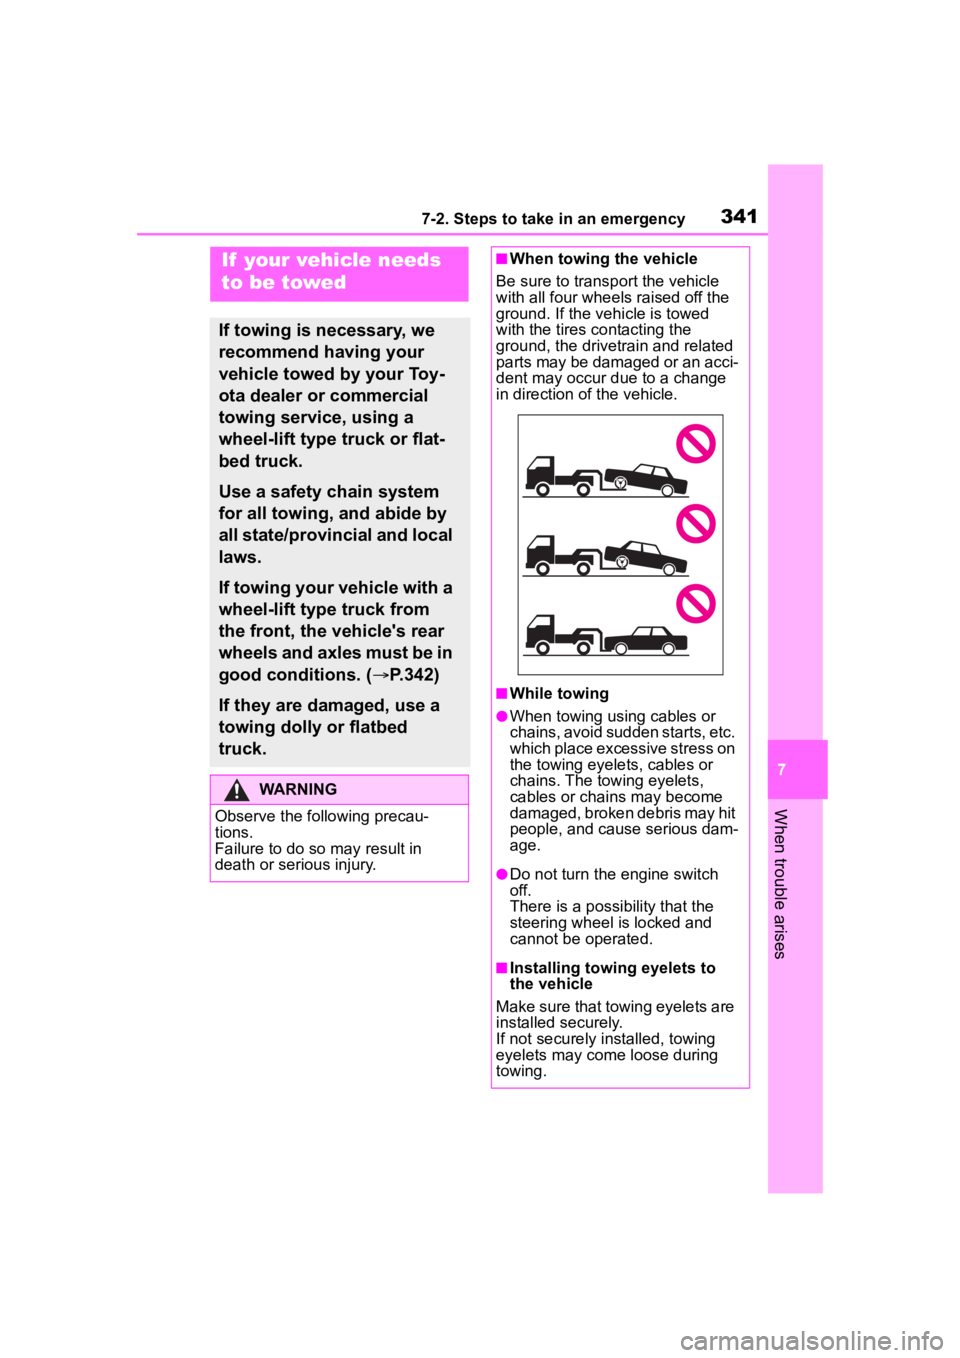
■When towing the vehicle
Be sure to transp ort the vehicle
with all four wheels raised off the
ground. If the vehicle is towed
with the tires co ntacting the
ground, the drivetrain and related
parts may be damaged or an acci-
dent may occur due to a change
in direction of the vehicle.
■While towing
●When towing using cables or
chains, avoid sudden starts, etc.
which place excessive stress on
the towing eyelets, cables or
chains. The towing eyelets,
cables or chains may become
damaged, broken debris may hit
people, and cause serious dam-
age.
●Do not turn the engine switch
off.
There is a possibility that the
steering wheel is locked and
cannot be operated.
■Installing towing eyelets to
the vehicle
Make sure that towing eyelets are
installed securely.
If not securely installed, towing
eyelets may come loose during
towing.
Page 342 of 449

3427-2. Steps to take in an emergency
The following may indicate a
problem with your transmission.
Contact your Toyota dealer or
commercial towing service
before towing.
The engine is running but the
vehicle does not move.
The vehicle makes an abnor-
mal sound.
From the front
Use a towing dolly under the
rear wheels.
From the rear
WARNING
■After towing
Make sure to remove the towing
eyelet.
If not removed, the SRS airbags
may not deploy correctly if the
vehicle is involved in a frontal col-
lision, or the fuel pump shutoff
system may not operate correctly
if involved in a rear collision.
NOTICE
■To prevent damage to the
vehicle when towing using a
wheel-lift type truck
●Do not tow the vehicle from the
rear when the engine switch is
off. The steering lock mecha-
nism is not strong enough to
hold the front wheels straight.
●When raising the vehicle,
ensure adequate ground clear-
ance for towing at the opposite
end of the raised vehicle. With-
out adequate clearance, the
vehicle could be damaged while
being towed.
■To prevent damage to the
vehicle when towing with a
sling-type truck
Do not tow with a sling-type truck,
either from the front or rear.
■To prevent damage to the
vehicle during emergency
towing
Do not secure cables or chains to
the suspension components.
■When towing down a long
slope
Use a wheel lift-type or flat bed
truck.
If a wheel lift-type or flat bed truck
is not used, the brakes may over-
heat, leading to poor brake perfor-
mance.
Situations when it is nec-
essary to contact dealers
before towing
Towing with a wheel-lift
type truck