Page 146 of 608
1463-3. Adjusting the seats
4RUNNER (U)
Vertical adjustmentUp
Pull the head restraints up.
Down
Push the head restraint down while
pressing the lock release button.
Vertical adjustmentUp
Pull the head restraints up.
Down
Push the head restraint down while
pressing the lock release button.
Folding the head restraints (vehi-
cle without third row seats)To u s e
Lift up the head restraint until it
locks.
To f o l d
Pull the head restraint lock release
lever to fold the head restraint.
Head restraints
Head restraints are provided for all seats.
Front seats
Lock release button
1
2
Second seats
Lock release button
1
2
1
2
Page 147 of 608
1473-3. Adjusting the seats
3
Operation of each component
4RUNNER (U)
To u s e
Lift up the head restraint until it
locks.
To f o l d
Pull the strap to fold the head
restraint.
■Removing the head restrain ts (except third row seats)
■ Installing the head restraints (except third row seats)
■ Adjusting the height of the h ead restraints (except third row s eats)
■ Adjusting the second center seat head restraint
Always raise the head restraint one level from the stowed posit ion when
using.
Third seats (vehicle with third row seats)
1
2
Pull the head restraint up while pressing
the lock release button.
Align the head restraint with the installa-
tion holes and push it down to the lock
position.
Press and hold the lock release button
when lowering the head restraint.
Make sure that the head restraints are
adjusted so that the center of the head
restraint is closest to the top of your ears.
Lock release button
Lock release
button
Page 148 of 608
1483-3. Adjusting the seats
4RUNNER (U)
WARNING
■Head restraint precautions
Observe the following precautions regarding the head restraints. Failure to
do so may result in death or serious injury.
● Use the head restraints designed for each respective seat.
● Adjust the head restraints to the correct position at all times.
● After adjusting the head restraints, push down on them and make sure
they are locked in position.
● Do not drive with the head restraints removed.
Page 150 of 608
1503-4. Adjusting the steering wheel and mirrors
4RUNNER (U)
WARNING
■Caution while driving
Do not adjust the steering wheel while driving.
Doing so may cause the driver to mishandle the vehicle and caus e an acci-
dent, resulting in death or serious injury.
■ After adjusting the steering wheel
Make sure that the steering wheel is securely locked.
Otherwise, the steering wheel may move suddenly, possibly causi ng an
accident, and resulting in death or serious injury. Also, the horn may not
sound if the steering wheel is not securely locked.
Page 155 of 608

155
3
Operation of each component
4RUNNER (U)
3-5. Opening, closing the windows and moon roof
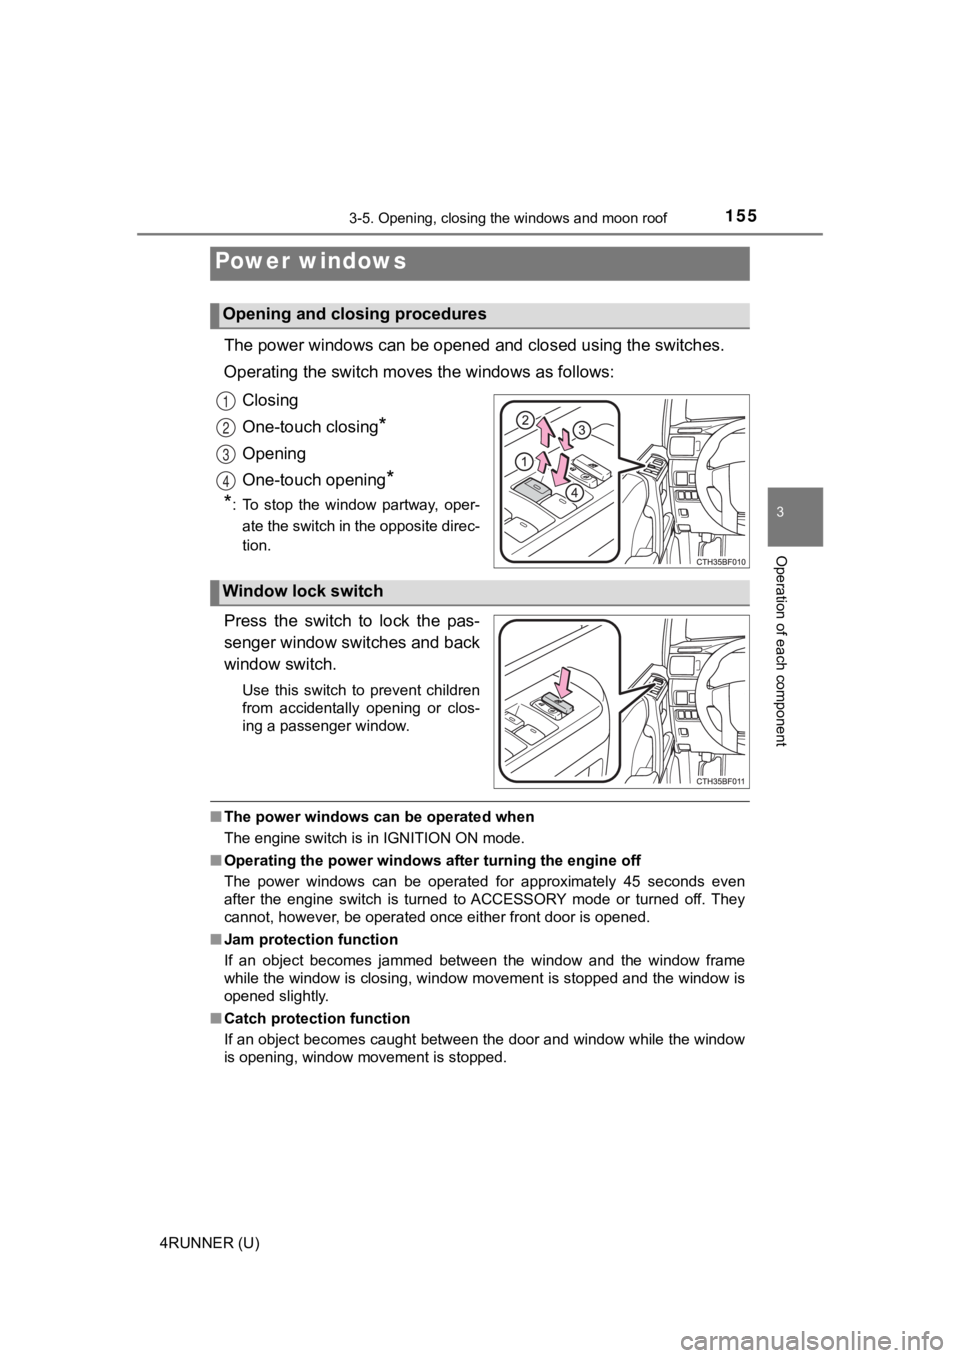
The power windows can be opened and closed using the switches.
Operating the switch moves the windows as follows:
Closing
One-touch closing
*
Opening
One-touch opening
*
*
: To stop the window partway, oper-
ate the switch in the opposite direc-
tion.
Press the switch to lock the pas-
senger window switches and back
window switch.
Use this switch to prevent children
from accidentally opening or clos-
ing a passenger window.
■ The power windows can be operated when
The engine switch is in IGNITION ON mode.
■ Operating the power windows after turning the engine off
The power windows can be operated for approximately 45 seconds even
after the engine switch is turned to ACCESSORY mode or turned o ff. They
cannot, however, be operated once either front door is opened.
■ Jam protection function
If an object becomes jammed between the window and the window f rame
while the window is closing, window movement is stopped and the window is
opened slightly.
■ Catch protection function
If an object becomes caught between the door and window while the window
is opening, window movement is stopped.
Power windows
Opening and closing procedures
1
2
3
4
Window lock switch
Page 156 of 608

1563-5. Opening, closing the windows and moon roof
4RUNNER (U)■
When the window cannot be opened or closed
When the jam protection function or catch protection function o perates
unusually and the door window cannot be opened or closed, perfo rm the fol-
lowing operations with the power window switch of that door.
● Stop the vehicle. With the engine switch in IGNITION ON mode, w ithin 4
seconds of the jam protection function or catch protection func tion activat-
ing, continuously operate the power window switch in the one-to uch closing
direction or one-touch opening direction so that the door windo w can be
opened and closed.
● If the door window cannot be opened and closed even when perfor ming the
above operations, perform the following procedure for function initialization.
Turn the engine switch to IGNITION ON mode.
Pull and hold the power window switch in the one-touch closing direction
and completely close the door window.
Release the power window switch for a moment, resume pulling the
switch in the one-touch closing direction, and hold it there for approxi-
mately 6 seconds or more.
Press and hold the power window switch in the one-touch opening direc-
tion. After the door window is completely opened, continue hold ing the
switch for an additional 1 second or more.
Release the power window switch for a moment, resume pushing th e
switch in the one-touch opening direction, and hold it there fo r approxi-
mately 4 seconds or more.
Pull and hold the power window switch in the one-touch closing direction
again. After the door window is completely closed, continue holding the
switch for a further 1 second or more.
If you release the switch while the window is moving, start aga in from the
beginning.
If the window reverses and cannot be fully closed or opened, have the vehicle
inspected by your Toyota dealer.
■ Door lock linked window operation
●The power windows can be opened and closed using the key or mechanical
key.
* ( P. 106, 512)
● The power windows can be opened using the wireless remote control.
*
(P. 106)
*: These settings must be customized at your Toyota dealer.
■ Customization
Settings (e.g. key linked operation) can be changed.
(Customizable features P. 549)
1
2
3
4
5
6
Page 157 of 608

1573-5. Opening, closing the windows and moon roof
3
Operation of each component
4RUNNER (U)
WARNING
Observe the following precautions.
Failure to do so may result in death or serious injury.
■Closing the windows
● The driver is responsible for all the power window operations, including the
operation for the passengers. In order to prevent accidental op eration,
especially by a child, do not let a child operate the power windows. It is
possible for children and other passengers to have body parts c aught in
the power window. Also, when riding with a child, it is recommended to use
the window lock switch. ( P. 155)
● Check to make sure that all passengers do not have any part of their body
in a position where it could be caught when a window is being o perated.
● When using the key or mechanical key and operating the power wi ndows,
operate the power window after checking to make sure that there is no
possibility of any passenger having any of their body parts cau ght in the
window. Also do not let a child operate window by the key or me chanical
key. It is possible for children and other passengers to get caught in the
power window.
● When exiting the vehicle, turn the engine switch off, carry the key and exit
the vehicle along with the child. There may be accidental operation, due to
mischief, etc., that may possibly lead to an accident.
■ Jam protection function
● Never use any part of your body to intentionally activate the jam protection
function.
● The jam protection function may not work if something gets jammed just
before the window is fully closed. Be careful not to get any pa rt of your
body jammed in the window.
■ Catch protection function
● Never use any part of your body or clothing to intentionally ac tivate the
catch protection function.
● The catch protection function may not work if something gets caught just
before the window is fully opened. Be careful not to get any part of your
body or clothing caught in the window.
Page 163 of 608

1633-5. Opening, closing the windows and moon roof
3
Operation of each component
4RUNNER (U)■
When the moon roof does not close normally
Perform the following procedure:
●If the moon roof closes but then re-opens slightly
Stop the vehicle.
Press and hold the “SLIDE (open/close)” switch in the close position.
*1
The moon roof will close, reopen and pause for approximately 10 sec-
onds.
*2 Then it will close again, tilt up and pause for approximately 1 sec-
ond. Finally, it will tilt down, open and close.
Check to make sure that the moon roof is completely closed and then
release the switch.
● If the moon roof tilts down but then tilts back up
Stop the vehicle.
Press and hold the “UP” switch
*1 until the moon roof moves into the tilt
up position and stops.
Release the “UP” switch once and then press and hold the “UP” s witch
again.
*1
The moon roof will pause for approximately 10 seconds in the tilt up posi-
tion.
*2 Then it will adjust slightly and pause for approximately 1 second.
Finally, it will tilt down, open and close.
Check to make sure that the moon roof is completely closed and then
release the switch.
*1: If the switch is released at the incorrect time, the procedure will have to
be performed again from the beginning.
*2: If the switch is released after the above mentioned 10 second pause, automatic operation will be disabled. In that case, press and h old the
“UP” or “DOWN” switch, and the moon roof will tilt up and pause for
approximately 1 second. Then it will tilt down, open and close. Check to
make sure that the moon roof is completely closed and then release the
switch.
If the moon roof does not fully close even after performing the above proce-
dure correctly, have the vehicle inspected by your Toyota deale r.
■ Moon roof open reminder function
An alarm will sound when the driver’s door is opened with the m oon roof not
fully closed and the engine switch off.
■ Door lock linked moon roof operation
●The moon roof can be opened and closed using the key or mechani cal key.
*
(P. 106, 512)
● The moon roof can be opened using the wireless remote control.
*
( P. 106)
*: These settings must be customized at your Toyota dealer.
1
2
3
1
2
3
4