Page 158 of 298

To add a destination to your Favorites list touch its pin on the map, then touch the star icon on the popup screen that
appears. Enter a name (or leave as-is to accept the default name), then touch
Add
to Favorites. The star becomes solid and
the destination is included on your
Favorites list.
To delete a Recent or Favorite destination, touch it on the destination list and hold it down
briefly until the X
appears. Then touch the X to delete it from the list.
Home and Work locations also display under the
navigation search bar. Touch to set an address to the corresponding location. After entering the address, touch
Save as Home or Save as Work. Then simply
touch these shortcuts whenever you want to navigate home or to work.
To change or delete the corresponding address, press
and hold the
Home or Work icon. A popup allows you to
enter a new address and
Save as Home or Save as Work.
Or touch
Clear Home or Clear Work to remove
associated addresses entirely.
NOTE: Based on your usage patterns, Model Y may
prompt you to save a location as Home or Work.
NOTE: Once a Home or Work location is saved, Model Y
may prompt you to navigate to your Work location in
the mornings and to your Home location in the evenings
and provide an estimated driving time based on current
traffic conditions. See Automatic Navigation on page
155.
For security reasons, if you sell Model Y, it is
recommended that you delete your Home and Work
locations. You can delete these individually or you can perform a factory reset to erase all personal data (touch
Controls > Service > Factory Reset).
Charging Locations
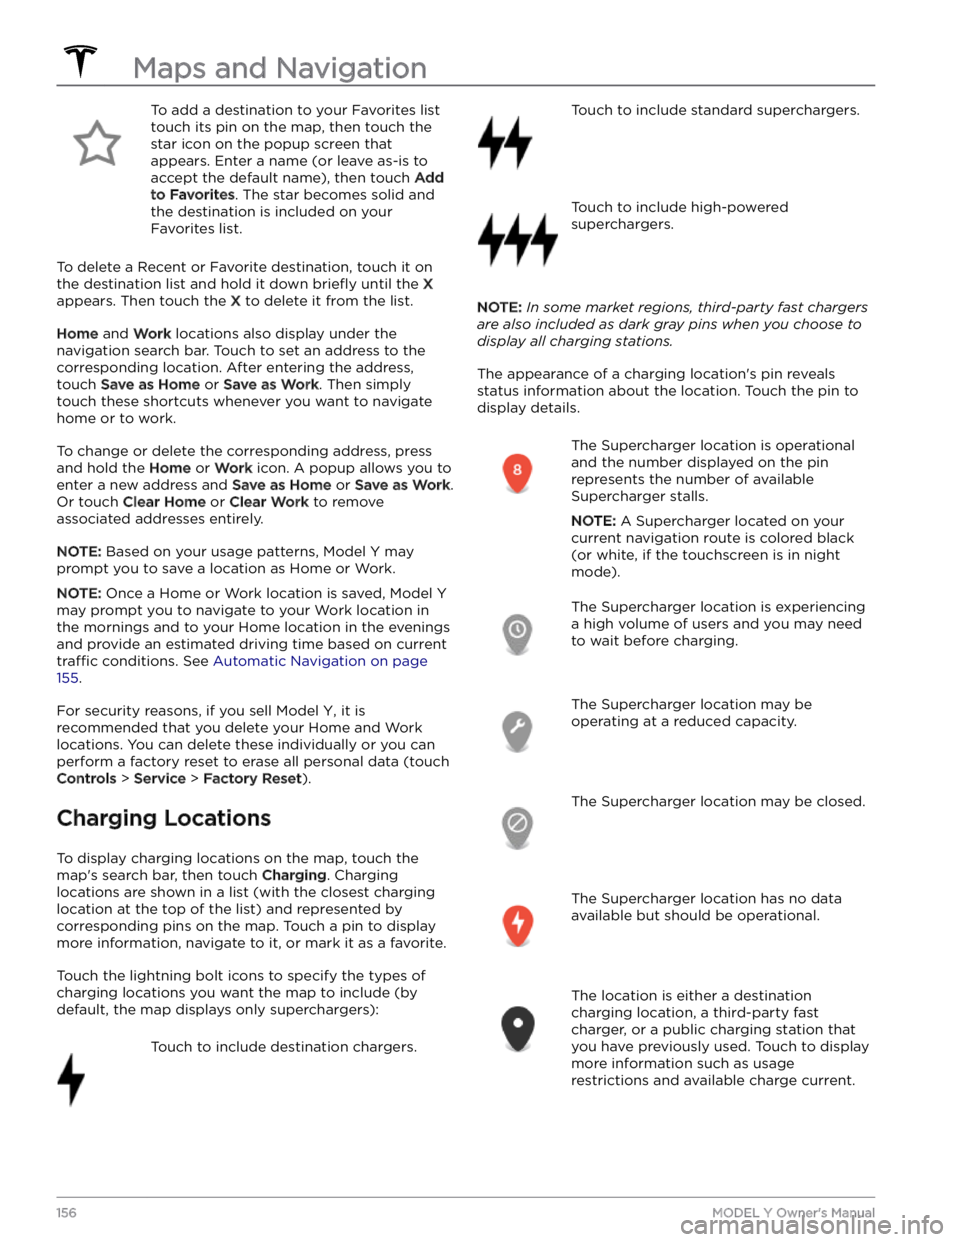
To display charging locations on the map, touch the
map
Page 159 of 298
NOTE: When the map is zoomed out and
more than one destination charging
location is available in an area, the pin is
round and displays the number of stations.
Touch the pin to zoom in. Then you can
touch an individual pin for details about a
specific location.
Touch a charging location
Page 160 of 298

To remove Supercharger stops and display directions only, touch
Remove all charging stops at the bottom of
the turn-by-turn direction list. If you remove charging stops, the turn-by-turn direction list may display an alert indicating that charging is needed to reach your destination. To add Supercharger stops back to the turn- by-turn direction list, touch
Add charging stops.
While charging at a Supercharger, the charging screen displays the remaining charging time needed to drive to your next Supercharger stop, or destination (if no further charging is needed). If you charge for a shorter or longer length of time, charging time at subsequent
Supercharger stops is adjusted accordingly.
NOTE: You can also use the mobile app to monitor
remaining charging time needed.
NOTE: If a Supercharger on your navigation route
experiences an outage, Trip Planner displays a
notification and attempts to reroute you to a different
Supercharger location.
If Trip Planner estimates that you won
Page 163 of 298
NOTE: Use a USB port located at the front of the center
console. The USB connections at the rear of the console are for charging only.
NOTE: For some vehicles manufactured after
approximately November 1, 2021, the center console USB ports may only support charging devices. Use the USB port inside the glove box for all other functions.
Bluetooth Connected Devices
If you have a Bluetooth-capable device such as a phone that is paired and connected to
Model Y (see Pairing a
Bluetooth Phone on page 133), you can play audio files
stored on it. Choose Media Player
Page 167 of 298
High Voltage Components
1.
High Voltage Cabling
2.
Heat Pump Assembly
3.
Front Motor (Dual Motor vehicles only)
4.
High Voltage Battery
5.
High Voltage Cabling
6.
Service Access Panel for High Voltage Components (Penthouse)
7.
Rear Motor
8.
High Voltage Busbars
9.
Charge Port
WARNING: The high voltage system has no user serviceable parts. Do not disassemble, remove or replace high
voltage components, cables or connectors. High voltage cables are typically colored orange for easy
identification.
WARNING: Read and follow all instructions provided on the labels that are attached to Model Y. These labels
are there for your safety.
WARNING: In the unlikely event that a fire occurs, immediately contact your local fire emergency responders.Charging Equipment
Charging equipment designed specifically to charge
your
Model Y is available from Tesla.
For information on the charging equipment available for
your region, go to http://shop.tesla.com.
Page 169 of 298
About the High Voltage Battery
Model Y has one of the most sophisticated battery
systems in the world. The most important way to preserve the high voltage Battery is to
LEAVE YOUR
VEHICLE PLUGGED IN when you are not using it. This is
particularly important if you are not planning to drive
Model Y for several weeks.
NOTE: When left idle and unplugged, your vehicle
periodically uses energy from the Battery for system
tests and recharging the
low voltage battery when
necessary.
There is no advantage to waiting until the Battery
Page 170 of 298
NOTE: Although Tesla recommends charging to 100% at
least once per week, remember that regenerative
braking is reduced while driving with a fully charged
battery. See
Regenerative Braking on page 66.
Submerged Vehicle
As with any electric vehicle, if your Tesla has been
exposed to
flooding, extreme weather events or has
otherwise been submerged in water (especially in salt water), treat it as if it
Page 173 of 298

NOTE: To prevent unauthorized unplugging of the
charge cable, the charge cable latch remains locked and
Model Y must be unlocked or able to recognize your
authenticated phone before you can disconnect the
charge cable.
To disconnect the charge cable:
1.
Press and hold the button on the connector handle to release the latch.
NOTE: You can also release the latch using the
lightning icon on the car status overview on the
touchscreen or mobile app, or by pressing and holding the rear trunk button on the key fob.
2.
Pull the connector from the charge port. The charge
port door automatically closes.
To disconnect the charge cable when using an adapter at a public charge station:
1.
Unlock Model Y.
2.
While holding the public charging handle in one hand and the adapter in the other hand, press and hold the button on the public charging handle and pull both
outwards, removing the handle and adapter at the same time.
NOTE: If the charging station handle separates from
the adapter, leaving the adapter in
Model Y, use the
touchscreen to unlock the charge port.
3.
Press and hold the button on the charging handle
again to release the adapter from the public charging handle.
NOTE: The charge port door automatically closes within
approximately 10 seconds of removing the connector from the charge port.
CAUTION: Tesla strongly recommends leaving
Model Y plugged in when not in use. This
maintains the Battery at the optimum level of
charge.
CAUTION: Model Y does not shift out of Park if the
charge port is unable to determine whether a
charging cable is plugged in. Ensure the charging
cable is unplugged and follow the instructions on
the touchscreen to proceed (see Park on page 56).
Charge Settings
Access charge settings by touching Controls > Charging
when Model Y is in Park. You can also touch the battery
icon on the touchscreen to access charge settings.
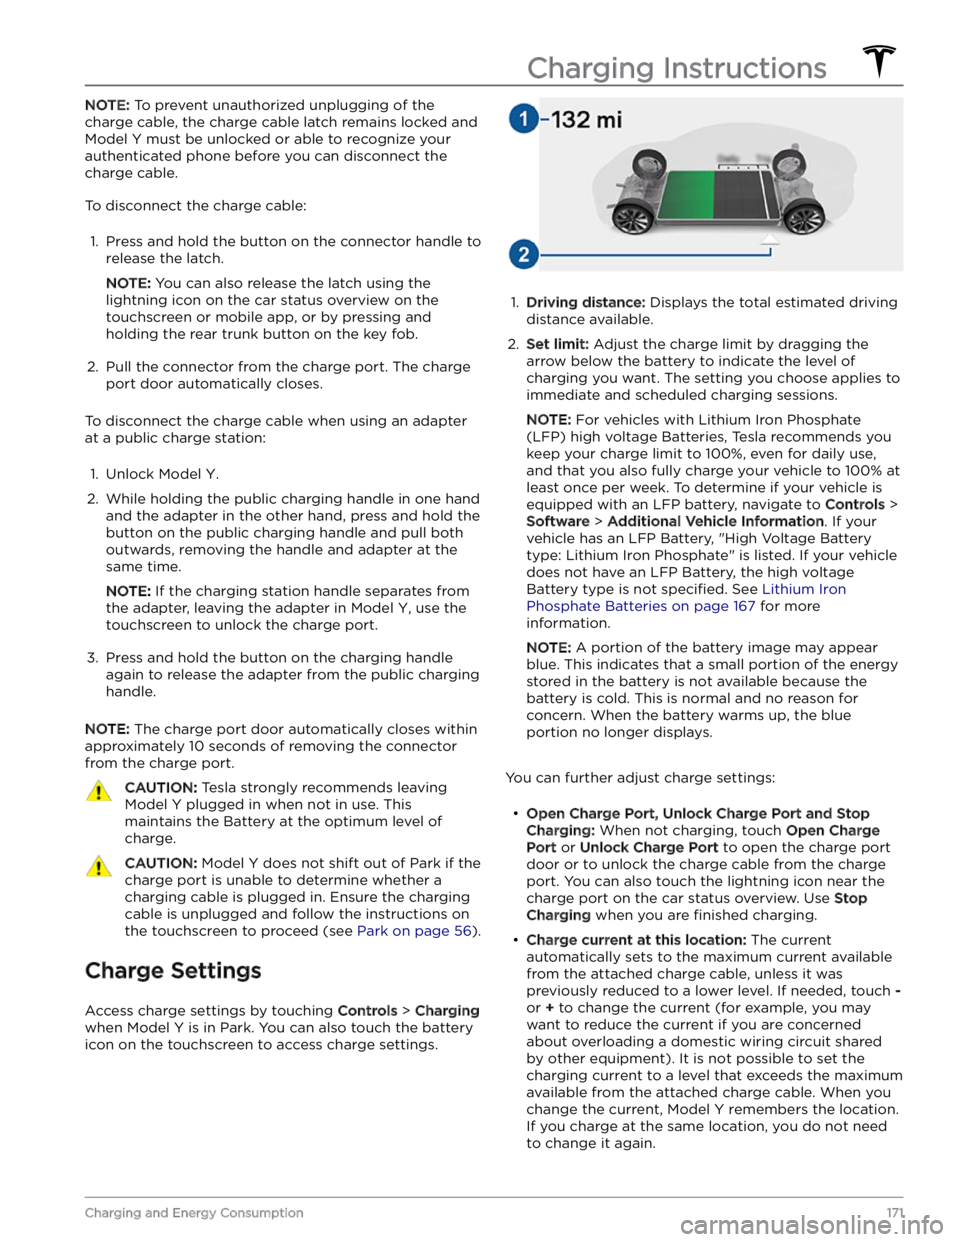
1.
Driving distance: Displays the total estimated driving
distance available.
2.
Set limit: Adjust the charge limit by dragging the
arrow below the battery to indicate the level of charging you want. The setting you choose applies to immediate and scheduled charging sessions.
NOTE: For vehicles with Lithium Iron Phosphate
(LFP) high voltage Batteries, Tesla recommends you keep your charge limit to 100%, even for daily use,
and that you also fully charge your vehicle to 100% at
least once per week. To determine if your vehicle is
equipped with an LFP battery, navigate to
Controls >
Software > Additional Vehicle Information. If your
vehicle has an LFP Battery, "High Voltage Battery type: Lithium Iron Phosphate" is listed. If your vehicle
does not have an LFP Battery, the high voltage Battery type is not
specified. See Lithium Iron
Phosphate Batteries on page 167 for more
information.
NOTE: A portion of the battery image may appear
blue. This indicates that a small portion of the energy
stored in the battery is not available because the battery is cold. This is normal and no reason for concern. When the battery warms up, the blue portion no longer displays.
You can further adjust charge settings: