2023 TESLA MODEL Y battery
[x] Cancel search: batteryPage 89 of 298

NOTE: Installing winter tires can result in temporarily
reduced regenerative braking power but after a short
period of driving,
Model Y recalibrates to correct this.
Touch
Service > Wheel & Tire Configuration > Tires to
select winter tires and quicken this process.
Blue Snowflake Icon
A blue snowflake icon appears on your
touchscreen when some of the stored energy in
the Battery is unavailable because the Battery is cold. This portion of unavailable energy displays in blue on the Battery meter. Regenerative
braking, acceleration, and charging rates may be limited. The
snowflake icon no longer displays
when the Battery is
sufficiently warm.
After Driving
Leave Model Y plugged in when not in use. This uses the
charging system, rather than the battery itself, to keep the battery warm (see
High Voltage Battery Information
on page 167).
Scheduled Departure
When parked, plug in Model Y and use the Schedule
settings, available on both the charging and climate
control screens, to set a time when you want to precondition
Model Y (see Scheduled Charging and
Scheduled Departure on page 174). Your vehicle
determines the appropriate time to begin charging so it is complete during
off-peak hours and the cabin and
Battery are warm by your set departure time. For more information, see
Scheduled Charging and Scheduled
Departure on page 174.
Storage
If you leave Model Y parked for an extended period of
time, plug the vehicle into a charger to prevent normal range loss and to keep the Battery at an optimal temperature. Your vehicle is safe to stay plugged in for any length of time.
When not in use, Model Y enters a sleep mode to
conserve energy. Reduce the number of times you check
your vehicle
Page 129 of 298

Overview of Climate Controls
Climate controls are available at the bottom of the touchscreen. By default, climate control is set to Auto, which
maintains optimum comfort in all but the most severe weather conditions. When you adjust the cabin temperature
while in the
Auto setting, the system automatically adjusts the heating, air conditioning, air distribution, and fan
speed to maintain the cabin at your selected temperature.
Touch the displayed temperature at the bottom of the touchscreen to access the main climate controls screen, where you can adjust your climate preferences. You can revert back to Auto at any time by touching
Auto. Touch the
power button on the main climate controls screen to toggle on or
off. For quick access to common controls, touch <
or > to display the climate popup.
NOTE: The climate control system is powered by the high voltage Battery. Therefore, prolonged use decreases
driving range.
WARNING: To avoid burns resulting from prolonged use, individuals who have peripheral neuropathy, or whose
capacity to feel pain is limited because of diabetes, age, neurological injury, or some other condition, should
exercise caution when using the climate control system and seat heaters.
Adjusting Climate Control Settings
NOTE: Easily adjust your climate preferences, such as turning on the seat heater or changing the cabin temperature,
hands-free by using voice commands (see
Voice Commands on page 136).
NOTE: For one-touch access to seat heaters and defrosters, you can add these controls to My Apps. See
Customizing My Apps on page 8.
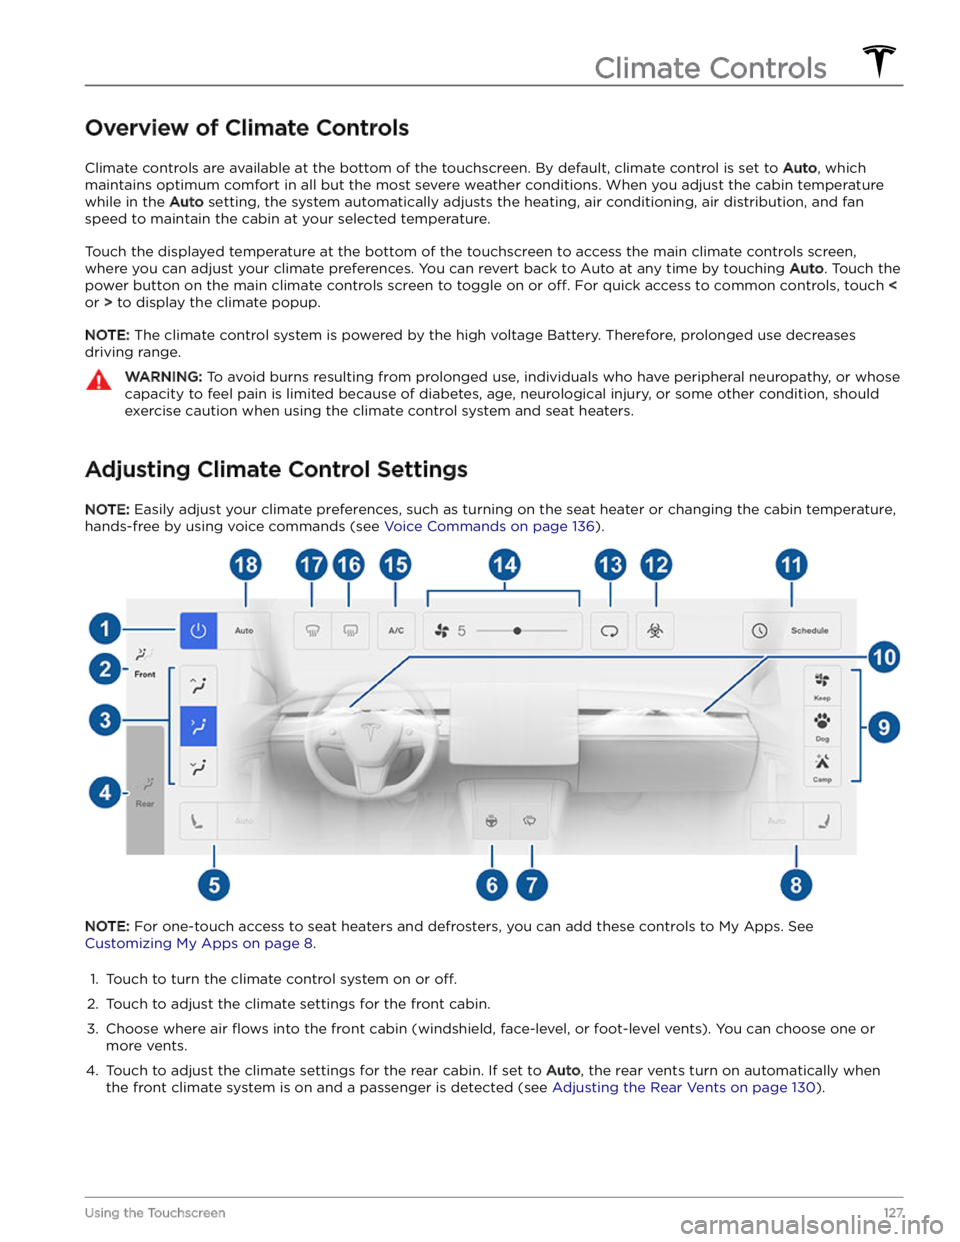
1.
Touch to turn the climate control system on or off.
2.
Touch to adjust the climate settings for the front cabin.
3.
Choose where air flows into the front cabin (windshield, face-level, or foot-level vents). You can choose one or
more vents.
4.
Touch to adjust the climate settings for the rear cabin. If set to Auto, the rear vents turn on automatically when
the front climate system is on and a passenger is detected (see Adjusting the Rear Vents on page 130).
Climate Controls
127Using the Touchscreen
Page 132 of 298

3. If necessary, adjust the climate settings.4.
On the climate controls screen, touch Keep Climate
On, Dog, or Camp.
NOTE: You can also control Dog and Camp from the
mobile app, by swiping up from the gray bar on the
Climate screen.
The climate control system attempts to maintain your climate settings until you shift out of Park or manually
turn it
off. Avoid using Keep Climate On, Dog, or Camp
when the Battery
Page 167 of 298

High Voltage Components
1.
High Voltage Cabling
2.
Heat Pump Assembly
3.
Front Motor (Dual Motor vehicles only)
4.
High Voltage Battery
5.
High Voltage Cabling
6.
Service Access Panel for High Voltage Components (Penthouse)
7.
Rear Motor
8.
High Voltage Busbars
9.
Charge Port
WARNING: The high voltage system has no user serviceable parts. Do not disassemble, remove or replace high
voltage components, cables or connectors. High voltage cables are typically colored orange for easy
identification.
WARNING: Read and follow all instructions provided on the labels that are attached to Model Y. These labels
are there for your safety.
WARNING: In the unlikely event that a fire occurs, immediately contact your local fire emergency responders.Charging Equipment
Charging equipment designed specifically to charge
your
Model Y is available from Tesla.
For information on the charging equipment available for
your region, go to http://shop.tesla.com.
Page 169 of 298

About the High Voltage Battery
Model Y has one of the most sophisticated battery
systems in the world. The most important way to preserve the high voltage Battery is to
LEAVE YOUR
VEHICLE PLUGGED IN when you are not using it. This is
particularly important if you are not planning to drive
Model Y for several weeks.
NOTE: When left idle and unplugged, your vehicle
periodically uses energy from the Battery for system
tests and recharging the
low voltage battery when
necessary.
There is no advantage to waiting until the Battery
Page 170 of 298

NOTE: Although Tesla recommends charging to 100% at
least once per week, remember that regenerative
braking is reduced while driving with a fully charged
battery. See
Regenerative Braking on page 66.
Submerged Vehicle
As with any electric vehicle, if your Tesla has been
exposed to
flooding, extreme weather events or has
otherwise been submerged in water (especially in salt water), treat it as if it
Page 173 of 298

NOTE: To prevent unauthorized unplugging of the
charge cable, the charge cable latch remains locked and
Model Y must be unlocked or able to recognize your
authenticated phone before you can disconnect the
charge cable.
To disconnect the charge cable:
1.
Press and hold the button on the connector handle to release the latch.
NOTE: You can also release the latch using the
lightning icon on the car status overview on the
touchscreen or mobile app, or by pressing and holding the rear trunk button on the key fob.
2.
Pull the connector from the charge port. The charge
port door automatically closes.
To disconnect the charge cable when using an adapter at a public charge station:
1.
Unlock Model Y.
2.
While holding the public charging handle in one hand and the adapter in the other hand, press and hold the button on the public charging handle and pull both
outwards, removing the handle and adapter at the same time.
NOTE: If the charging station handle separates from
the adapter, leaving the adapter in
Model Y, use the
touchscreen to unlock the charge port.
3.
Press and hold the button on the charging handle
again to release the adapter from the public charging handle.
NOTE: The charge port door automatically closes within
approximately 10 seconds of removing the connector from the charge port.
CAUTION: Tesla strongly recommends leaving
Model Y plugged in when not in use. This
maintains the Battery at the optimum level of
charge.
CAUTION: Model Y does not shift out of Park if the
charge port is unable to determine whether a
charging cable is plugged in. Ensure the charging
cable is unplugged and follow the instructions on
the touchscreen to proceed (see Park on page 56).
Charge Settings
Access charge settings by touching Controls > Charging
when Model Y is in Park. You can also touch the battery
icon on the touchscreen to access charge settings.
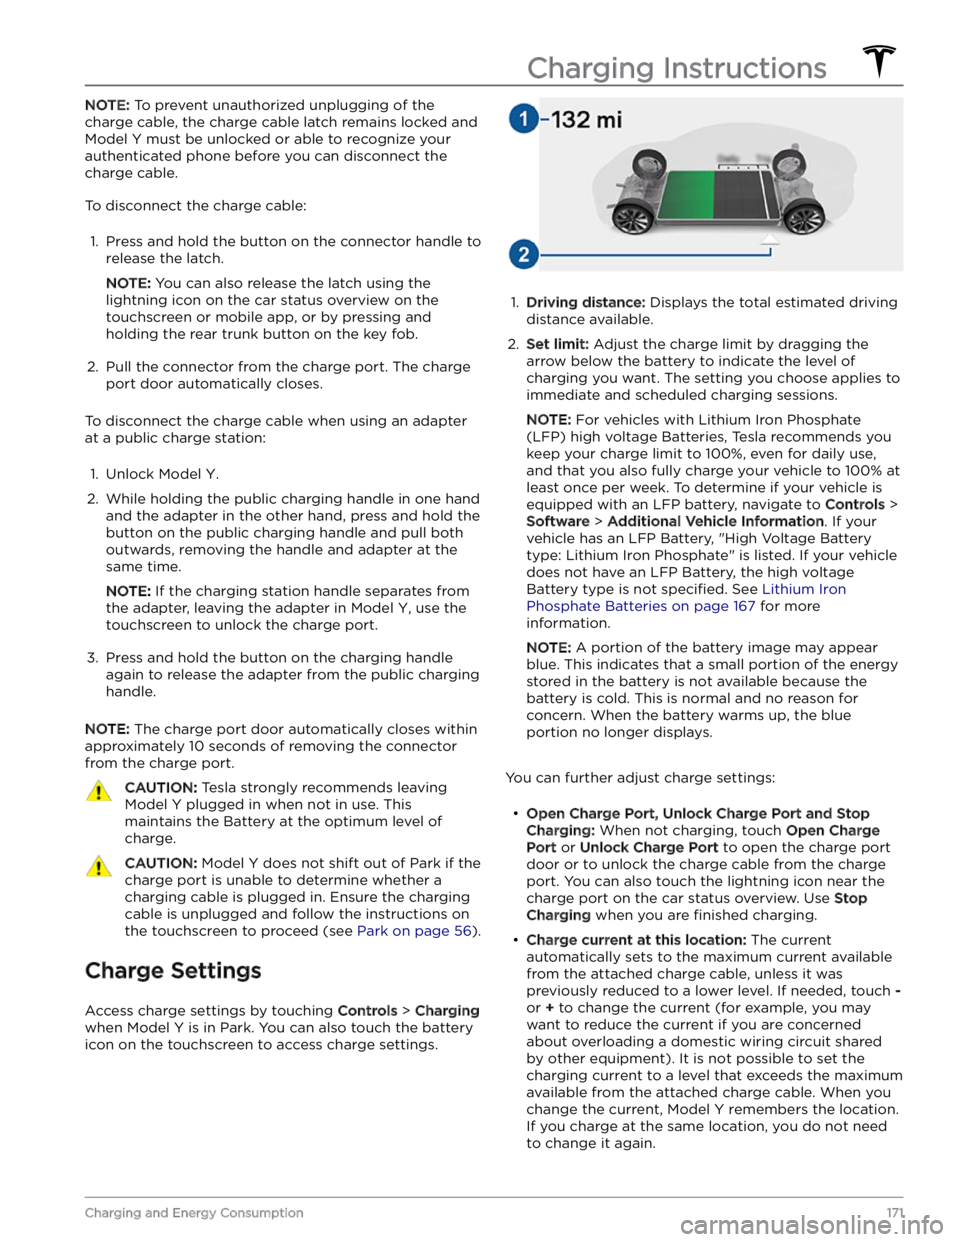
1.
Driving distance: Displays the total estimated driving
distance available.
2.
Set limit: Adjust the charge limit by dragging the
arrow below the battery to indicate the level of charging you want. The setting you choose applies to immediate and scheduled charging sessions.
NOTE: For vehicles with Lithium Iron Phosphate
(LFP) high voltage Batteries, Tesla recommends you keep your charge limit to 100%, even for daily use,
and that you also fully charge your vehicle to 100% at
least once per week. To determine if your vehicle is
equipped with an LFP battery, navigate to
Controls >
Software > Additional Vehicle Information. If your
vehicle has an LFP Battery, "High Voltage Battery type: Lithium Iron Phosphate" is listed. If your vehicle
does not have an LFP Battery, the high voltage Battery type is not
specified. See Lithium Iron
Phosphate Batteries on page 167 for more
information.
NOTE: A portion of the battery image may appear
blue. This indicates that a small portion of the energy
stored in the battery is not available because the battery is cold. This is normal and no reason for concern. When the battery warms up, the blue portion no longer displays.
You can further adjust charge settings:
Page 176 of 298

Toggle between Scheduled Departure and Scheduled Charging by touching
Controls > Charging > Switch to
Scheduled Charging/Scheduled Departure when Model
Y is in Park.
NOTE: Scheduled Charging/Scheduled Departure
settings are also available on the Climate Controls screen and in the Tesla mobile app.
Think of Scheduled Charging as "When do I want
charging to start?" and think of
Scheduled Departure
Off-Peak Charging which is "When do I want charging to
be complete?"
Scheduled Charging can be used together with
Scheduled Departure Preconditioning but not with
Scheduled Departure Off-Peak Charging.
Scheduled Charging/Scheduled Departure settings are
automatically saved for each location.
NOTE: If you plug in Model Y with both Off-Peak
Charging and Scheduled Charging deselected, your
vehicle charges immediately.
Using Scheduled Charging
Use Scheduled Charging to specify a daily time in which
you want
Model Y to start charging.
With Scheduled Charging selected, enable the feature
then set a daily time to start charging.
NOTE: Scheduled Charging starts charging immediately
if
Model Y is plugged in up to six hours after the
scheduled start time. However, if
Model Y is plugged in
after six hours of the scheduled charging time, charging may not start until the scheduled time on the next day.
Using Scheduled Departure
Use Scheduled Departure to set a daily time when you
want
Model Y to be ready to drive. Model Y
automatically calculates when it needs to start preconditioning and/or charging. This ensures that charging is complete and/or the cabin climate and Battery are preconditioned by your departure time.
When Scheduled Departure is displayed, touch
Schedule to set a daily time when you want Model Y to
be ready to drive. Specify a time, then touch
Settings to
enable one or both of the following departure features.
When plugging in with
Off-Peak Charging enabled, the
vehicle
briefly draws power (you may hear clicking) to
calculate the necessary charging start time.
After you