Page 119 of 296

Stop Signs and Road Markings
When driving with Autosteer or Traffic-aware Cruise Control engaged, and Traffic Light and Stop Sign Control
enabled,
Model X is designed to respond as follows when approaching intersections controlled by stop signs, stop
lines, or road markings:
Type of IntersectionVehicle Intended Response
No Traffic Control
Arm of T-junction
Model X assumes the right of way and continues straight without slowing down or
stopping.
End of T-junction
If Model X detects a T-junction based on the map data, Model X slows down and
comes to a complete stop at the red stop line displayed on the
instrument panel.
When you want to proceed, you must take over steering and acceleration.
WARNING: Model X may not stop at a T-junction that does not have a stop
sign or stop line, or if the T-junction is not included in the map data. Drive
attentively and be prepared to stop (when necessary and/or appropriate).
Stop Sign
Model X slows down and comes to a complete stop at the red stop line displayed on
the
instrument panel. When you want to proceed through the intersection, you must
briefly press the accelerator pedal.
NOTE: If you confirm that you want to proceed through an intersection controlled by
a stop sign by
briefly pressing the accelerator pedal before Model X has stopped,
your
confirmation is ignored. Model X is not designed to proceed through a stop
sign without stopping.
NOTE: Even when using Autosteer, and even if you have engaged a turn signal, you
must turn the
steering yoke (or steering wheel) yourself (which cancels Autosteer)
to complete a turn at an intersection.
Traffic Light and Stop Sign Control
117Autopilot
Page 123 of 296
To Pause Parking
To pause Autopark, press the brake pedal once. Model X
stops and remains stopped until you touch Resume on
the touchscreen.
To Cancel Parking
Autopark cancels the parking sequence when you
manually move the
steering yoke (or steering wheel),
shift, or touch
Cancel on the touchscreen. Autopark also
cancels parking when:
Page 149 of 296

to display detailed information about the dampers for each wheel, including ride height, compression and
rebound values, and body accelerations.
Auto-Raising Locations
Whenever you raise the suspension to High or Very
High, the location is automatically saved. By saving the
location, you do not need to manually raise the
suspension every time you arrive at a frequently-used location where you have previously raised the
suspension. When you return to the saved location,
Model X raises the suspension and the instrument panel
displays a message indicating that the suspension is being raised.
When saving locations, Model X also saves the Keep
until XX mph setting (if specified).
NOTE: When returning to a saved location and driving
faster than the
High and Very High suspension settings
allow, the suspension does not raise until
Model X slows
down.
NOTE: After leaving a saved location, the suspension
automatically lowers. However, it may not lower until
Model X meets the speed and distance threshold at
which the suspension lowers.
NOTE: If Model X reaches a saved location and the
existing suspension setting is already higher than the level that has been saved for that location, the ride height is not adjusted.
To remove an auto-raising location
If you do not want the suspension to automatically raise at a location, touch to deselect
Always raise at this
location in the popup that appears when you arrive at a
saved location.
Or, when using the Raise Suspension
shortcut on the main Controls window, touch to deselect
Location Saved.
Self-Leveling
Model X equipped with air suspension automatically
self-levels, even when power is
off. To prevent damage
when jacking or lifting the vehicle, you must activate
Jack Mode to disable self-leveling (press the brake pedal
and touch
Controls > Service > Jack Mode). For more
details, see
Jack Mode on page 202.
Air Suspension
147Using the Touchscreen
Page 174 of 296

USB Connected Flash Drives
Insert a flash drive into a front USB port (see USB Ports
on page 30). Touch Media Player > USB, and then touch
the name of the folder that contains the song you want to play. After you display the contents of a folder on the USB connected
flash drive, you can touch any song in
the list to play it. Or use the previous and next arrows in
Media Player to scroll through your songs. You can also
scroll to next/previous songs using the left scroll button on the
steering yoke (or steering wheel).
NOTE: To play media from a USB connection, Model X
recognizes flash drives only. To play media from other
types of devices (such as an iPod), you must connect the device using Bluetooth.
NOTE: Media Player supports USB flash drives with
exFAT formatting (NTFS is not currently supported).
NOTE: Use a USB port located at the front of the center
console. The USB connections at the rear of the console are for charging only.
Bluetooth Connected Devices
If you have a Bluetooth-capable device such as a phone that is paired and connected to
Model X (see Pairing a
Bluetooth Phone on page 143), you can play audio files
stored on it. Choose Media Player
Page 175 of 296
Overview
NOTE: Entertainment options vary by market region.
The touchscreen displays the Entertainment screen when you choose any of the following apps:
Theater: Play various video streaming services (such as Netflix, YouTube, Hulu, etc.) while parked.
Available only if
Model X is connected to WiFi, or is equipped with premium connectivity and a cellular
signal is available.
Arcade: Want to game? Depending on the game, you may need to use the steering yoke (or steering
wheel) buttons or a Bluetooth or USB controller to play. See Gaming Controllers on page 174.
Toybox: Play in the Toybox while parked.WARNING: Use these features only when Model X is parked. Always pay attention to road and traffic
conditions when driving. Using these features while driving is illegal and very dangerous.
NOTE: You can also use voice commands to access these features (see Voice Commands on page 148).
Toybox
Your vehicle
Page 194 of 296

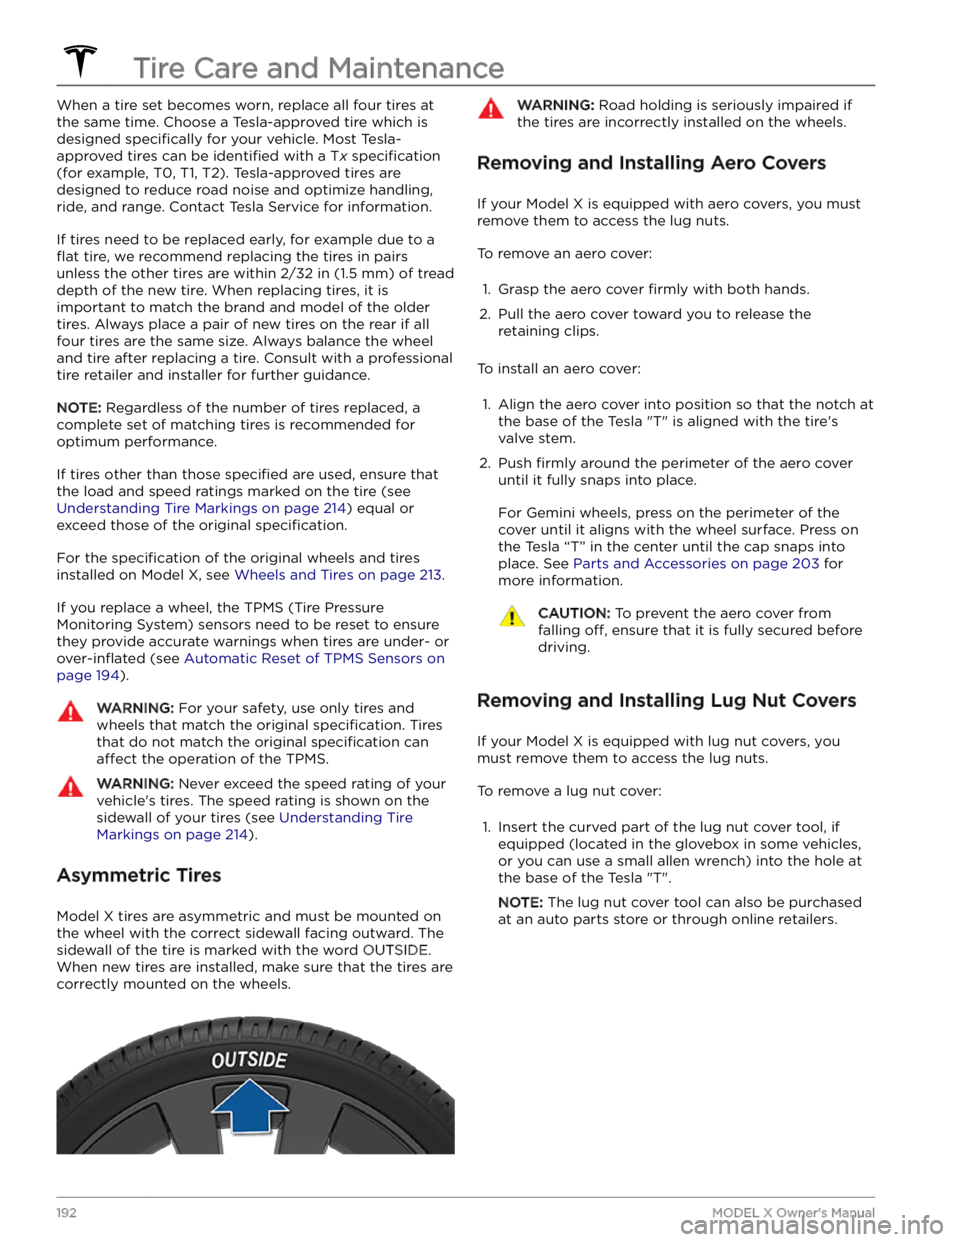
When a tire set becomes worn, replace all four tires at
the same time. Choose a Tesla-approved tire which is
designed
specifically for your vehicle. Most Tesla-
approved tires can be
identified with a Tx specification
(for example, T0, T1, T2). Tesla-approved tires are
designed to reduce road noise and optimize handling, ride, and range. Contact Tesla Service for information.
If tires need to be replaced early, for example due to a
flat tire, we recommend replacing the tires in pairs
unless the other tires are within
2/32 in (1.5 mm) of tread
depth of the new tire. When replacing tires, it is important to match the brand and model of the older
tires. Always place a pair of new tires on the rear if all four tires are the same size. Always balance the wheel and tire after replacing a tire. Consult with a professional tire retailer and installer for further guidance.
NOTE: Regardless of the number of tires replaced, a
complete set of matching tires is recommended for
optimum performance.
If tires other than those specified are used, ensure that
the load and speed ratings marked on the tire
(see
Understanding Tire Markings on page 214) equal or
exceed those of the original
specification.
For the specification of the original wheels and tires
installed on
Model X, see Wheels and Tires on page 213.
If you replace a wheel, the TPMS (Tire Pressure Monitoring System) sensors need to be reset to ensure they provide accurate warnings when tires are under-
or
over-inflated (see Automatic Reset of TPMS Sensors on
page 194).
WARNING: For your safety, use only tires and
wheels that match the original specification. Tires
that do not match the original specification can
affect the operation of the TPMS.
WARNING: Never exceed the speed rating of your
vehicle
Page 195 of 296
2.
Maneuver the lug nut cover tool so that it is fully inserted into the hole in the lug nut cover.
3.
Twist the lug nut cover tool so that the curved part is
touching the middle of the lug nut cover.
4.
Firmly pull the lug nut tool away from the wheel until the lug nut cover is released.
To install the lug nut cover:
1.
Align the lug nut cover into position.
2.
Push firmly on the lug nut cover until it fully snaps
into place.
CAUTION: Make sure the lug nut cover is fully
secure before driving to prevent it from falling
off.
Wheel Configuration
If you are installing new wheels or swapping them for
different ones, update your vehicle
Page 196 of 296
Automatic Reset of TPMS Sensors
After replacing one or more wheels (but not after replacing a tire or rotating wheels), the TPMS sensors are reset to ensure tire pressure warnings are accurate. TPMS sensors reset automatically after driving over
15 mph (25 km/h) for longer than 10 minutes.
NOTE: After replacing a wheel, false tire pressure
warnings may display before you