Page 131 of 296
NOTE: Depending on market region, vehicle
configuration, options purchased, and software version,
your vehicle may not be equipped with Dashcam or the
features may not operate exactly as described. It is your
sole responsibility to consult and comply with all local
regulations and property restrictions regarding the use
of cameras.
Dashcam records video footage of your vehicle
Page 133 of 296
NOTE: Depending on market region, vehicle
configuration, options purchased, and software version,
your vehicle may not be equipped with Sentry Mode or
the features may not operate exactly as described. It is
your sole responsibility to consult and comply with all
local regulations and property restrictions regarding the
use of cameras.
When enabled, your vehicle
Page 139 of 296

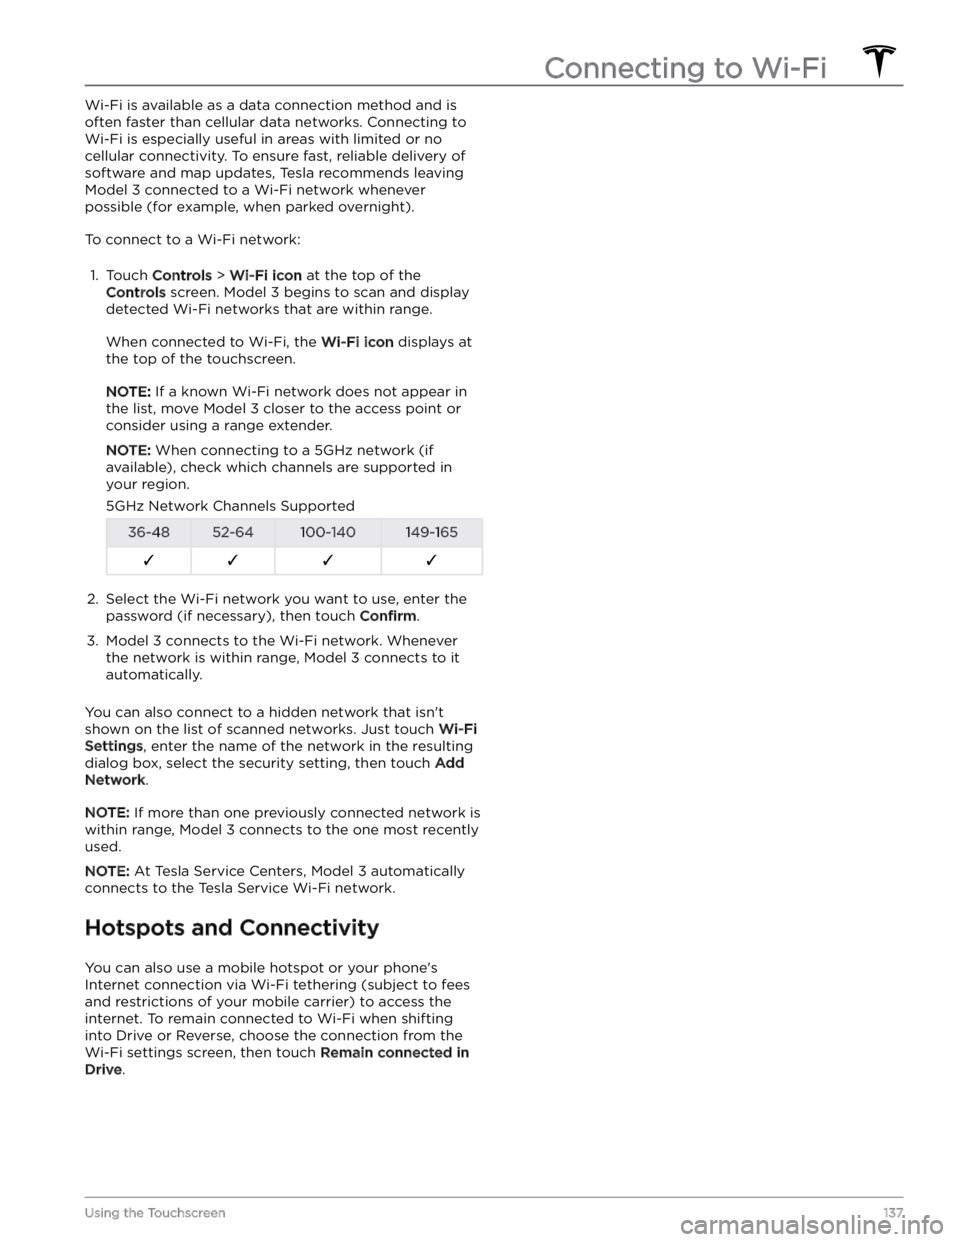
Wi-Fi is available as a data connection method and is often faster than cellular data networks. Connecting to Wi-Fi is especially useful in areas with limited or no
cellular connectivity. To ensure fast, reliable delivery of software and map updates, Tesla recommends leaving
Model 3 connected to a Wi-Fi network whenever
possible (for example, when parked overnight).
To connect to a Wi-Fi network:
1.
Touch Controls > Wi-Fi icon at the top of the
Controls screen. Model 3 begins to scan and display
detected Wi-Fi networks that are within range.
When connected to Wi-Fi, the Wi-Fi icon displays at
the top of the touchscreen.
NOTE: If a known Wi-Fi network does not appear in
the list, move
Model 3 closer to the access point or
consider using a range extender.
NOTE: When connecting to a 5GHz network (if
available), check which channels are supported in your region.
5GHz Network Channels Supported36-4852-64100-140149-165F�F�F�F�2.
Select the Wi-Fi network you want to use, enter the password (if necessary), then touch
Confirm.
3.
Model 3 connects to the Wi-Fi network. Whenever
the network is within range,
Model 3 connects to it
automatically.
You can also connect to a hidden network that isn
Page 147 of 296

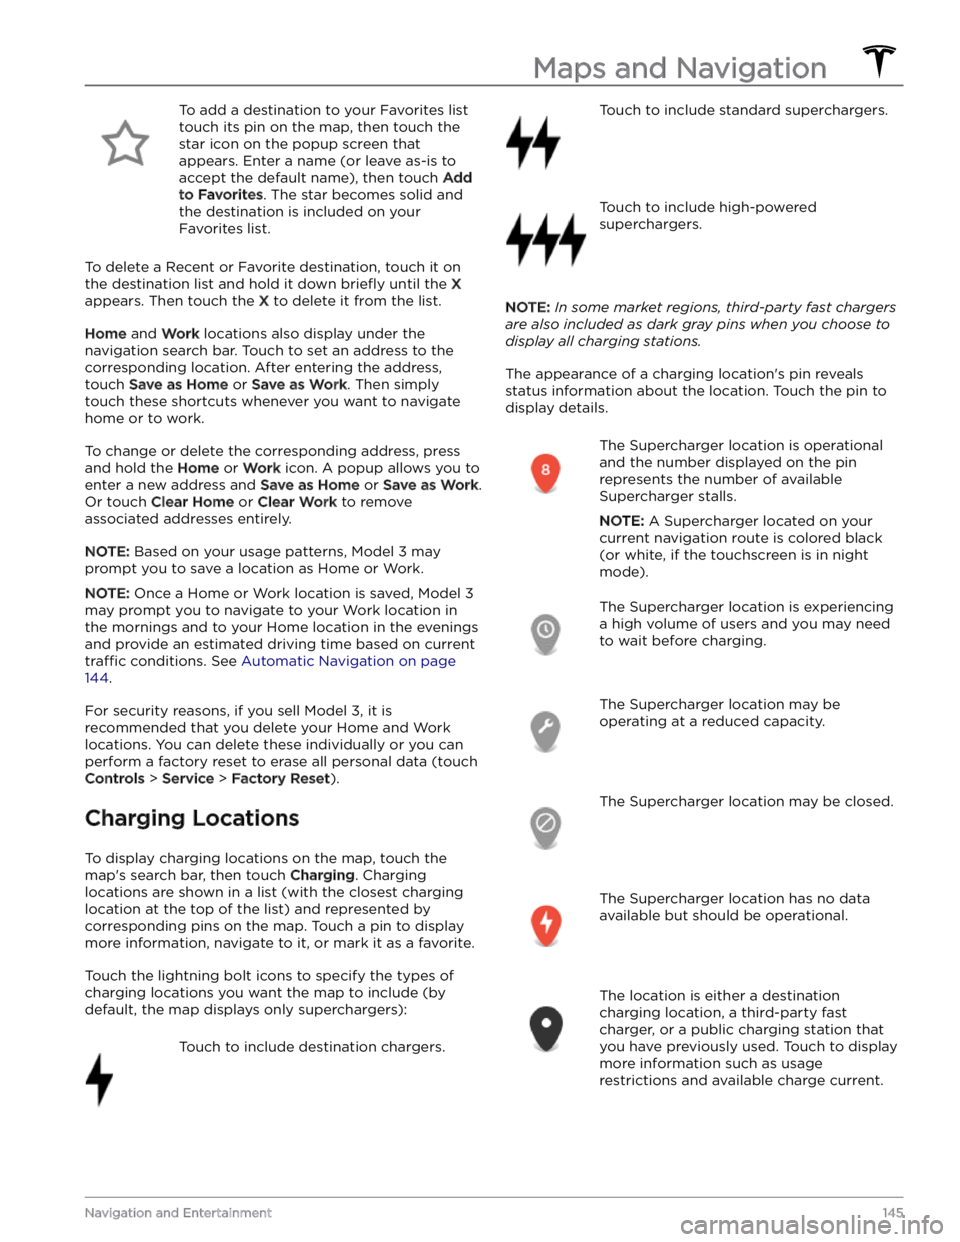
To add a destination to your Favorites list touch its pin on the map, then touch the star icon on the popup screen that
appears. Enter a name (or leave as-is to accept the default name), then touch
Add
to Favorites. The star becomes solid and
the destination is included on your
Favorites list.
To delete a Recent or Favorite destination, touch it on the destination list and hold it down
briefly until the X
appears. Then touch the X to delete it from the list.
Home and Work locations also display under the
navigation search bar. Touch to set an address to the corresponding location. After entering the address, touch
Save as Home or Save as Work. Then simply
touch these shortcuts whenever you want to navigate home or to work.
To change or delete the corresponding address, press
and hold the
Home or Work icon. A popup allows you to
enter a new address and
Save as Home or Save as Work.
Or touch
Clear Home or Clear Work to remove
associated addresses entirely.
NOTE: Based on your usage patterns, Model 3 may
prompt you to save a location as Home or Work.
NOTE: Once a Home or Work location is saved, Model 3
may prompt you to navigate to your Work location in
the mornings and to your Home location in the evenings
and provide an estimated driving time based on current
traffic conditions. See Automatic Navigation on page
144.
For security reasons, if you sell Model 3, it is
recommended that you delete your Home and Work
locations. You can delete these individually or you can perform a factory reset to erase all personal data (touch
Controls > Service > Factory Reset).
Charging Locations
To display charging locations on the map, touch the map
Page 156 of 296
High Voltage Components
1.
Heat Pump Assembly
2.
Front Motor (Dual Motor vehicles only)
3.
High Voltage Battery
4.
Service Access Panel for High Voltage Components (Penthouse)
5.
Rear Motor
6.
High Voltage Lines
7.
Charge Port
WARNING: The high voltage system has no user serviceable parts. Do not disassemble, remove or replace high
voltage components, cables or connectors. High voltage cables are typically colored orange for easy
identification.
WARNING: Read and follow all instructions provided on the labels that are attached to Model 3. These labels
are there for your safety.
WARNING: In the unlikely event that a fire occurs, immediately contact your local fire emergency responders.
Electric Vehicle Components
154MODEL 3 Owner
Page 159 of 296
NOTE: Although Tesla recommends charging to 100% at
least once per week, remember that regenerative
braking is reduced while driving with a fully charged
battery. See
Regenerative Braking on page 61.
Submerged Vehicle
As with any electric vehicle, if your Tesla has been
exposed to
flooding, extreme weather events or has
otherwise been submerged in water (especially in salt water), treat it as if it
Page 176 of 296
Installation:
1.
Remove the protective caps from the positive (+) and negative (-) posts on the new low voltage lead-acid battery.
2.
Carefully place the new lead-acid battery in the vehicle, taking care not to damage nearby
components.
3.
Install the low voltage lead-acid battery hold down
and use a 10mm socket to tighten the nut that secures it to the battery. Torque the nut to 6 Nm (4.4
ft-lb).
4.
Reconnect the first responder loop.
5.
Reconnect the positive (+) terminal by positioning
the terminal clamp over the terminal post. Using a 10mm socket, torque the nut to 6 Nm (4.4 ft-lb). Reinstall the positive (+) terminal cover.
6.
Reconnect the negative (-) terminal by positioning
the terminal clamp over the connector. Using a 10mm socket, torque the nut to 6 Nm (4.4 ft-lb).
7.
Connect the vent tube hose into the negative (-) terminal side of the low voltage lead-acid battery.
Maintenance Service Intervals
174MODEL 3 Owner
Page 185 of 296

Cleaning the Exterior
To prevent damage to the paint, immediately remove
corrosive substances (bird droppings, tree resin, dead insects, tar spots, road salt, industrial fallout, etc.). Do not wait until
Model 3 is due for a complete wash. If
necessary, use denatured alcohol to remove tar spots
and stubborn grease stains, then immediately wash the area with water and a mild, non-detergent soap to remove the alcohol.
Keep the exterior cameras free of dirt, condensation, or obstructions. These substances can cause unclear pictures or Autopilot and safety features to stop working (see
Cleaning a Camera on page 183).
Follow these steps when washing the exterior of Model
3:
1.
Rinse Thoroughly
Before washing, flush grime and grit from the vehicle
using a hose. Flush away accumulations of mud in areas where debris easily collects (such as wheel wells and panel seams). If salt has been used on the highways (such as during winter months), thoroughly
rinse all traces of road salt from the underside of the
vehicle, wheel wells, and brakes.
2.
Hand Wash
Hand wash Model 3 using a clean soft cloth and cold
or lukewarm water containing a mild, high-quality car shampoo.
CAUTION: Some cleaners and car shampoos
contain chemicals that can cause damage or
discoloration, especially to plastic trim pieces,
lamps, or camera lenses. For example, some car
cleaning formulas contain hydroxide or other
highly alkaline or caustic ingredients that can
damage exterior components. Damage or
discoloration resulting from cleaning products
is not covered by the warranty.
3.
Rinse with Clean Water
After washing, rinse with clean water to prevent soap from drying on the surfaces.
4.
Dry Thoroughly and Clean Exterior Glass
After washing and rinsing, dry thoroughly with a chamois. If necessary, dry the brakes by going on a
short drive and applying the brakes multiple times.
Window Cleaning and Treatments
Clean windows and mirrors using an automotive glass
cleaner. Do not scrape or use any abrasive cleaning
fluid
on glass or mirrored surfaces. Follow the directions in
Cleaning the Exterior on page 183 for best practices in
cleaning the exterior glass.
To add a hydrophobic coating to your vehicle