2023 SUBARU SOLTERRA brake light
[x] Cancel search: brake lightPage 364 of 628

3645-4. Using the driving support systems
Owners Manual_USA_M42C01_en
■Function description
When exiting from a parallel
parking space, if the system
determines that exit is possible
the parallel exiting function can
be used. Also, depending on the
surrounding environment, if it is
necessary to change the direc- tion of travel of the vehicle, the
shift position can be changed by
assistance control.
■Leaving a parking space
using the parallel exiting
function
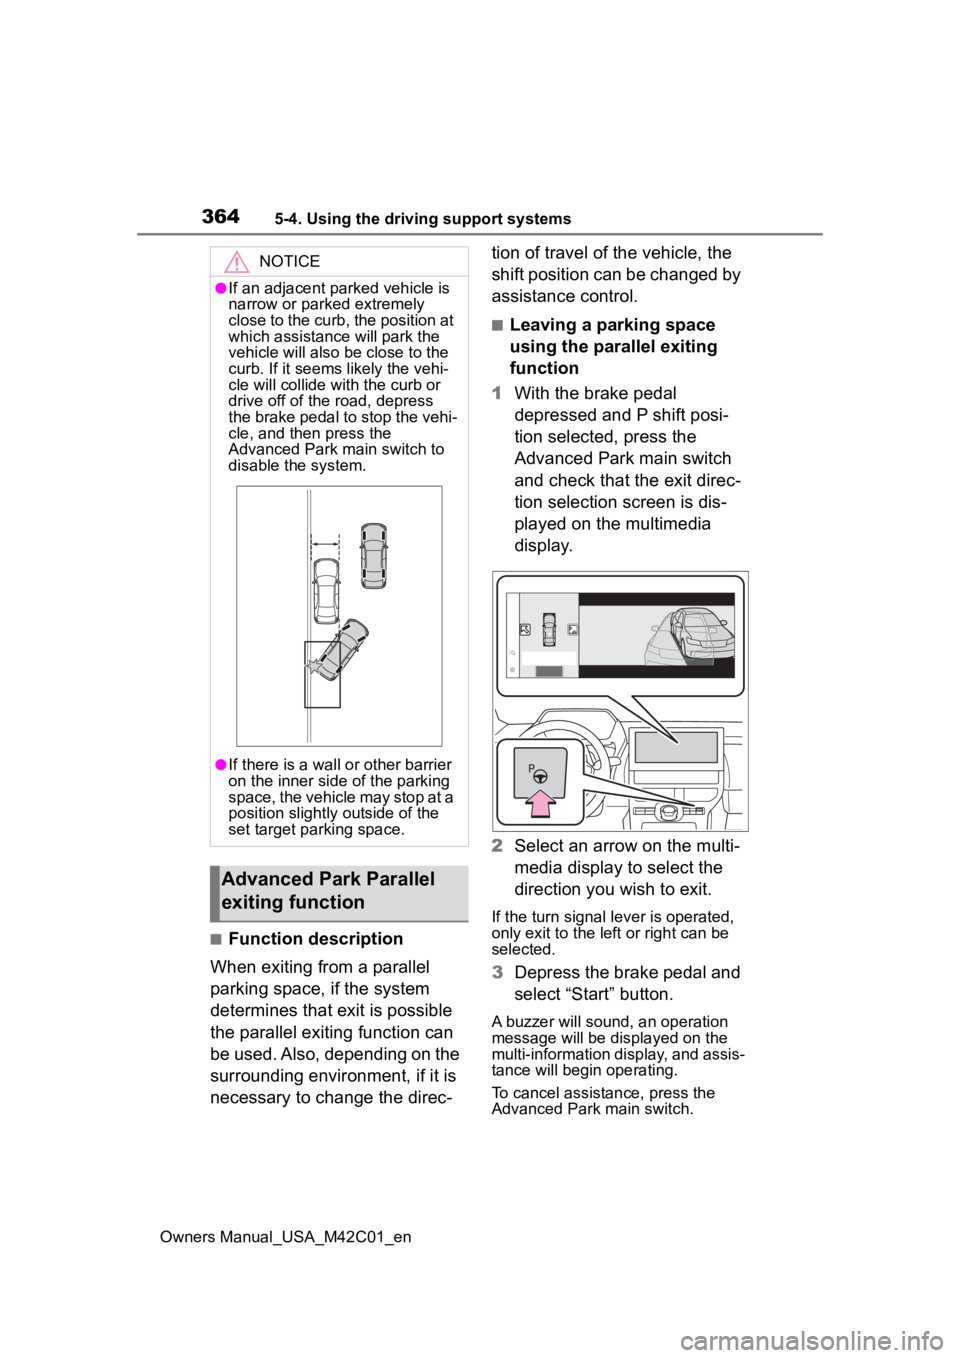
1 With the brake pedal
depressed and P shift posi-
tion selected, press the
Advanced Park main switch
and check that the exit direc-
tion selection screen is dis-
played on the multimedia
display.
2 Select an arrow on the multi-
media display to select the
direction you wish to exit.
If the turn signal lever is operated,
only exit to the left or right can be
selected.
3Depress the brake pedal and
select “Start” button.
A buzzer will sound, an operation
message will be displayed on the
multi-information display, and assis-
tance will begin operating.
To cancel assistance, press the
Advanced Park main switch.
NOTICE
●If an adjacent parked vehicle is
narrow or parked extremely
close to the curb, the position at
which assistance will park the
vehicle will also be close to the
curb. If it seems likely the vehi-
cle will collide with the curb or
drive off of the road, depress
the brake pedal to stop the vehi-
cle, and then press the
Advanced Park main switch to
disable the system.
●If there is a wall or other barrier
on the inner side of the parking
space, the vehicle may stop at a
position slightly outside of the
set target parking space.
Advanced Park Parallel
exiting function
Page 384 of 628

3845-4. Using the driving support systems
Owners Manual_USA_M42C01_en
■When “X-MODE” is not avail-
able
In the following cases, the system
does not operate.
• When the EV system is not started
• When SNOW/DIRT mode or D.SNOW/MUD mode is not
selected
• When Regeneration Boost is selected
• When Advanced Park is being used
• When the EV system is malfunc- tioning
■About Dynamic Radar Cruise
Control or Cruise Control
Dynamic radar cruise control and
cruise control cannot be used during
“X-MODE”. If dynamic radar cruise
control or cruise control are being
used, it will be automatically can-
celed.
■During “X-MODE”
• In “X-MODE”, VSC does not switch ON/OFF even if the VSC
OFF switch is operated. It is fixed
as ON in SNOW/DIRT mode and
OFF in D.SNOW/MUD mode.
• During “X-MODE”, even if the Eco mode switch or regeneration
boost switch is operated, opera-
tions will not switch to the respec-
tive modes.
■“X-MODE” Automatic Release
• “X-MODE” is automatically can- celed when the po wer switch is
turned OFF.
• When the vehicle speed exceeds about 25 mph (40 km/h), the X-
MODE is canceled, the “X-MODE”
indicator on the meter lights up in
white, and switches to the normal
mode.
• When the vehicle speed is approximately 22 mph (35 km/h)
or less, “X-MODE” indicator lights
up in green and switches to X- MODE again.
■Cautions regarding the use of
the system
For safety, the fo llowing operations
are not accepted when “X-MODE” is
ON.
• Eco mode switch operations
• Regeneration Boost switch opera- tions
When the “X-MODE” switch is
pressed and SNOW/DIRT mode
or D.SNOW/MUD mode is
selected, the Downhill Assist
Control automatically enters the
standby state and operates
under the following conditions.
• When the vehicle speed is
approximately 18 mph (30
km/h) or less
• Neither the accelerator pedal or brake pedal are not oper-
ated
■When changing the target vehi-
cle speed
When changing the target vehicle
speed, adjust it with the accelerator
pedal or the brake pedal. When the
foot is removed from the pedal, the
system will operate at the vehicle
speed at that time.
■Downhill Assist Control during
“X-MODE”
• In SNOW/DIRT mode or D.SNOW/MUD mode, the down-
hill assist control can be set to
standby state. The operation indi-
cator changes depending on the
operating status of the downhill
When selecting “X-
MODE”, Downhill Assist
Control
Page 385 of 628

3855-4. Using the driving support systems
Owners Manual_USA_M42C01_en
5
Driving
assist control.
• When the system is not operating, the indicator turns on white.
■When Downhill Assist Control
is not available when selecting
“X-MODE”
In the following cases, the system
does not operate.
• When SNOW/DIRT mode or D.SNOW/MUD mode is not
selected
• When the shift position is in P
• When the Grip Control is operat- ing
• When the brake system or EV system is malfunctioning
With SNOW/DIRT mode or
D.SNOW/MUD mode selected,
press down on the Grip Control
switch.
At this time, the downhill assist
control system indicator turns off
and the Grip Control indicator
turns on.
When the vehicle is stopped,
press the brake pedal firmly and
operate the switch. The vehicle
may start moving unintentionally
on an incline.
■Set the speed of the Grip
Control
Press the Grip Control switch up
or down to set the desired
speed (approximately 2 to 6
mph [2 to 10 km/h]). The set
speed is shown on the multi-
information display. Increase Speed
Decrease Speed
Indicator Lights
■Grip Control Operations
During system operations, the
Grip Control indicator turns on
green. If the Grip Control indica-
tor is white, release the brake
pedal to activate the system.
While the system is operating,
the accelerator pedal and brake
pedal can be used to temporar-
ily accelerate or decelerate. If
operating the accelerator pedal
or brake pedal is stopped, the
speed will return to the set
speed.
■When Grip Control is
released
• Press the “X-MODE” Switch
When the Grip Control is released,
the Grip Control operation light
turns off, and af ter a while, the
downhill assist control system indi-
cator light turns on.
When using Grip Control
Page 388 of 628

3885-4. Using the driving support systems
Owners Manual_USA_M42C01_en
■The Secondary Collision
Brake
When the SRS airbag sensor
detects a collision and the sys-
tem operates, the brakes and
brake lights are automatically
controlled to reduce the vehicle
speed and help reduce the pos-
sibility of further damage due to
a secondary collision.
■When the
TRAC/VSC/ABS/Trailer Sway
Control systems are operating
The slip indicator light will flash
while the TRAC/VSC/ABS/Trailer
Sway Control systems are operat-
ing.
■Disabling the TRAC system
If the vehicle gets stuck in mud, dirt
or snow, the TRAC system may
reduce power from the EV system to
the wheels.
Pressing to turn the system off
may make it easier for you to rock
the vehicle in order to free it.
To turn the TRAC system off, quickly
press and release .
The “Traction Control Turned OFF”
will be shown on the multi-informa-
tion display.
Press again to t urn the system
back on.
■Turning off both TRAC, VSC
and Trailer Sway Control sys-
tems
To turn the TRAC/VSC/Trailer Sway
Control systems off, press and hold for more than 3 seconds while
the vehicle is stopped.
The VSC OFF indicator light will
come on and the “Traction Control
Turned OFF” will be shown on the
multi-information display.
*
Press again to turn the systems
back on.
*: PCS (Pre-Collision System) will also be disabled (only pre-collision
warning is available). The PCS
warning light will come on and a
message will be disp layed on the
multi-information display.
( P.270)
■When the message is dis-
played on the multi-information
display showing that TRAC has
been disabled even if has
not been pressed
TRAC is temporary deactivated. If
the information continues to show,
contact your Toyota dealer.
■Operating conditions of hill-
start assist control
When all of the fo llowing conditions
are met, the hill-star t assist control
will operate:
●The shift position is in a position
other than P or N (when starting
off forward/backward on an
Page 391 of 628

3915-4. Using the driving support systems
Owners Manual_USA_M42C01_en
5
Driving
WARNING
●Unlike the parking brake, hill-
start assist control is not
intended to hold the vehicle sta-
tionary for an extended period
of time. Do not attempt to use
hill-start assist control to hold
the vehicle on an incline, as
doing so may lead to an acci-
dent.
■When the
TRAC/ABS/VSC/Trailer Sway
Control is activated
The slip indicator light flashes.
Always drive carefully. Reckless
driving may cause an accident.
Exercise particular care when the
indicator light flashes.
■When the TRAC/VSC/Trailer
Sway Control systems are
turned off
Be especially careful and drive at
a speed appropriate to the road
conditions. As these are the sys-
tems to help ensure vehicle stabil-
ity and driving force, do not turn
the TRAC/VSC/Trailer Sway Con-
trol systems off unless necessary.
Trailer Sway Control is part of the
VSC system and will not operate
if VSC is turned off or experiences
a malfunction.
■Replacing tires
Make sure that all tires are of the
specified size, brand, tread pat-
tern and total load capacity. In
addition, make sure that the tires
are inflated to the recommended
tire inflation pressure level.
The ABS, TRAC, VSC and Trailer
Sway Control systems will not
function correctly if different tires
are installed on the vehicle.
Contact your Toyota dealer for fur-
ther information when replacing
tires or wheels.
■Handling of tires and the sus-
pension
Using tires with any kind of prob-
lem or modifying the suspension
will affect the driving assist sys-
tems, and may cause a system to
malfunction.
■Trailer Sway Control precau-
tion
The Trailer Sway Control system
is not able to red uce trailer sway
in all situations. Depending on
many factors such as the condi-
tions of the vehicle, trailer, road
surface and driving environment,
the Trailer Sway Control system
may not be effective. Refer to
your trailer owner’s manual for
information on how to tow your
trailer properly.
■If trailer sway occurs
Observe the following precau-
tions.
Failing to do so may cause death
or serious injury.
●Firmly grip the steering wheel.
Steer straight ahead. Do not try
to control trailer swaying by
turning the steering wheel.
●Begin releasing the accelerator
pedal immediately but very
gradually to reduce speed.
Do not increase speed. Do not
apply vehicle brakes.
If you make no extreme correction
with the steering or brakes, your
vehicle and traile r should stabi-
lize. ( P.229)
Page 394 of 628

3945-5. Driving tips
Owners Manual_USA_M42C01_en
to the driving conditions:
Do not try to forcibly open a
window or move a wiper that
is frozen. Pour warm water
over the frozen area to melt
the ice. Wipe away the water
immediately to prevent it from
freezing.
To ensure proper operation of
the climate control system
fan, remove any snow that
has accumulated on the air
inlet vents in front of the wind-
shield.
Check for and remove any
excess ice or snow that may
have accumulated on the
exterior lights, vehicle’s roof,
chassis, around the tires or on
the brakes.
Remove any snow or mud
from the bottom of your shoes
before getting in the vehicle.
Accelerate the vehicle slowly,
keep a safe distance between
you and the vehicle ahead, and
drive at a reduced speed suit-
able to road conditions.
Turn automatic mode of the
parking brake off. Otherwise,
the parking brake may freeze
and not be able to be
released automatically. Also, avoid using the following
as the parking brake may
operate automatically, even if
automatic mode is off.
• Brake hold system
• Remote parking function
Park the vehicle and shift the
shift position to P without set-
ting the parking brake. The
parking brake may freeze up,
preventing it from being
released. If the vehicle is
parked without setting the
parking brake, make sure to
block the wheels.
Failure to do so may be dan-
gerous because it may cause
the vehicle to move unexpect-
edly, possibly leading to an
accident.
When the parking brake is in
automatic mode, release the
parking brake after shifting
the shift position to P.
( P.244)
If the vehicle is parked without
setting the parking brake,
confirm that the shift position
cannot be moved out of P.
If the vehicle is left parked
with the brakes damp in cold
temperatures, there is a pos-
sibility of the brakes freezing.
When driving the vehicle
When parking the vehicle
Page 457 of 628

4577-2. Maintenance
Owners Manual_USA_M42C01_en
7
Maintenance and care
Radiator/con-
denser
The radiator and
condenser should
be free from for-
eign objects.
( P.466)
Washer fluid
Is there sufficient
washer fluid?
( P.471)
Vehicle interior
ItemsCheck points
Accelerator
pedal
• The accelerator
pedal should
move smoothly
(without uneven
pedal effort or
catching).
Transmission
“Park” mecha-
nism
• When parked on a slope and the
shift position is in
P, is the vehicle
securely
stopped?
Brake pedal
• Does the brake pedal move
smoothly?
• Does the brake pedal have
appropriate
clearance from
the floor?
• Does the brake pedal have the
correct amount
of free play?
ItemsCheck points
Brakes
• The vehicle should not pull to
one side when
the brakes are
applied.
• The brakes should work
effectively.
• The brake pedal should not feel
spongy.
• The brake pedal should not get
too close to the
floor when the
brakes are
applied.
Head
restraints
• Do the head restraints move
smoothly and
lock securely?
Indica-
tors/buzzers
• Do the indica-tors and buzzers
function prop-
erly?
Lights
• Do all the lights come on?
• Are the head- lights aimed cor-
rectly?
Parking brake
• Does the park-ing brake oper-
ate normally?
• When parked on a slope and the
parking brake is
on, is the vehicle
securely
stopped?
ItemsCheck points
Page 468 of 628

4687-3. Do-it-yourself maintenance
Owners Manual_USA_M42C01_en
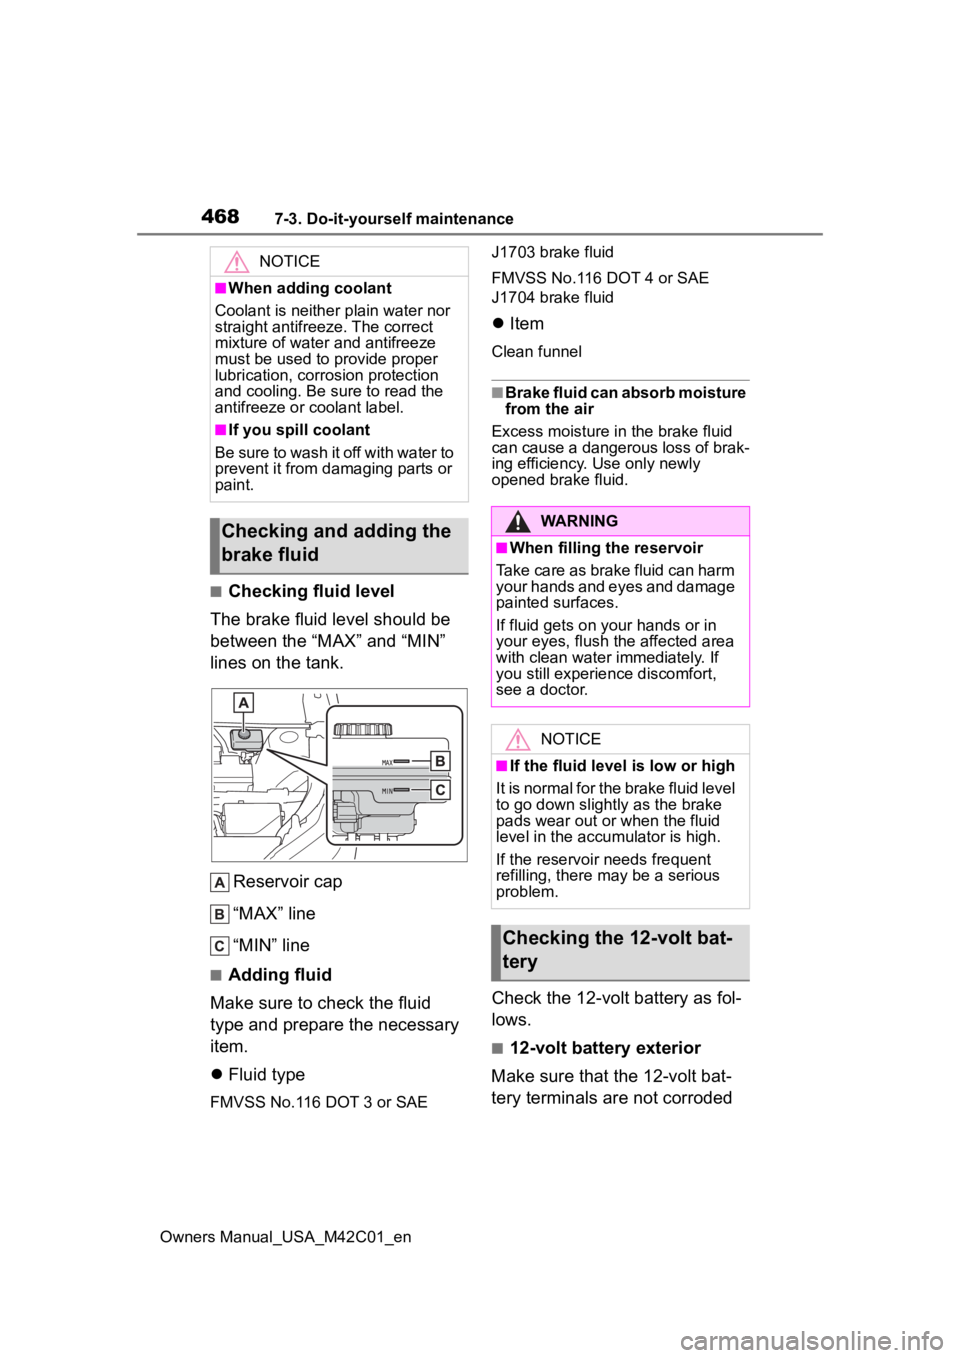
■Checking fluid level
The brake fluid level should be
between the “MAX” and “MIN”
lines on the tank.
Reservoir cap
“MAX” line
“MIN” line
■Adding fluid
Make sure to check the fluid
type and prepare the necessary
item.
Fluid type
FMVSS No.116 DOT 3 or SAE J1703 brake fluid
FMVSS No.116 DOT 4 or SAE
J1704 brake fluid
Item
Clean funnel
■Brake fluid can absorb moisture
from the air
Excess moisture in the brake fluid
can cause a dangerous loss of brak-
ing efficiency. Use only newly
opened brake fluid.
Check the 12-volt battery as fol-
lows.
■12-volt battery exterior
Make sure that the 12-volt bat-
tery terminals are not corroded
NOTICE
■When adding coolant
Coolant is neither plain water nor
straight antifreeze. The correct
mixture of water and antifreeze
must be used to provide proper
lubrication, corrosion protection
and cooling. Be sure to read the
antifreeze or coolant label.
■If you spill coolant
Be sure to wash it off with water to
prevent it from d amaging parts or
paint.
Checking and adding the
brake fluidWARNING
■When filling the reservoir
Take care as brake fluid can harm
your hands and eyes and damage
painted surfaces.
If fluid gets on your hands or in
your eyes, flush the affected area
with clean water immediately. If
you still experience discomfort,
see a doctor.
NOTICE
■If the fluid level is low or high
It is normal for the brake fluid level
to go down slight ly as the brake
pads wear out or when the fluid
level in the accumulator is high.
If the reservoir needs frequent
refilling, there m ay be a serious
problem.
Checking the 12-volt bat-
tery