2023 SUBARU SOLTERRA check
[x] Cancel search: checkPage 100 of 628

1002-2. Charging
Owners Manual_USA_M42C01_enminate when the tr
action battery
cooler is on standby or operating.
●When the charge level of the trac-
tion battery is low, the traction bat-
tery cooler may n ot operate, even
if the temperature of the traction
battery is high.
●When the following conditions are
met while the trac tion battery
cooler is operating, the cooling
operation will stop.
• The hood is opened
• The power switch is turned to ACC or ON.
• The shift position is changed to any position other than P
• The Remote Air Conditioning Sys- tem is operated ( P.409)
• The remaining charge of the trac-
tion battery drops below a certain
amount
●The traction battery cooler oper-
ates using power s upplied by the
traction battery and an external
power source.
• While the traction battery cooler is
operating, the charge of the trac-
tion battery will increase and
decrease within a certain range,
and will not increase as during AC
charging.
• When the traction battery cooler operates, charger will recognize it
as the battery being charged. If
this function ope rates while a
charger which charges a charging
fee is connected to the vehicle,
AC charging fees will apply.
■Changing of the traction battery
cooler setting
Setting can be changed on the
multi-information display.
Use the meter control switches
( P.156) and select “Vehicle Set-
tings”, “Charging Se ttings”, “Battery
Cooler”, and change the setting.
When selecting to off, the traction
battery output may be restricted
depending on the driving situation.
To enable the use of battery
electric vehicle, we recommend
systematically charging the
vehicle.
■Before leaving home
In order to use the battery elec-
tric vehicle, charge the traction
battery at home before leaving.
■On the way to the destina-
tion or at the destination
When the remaining charge of
the traction battery gets low,
recharge the battery at the near-
est charging station.
Charging tips
This section explains meth-
ods for using the charging
function for this vehicle and
checking information
related to charging.
Systematically charging
Page 101 of 628

1012-2. Charging
Owners Manual_USA_M42C01_en
2
Electric Vehicle system
Information related to charging
is displayed and can be checked
on the multi-information display.
■While charging
When any door is opened during
charging with the power switch
off, the current charging condi-
tion and approximate time
remaining until charging is com-
plete are displayed for a certain
period of time.
The actual charging time may
differ depending on conditions
such as the remaining capacity
of the traction battery, outside
temperature, and specifications
of the AC/DC charger.
The time until charging com-
pleted may not be displayed if
the charging current to the trac-
tion battery becomes smaller
and the charging time becomes
longer.
■After charging is complete
When any door is opened with
the power switch off after
charging is complete, a mes-
sage detailing the results of the
charging is displayed for a while.
Also, a message is displayed if
an operation that stops charging
is performed or a situation
where charging cannot be per-
formed occurs.
When a message is displayed,
follow the instructions displayed
on the screen. ( P.140)Checking information
related to charging
Page 103 of 628

1032-2. Charging
Owners Manual_USA_M42C01_en
2
Electric Vehicle system
Before charging, always check
the following items.
The parking brake is applied.
( P.243)
The power switch is turned to
OFF. ( P.231)
Lights such as the headlights,
emergency flashers and inte-
rior lights, etc. are turned off.
If these light switches are turned
on, then these features will con-
sume electricity, and charging time
will increase.
Before charging, make sure that
each part of the AC charging
cable is in good condition.
( P.92)
■During charging
●The charging starting time may
differ depending on the state of
the vehicle, but this does not indi-
cate a malfunction.
●During charging, sounds may be
heard from near the traction bat-
tery in accordance with the opera-
tion of the air conditioning system
or “Battery Cooler” ( P.99).
●During and after charging, the motor compartment and its sur-
rounding area in which the
onboard traction battery charger is
installed may get warm.
●The surface of the CCID
(Charging Circuit Interrupting
Device) may become hot, but this
does not indicate a malfunction.
●Depending on radio wave condi-
tions, interference may be heard
on the radio.
■When charging using a public
charging facility
●When charging using a public
charging facility, check the setting
of the charging schedule function.
• When the charging schedule is registered, temporarily turn off the
function or turn “ Charge Now” on.
( P. 1 1 9 )
• When the charging schedule is set to on, charging will not start even
if the AC charging cable is con-
nected. Also, charging fee may
occur due to connection of the AC
charging cable.
■Capacity reduction of the trac-
tion battery
The capacity of the traction battery
will decline gradually when the trac-
tion battery is in use. The rate at
which it declines will differ in accor-
dance with environmental conditions
and the way in which the vehicle is
used. Observing the following can
help suppress the decline in the
traction battery capacity.
●Avoid parking the vehicle in high
temperature areas, under direct
sunlight when the traction battery
is fully charged.
●Avoid accelerating and decelerat-
ing frequently and suddenly.
●Avoid frequent d riving at high
speed.
●Use the charging schedule func-
tion as much as possible in order
to fully charged the traction bat-
tery before starting off. ( P. 1 1 8 )
NOTICE
●When charging with a charger,
follow the procedures for using
each charger.
Confirm the following
before charging
Inspecting the AC
charging cable
Page 105 of 628
1052-2. Charging
Owners Manual_USA_M42C01_en
2
Electric Vehicle system
■Charging electricity
This vehicle can be charged up to
approximately 7 kW.
However, depending on the used
charger or AC charging cable,
charging electrici ty may be limited.How to use AC
charging
This section explains the
procedure for charging the
traction battery with an AC
charging cable.
When using an AC charger,
make sure to check the
operation instructions of
the AC charger.
When the charging sched-
ule is registered, make sure
“Charge Now” is turned on
before charging. ( P.124,
128)
NOTICE
■When using the AC charging
cable and related parts
To prevent damage to the AC
charging cable and related parts,
observe the following precautions.
●When interrupting or canceling
charging, remove the charging
connector before removing the
plug.
●When removing the AC
charging cable, check that the
charging connector is unlocked.
●Do not forcefully pull the
charging connector cap and AC
charging inlet cap.
●Do not apply a vibration to the
charging connector while
charging. Charging may be
stopped.
●Do not insert anything but the
charging connector into the AC
charging inlet.
Page 106 of 628
1062-2. Charging
Owners Manual_USA_M42C01_en
P.102
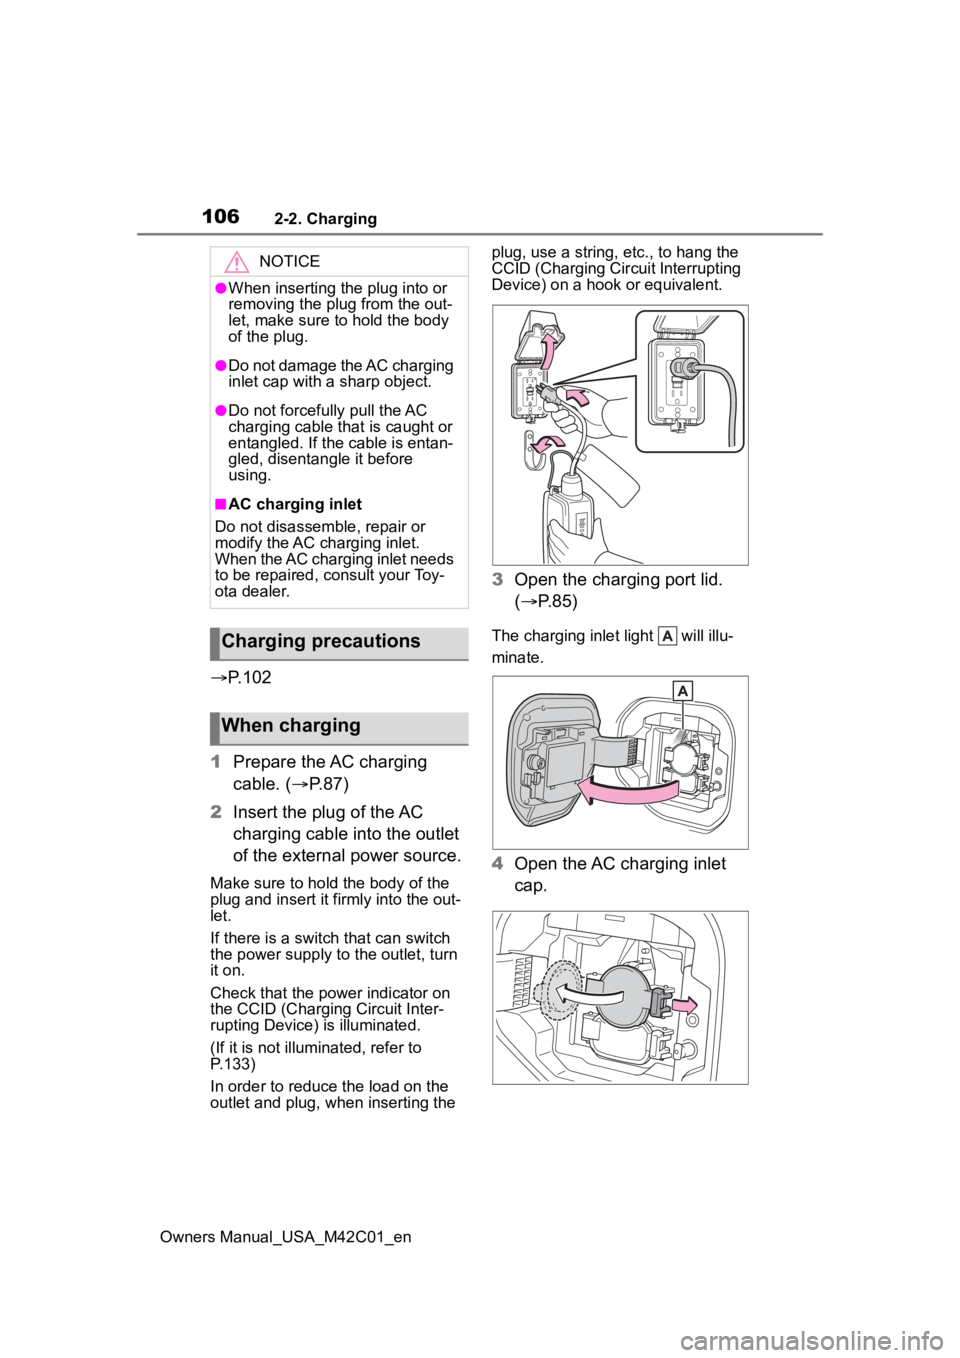
1 Prepare the AC charging
cable. ( P.87)
2 Insert the plug of the AC
charging cable into the outlet
of the external power source.
Make sure to hold the body of the
plug and insert it firmly into the out-
let.
If there is a switch that can switch
the power supply to the outlet, turn
it on.
Check that the power indicator on
the CCID (Charging Circuit Inter-
rupting Device) is illuminated.
(If it is not illuminated, refer to
P.133)
In order to reduce the load on the
outlet and plug, when inserting the plug, use a string, e
tc., to hang the
CCID (Charging Cir cuit Interrupting
Device) on a hook or equivalent.
3 Open the charging port lid.
( P.85)
The charging inlet light will illu-
minate.
4Open the AC charging inlet
cap.
NOTICE
●When inserting the plug into or
removing the plug from the out-
let, make sure to hold the body
of the plug.
●Do not damage the AC charging
inlet cap with a sharp object.
●Do not forcefully pull the AC
charging cable that is caught or
entangled. If the cable is entan-
gled, disentangle it before
using.
■AC charging inlet
Do not disassemble, repair or
modify the AC charging inlet.
When the AC charging inlet needs
to be repaired, consult your Toy-
ota dealer.
Charging precautions
When charging
Page 107 of 628
1072-2. Charging
Owners Manual_USA_M42C01_en
2
Electric Vehicle system
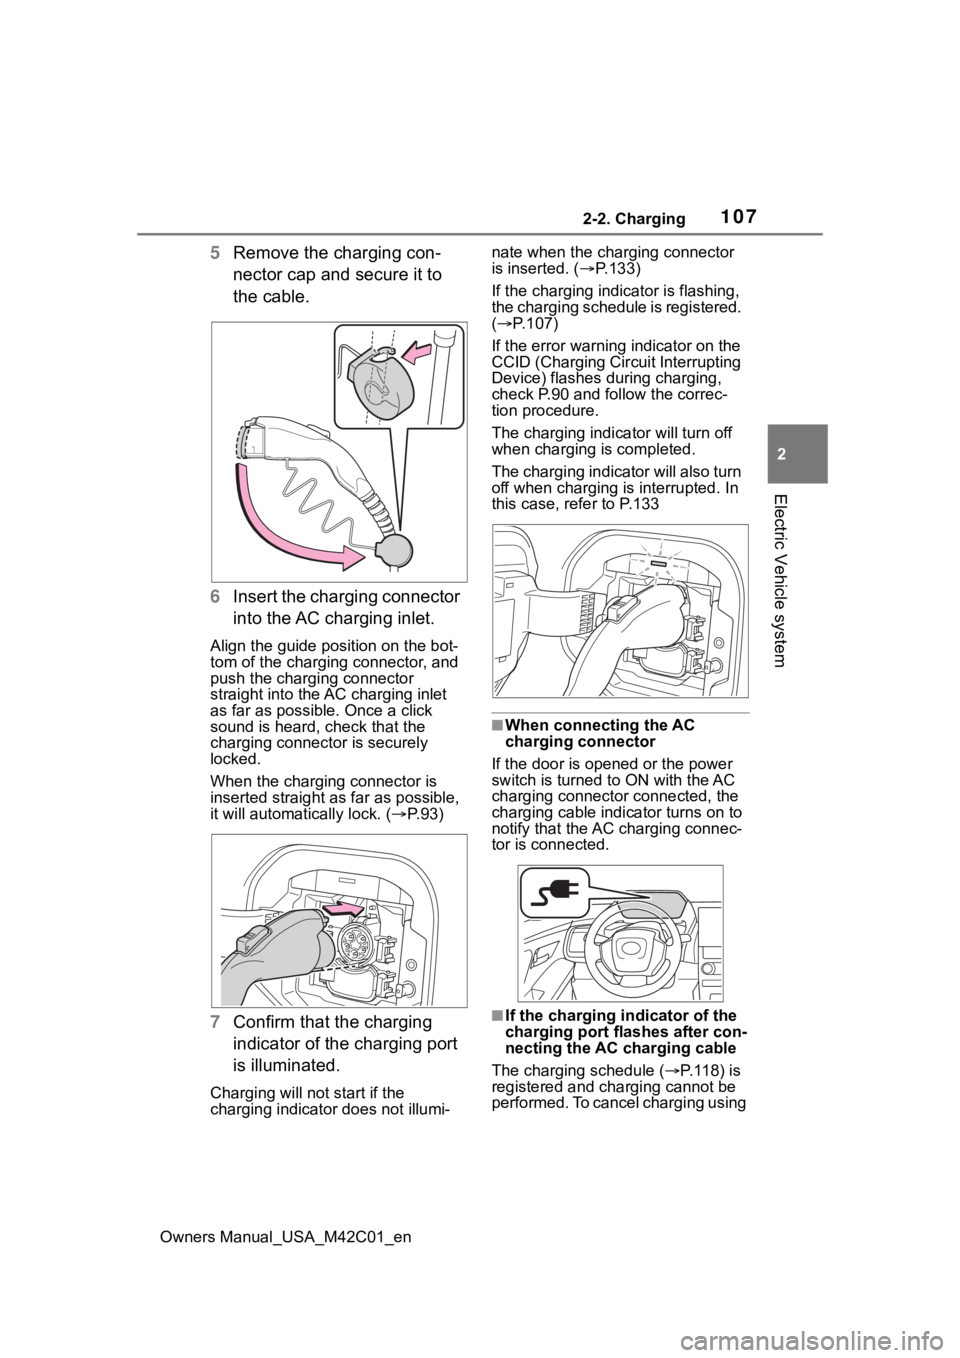
5 Remove the charging con-
nector cap and secure it to
the cable.
6 Insert the charging connector
into the AC charging inlet.
Align the guide position on the bot-
tom of the charging connector, and
push the charging connector
straight into the AC charging inlet
as far as possible. Once a click
sound is heard, check that the
charging connector is securely
locked.
When the charging connector is
inserted straight as far as possible,
it will automatically lock. ( P. 9 3 )
7 Confirm that the charging
indicator of the charging port
is illuminated.
Charging will not start if the
charging indicator does not illumi- nate when the charging connector
is inserted. (
P.133)
If the charging indicator is flashing,
the charging schedule is registered.
( P.107)
If the error warning indicator on the
CCID (Charging Cir cuit Interrupting
Device) flashes during charging,
check P.90 and follow the correc-
tion procedure.
The charging indicator will turn off
when charging is completed.
The charging indicator will also turn
off when charging is interrupted. In
this case, refer to P.133
■When connecting the AC
charging connector
If the door is opene d or the power
switch is turned to ON with the AC
charging connector connected, the
charging cable indicator turns on to
notify that the AC charging connec-
tor is connected.
■If the charging i ndicator of the
charging port flashes after con-
necting the AC charging cable
The charging schedule ( P. 1 1 8 ) i s
registered and charging cannot be
performed. To cancel charging using
Page 108 of 628

1082-2. Charging
Owners Manual_USA_M42C01_enthe charging schedule and start
charging, perform any of the follow-
ing procedures.
●Turn “Charge Now” on (
P.124,
128)
●While the charging indicator is
flashing, remove and reconnect
the charging conn ector immedi-
ately
■When the charging connector
cannot be inserted into the AC
charging inlet
P. 9 3
■Safety function
If the latch release button is
pressed, charging will not begin
even if the AC charging cable is
connected.
Also, charging will be stopped if the
latch release button is pressed and
held for several seconds during
charging. When restarting charging,
reinsert the charging connector after
pulling it out , and check that the
charging indicator of the charging
port illuminates.
■Charging time may increase
P. 1 0 4
■When your circuit breaker trips
during charging
The upper limit of the charging cur-
rent can be chan ged on the multi-
information display or multimedia.
●Setting operations on multi-infor-
mation display
1 Press or of the meter
control switches to select .
2 Press or of the meter
control switches to select “Vehi-
cle Settings”, and then press and
hold .
3 Press or of the meter
control switches to select “Charging Settings”, and then
press .
The “Charging Se ttings” screen will
be displayed.
4 Press or of the meter
control switches to select
“Charging Current”, and then
press .
The “Charging Curr ent” screen will
be displayed.
5 Press or of the meter
control switches to select “16A”
or “8A” and then press .
●Setting operations on multimedia
1 Select .
2 Select “Vehicle customize”.
3 Select “Charging”.
4 Select “Charging current”.
5 S e l e c t “ 1 6 A” o r “ 8 A” .
The maximum charging current is
limited to less than or equal to the
selected current.
*
If the breaker still trips while
charging, even after changing the
upper limit of the charging current,
check if the connected power
source meets the specified charging
conditions. ( P.96)
*: Restricting the charging current
will lengthen the c harging time.
■Changing the “Cha rging Limit”
settings
The upper limit of the charge capac-
ity can be chang ed on the multi-
information display or multimedia.
The selected upper limit value is
common to AC charging and DC
charging.
●Setting operations on multi-infor-
mation display
Page 109 of 628

1092-2. Charging
Owners Manual_USA_M42C01_en
2
Electric Vehicle system
1 Press or of the meter
control switches to select .
2 Press or of the meter
control switches to select “Vehi-
cle Settings”, and then press and
hold .
3 Press or of the meter
control switches to select
“Charging Settings”, and then
press .
The “Charging Sett ings” screen will
be displayed.
4 Press or of the meter
control switches to select
“Charging Limit”, and then press
.
The “Charging Limit” screen will be
displayed.
5 Select “Full”, “90%”, “80%”,
“70%”, “60%” or “50%” and then
press .
●Setting operations on multimedia
1 Select .
2 Select “Vehicle customize”.
3 Select “Charging”.
4 Select “Charging limit”.
5 Select “Full”, “90%”, “80%”,
“70%”, “60%” or “50%”.
If the setting is changed during DC
charging, charging may stop due to
the operation of the DC charger
timer and the traction battery cannot
be fully charged.
■Protection function of AC
charging inlet overheating
By installing a temp erature sensor
to the AC charging inlet, prevents
parts from melting when the tem-
perature rises due to foreign matter
entering the charging connector. When a certain temperature
increase is detected, charging is
stopped immediately.
After this, when the power switch is
off, a message will be displayed on
the multi-information display
(
P.140)
WARNING
■When charging
Observe the following precau-
tions.
Failure to do so may cause an
unexpected accident, resulting in
death or serious injury.
●Connect to a power source suit-
able for charging. ( P. 9 6 )
●Check that the AC charging
cable, plug and outlet are free of
foreign matter.
●Before charging, check that the
AC charging inlet is not
deformed, damaged or cor-
roded, and check that the inlet
is free of foreign matter such as
dirt, snow and ice.
If there is dirt or dust in these
areas, remove completely
before inserting the charging
connector.
●Do not get the te rminals of the
AC charging inlet wet.
●Only use outlets where the plug
can be securely inserted.
●Do not bundle or wind the AC
charging cable while charging,
as doing so may result in over-
heating.
●Do not touch the terminals of
the charging connector and AC
charging inlet with a sharp metal
objects (needles, etc.,) or
hands, or short them with for-
eign objects.