2023 SUBARU SOLTERRA wheel
[x] Cancel search: wheelPage 49 of 628

491-2. Child safety
Owners Manual_USA_M42C01_en
1
For safety and security
1-2.Child safety
Riding with children
Observe the following pre-
cautions when children are
in the vehicle.
Use a child restraint system
appropriate for the child,
until the child becomes
large enough to properly
wear the vehicle’s seat belt.
It is recommended that chil-
dren sit in the rear seats to
avoid accidental contact
with the steering wheel,
wiper switch, etc.
Use the rear door child-pro-
tector lock or the window
lock switch to avoid children
opening the door while driv-
ing or operating the power
window accidentally.
( P.171, 214)
Do not let small children
operate equipment which
may catch or pinch body
parts, such as the power
window, hood, back door,
seats, etc.
WARNING
■When children are in the vehi-
cle
Never leave children unattended
in the vehicle, and never allow
children to have or use the key.
Children may be able to start the
vehicle or shift the vehicle into
neutral. There is also a danger
that children ma y injure them-
selves by playing with the side
windows or other features of the
vehicle. In addition, heat build-up
or extremely cold temperatures
inside the vehicle can be fatal to
children.
Page 79 of 628

792-1. Electric vehicle system
Owners Manual_USA_M42C01_en
2
Electric Vehicle system
WARNING
●If your vehicle needs to be
towed, be sure to transport the
vehicle with the front wheels
(2WD models) or four wheels
(AWD models) raised. If the
vehicle is towed with the wheels
which are connected to the
electric motor (traction motor)
contacting the ground, electric-
ity generated by the operation of
the motor may cause a fire to
occur depending on the nature
of the damage or malfunction.
( P.507)
●Carefully inspect the ground
under the vehicle. If leaked liq-
uid (other than water from the
air conditioning) is found on the
ground, the traction battery may
have been damaged. Leave the
vehicle as soon as possible.
In addition, contact your Toyota
dealer with regard to the leak-
age found on the ground.
Even in the event of a minor
accident, the traction battery
and surrounding parts may be
damaged. In case of an acci-
dent, have the traction battery
inspected at a Toyota dealer.
■Traction battery
●Your vehicle contains a sealed
lithium-ion battery.
●Never resell, hand over or mod-
ify the traction battery. To pre-
vent accidents, traction
batteries that have been
removed from a disposed vehi-
cle are collected through your
Toyota dealer. Do not dispose of
the battery yourself. Unless the
battery is properly collected, the
following may occur, resulting in
death or serious injury:
• Do not illegally dispose of or
dump the traction battery, and it
is hazardous to the environment
or someone may touch a high
voltage part, resulting in an
electric shock.
• The traction battery is intended to be used exclusively with your
battery electric vehicle. If the
traction battery is used outside
of your vehicle or modified in
any way, accidents such as
electric shock, heat generation,
smoke generation, an explo-
sion and electrolyte leakage
may occur. When reselling or
handing over your vehicle, the
possibility of an accident is
extremely high because the per-
son receiving the vehicle may
not be aware of the dangers
from these modifications.
●If your vehicle is disposed of
without the traction battery hav-
ing been removed, there is a
danger of serious electric shock
if high voltage parts, cables and
their connectors are touched. In
the event that your vehicle must
be disposed of, the traction bat-
tery must be disposed of by
your Toyota dealer or a qualified
service shop. If the traction bat-
tery is not disposed of properly,
it may cause electric shock that
can result in dea th or serious
injury.
●For information about traction
battery collection locations, con-
tact information, or the recycling
process, contact your Toyota
dealer.
Page 110 of 628

1102-2. Charging
Owners Manual_USA_M42C01_en
WARNING
●When charging outdoors, make
sure to connect to a weather-
proof outlet for outdoor use.
Ensure the weatherproof outlet
cover closes completely. If the
weatherproof outlet cover can-
not be closed, install a weather-
proof outlet cover that will close.
●In order to stop charging at the
charging station, follow the
instructions of the charger.
●If any heat, smoke, odors, noise
or other abnormalities are
noticed during charging, stop
charging immediately.
●Do not insert the plug if the out-
let is submerged in water or
snow.
●When charging while it is raining
or snowing, do not connect or
disconnect the plug if your
hands are wet. Also, do not get
the plug or outlet wet.
●Do not charge the vehicle
during a lightning storm.
●Prevent the AC charging cable
from being caught in the door or
back door.
●Do not let the wheels on the AC
charging cable, plug, charging
connector and CCID (Charging
Circuit Interrupting Device).
●Firmly insert the plug into the
outlet.
●Do not use an extension cord
and converting adaptor.
●Close the hood before using the
charging system.
The cooling fan may start oper-
ating suddenly. Touching or get-
ting close to rotating parts such
as the fan may cause your
hands or clothes (especially a
necktie or scarf) to become
caught and result in a serious
injury.
●After connecting the charging
cable, confirm that it is not
wound around anything.
●If the power indicator on the
CCID (Charging Circuit Inter-
rupting Device) does not illumi-
nate after plugging the AC
charging cable into the outlet,
unplug it immediately.
■If the error warn ing indicator
on the CCID (Charging Circuit
Interrupting Device) illumi-
nates or flashes during
charging
There may be an electrical leak-
age in the power source path, or
there may be a malfunction in the
AC charging cable or CCID
(Charging Circuit Interrupting
Device).
Refer to P.90 and follow the cor-
rection procedure. If the error
warning indicator does not turn off
even after performing the correc-
tion procedure, immediately stop
charging, remove the AC
charging cable and contact your
Toyota dealer. Continuing to
charge the vehicle in that condi-
tion may lead to u nforeseen acci-
dents or serious injury.
Page 158 of 628

1583-1. Instrument cluster
Owners Manual_USA_M42C01_en
meter using the meter control
switches.
This menu icon can be set to be
displayed/not displayed in .
■Display items
Drive information
Torque distribution (if
equipped)
Tire inflation pressure
■Drive information
2 items that are selected using
the “Drive Info. Items” setting
(average speed, distance and
total time) can be displayed ver-
tically.
The displayed information
changes according to the “Drive
Info. Type” setting (since the
system was started or between
resets). ( P.158)
Use the displayed information
as a reference only.
Following items will be dis-
played.
“Trip”
• “Average Speed”: Displays the
average vehicle speed since EV
system start
*
• “Distance”: Displ ays the distance
driven since EV system start
*
• “Total Time”: Displays the elapsed time since EV system start
* *
: These items are r
eset each time
the EV system stops.
“Total”
• “Average Speed”: Displays the
average vehicle speed since the
display was reset
*
• “Distance”: Displ ays the distance
driven since the display was
reset
*
• “Total Time”: Displays the elapsed
time since the display was reset
*
*
: To reset, display the desired item and press and hold the meter
control switch.
■Torque distribution (if
equipped)
Displays the drive status of each
wheel in 6 steps from 0 to 5.
■Tire inflation pressure
Displays inflation pressure of
each tire.
■Meter display settings that
can be changed
Clock setting
P.154
Language
Select to change the language dis-
played.
Units
Select to change the units of mea-
sure displayed.
Vehicle information dis-
play
Settings display
Page 161 of 628

161
Owners Manual_USA_M42C01_en
4
4
Before driving
Before driving
4-1. Key informationKeys ............................ 162
Digital key ................... 165
4-2. Opening, closing and locking the doors
Side doors ................... 167
Back door .................... 172
Smart key system ....... 187
4-3. Adjusting the seats Front seats .................. 192
Rear seats................... 193
Head restraints............ 196
4-4. Adjusting the steering wheel and mirrors
Steering wheel ............ 199
Inside rear view mirror 200
Digital Rear-view Mirror 201
Outside rear view mirrors .................................. 210
4-5. Opening, closing the win- dows
Power windows ........... 212
4-6. Favorite settings My Settings ................. 215
Page 199 of 628

1994-4. Adjusting the steering wheel and mirrors
Owners Manual_USA_M42C01_en
4
Before driving
4-4.Adjusting the steering wheel and mirrors
1 Hold the steering wheel and
push the lever down.
2 Adjust to the ideal position by
moving the steering wheel
horizontally and vertically.
After adjustment, pull the lever up
to secure the steering wheel.
To sound the horn, press on or
close to the mark.
Steering wheel
Adjustment procedure
WARNING
■Caution while driving
Do not adjust the steering wheel
while driving.
Doing so may cause the driver to
mishandle the vehicle and cause
an accident, resul ting in death or
serious injury.
■After adjusting the steering
wheel
Make sure that the steering wheel
is securely locked.
Otherwise, the steering wheel
may move suddenly, possibly
causing an accident, and resulting
in death or serious injury. Also,
the horn may not sound if the
steering wheel is not securely
locked.
Sounding the horn
Page 200 of 628

2004-4. Adjusting the steering wheel and mirrors
Owners Manual_USA_M42C01_en
*: If equipped
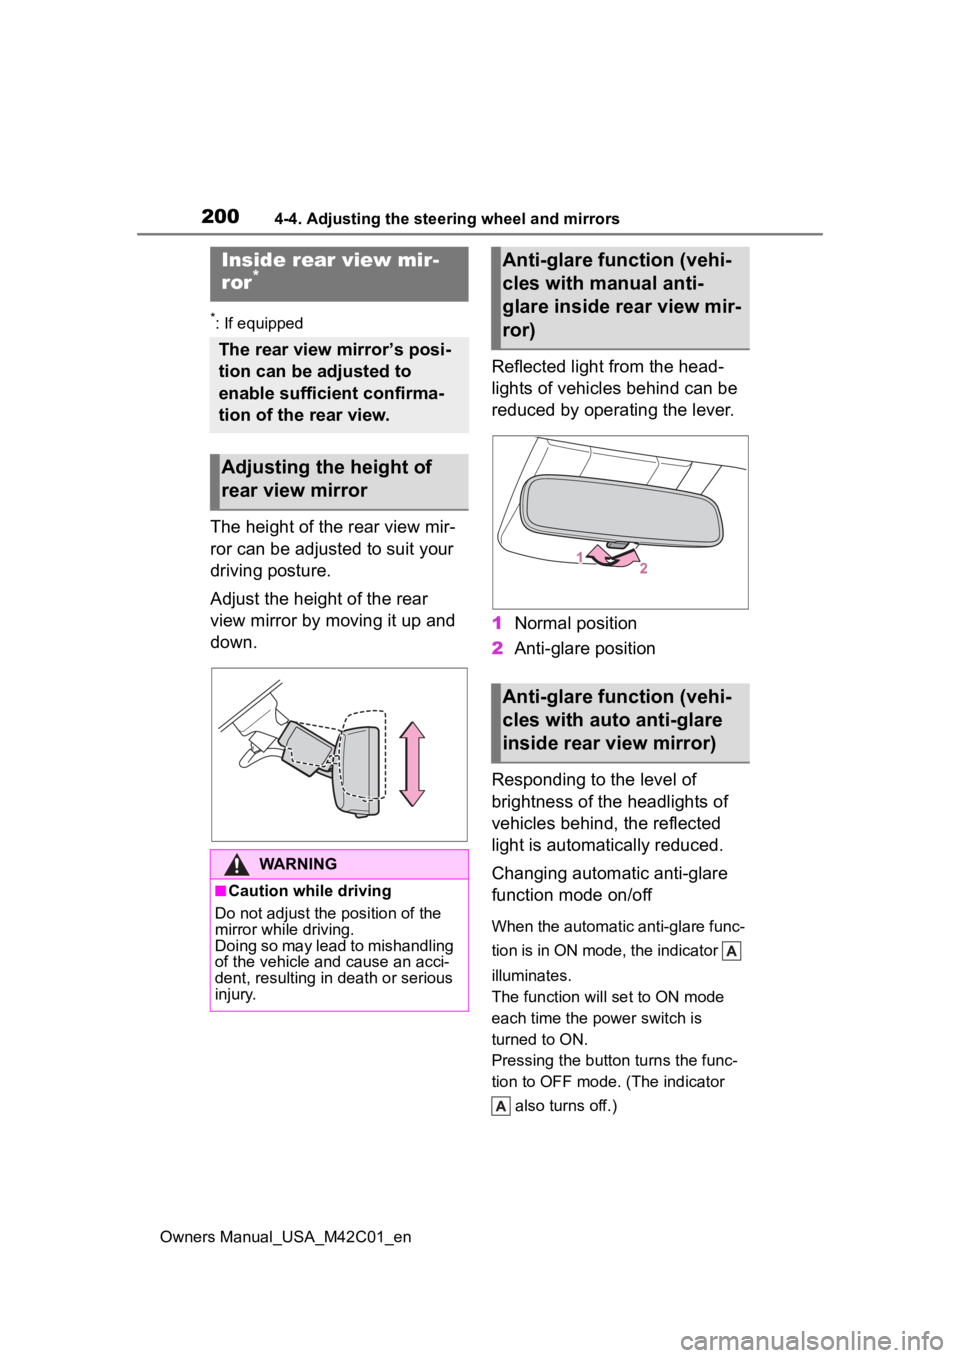
The height of the rear view mir-
ror can be adjusted to suit your
driving posture.
Adjust the height of the rear
view mirror by moving it up and
down.Reflected light from the head-
lights of vehicles behind can be
reduced by operating the lever.
1
Normal position
2 Anti-glare position
Responding to the level of
brightness of the headlights of
vehicles behind, the reflected
light is automatically reduced.
Changing automatic anti-glare
function mode on/off
When the automatic anti-glare func-
tion is in ON mode, the indicator
illuminates.
The function will set to ON mode
each time the power switch is
turned to ON.
Pressing the button turns the func-
tion to OFF mode. (The indicator also turns off.)
Inside rear view mir-
ror*
The rear view mirror’s posi-
tion can be adjusted to
enable sufficient confirma-
tion of the rear view.
Adjusting the height of
rear view mirror
WARNING
■Caution while driving
Do not adjust the position of the
mirror while driving.
Doing so may lead to mishandling
of the vehicle and cause an acci-
dent, resulting in death or serious
injury.
Anti-glare function (vehi-
cles with manual anti-
glare inside rear view mir-
ror)
Anti-glare function (vehi-
cles with auto anti-glare
inside rear view mirror)
Page 201 of 628

2014-4. Adjusting the steering wheel and mirrors
Owners Manual_USA_M42C01_en
4
Before driving
■To prevent sensor error (vehi-
cles with auto anti-glare inside
rear view mirror)
To ensure that the sensors operate
properly, do not touch or cover
them.
*: If equipped
Digital Rear-view Mir-
ror*
The Digital Rear-view Mir-
ror is a system that uses the
camera on the rear of the
vehicle and displays its
image on the display of the
Digital Rear-view Mirror.
The Digital Rear-view Mir-
ror can be changed
between optical mirror
mode and digital mirror
mode by operating the
lever.
The Digital Rear-view Mir-
ror allows the driver to see
the rear view despite
obstructions, such as the
head restraints or luggage,
ensuring rear visibility.
Also, the rear seats are not
displayed and privacy of the
passengers is enhanced.
WARNING
Observe the following precau-
tions.
Failure to do so may result in
death or serious injury.
■Before using the Digital Rear-
view Mirror
●Make sure to adjust the mirror
before driving. ( P.203)
• Change to optical mirror mode and adjust the position of the
Digital Rear-view Mirror so that
the area behind your vehicle
can be viewed properly.